- SQL Server на Mac
- Install SQL Server on a Mac
- Install and Configure Docker
- Now the Actual SQL Server Installation
- Pull the SQL Server Image
- Launch the SQL Server Image
- Password Strength
- Check the Docker container (optional)
- Show All Containers
- Check your Installation & Manage SQL Server
- sql-cli
- Azure Data Studio
- DBeaver
- Installing SQL Server on macOS
- Installing Docker
- Running SQL Server Container Image
- Handy Tips & Tools
- Database.Guide
- Categories
- How to Install SQL Server on a Mac
- Install Docker
- What is Docker?
- Launch Docker
- Increase the Memory (optional)
- Download SQL Server
- Launch the Docker Image
- Password Strength
- Check the Docker container (optional)
- Install sql-cli (unless already installed)
- Permissions Error?
- Connect to SQL Server
- Run a Quick Test
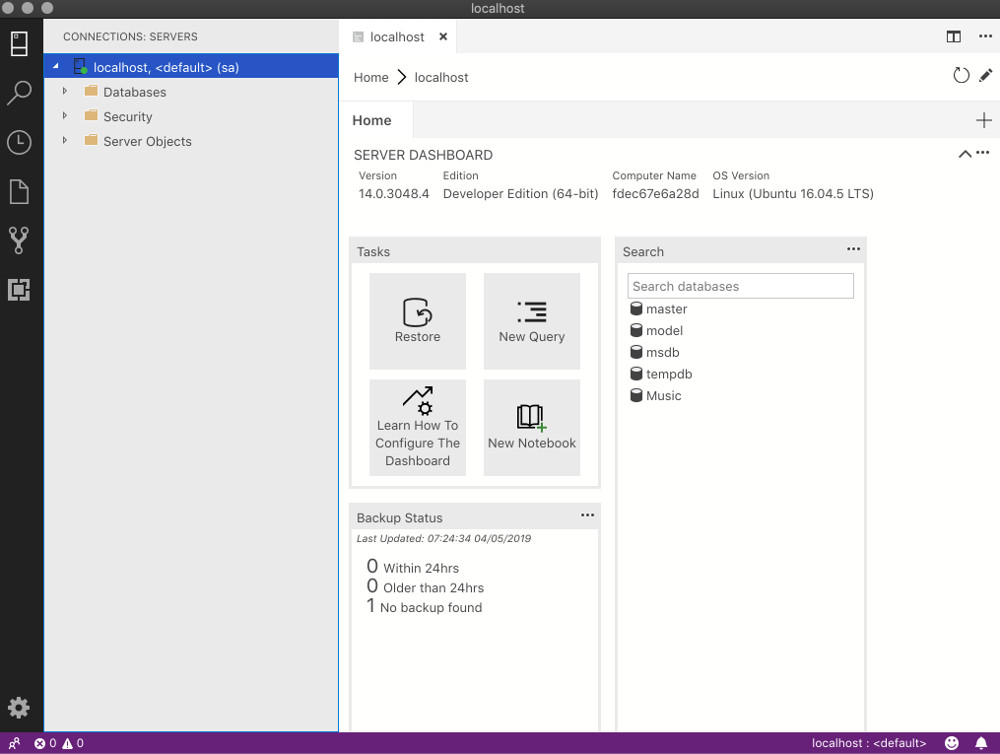
- A SQL Server GUI for your Mac – Azure Data Studio
- Another Free SQL Server GUI – DBeaver
- Limitations of SQL Server for Linux/Mac
SQL Server на Mac
Можно ли установить ядро SQL Server Express Edition на OS X? Я использую MacBook дома и хотел бы использовать его в качестве платформы для тестирования / обучения для SQL Server.
Нет, SQL Server не будет работать на macOS (он может работать на оборудовании Apple, если вы используете Boot Camp и изначально загружаетесь для Windows). В противном случае вам потребуется установить какое-либо программное обеспечение для виртуализации, где вы устанавливаете Windows в виртуальной машине и устанавливаете SQL Server там — я использую Parallels Desktop , но есть также VMWare Fusion и Oracle VirtualBox .
(Я не тестировал последний в последнее время, но в прошлый раз, когда я пытался, это было катастрофой — получает отличные отзывы в качестве хоста VM на Windows, но не очень стабильно на Mac.)
Вы также можете, конечно, RDP на другие машины, использовать эквивалентные клиенты SSMS для подключения к другому SQL Server, работающему под управлением Windows в другом месте, или установить другую платформу на Mac ( например, PostgreSQL ). Существует также IDE от JetBrains под названием DataGrip, и я уверен, что другие, о которых я не знаю.
С SQL Server 2017 вы можете запускать SQL Server в Linux и даже размещать свой собственный докер-контейнер, вообще не используя Windows (сейчас я делаю это на своих компьютерах Mac — и я писал об этом здесь ).
VS Code , Visual Studio и Operations Studio теперь работают изначально на Mac, так что это может работать и в некоторых случаях. Все зависит от того, ожидаете ли вы, что SQL Server действительно будет работать на macOS, или вы просто хотите выполнять большую часть своей работы там.
РЕДАКТИРОВАТЬ
Недавно SQL Server был выпущен для Linux. Это делает использование Docker жизнеспособным решением для «запуска SQL Server на Mac». Некоторые подробности о том, как это сделать, можно найти здесь: https://docs.microsoft.com/en-us/sql/linux/sql-server-linux-setup-docker .
Старый ответ
Если у вас Mac и вы не хотите запускать виртуальную машину, есть несколько вариантов.
Вы можете получить пробную версию Azure и настроить экземпляр SQL Server. Azure также предоставляет веб-интерфейс запросов.
Вы также можете настроить бесплатную учетную запись Amazon RDS и создать экземпляр SQL Server.
Если вам нужен клиент базы данных MSSQL, который работает на OS X (аналогично SSMS), есть несколько доступных.
Вы можете найти обзор нескольких клиентов здесь .
Источник
Install SQL Server on a Mac
Install SQL Server directly to your Mac — no virtual machine required!
Microsoft has made SQL Server available for macOS and Linux systems. This is made possible by running SQL Server from a Docker container. Therefore, there’s no need to install a virtual machine with Windows (which was the only way to run SQL Server on a Mac prior to SQL Server 2017).
Install and Configure Docker
This is a prerequisite for installing SQL Server on your Mac. Because the Mac runs SQL Server inside a Docker container, the first thing we need to do is download and install Docker (unless it’s already installed). Once installed, we’ll increase its memory allocation to a more suitable level for running SQL Server.
- Download Docker from the download page, extract it, and drag it into your Application folder.
- Launch Docker, and go to Preferences > Advanced and increase its memory allocation to 4GB
If I’ve confused you, don’t worry. I’ve written a tutorial with screenshots: Install Docker on a Mac and Configure for SQL Server.
OK, we’re now ready to install SQL Server on your Mac.
Now the Actual SQL Server Installation
Now that we’ve installed Docker and increased its memory allocation, we can go ahead and install SQL Server. The Mac uses the Linux image (the SQL Server for Linux Docker image).
Pull the SQL Server Image
Open a Terminal window and run the following command:*
This pulls the latest SQL Server for Linux Docker image to your computer.
* The exact command will depend on which release you download. Also, since I wrote this article, Docker has moved the repository for SQL Server. You might need to use docker pull mcr.microsoft.com/mssql/server:2017-latest-ubuntu to download SQL Server 2017.
Also, SQL Server 2019 Preview has been available since late 2018. As of late 2019 you can download it at docker pull mcr.microsoft.com/mssql/server:2019-CTP3.2-ubuntu .
For the latest image, see the official Microsoft repository on the Docker website.
Launch the SQL Server Image
Run the following command to launch an instance of the Docker image you just downloaded:
Replace the container name and password with your own. Also be sure to make a strong password, or you may get an error (see below).
Also, if you downloaded a different container image, replace microsoft/mssql-server-linux with your container image.
Here’s an explanation of the above parameters:
-d This is an optional parameter that launches the Docker container in daemon mode. This means that it runs in the background and doesn’t need its own Terminal window open. You can omit this parameter to have the container run in its own Terminal window. —name Homer This optional parameter provides a name for the container. This can be handy when stopping and starting the container from the Terminal. -e ‘ACCEPT_EULA=Y’ The Y shows that you agree with the EULA (End User Licence Agreement). This is required in order to install SQL Server. -e ‘SA_PASSWORD=myPassw0rd’ Required parameter that sets the sa database password. -p 1433:1433 This maps the local port 1433 to port 1433 on the container. This is the default TCP port that SQL Server uses to listen for connections. microsoft/mssql-server-linux This tells Docker which image to use. If you downloaded a different one, use that instead.
Password Strength
If you get the following error at this step, try again, but with a stronger password.
Check the Docker container (optional)
Type the following command to check that the Docker container is running.
If it’s up and running, it should return something like this:
Show All Containers
The above command only shows those containers that are currently running. To show all containers (whether they’re running or not), append the -a flag to the command (you can also use -all ):
Check your Installation & Manage SQL Server
Now that you’ve installed SQL Server on your Mac, you’ll probably want to check that you can access it and query it, etc. Then you’ll probably want to start creating databases and doing other DB-related tasks. You’ll need some sort of management tool for this.
Here are three options:
sql-cli
sql-cli is a cross platform command line tool for SQL Server. This means you can create databases and query them right from your Mac’s Terminal window.
Installation is as easy as running a single command (assuming you already have NodeJs installed).
Azure Data Studio
Azure Data Studio (formerly called SQL Operations Studio) is a free GUI tool from Microsoft. It’s a bit more user friendly for those who aren’t comfortable with the command line interface.
Installation is as easy as downloading it and dragging it to your Applications folder.
DBeaver
Another GUI option is DBeaver. DBeaver is a free open source database tool that works with many different database management systems (MySQL, PostgreSQL, MariaDB, SQLite, Oracle, DB2, SQL Server, Sybase, MS Access, Teradata, Firebird, Derby, etc).
You have a few options for installing DBeaver. The easiest way is to download the «installer option», and then run the installation wizard.
Источник
Installing SQL Server on macOS


It’s a bit inconvenience when working on a project that uses the Microsoft SQL Server while your dev machine is either Linux or macOS. I always ended up setting up and using a remote test database.
But now it’s no longer the case. October last year, SQL Server 2017 for Linux finally went into general availability. It’s container images are also available on Docker hub for us to use. That means we can finally install SQL Server on macOS!
Installing Docker
First, you’re going to need Docker. If you haven’t had it installed, heads up to the Docker store website and download the community edition for Mac. Just follow the instructions, it’s super easy to install.
Once it’s installed, you’ll have a new Docker icon on your menu bar. Click this icon and make sure that Docker is already.

Running SQL Server Container Image
Once you have Docker installed and running, open the terminal and run the following command to pull the latest version of SQL Server 2017 container image from Docker hub:
If you want to pull another version, just replace the 2017-latest part with the desired tag. You can check all of the available tags on Docker hub. For example, if want to pull the GA (General Availability) version instead, use the following command:
Once the image is pulled, you can run it on a new container using the following command:
- -d : Detached mode, run the container in the background.
- -p : Publish a container’s port (second value) to the host (first value). In our case, SQL server is listening on port 1433 within the container and we expose it to the same port on the host.
- —name : Assign a name to the container, we named it awesome 😎.
- -e : Set environment variables. ACCEPT_EULA=Y to confirm your acceptance of the licensing agreement. MSSQL_SA_PASSWORD=P@55word set the password for the sa user (the default system administrator username). It must be at least 8 characters and contains three of the following categories: lowercase, uppercase, digits, and symbols.
To list all of the containers, run the following command:
You should see the output similar to this:
Locate your awesome container and make sure that its STATUS column is Up . If the status is Exited , checkout the troubleshooting guide.
Handy Tips & Tools
Congratulation! 🎉 You now have Microsoft SQL Server installed on your macOS machine! Here are some common Docker commands that might come in handy for you:
It’s a bit inconvenience to run the sqlcmd from within the container in order to work with the database. Luckily there are some tools that you can use for interfacing with SQL Server:
- TablePlus: This is my favorite one. A native macOS application that works not only with MySQL and SQL Server databases but also Postgres and Redis!
- SQL Operations Studio: This one is coming from Microsoft and can be run on Windows, macOS or Linux.
- mssql for VS Code: If you’re using Visual Studio Code, this extension might come in handy.
- sql-cli for Node: If you’re a fellow Javascript developer. You can install this sql-cli for Node globally. This way you’ll have the quite similar sqlcmd feel.
Источник
Database.Guide
Categories
How to Install SQL Server on a Mac
Here I’ll show you how to get SQL Server up and running on your Mac in less than half an hour. And the best part is, you’ll have SQL Server running locally without needing any virtualization software.
Prior to SQL Server 2017, if you wanted to run SQL Server on your Mac, you first had to create a virtual machine (using VirtualBox, Parallels Desktop, VMware Fusion, or Bootcamp), then install Windows onto that VM, then finally SQL Server. This is still a valid option depending on your requirements (here’s how to install SQL Server on a Mac with VirtualBox if you’d like to try that method).
Starting with SQL Server 2017, you can now install SQL Server directly on to a Linux machine. And because macOS is Unix based (and Linux is Unix based), you can run SQL Server for Linux on your Mac. The way to do this is to run SQL Server on Docker.
So let’s go ahead and install Docker. Then we’ll download and install SQL Server.
But first… if you’re using a Mac with the M1 chip, see How to Install SQL Server on an M1 Mac (ARM64).
Install Docker
Download the (free) Docker Community Edition for Mac (unless you’ve already got it installed on your system). This will enable you to run SQL Server from within a Docker container.
To download, visit the Docker CE for Mac download page and click Get Docker .
To install, double-click on the .dmg file and then drag the Docker.app icon to your Application folder.
 Docker installation on a Mac.
What is Docker?
Docker is a platform that enables software to run in its own isolated environment. SQL Server (from 2017) can be run on Docker in its own isolated container. Once Docker is installed, you simply download — or “pull” — the SQL Server on Linux Docker Image to your Mac, then run it as a Docker container. This container is an isolated environment that contains everything SQL Server needs to run.
Launch Docker
Launch Docker the same way you’d launch any other application (eg, via the Applications folder, the Launchpad, etc).
When you open Docker, you might be prompted for your password so that Docker can install its networking components and links to the Docker apps. Go ahead and provide your password, as Docker needs this to run.
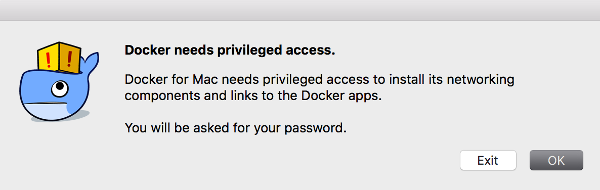 The password request dialog
Increase the Memory (optional)
By default, Docker may have 2GB of memory allocated to it. SQL Server needs at least 2GB. However, it won’t hurt to increase it if you can.
In my case, I increased it to 4GB.
To do this, select Preferences from the little Docker icon in the top menu:
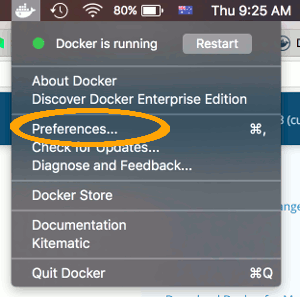
Then on the Resources > Advanced screen, slide the memory slider up to at least 4GB:
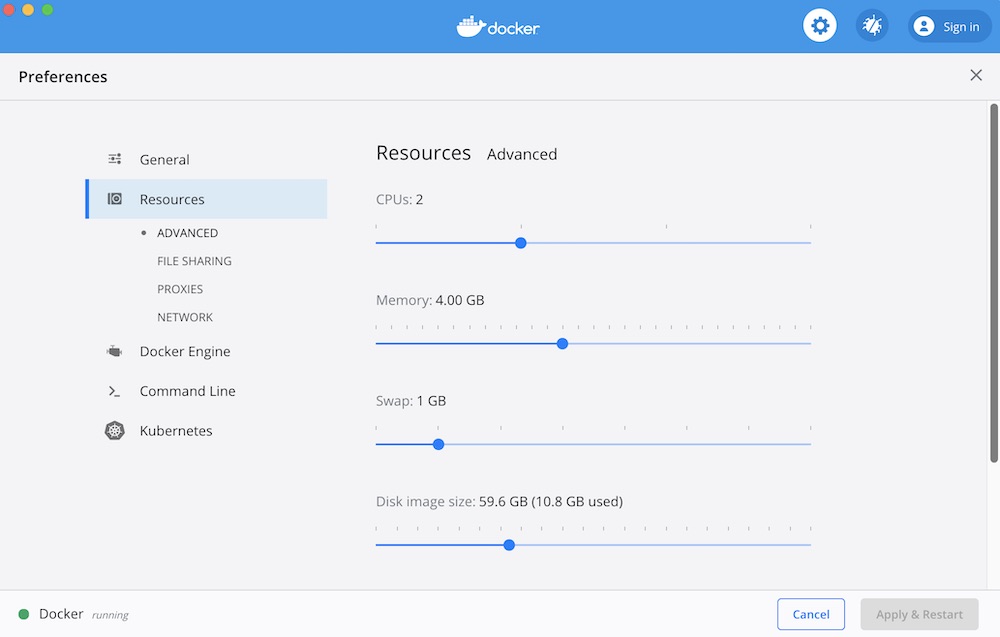
Then finish off by clicking Apply & Restart
Download SQL Server
Now that Docker is installed, we can download and install SQL Server for Linux.
Open a Terminal window and run the following command.
This downloads the latest SQL Server 2019 for Linux Docker image to your computer.
You can also check for the latest container version on the Docker website if you wish.
Launch the Docker Image
Run the following command to launch an instance of the Docker image you just downloaded:
But of course, use your own name and password. Also, if you downloaded a different Docker image, replace mcr.microsoft.com/mssql/server:2019-latest with the one you downloaded.
Here’s an explanation of the parameters:
| -d | This optional parameter launches the Docker container in daemon mode. This means that it runs in the background and doesn’t need its own Terminal window open. You can omit this parameter to have the container run in its own Terminal window. |
| —name sql_server_demo | Another optional parameter. This parameter allows you to name the container. This can be handy when stopping and starting your container from the Terminal. |
| -e ‘ACCEPT_EULA=Y’ | The Y shows that you agree with the EULA (End User Licence Agreement). This is required in order to have SQL Server for Linux run on your Mac. |
| -e ‘SA_PASSWORD=reallyStrongPwd123’ | Required parameter that sets the sa database password. |
| -p 1433:1433 | This maps the local port 1433 to port 1433 on the container. This is the default TCP port that SQL Server uses to listen for connections. |
| mcr.microsoft.com/mssql/server:2019-latest | This tells Docker which image to use. If you downloaded a different one, use it instead. |
Password Strength
If you get the following error at this step, try again, but with a stronger password.
I received this error when using reallyStrongPwd as the password (but of course, it’s not a really strong password!). I was able to overcome this by adding some numbers to the end. However, if it wasn’t just a demo I’d definitely make it stronger than a few dictionary words and numbers.
Check the Docker container (optional)
You can type the following command to check that the Docker container is running.
If it’s up and running, it should return something like this:
Install sql-cli (unless already installed)
Run the following command to install the sql-cli command line tool. This tool allows you to run queries and other commands against your SQL Server instance.
This assumes you have NodeJs installed. If you don’t, download it from Nodejs.org first. Installing NodeJs will automatically install which is what we use in this command to install sql-cli.
Permissions Error?
If you get an error, and part of it reads something like Please try running this command again as root/Administrator , try again, but this time prepend sudo to your command:
Connect to SQL Server
Now that sql-cli is installed, we can start working with SQL Server via the Terminal window on our Mac.
Connect to SQL Server using the mssql command, followed by the username and password parameters.
You should see something like this:
This means you’ve successfully connected to your instance of SQL Server.
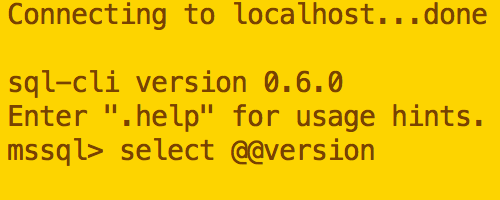
Run a Quick Test
Run a quick test to check that SQL Server is up and running and you can query it.
For example, you can run the following command to see which version of SQL Server your running:
If it’s running, you should see something like this (but of course, this will depend on which version you’re running):
If you see a message like this, congratulations — SQL Server is now up and running on your Mac!
You can now go ahead and run SQL queries against SQL Server.
See my free SQL Tutorial for Beginners to get started with writing simple queries against SQL Server.
A SQL Server GUI for your Mac – Azure Data Studio
Azure Data Studio (formerly SQL Operations Studio) is a free GUI management tool that you can use to manage SQL Server on your Mac. You can use it to create and manage databases, write queries, backup and restore databases, and more.
Azure Data Studio is available on Windows, Mac and Linux.
Here are some articles/tutorials I’ve written for Azure Data Studio:
Another Free SQL Server GUI – DBeaver
Another SQL Server GUI tool that you can use on your Mac (and Windows/Linux/Solaris) is DBeaver.
DBeaver is a free, open source database management tool that can be used on most database management systems (such as MySQL, PostgreSQL, MariaDB, SQLite, Oracle, DB2, SQL Server, Sybase, Microsoft Access, Teradata, Firebird, Derby, and more).
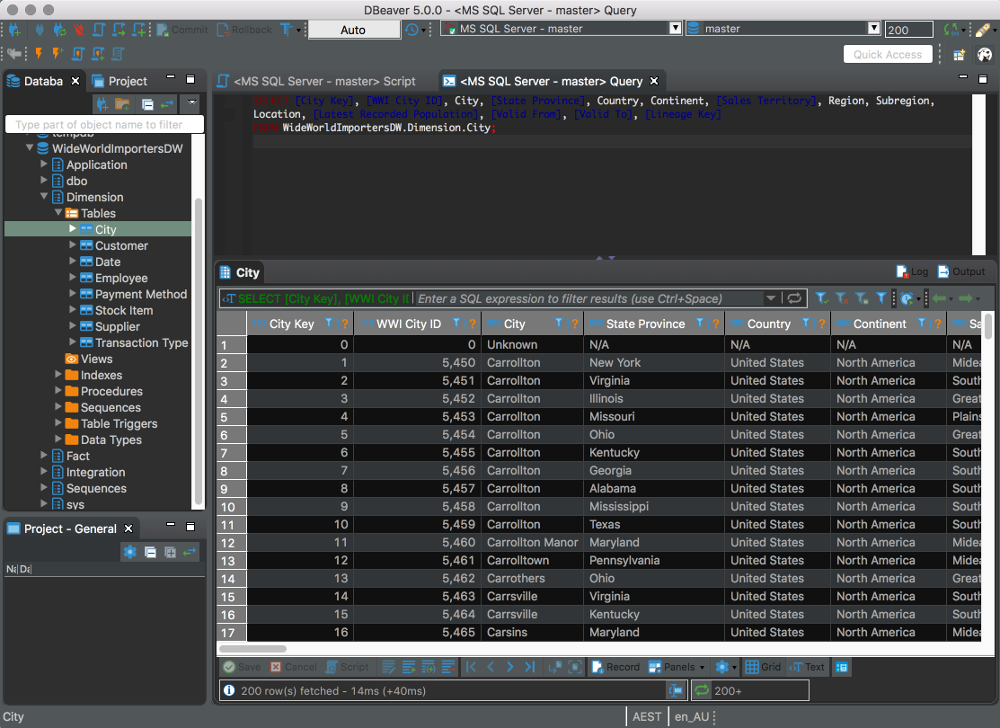 DBeaver using the “Dark” theme.
I wrote a little introduction to DBeaver, or you can go straight to the DBeaver download page and try it out with your new SQL Server installation.
Limitations of SQL Server for Linux/Mac
SQL Server for Linux does have some limitations when compared to the Windows editions (although this could change over time). The Linux release doesn’t include many of the extra services that are available in the Windows release, such as Analysis Services, Reporting Services, etc. Here’s a list of what’s available and what’s not on SQL Server 2017 for Linux and here’s Microsoft’s list of Editions and supported features of SQL Server 2019 on Linux.
Another limitation is that SQL Server Management Studio is not available on Mac or Linux. SSMS a full-blown GUI management for SQL Server, and it provides many more features than Azure Data Studio and DBeaver (at least at the time of writing). You can still use SSMS on a Windows machine to connect to SQL Server on a Linux or Mac machine, but you just can’t install it locally on the Linux or Mac machine.
If you need any of the features not supported in SQL Server for Linux, you’ll need SQL Server for Windows. However, you can still run SQL Server for Windows on your Mac by using virtualization software. Here’s how to install SQL Server for Windows on a Mac using VirtualBox.
Источник


