- SQLite — Installation
- Install SQLite on Windows
- Install SQLite on Linux
- Install SQLite on Mac OS X
- How to Install and Basic SQLite Use on Linux
- Installing Sqlite
- Create Database
- Create Table
- Inserting Data
- Fetching data
- Special commands to sqlite3(dot -commands)
- Writing results to a file
- Как установить SQLite и браузер SQLite в Ubuntu
- Установка SQLite в Ubuntu
- Создание базы данных и таблицы SQLite
- Установка браузера SQLite в Ubuntu
- Удаление SQLite и браузера SQLite
- Install SQLite and SQLite Browser on Ubuntu 18.04 LTS
- Installing SQLite 3
- Installing SQLite Browser
- Using SQLite using SQLite Browser
- Getting Started with SQLite 3 using SQLite Browser
- Exporting SQLite Database using SQLite Browser
SQLite — Installation
SQLite is famous for its great feature zero-configuration, which means no complex setup or administration is needed. This chapter will take you through the process of setting up SQLite on Windows, Linux and Mac OS X.
Install SQLite on Windows
Step 1 − Go to SQLite download page, and download precompiled binaries from Windows section.
Step 2 − Download sqlite-shell-win32-*.zip and sqlite-dll-win32-*.zip zipped files.
Step 3 − Create a folder C:\>sqlite and unzip above two zipped files in this folder, which will give you sqlite3.def, sqlite3.dll and sqlite3.exe files.
Step 4 − Add C:\>sqlite in your PATH environment variable and finally go to the command prompt and issue sqlite3 command, which should display the following result.
Install SQLite on Linux
Today, almost all the flavours of Linux OS are being shipped with SQLite. So you just issue the following command to check if you already have SQLite installed on your machine.
If you do not see the above result, then it means you do not have SQLite installed on your Linux machine. Following are the following steps to install SQLite −
Step 1 − Go to SQLite download page and download sqlite-autoconf-*.tar.gz from source code section.
Step 2 − Run the following command −
The above command will end with SQLite installation on your Linux machine. Which you can verify as explained above.
Install SQLite on Mac OS X
Though the latest version of Mac OS X comes pre-installed with SQLite but if you do not have installation available then just follow these following steps −
Step 1 − Go to SQLite download page, and download sqlite-autoconf-*.tar.gz from source code section.
Step 2 − Run the following command −
The above procedure will end with SQLite installation on your Mac OS X machine. Which you can verify by issuing the following command −
Finally, you have SQLite command prompt where you can issue SQLite commands for your exercises.
Источник
How to Install and Basic SQLite Use on Linux

In this article, We will see how to install SQLite (relational database) with its basic operations. What if I tell you that SQLite is likely used more than all other database engines combined. Yes, You heard it right. It is the most widely deployed database in the world with millions and billions of copies.
The reason behind this popularity is some unique characteristics that are unusual and which makes it different from many other SQL database engines like MySQL, PostgreSQL, Oracle, Microsoft SQL Server, etc. Let’s get started with it. First, We will install it on Linux and later on cover basic database operations.
Installing Sqlite
To install on your Debian based (Ubuntu, Debian, etc.) machine execute below commands.
To install on your RPM-based (RHEL, CentOS, Fedora etc.) machine execute below commands.
You may also install SQlite using the DNF package manager:
Now Open a terminal and Execute «sqlite3», you will see the following lines with prompt.
The very first line shows the version and release date and time of sqlite3.
The second line tells to enter «.help» for instructions.
.help command list all the meta commands and their descriptions. These meta commands are also called «dot» commands because they are preceded by a dot.
Put «.help» to prompt
Before explaining these dot commands, let’s see some of the basic database operations.
First run «.quit» command to end the session.
Create Database
Execute below command on shell prompt.
It will create «example.db» (You can put your choice of name in place of «example.db») database file ( if not exists). If exists then open the database contained in the file.
The difference between «sqlite3» and «sqlite3 dbname.db» command is the first one will create a temporary database for the session and will expire when the session is closed.
Create Table
Let’s create a student table with attributes:
reg_no int(4)
Name varchar(20)
Marks int(3)
enter the following commands in terminal
It will create a student table with above attributes.
You can see the list of tables in the selected database by .table command
There is only one table student in my case.
You can also see the schema of the table using .schema table_name
Inserting Data
Let’s insert 3 records in the table
101, pradip, 87
102, Avinash, 86
103, Rakesh, 90
Enter the following command one by one
Fetching data
You can fetch data from table with select statement
It shows the result in default mode (list).
You can change the mode with .mode command
Enter .mode column to prompt and then perform select query. It will show the result in a column format.
Delete, Alter, Drop etc have same syntax as sql.
Special commands to sqlite3(dot -commands)
We saw «.help» commands list all the dot commands. Let’s understand some other important commands.
Shows name of database selected.
List the tables in the selected database.
Shows the current settings
You can show attribute name in query result by running .header ON|OFF command
The Program is able to show the results of a query in eight different formats: «csv», «column»,»html»,»insert», «line», «list», «tabs», «tcl»..mode command is use to switch between these output formats.
You can use .separator command to change separator.
sqlite> .separator —
> select * from student;
reg_no-name-marks
101-Pradip-87
102-Avinash-86
103-Rakesh-91
Writing results to a file
by default, It sends query results to standard output.
you can change this using «.output» and «.once» commands.
Just put the name of an output file as an argument to .output and all subsequent query results will be written to that file.
Or use the .once the command with file name if you want only the result of next query to be redirected.
We have successfully installed SQLite on Linux with basic operations. These operations are only a few out of all available. We can’t cover all of them in this article. If you find any difficulties in an installation or in any command, Let me know in the comment section.
Источник
Как установить SQLite и браузер SQLite в Ubuntu
SQLite — это легкая, небольшая и автономная СУБД. Популярные базы данных, такие как MySql, PostgreSQL и т. д. работают как клиент — сервер, и у них есть специальный процесс, выполняющий и контролирующий все аспекты работы базы данных.
А SQLite не имеет запущенного процесса и не имеет модели клиент — серверной. SQLite DB — это просто файл с расширениями .sqlite3 .sqlite .db. Каждый язык программирования имеет библиотеку для поддержки SQLite.
SQLite используется в таких программах как:
- Веб-браузеры (Chrome, Safari, Firefox).
- MP3-плееры, приставки и электронные гаджеты.
- Устройства на Android, Mac, Windows, iOS и iPhone.
Областей где используется SQLite очень много. Например каждый смартфон в мире имеет сотни файлов базы данных SQLite. На наш взгляд это довольно большое количество. Пока приступить к установке db.
Установка SQLite в Ubuntu
Настройка и установка SQLite очень проста, по сравнению с другими популярными базами данных, такими как MySql, Postgresql и т. д. Во-первых, обновите apt-cache, выполнив следующую команду.
Теперь проверьте, есть ли какие нибудь пакеты SQLite, которые доступны в репозитории apt. Для этого выполнив следующую команду.
Чтобы установить SQLite, выполните следующую команду.
Вы можете проверить установку, для этого запустите сеанс sqlite. Это можно сделать выполнив следующую команду.
Как видно из приведенного выше изображения, SQLite3 успешно установлен и работает с версией 3.33.0..
Создание базы данных и таблицы SQLite
База данных хранится в виде файла в вашей файловой системе. Вы можете создать базу данных при запуске сеанса sqlite, указав имя базы данных в качестве аргумента. Если БД доступна, она откроет базу данных, если нет, то создаст новую базу данных.
Если мы не передаем имя БД в качестве аргумента, то создается временная база данных в памяти, которая будет удалена после завершения сеанса. Здесь у меня нет никакой базы данных, поэтому я создам новую БД, упомянув имя db в качестве аргумента. Как только вы подключитесь к сеансу, вы можете запустить команду .databases, чтобы увидеть, какой файл прикреплен к базе данных.
$ sqlite3 /home/tecmint/test # создание тестовой базы данных в /home/tecmint
sqlite> .databases #команда для того чтобы увидеть, какой сеанс базы данных подключен
Теперь давайте создадим пример таблицы, выполнив следующие запросы.
# create table
sqlite> CREATE TABLE employee(
Name String,
age Int);
# Insert records
sqlite> insert into employee(Name, age)
VALUES (‘Tom’,25),
(‘Mark’,40),
(‘Steve’,35);
Вы можете запустить команду .tables, чтобы вывести список таблиц в базе данных.
sqlite> .tables # отображает список таблиц в базе данных
sqlite> .headers on # включить столбец для печати
sqlite> SELECT * FROM employee; # выбор записи из таблицы
Установка браузера SQLite в Ubuntu
Теперь, когда мы как установили и настроили sqlite3, мы также установим sqlite browser. Это простой графический инструмент для управления базами данных sqlite.
$ sudo apt install sqlitebrowser -y
Вы можете запустить приложение из меню «Пуск» или из терминала. Для запуска браузера из терминала выполните следующую команду.
Удаление SQLite и браузера SQLite
Для удаления SQLite, так и SQLite browser потребуется выполнить следующую команду.
$ sudo apt —purge remove sqlite3 sqlitebrowser
Вот и все. Если у вас есть какие-либо отзывы или советы, пожалуйста, используйте раздел комментариев, чтобы опубликовать их.
Источник
Install SQLite and SQLite Browser on Ubuntu 18.04 LTS
SQLite is a lightweight database software. It is a command line application. You must use the command line or SQLite API on other programming languages to use SQLite database. SQLite has a graphical front end SQLite Browser for working with SQLite databases graphically.
SQLite 3 is the latest version at the time of this writing. SQLite 3 is available in the official package repository of Ubuntu 18.04 LTS. SQLite Browser is also available in the official package repository of Ubuntu 18.04 LTS.
In this article, I will show you how to install SQLite 3 and SQLite Browser on Ubuntu 18.04 LTS. I will also show you some of the basic queries of SQLite 3. Let’s get started.
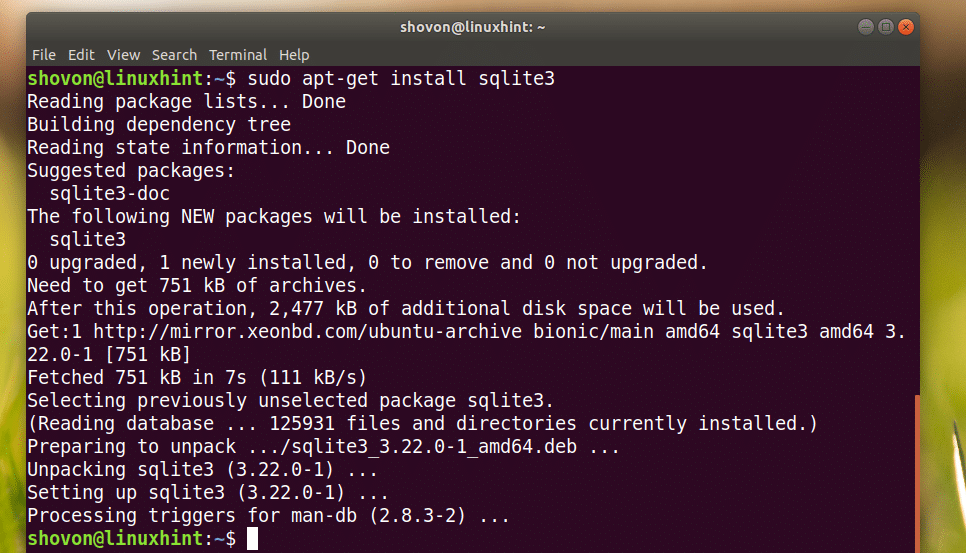
Installing SQLite 3
First update the apt package repository cache with the following command:

The apt package repository cache should be updated.

Now to install SQLite 3, run the following command:

SQLite 3 should be installed.
Now you can check whether SQLite 3 is working with the following command:

Installing SQLite Browser
Run the following command to install SQLite Browser:

Now press y and then press .
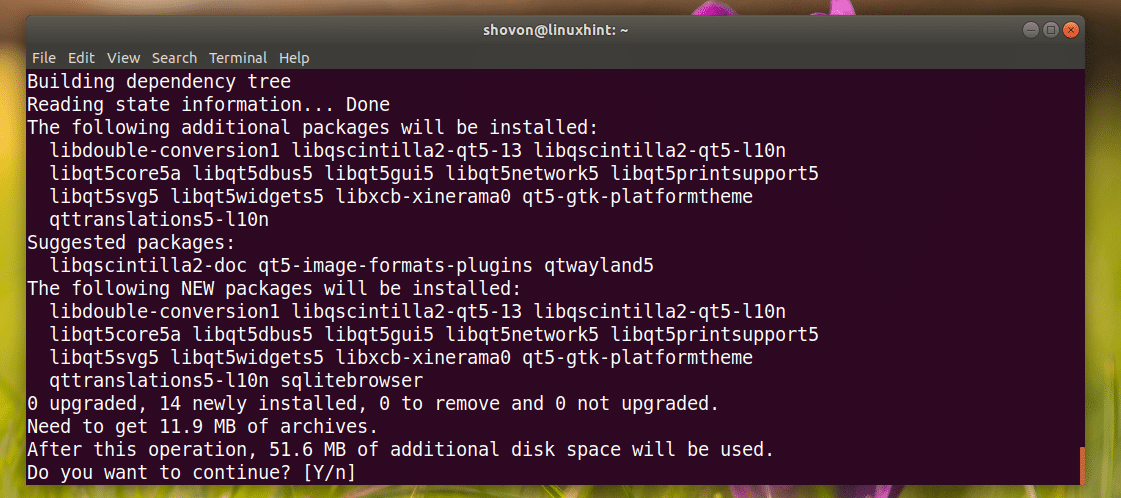
SQLite Browser should be installed.

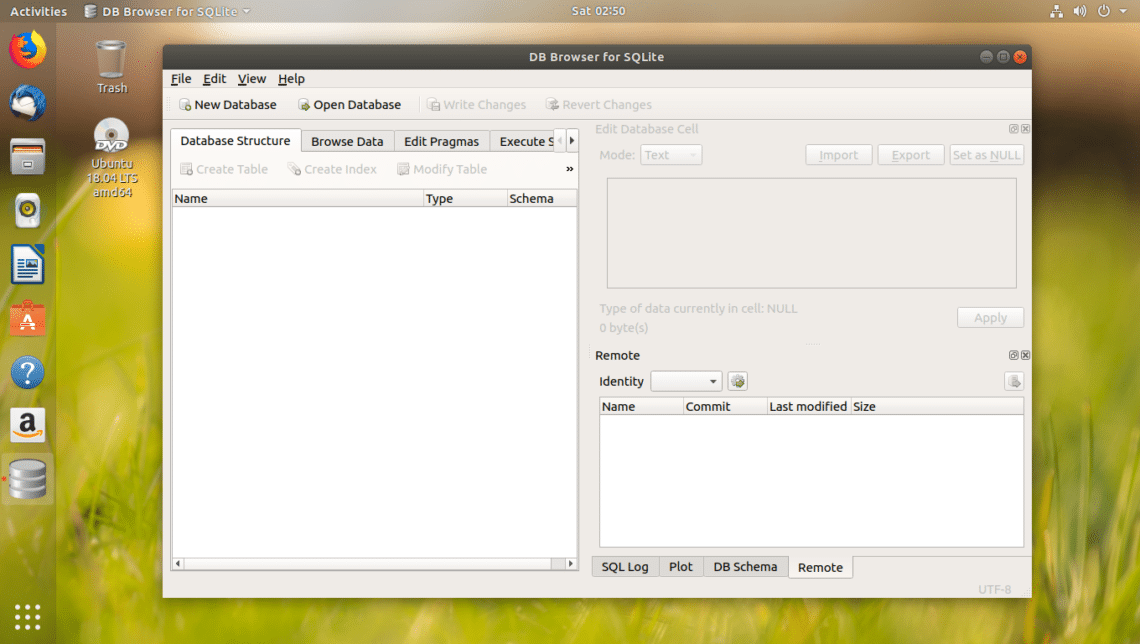
Using SQLite using SQLite Browser
Now you can go to the Application Menu and search for SQLite Browser. You should see a database icon as marked in the screenshot below. Click on it.

SQLite Browser should start as you can see in the screenshot below.
Getting Started with SQLite 3 using SQLite Browser
In this section, I will show you the basics of SQLite 3 database with SQLite Browser graphical user interface.
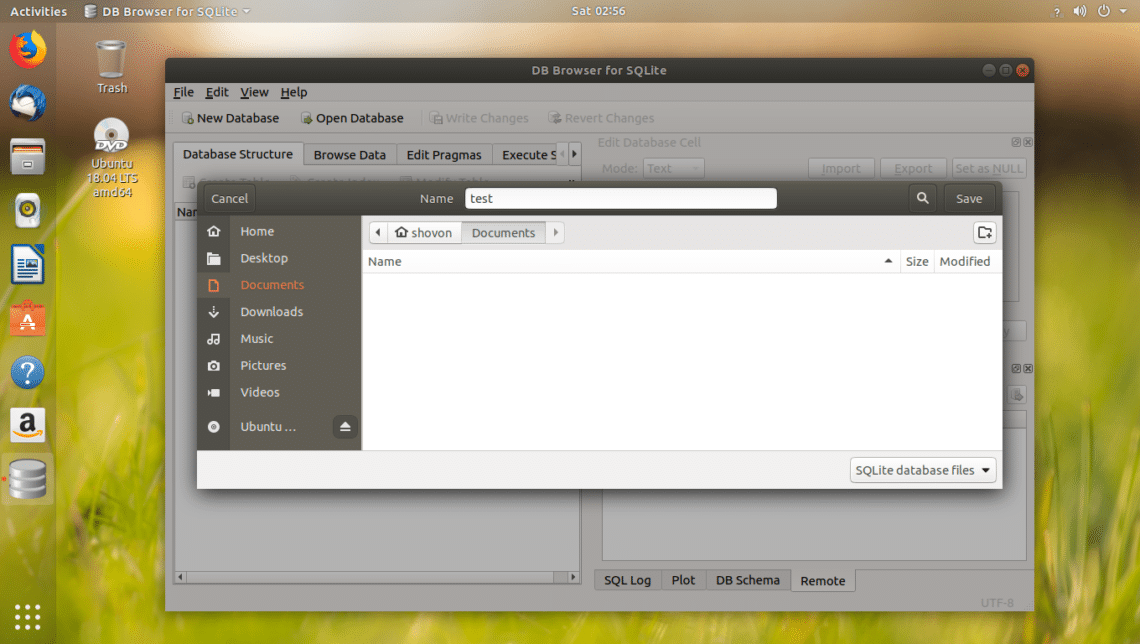
First click on New Database to create a new database using SQLite Browser.

You should see the following dialog window. Type in a filename and save it somewhere on your filesystem.
Now you should the following window. Using this window, you can create your first SQLite 3 table.
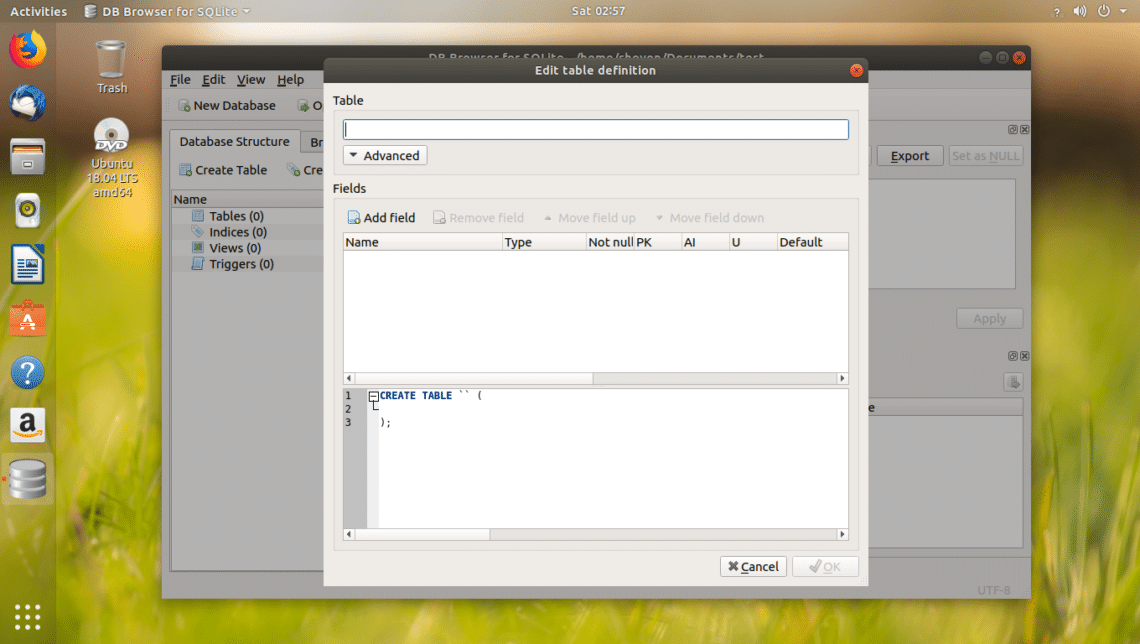
Enter the name of the table. If you want to follow along, users table it is.

Now you can click on Add field button to add as many fields or columns on your table.

Once you click on Add field button, you should see a new field as marked in the screenshot below.
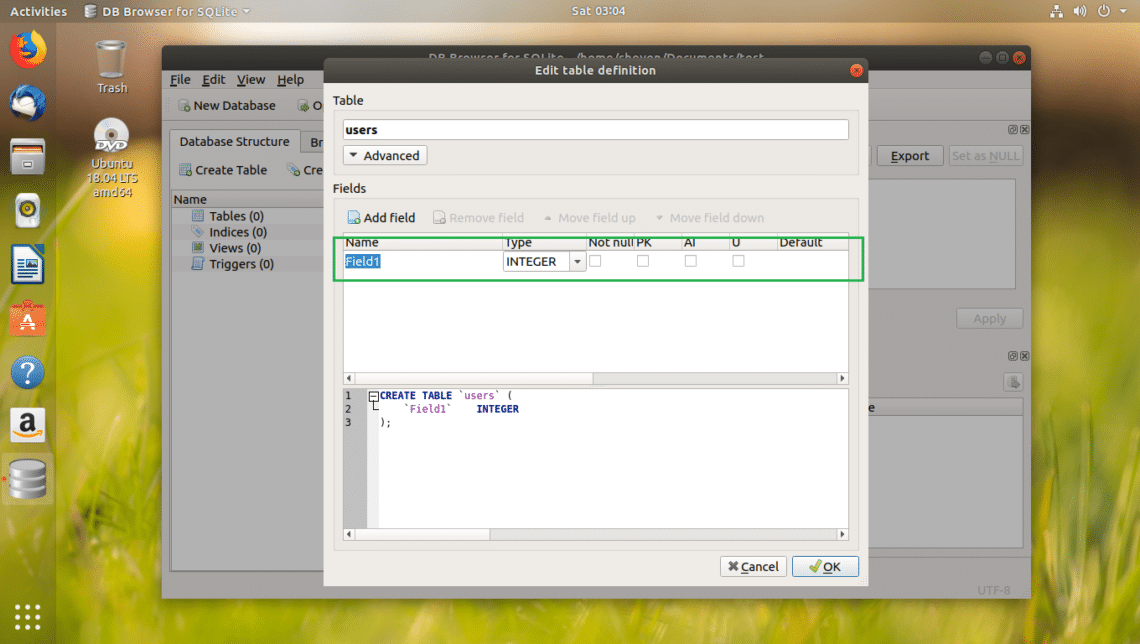
I named the field id, changed the Type to INTEGER, checked the Not null, PK (Primary Key), AI (Auto Increment) checkboxes.

I added name and country field, set their Type to TEXT and checked the Not null checkboxes.
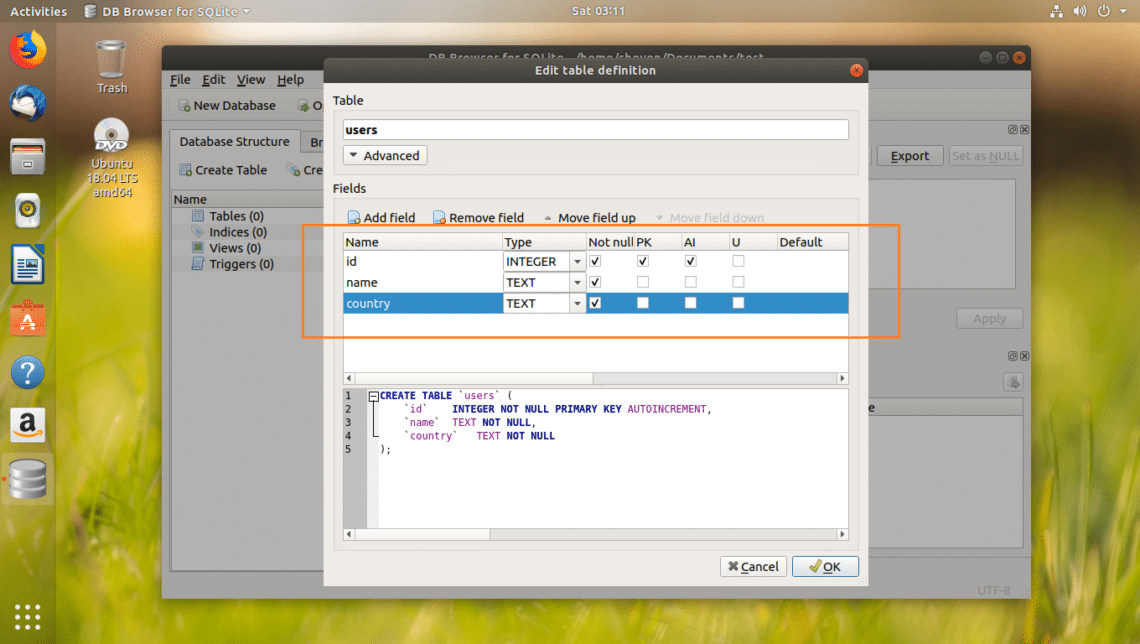
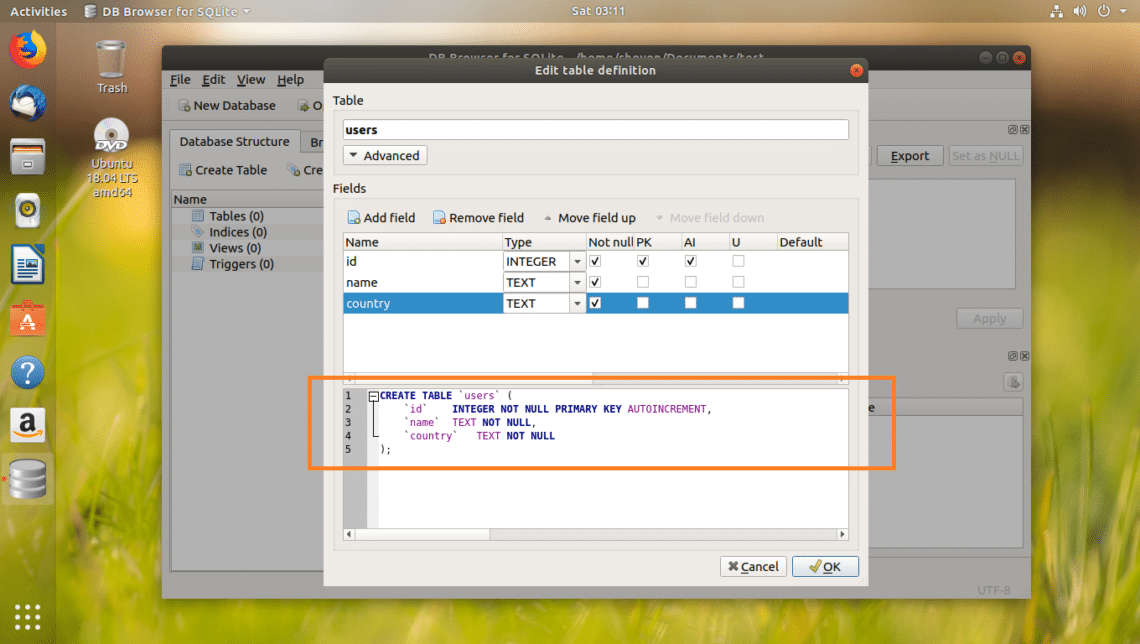
In the marked section of the screenshot below, you can find the SQL code. You can run this code in the SQLite 3 command line interface and create an identical users table as well. SQLite Browser is an awesome tool to lean SQLite as well.
Once you’re happy with your table, click on OK.

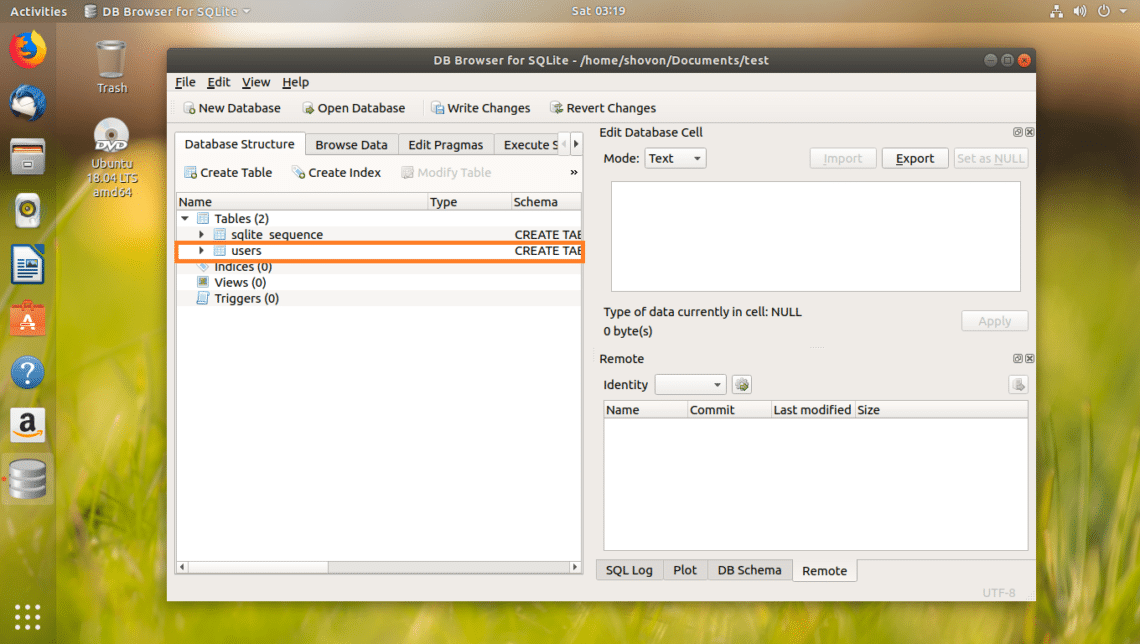
users table should be created.

Now I will show you how to insert data into the users table.
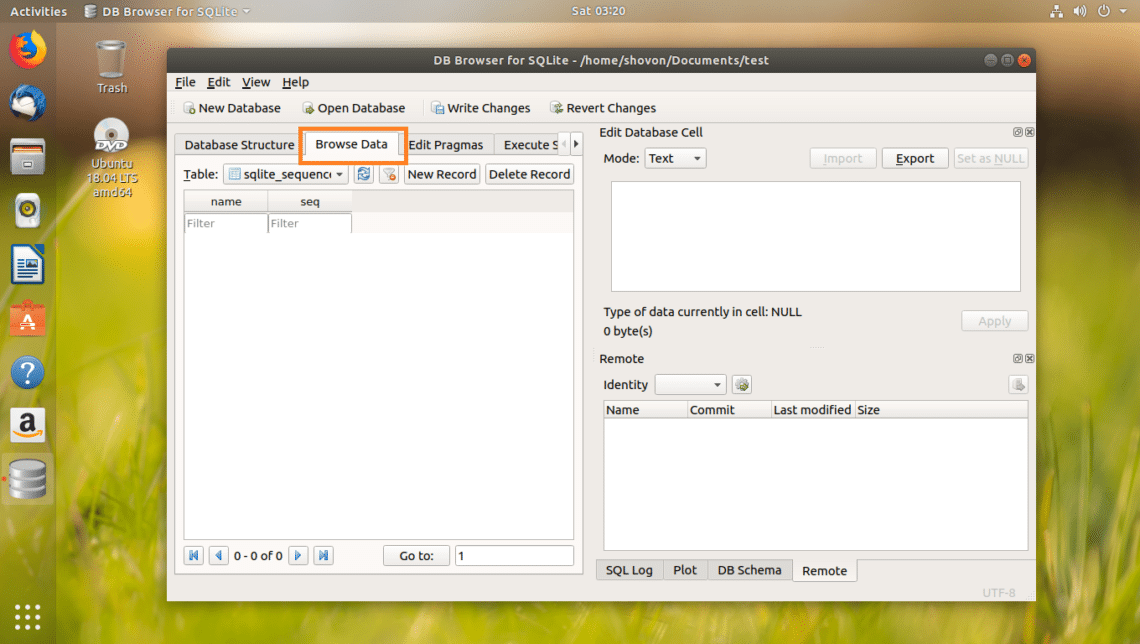
First go to the Browse Data tab as marked in the screenshot below.
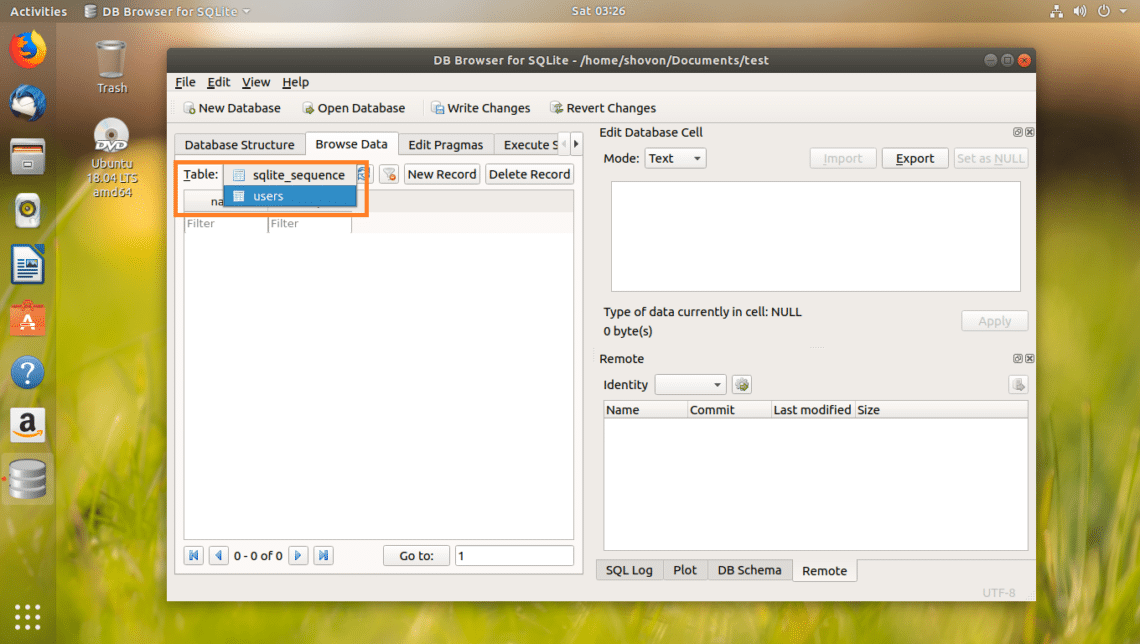
Now select the users table from the marked section of the screenshot below.
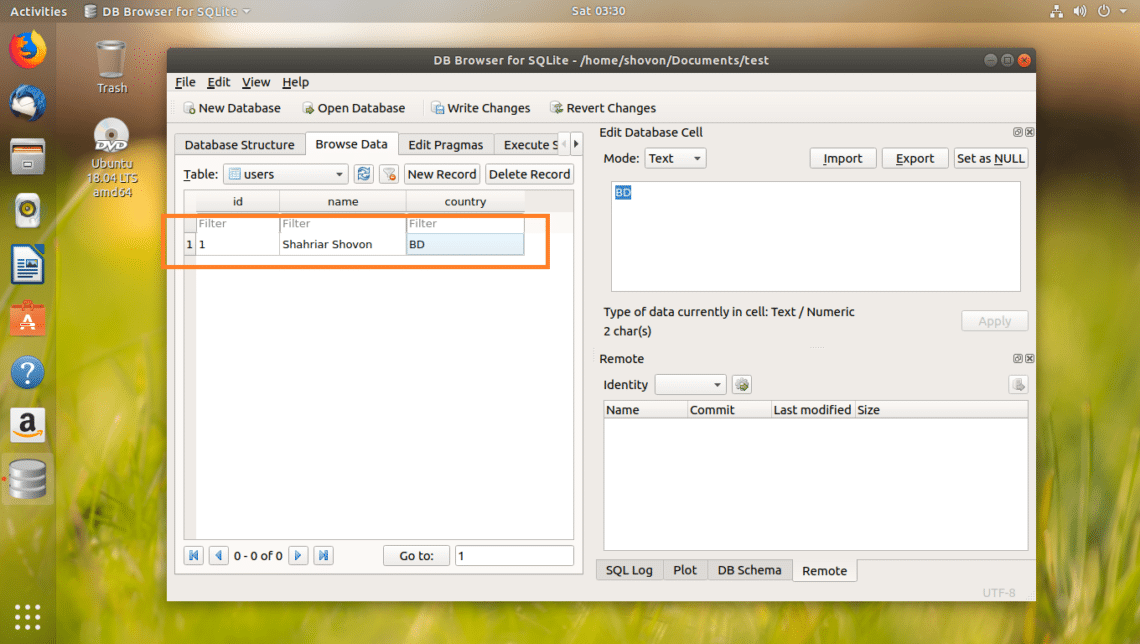
Once users table is selected, click on New Record button to add a new row or data into the table.
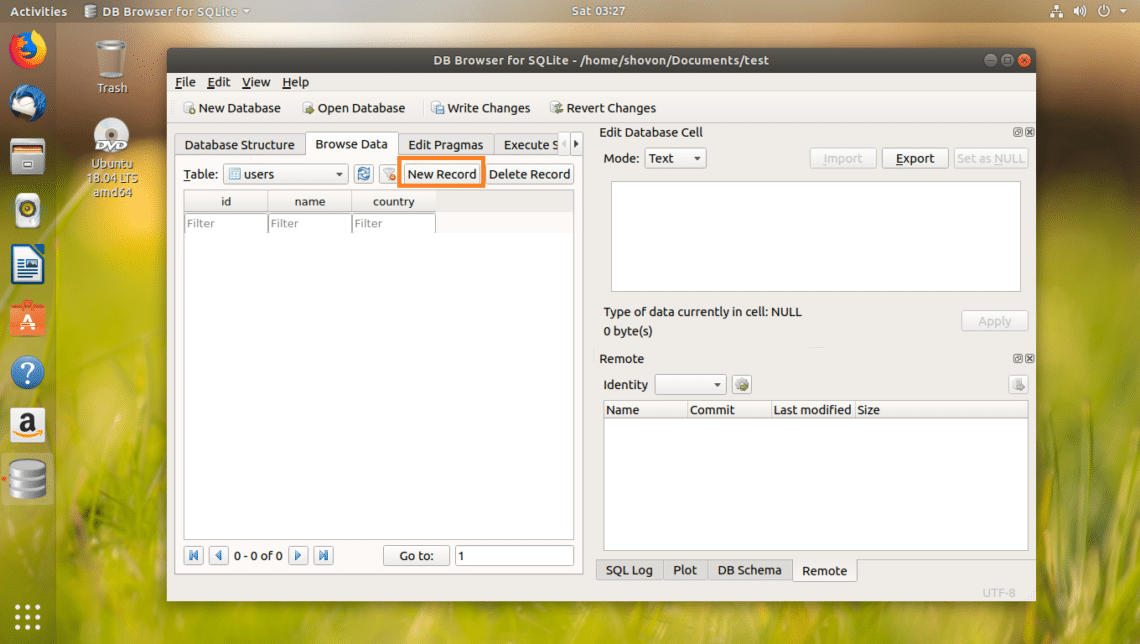
The id should be auto generated. The name and the country field should be blank. Click on each of them and type in your desired data.

As you can, I added a new row to the users table.
Now to save the changes, click on Write Changes button as marked in the screenshot below.
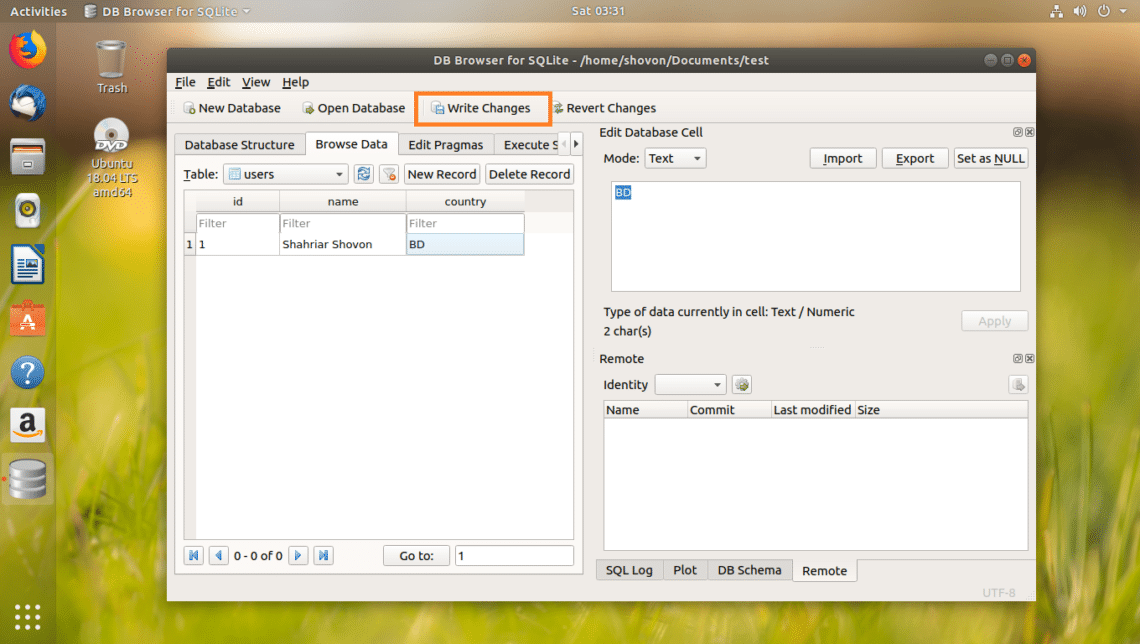
The changes should be written to the file on your filesystem.
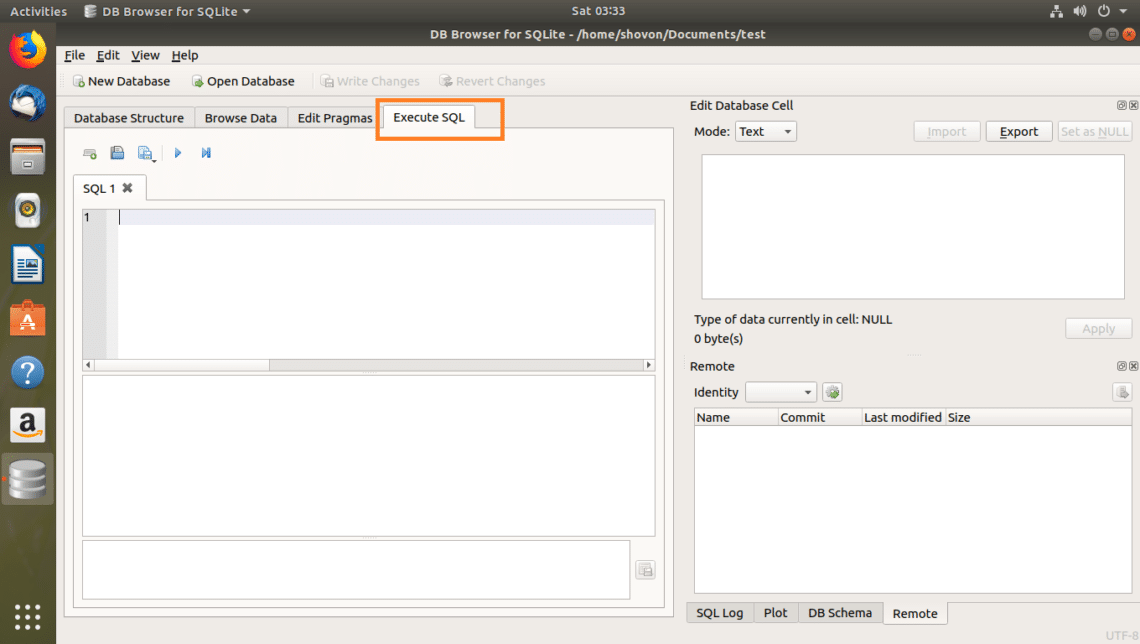
If you want, you can execute SQL statements on SQLite Browser as well.
To execute SQL statements, first go to the Execute SQL tab as marked in the screenshot below.
Enter your SQL statements in the marked section of the screenshot below.

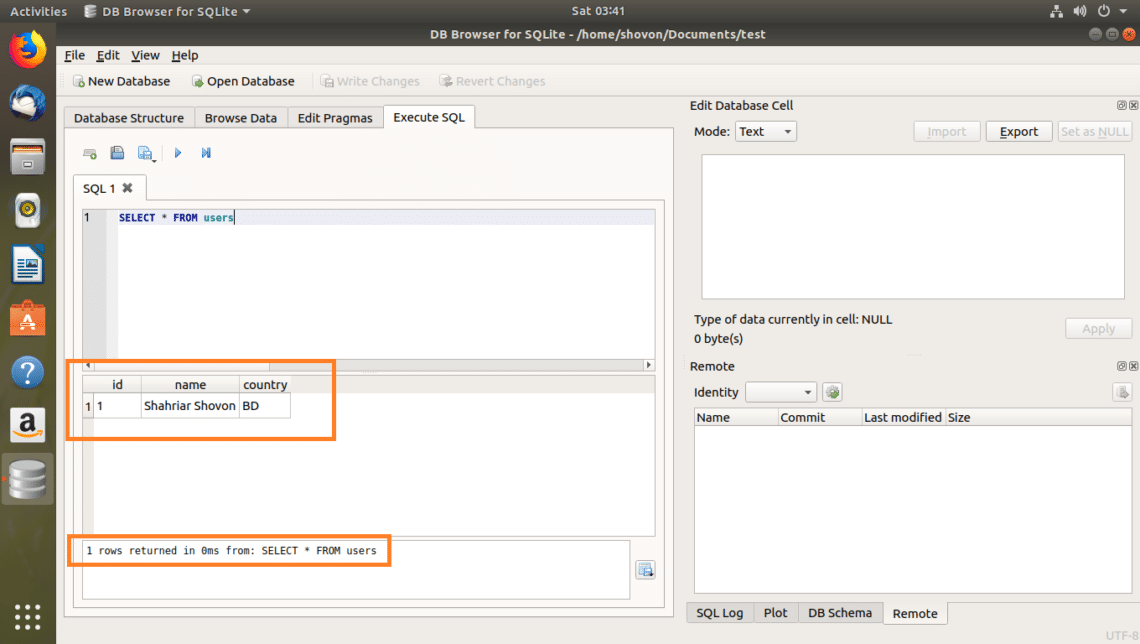
I wrote a simple SQL statement, SELECT * FROM users.
Now if you want to execute the SQL statement, click on the play button as marked in the screenshot below. You can also press F5 or + r

As you can see, the data is returned.
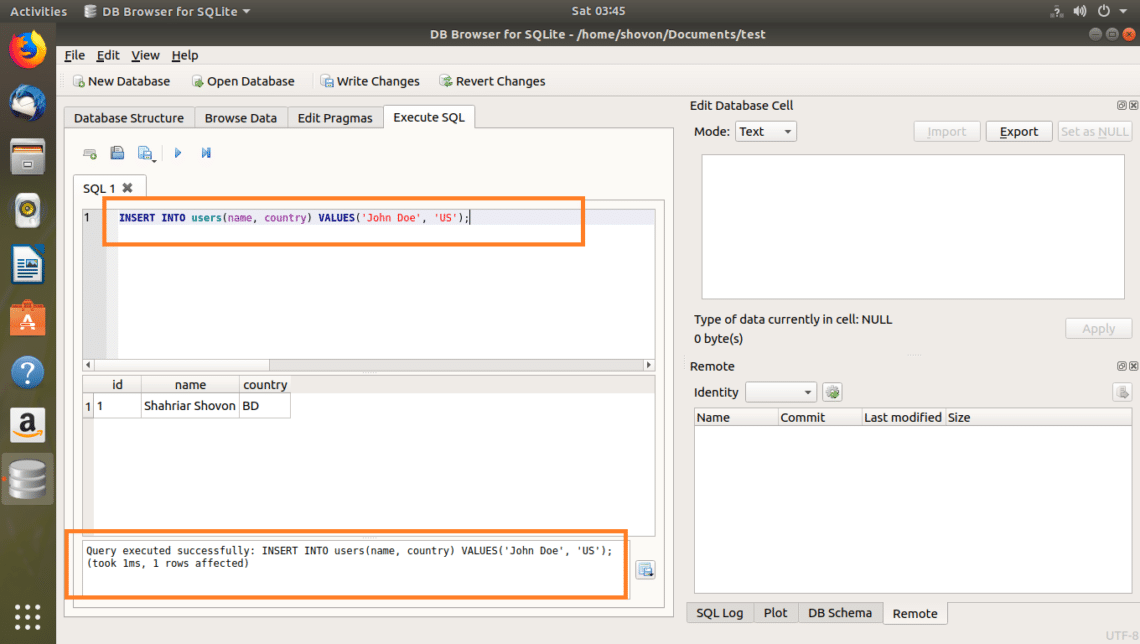
You can insert into the users table with the following SQL command:
INSERT INTO users(name, country) VALUES(‘John Doe’, ‘US’);
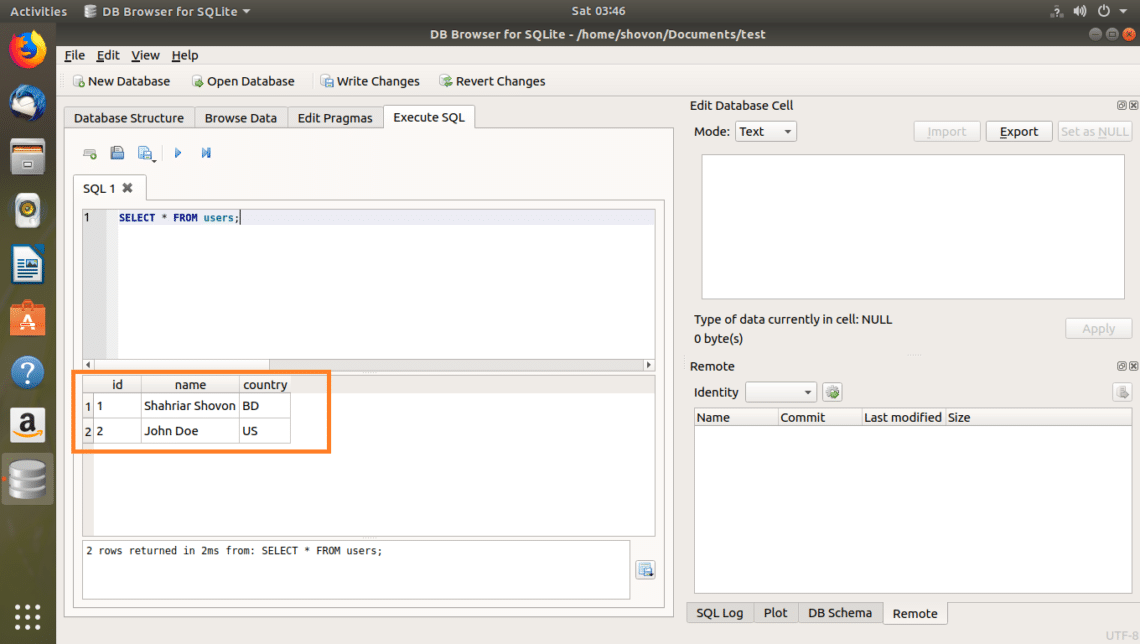
Now if you run SELECT * FROM users again, you should see the new data.
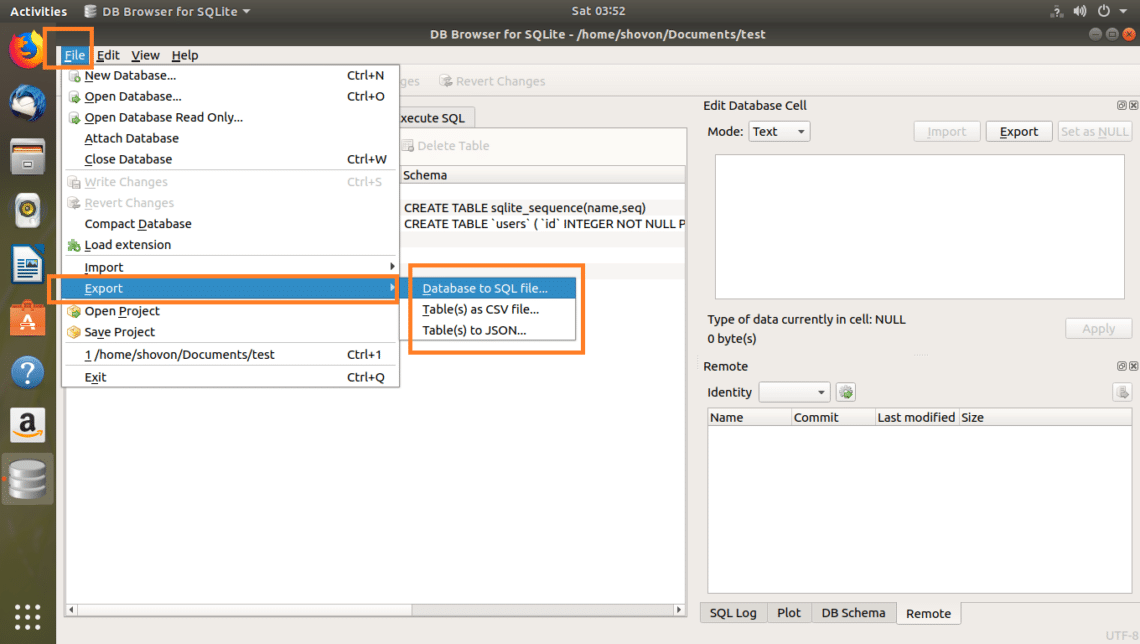
Exporting SQLite Database using SQLite Browser
You can export the SQLite database using SQLite Browser.
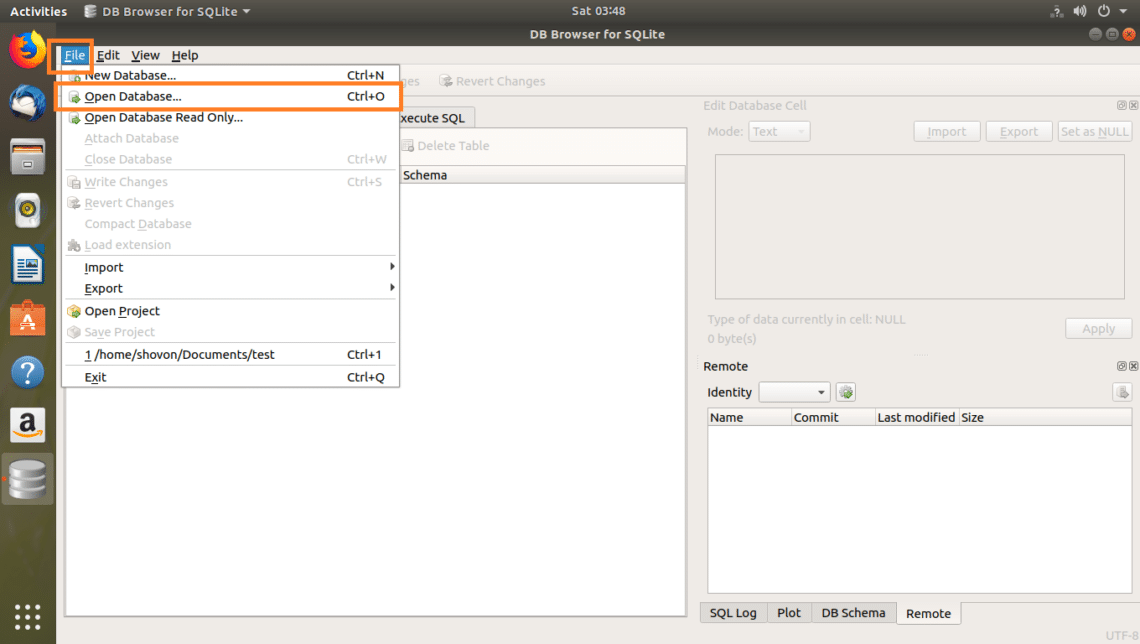
First open the SQLite database from File > Open Database…
Now select your SQLite database file and click on Open.

Your database should be opened.
Now you can click on File > Export and then select either Database to SQL file… or Table(s) as CSV file… or Table(s) to JSON… to export the database to your desired format.
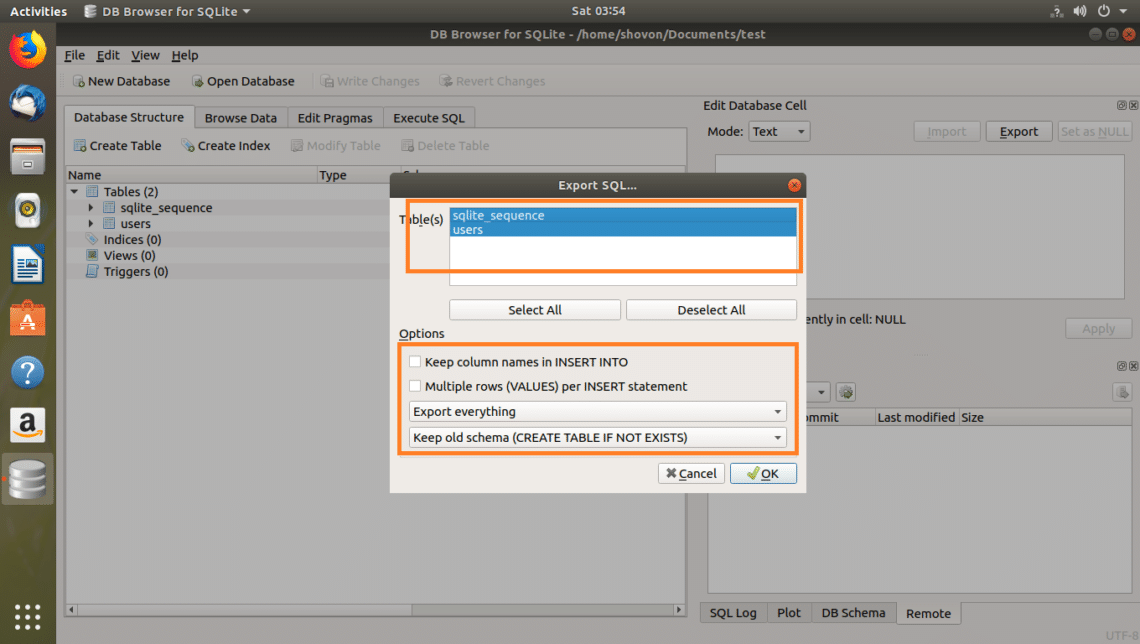
You should see the following window. Now select the tables that you want to export from the Table(s) section. By default, all the tables are selected.
You can also change some options to configure how the exported file should be formatted.
Once you’re happy, click on OK.
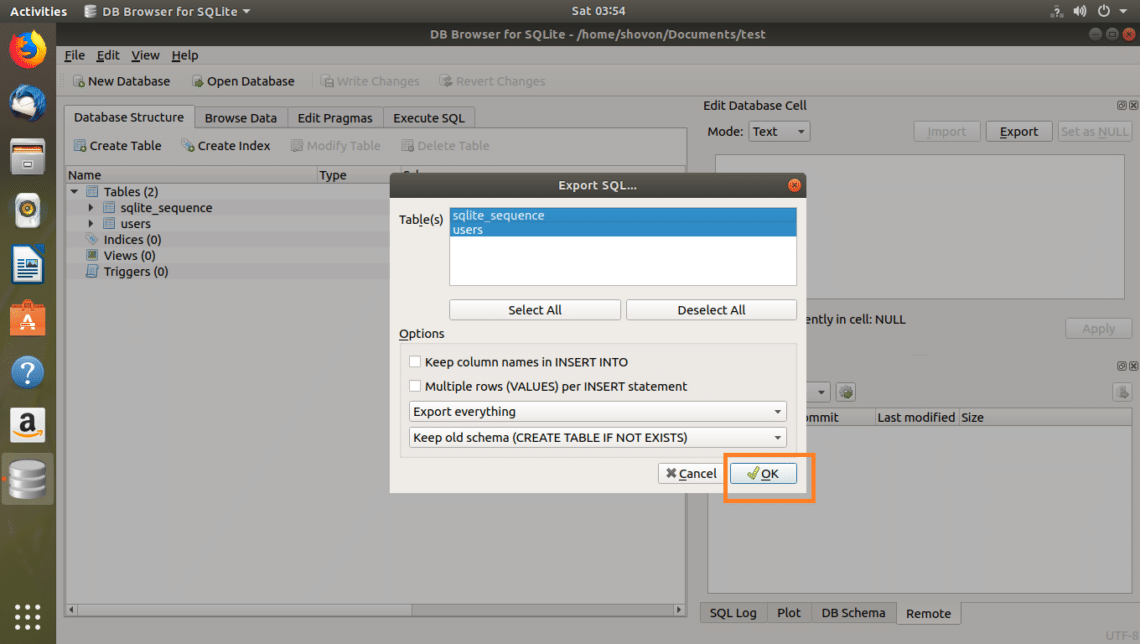
Now select the file path, type in a filename and click on Save.

The database should be exported, now click on OK.

As you can see, the database was exported as SQL.

So that’s how you install SQLite 3 and SQLite Browser on Ubuntu 18.04 LTS, and use SQLite Browser. Thanks for reading this article.
Источник


