- DB Browser for SQLite
- Screenshot
- What it is
- What it is not
- Downloads
- Windows
- Windows PortableApp
- macOS
- Homebrew
- Nightly builds
- Linux
- AppImage
- Snap packages
- Snap Release build
- Snap Nightly builds
- Arch Linux
- Fedora
- openSUSE
- Debian
- Ubuntu and Derivatives
- Stable release
- Nightly builds
- Other Linux
- FreeBSD
- Как настроить и изучить SQL на Mac
- Как настроить и изучить SQL в OS X: выбор версии для установки
- Как установить SQLite в OS X
- Как научиться SQL в OS X
- SQLite Database Manager 4+
- Qiang Li
- Снимки экрана
- Описание
- How To Install SQLite3 On Mac
- 1. Install SQLite3 On Mac.
- 2. Start & Stop ( Quit / Exit ) SQLite Server.
- 3. Install SQLite Studio.
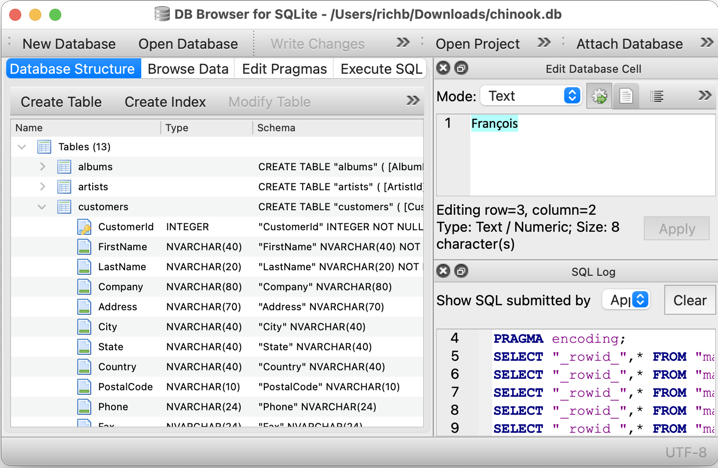
DB Browser for SQLite
The Official home of the DB Browser for SQLite
Screenshot
![]()


![]()

![]()

![]()
What it is
DB Browser for SQLite (DB4S) is a high quality, visual, open source tool to create, design, and edit database files compatible with SQLite.
DB4S is for users and developers who want to create, search, and edit databases. DB4S uses a familiar spreadsheet-like interface, and complicated SQL commands do not have to be learned.
Controls and wizards are available for users to:
- Create and compact database files
- Create, define, modify and delete tables
- Create, define, and delete indexes
- Browse, edit, add, and delete records
- Search records
- Import and export records as text
- Import and export tables from/to CSV files
- Import and export databases from/to SQL dump files
- Issue SQL queries and inspect the results
- Examine a log of all SQL commands issued by the application
- Plot simple graphs based on table or query data
What it is not
This program is not a visual shell for the sqlite command line tool, and does not require familiarity with SQL commands. It is a tool to be used by both developers and end users, and must remain as simple to use as possible in order to achieve these goals.
Источник
Downloads
Windows
Our latest release (3.12.2) for Windows:
Windows PortableApp
Note — If for any reason the standard Windows release does not work (e.g. gives an error), try a nightly build (below).
Nightly builds often fix bugs reported after the last release. рџ„
macOS
Our latest release (3.12.2) for macOS:
Homebrew
If you prefer using Homebrew for macOS, our latest release can be installed via Homebrew Cask:
Nightly builds
Download nightly builds for Windows and macOS here:
Linux
Our latest release is available as an AppImage, Snap packages, and distribution specific packages:
AppImage
Remember to change it’s permission bits to be executable before you run it. рџ„
Snap packages

Snap Release build
Snap Nightly builds
Other distribution specific instructions:
Arch Linux
Arch Linux provides an up to date version
Install with the following command:
Fedora
Install for Fedora (i386 and x86_64) by issuing the following command:
openSUSE
Debian
Note that Debian focuses more on stability rather than newest features. Therefore packages will typically contain some older version, compared to the latest release.
Update the cache using:
Install the package using:
Ubuntu and Derivatives
Stable release
For Ubuntu and derivaties, @deepsidhu1313 provides a PPA with the latest release here:
To add this ppa just type in these commands in terminal:
Then update the cache using:
Install the package using:
Ubuntu 14.04.X, 15.04.X, 15.10.X and 16.04.X are supported for now (until Launchpad decides to discontinue building for any series).
Ubuntu Precise (12.04) and Utopic (14.10) are not supported:
- Precise does not have a new enough Qt package in its repository by default, which is a dependency
- Launchpad does not support Utopic any more, which has reached its End of Life
Nightly builds
Nightly builds are available here:
To add this ppa, type these commands into the terminal:
Then update the cache using:
Install the package using:
Other Linux
On others, compile DB4S using the instructions in BUILDING.md.
FreeBSD
DB Browser for SQLite works well on FreeBSD, and there is a port for it (thanks to lbartoletti рџ„). DB4S can be installed using either this command:
Источник
Как настроить и изучить SQL на Mac

Я хочу изучать SQL на моем Mac. Какой лучший способ начать?
Если вы заинтересованы в веб-дизайне или программировании, то рано или поздно вы столкнетесь с SQL (язык структурированных запросов). SQL — это относительно простой язык программирования и кодирования, используемый для управления данными, хранящимися в базе данных (или в СУБД, или в системе управления реляционными базами данных, чтобы дать ей полное и причудливое название).
Не удивляйтесь сухости управления данными в SQL или странности языка. Многие недовольные программисты проклинают SQL, но важно, чтобы вы учились. SQL стоит за каждым крупным банком, больницей и государственной системой, не говоря уже о каждом веб-сайте, который вы используете.
Также гораздо проще выучить SQL, чем вы можете себе представить. SQL появился в 1974 году и не взял на вооружение много современных достижений в кодировании, поэтому у него нет объектно-ориентированных структур, деревьев или вложенных операций. Вы просто учитесь создавать, читать, обновлять и удалять данные из таблиц, процесс, известный как CRUD.
- Как писать приложения с Apple Swift 2
- Лучший Mac для разработки приложений
- Как сделать игру для iOS
- Узнайте, как кодировать на Mac с Python
Как настроить и изучить SQL в OS X: выбор версии для установки
Существует несколько различных установок SQL, но эти три являются основными, которые люди используют:
- SQLite. Эта библиотека небольшая и встроена в создаваемое вами приложение. Это избавляет вас от необходимости общаться через порты, и это невероятно быстро. Его набор функций ограничен по сравнению с другими услугами.
- MySQL. Это самое большое имя в мире, и оно гораздо более функционально, чем SQLite. Его легко установить, и есть много учебных пособий и справки.
- PostgreSQL. Это расширенный вариант, и определенно не там, где вы хотите быть новичком. Он мощный и легко расширяемый, хотя и не так популярен, как MySQL.
Если вы новичок, тогда переходите на SQLite. Его проще устанавливать и изучать, и вы можете пройти долгий путь, изучая только основы SQL. Вы всегда можете перейти на MySQL, если обнаружите, что SQL — это необходимый набор навыков.
Как установить SQLite в OS X
Установить SQLite на ваш Mac довольно просто. Просто следуйте этим шагам:
Перейдите на SQlite.org и загрузите файл исходного кода C с именем sqlite-autoconf-3130000.tar.gz или аналогичный со страницы загрузки SQLite.
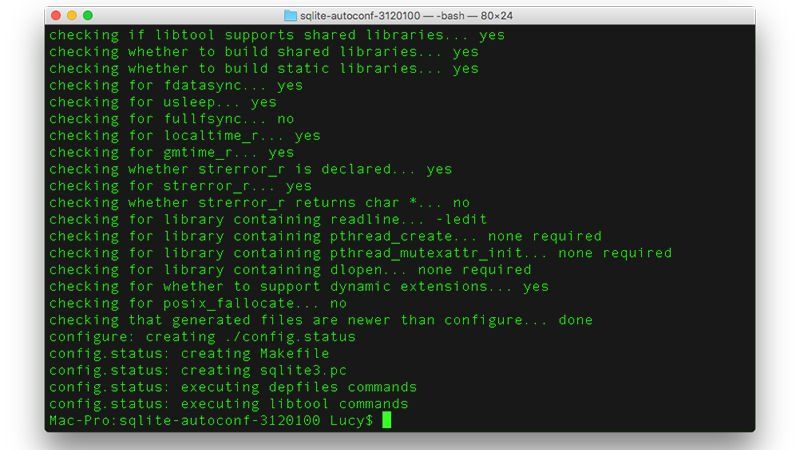
Откройте терминал и введите следующие команды:
- CD Загрузки /
- tar -xf sqlite-autoconf-3130000.tar.gz [или любое другое имя файла исходного кода C]
- cd sqlite-autoconf-3130000
- ./ configure —prefix = / usr / local
- делать
- сделать установку
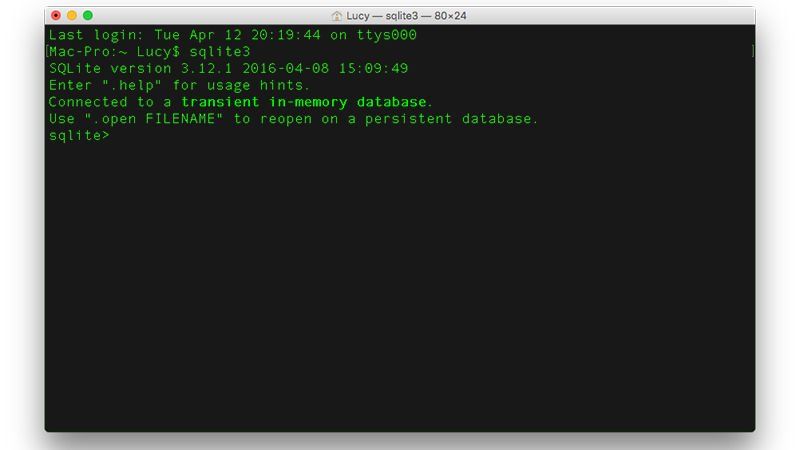
Теперь вы можете проверить установку SQLite, введя sqlite3 в Терминале. Тебе следует увидеть:
SQLite версии 3.13.0 2016-04-08 15:09:49 [или аналогичный]
Введите «.help» для использования подсказок.
Подключен к временной базе данных в памяти.
Используйте «.open FILENAME», чтобы открыть постоянную базу данных.
Как научиться SQL в OS X
После того, как вы настроили SQLite в Mac OS X, пришло время начать изучать, как его использовать. К счастью, нет недостатка в курсах и книгах, которые помогут вам учиться. Вот некоторые из лучших мест для начала:
- Codecademy: изучение SQL
- Изучай SQL трудный путь (альфа)
- com: учебник по SQL
- TutorialsPoint: SQL
Источник
SQLite Database Manager 4+
Qiang Li
-
- 449,00 ₽
- Включает встроенные покупки
Снимки экрана
![]()
![]()
![]()
![]()
![]()
![]()
![]()
Описание
Browser Sqlite Database data with Sqlite Database Manager, you can view data easily with Filter, Sort, Paging. With the In-App Purchase ‘Edit Data’ and ‘DB Creator’ you can edit it directly on your Mac, create new databases and new tables.
* View table data with paging list
* 10+ data view UI control (include Map, Date Time, Checkbox, Rating, Color . )
* Filter/Search table data on column
* Sort table data by click on the column header
* Choose tables to show and columns to show
* Drag drop rearrange column order and change column width in main table
* Zoom data via change data font size
* Open multiple database at same time
* Full screen view data
* CSV View and export
* Html View with customisable template
* Works great with companion mobile app ‘Sqlite Database Manager’ for iPhone and iPad
Photo collection view:
If table data have photo/image field, you can switch to photo collection view by click on toggle C/T button next to page control buttons.
In-app Purchase ‘Edit Data’ Features:
* 10+ data edit UI control (include Map, Date Time, Checkbox, Rating, Color Picker,Dropdown, Multi-select. )
* Update table row data
* Delete table row data
* Add table row data
* Cross table ID,Value single or multi-select using the Data Picker
In-app ‘DB Creator’ Features:
* Create Database
* Create Table
* Create contacts table by import Contacts
* Import CSV Data
In-app Purchase ‘Map View’ Features:
* View Geolocation on map
Support two format:
1. Latitude and Longitude column data;
2. any column contain this format geolocation:
* Auto update Geolocation by search address
Select address column to search, and select save to column to save the found geolocation.
Please select the column which have enough length to save Latitude and Longitude.
In-App Purchase ‘Instant Web Server’ Features:
* Publish data on local network with one single click, view and add data on any web browser from mobile devices or computers
* Easy setup template for list page and detail page
* Build-in form to add data
* Configable URL Path, template and server port
* Build-in 10+ Html Table Template
In-App Purchase ‘App Builder’
* Build customised User Interface for your database
* Bind database table row data to user control
* Support Rows Table List, Row detail data controls, search field
Источник
How To Install SQLite3 On Mac
SQLite is a popular embedded relational database. It can be used on both mobile devices and personal computers. This article will tell you how to install and manage it in Mac.
1. Install SQLite3 On Mac.
- Download the SQLite zip file from SQLite official website.
- Then unzip the download file into a local folder such as /Users/zhaosong/Documents/WorkSpace/tool/sqlite-tools.
- Now the SQLite server has been installed, it does not need any installation.
- For macOS X 10.4 or higher version, SQLite3 has been installed on macOS by default. You can run the command which sqlite3 to show the SQLite binary file path in the system PATH environment variable value.
- If the output sqlite3 binary path is not which you want, you can go to the macOS user home directory then edit .bash_profile file to add and export your SQLite3 binary file path at the beginning of the system environment variable PATH value like below.
After you save above changes in .bash_profile file, run $ source .bash_profile to activate it.
2. Start & Stop ( Quit / Exit ) SQLite Server.
- Open a terminal and CD to the SQLite file unzip folder.
- Execute sqlite3 in command line, when you see below messages, the SQLite server has been started. You can interact with SQLite3 in the command line console, after you input one statement, you need to type a ; + Enter key to terminate the current input.
- If you want to stop ( quit ) SQLite3 database in command line console, you can first type ; to terminate the last statement input, then type .quit / .exit + Enter key. When you quit the SQLite3 database, the SQLite3 process is terminated also that means the SQLite server is stopped.
- Now click Finder —> Go —> Applications to open MacOS application folder. And click Utilities —> Activity Monitor to open the activity monitor. You can find the sqlite3 process in this window.
3. Install SQLite Studio.
SQLite save all data of one database in a .db file. It is a binary file. So if you want to create more databases, you need to create more .db file.
SQLite Studio is just a visual tool that can help you to manage SQLite database, includes create table, view, etc.
- Go to SQLite Studio download page to download the latest version.
- Open the downloaded zip file and click the InstallSQLiteStudio-3.2.1.app icon to install it.
- But because the installer is not downloaded from App Store, so you may encounter errors which said can not open it.
- Click System Preferences —> Security & Privacy then click Open Anyway button to open the SQLite Studio installer. Below picture does not contain the button, because I have already click the button before. If you install SQLite Studio for the first time, the Open Anyway button will be shown.
- After the installation process, you can find the SQLiteStudio icon in Finder —> Go —-> Applications folder.
Источник


