- SSD caching with bcache for Linux
- Preconditions
- Ubuntu base installation
- bcache installation
- bcache-tools
- Concept
- Setup
- Cleanup devices
- Create and register the devices
- Show bcache superblock
- Attach devices
- Check bcache status
- Migrate root partition
- Check caching
- Reuse old root as swap
- Author
- Nikolaus Rath’s Website
- lvmcache
- bcache
- Настройка SSD кеширования LVM Cache в CentOS
SSD caching with bcache for Linux
This post is older than a year. Consider some information might not be accurate anymore.
This article describes SSD caching for the HDD drive on a new Ubuntu Linux installation. The contents might as well apply to Debian Jessie.
Preconditions
- Device: Thinkpad Edge S430, 500 GB hdd, 16 GB ssd, 16 GB ram
- OS: Ubuntu 14.04.02 LTS (Desktop)
- bcache as ssd cache
Ubuntu base installation
During the installation I partition my hdd drive like this
hdd disk partitioning
- /dev/sda1 в‡’ 256 MB boot partition, will not be cached, as precaution for dist-upgrades
- /dev/sda5 в‡’ 8 GB for / (sufficient for basic installation and will be later used as swap partition)
- /dev/sda6 ⇒ the remaining hdd disk space for migration to bcache, don’t assign a mount point
- /dev/sdb1 в‡’ the 16 GB sdd cache
Ubuntu will complain that there is no swap partition and /dev/sda6 has no mount point. These warnings can be ignored from the initial base installation. After you have finished the base installation, you are ready to install bcache.
bcache installation
If you have kernel version 3.10 or greater you should have bcache, eg. Ubuntu distributions since version 14.04. You can lookup the kernel version with
bcache-tools
The first thing you must do is install bcache-tools. This is the tool that will create and register the block devices to work with bcache. To install bcache-tools you must first add the repository. This is done with the following commands:
If you are using higher ubuntu version like 14.10, bcache-tools are already in the repository.
Concept
bcache has two requirements: # a вЂbacking’ device, the device that shall be cached, the empty hard disk or an empty partition on a hard disk # a вЂcaching’ device, the device that is used as cache, the SSD, e.g. 16-32 GB contained in hybrid drives

It is designed around the unique characteristics of flash-based SSDs and uses a hybrid btree/log to track cached extents. It is designed to avoid random writes at all costs. bcache fills up an erase block sequentially and then issues a discard before reusing it. Both write-through and write-back caching are supported. Write-back defaults to off, but can be switched on and off arbitrarily at runtime. The virtual bcache device is created by attaching the backing device and caching device.
Setup
- the backing device is /dev/sda6 , formatted as ext4
- the caching device is /dev/sdb1 , formatted as ext4
Cleanup devices
If the devices have already been used for bcache a cleanup is necessary. You may skip this section, if the devices are not used with bcache before.
We put zeroes on the first 4kB of the disk:
Create and register the devices
The virtual bcache device is created by attaching the backing device and caching device.
First set up the backing device (the empty partition on your hard drive).
Then do the same thing for your caching partition.
If you get an error that there are already non-bcache superblocks on the device(s), you have to remove those errors with the wipefs command (see above cleanup section).
Once the backing device is registered, it will show up in /dev in the form of /dev/bcacheX (where X is a number – such as /dev/bcache0 ).
You might need to format the devices
Show bcache superblock
bcache-super-show prints the bcache superblock of a cache device or a backing device.
Attach devices
The devices are now created and registered. You now have to attach the caching and backing devices to enable the caching feature. Here you will need the UUID (a long string of characters) found in /sys/fs/bcache/ (enter the command: ls /sys/fs/bcache and you’ll see the UUID). To attach the devices, you simply use the echo command to add the UUID to the attach file in /sys/block/bcache0/bcache/. The command is:
Where UUID is the actual UUID found in /sys/fs/bcache .
Check bcache status
If bcache was properly setup, check with lsblk .
- bcache0 for the backing device
- bcache0 for the caching device
Migrate root partition
create mount points
copy contents from old to new partition
- find out the UUID of /dev/bcache0
- replace the previous UUID of / with the new UUID в‡’ /dev/bcache0
- creates a new grub.cfg with changed values from /etc/fstab
Check caching
After the grub installation, the next reboot should start from the backing device with bcache using the sdd as caching device.
To check to see if the caching is working, open up a terminal window and issue the command:
Reuse old root as swap
/dev/sda5 is no longer used and with 8 GB fits perfectly as swap for 16 GB main memory.
You might change the partition type of /dev/sda5 to swap.
- Change this partition type to Linux swap
make and enable swap
- add swap partition to /etc/fstab
Author

Tan-Vinh Nguyen
The happiest people don’t have the best of everything, they just make the best of everything they have.
Birth, Development, in Progress .
Источник
Nikolaus Rath’s Website
Wed 10 February 2016
I recently found myself with a spare 128 GB SSD disk and decided to try my hand at setting up SSD caching under Linux. My personal desktop system so far stored all data on traditional spinning disks. However, a little while ago I got a new computer at work that comes exclusively with SSD storage, and since then I’ve become increasingly annoyed with the disk performance of my personal system. Using SSD caching seemed like an appealing option to increase performance without having to replace any disks.
The two operations where the disk performance is most noticeable is when booting up the system, and when using Unison to synchronize my home directory between different systems. Booting the system typically takes about 1 minute and 30 seconds from loading the initrd to X11 coming up, and about 2 minutes until my desktop is fully loaded (that’s i3, Dropbox, Emacs, Firefox, Network Manager, XFCE Terminal, and Pulse Audio). Scanning my home directory with Unison typically takes about 1 minute and 19 seconds (that’s just detecting any changes that need to be synchronized, not actually transferring the changed data).
To better estimate how much improvement I could possibly get from the SSD, I first transferred my entire root file system from spinning disks to the SSD. This increased my boot time to X11 from 1:30 to 22 seconds (I unfortunately didn’t write down the time when the desktop was fully loaded).
For SSD caching under Linux, there are currently three options: bcache, lvmcache, and EnhanceIO (A nice overview of the differences between bcache and lvmcache can be found on the Life Reflections Blog). EnhanceIO I ruled out immediately because it isn’t included in the mainline kernel. bcache has the drawback of requiring you to reformat your partitions and there are various rumours about data corruption with more complex storage stacks. Therefore, I tried lvmcache first.
lvmcache
Initial setup of lvmcache on the block devices was straightforward, but getting the system to setup the stack correctly on boot required some manual work for my Debian Jessie system. It turns out that there is a missing dependency on the thin-provisioning-tools package that contains the cache_check binary. Furthermore, in order to be able cache the root file system, you need to manually configure initramfs-tools to include this binary (and the C++ library that it requires) in the initrd. That out of the way, things worked smoothly.
Unfortunately, even after several boots I was unable to measure any performance improvement. I tried to encourage promotion of blocks to the cache by setting the sequential_threshold, read_promote_adjustment and write_promote_adjustment variables to zero (using dmsetup message 0 0), but to no avail. Maybe using it for a longer time would have eventually improved performance, but I got the impression that lvmcache was not the right tool for my use case. As I understand, lvmcache is not actually a cache but more of tiered storage system: it tries to determine which blocks are accessed most frequently, and «promotes» them to storage on the cache device. A traditional cache, in contrast, would put almost every block that is read or written into the cache, evicting the least-frequently accessed block from the cache to make room if necessary.
bcache
bcache works more like a traditional cache. The only exception is that it tries to detect sequential access (e.g. watching a movie, creating an ISO image) and bypasses the cache for such requests (because typically spinning disks are quite performant for them). I was a bit worried about the interaction between bcache, LVM, dm-crypt and btrfs, but also unable to find any concrete reports of problems other than a bug in the btrfs+bcrypt interaction that was fixed in kernel 3.19. Also, there were several people on the bcache and btrfs mailing lists who reported successfully using it even in complex stacks.
Therefore, I decided to bite the bullet and give bcache a try. After moving around a lot of data in order to be able to format the bcache devices and enabling the most-recent kernel from the jessie-backports repository (4.3 at the time of this post) to avoid the above mentioned bcrypt+btrfs bug, I ended up with the following configuration:
- /dev/sda3 (a 512 GB partition an a spinning disk) is the backing device for /dev/bcache0
- /dev/sdb3 (a 256 GB partition on a spinning disk) is the backing device for /dev/bcache1
- /dev/sdc2 (a 58 GB partition on the SSD) is initialized as a cache device, and connected to both bcache0 and bcache1.
- /dev/bcache1 and /dev/bcache2 are used as LVM physical volumes (PVs), forming volume group vg0.
- /dev/mapper/vg0-root is the btrfs formatted root file system (linearly mapped onto the PVs)
- /dev/mapper/vg0-home is a LUKS (dm-crypt) encrypted device (linearly mapped onto the PVs)
- /dev/mapper/vg0-home_luks is the btrfs-formatted home file system (backed by vg0-home).
This time, there was no need for any manual fiddling with the initrd, things worked perfectly out of the box. I am also extremely pleased with the performance. While the first reboot proceeded at regular speed, subsequest boots reduced the time to X11 from 1:30 minutes to about 9 seconds, and the time until the fully loaded desktop from 2:00 minutes to about 15 seconds (times are not exact because I used a stopwatch). Note that this is even faster than in my SSD-only experiment — presumably because now both root file system and home directory are utilizing the SSD. The time required to scan my home directory for synchronization changed from 1:19 (with spinning disks) to 4 seconds (with SSD cache). Wow!
I am a little bit worried about encountering bugs in this rather complex stack, but I hope that they will at least not go unnoticed because btrfs checksums all its data. If I encounter any problems, I will update this blog post.
Update: I’ve now replaced btrfs with ext4, but otherwise kept the stack unchanged. See BTRFS Reliability — a datapoint for details.
Posted by Nikolaus Rath Wed 10 February 2016 misc —> Linux
Источник
Настройка SSD кеширования LVM Cache в CentOS
В этой статье мы покажем, как использовать SSD диск в качестве кэширующего устройства для двух SATA дисков, объединенных в RAID 1 на сервере с CentOS Linux на примере LVM Cache. В такой конфигурации кэширующее и кэшируемое устройство должно входить в одну группу томов LVM, а отключение/включение кэша можно выполнять без на ходу без без перезагрузок и перемонтирования.
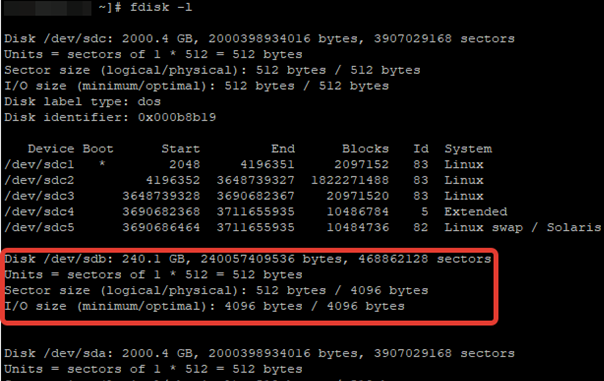
После установки ОС на RAID1 из двух SATA дисков, мы подключили отдельный SSD диск на 240 Гб. Проверим, что он доступен:
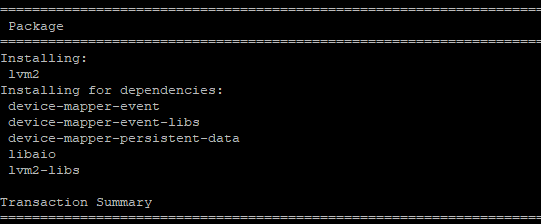
С помощью менеджера пакетов установите утилиту lvm2, которая будет использоваться для реализации кэша .
# yum install lvm2 -y
После установки ПО, нужно определить блочное устройство SSD-диска и раздел, к которому примонтирована нужная директория. В моем случае это будет директория home, раздел для которой я создал при установке ОС.
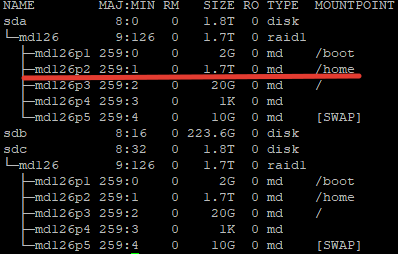
Директории /home соответствует раздел /dev/md126p2. Обратите на это внимание, так как дальнейшая настройка будет связана именно с этим разделом.
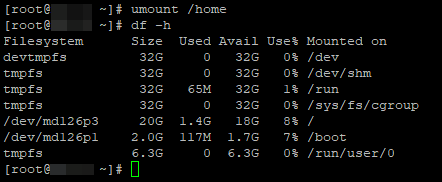
Теперь можно перейти к настройке кэша. Отмонтируйте директорию:
Для создания кэширующего SSD устройства выполните следующие команды
# pvcreate /dev/md126p2
# pvcreate /dev/sdb
# vgcreate ssdcache /dev/md126p2 /dev/sdb
# lvcreate -l 100%FREE -n hdd_data ssdcache /dev/md126p2
# lvcreate -L 16G -n ssd_meta ssdcache /dev/sdb
# lvcreate -l 90%FREE -n ssd_data ssdcache /dev/sdb
# lvconvert —type cache-pool —poolmetadata ssdcache/ssd_meta ssdcache/ssd_data
# lvconvert —type cache —cachemode writeback —cachepool ssdcache/ssd_data ssdcache/hdd_data
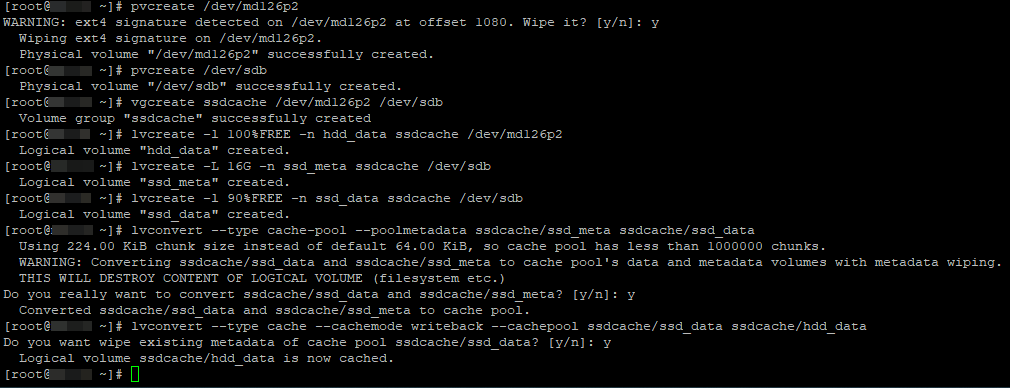
- pvcreate — инициализирует физический том для LVM
- vgcreate – создать группу томов
- lvcreate -l – создать логический том, размер тома указывается в процентах
- lvcreate -L – создание логического тома с метаданными для кэша
- lvconvert — объединяем кэш-пул и логический том через метаданные. Задаем режима кеширования, в нашем случае writeback.
Есть два режима кеширования:
- Writeback — данные сначала пишутся в кэш, затем на диск. Это более производительный вариант. При сбое кэширующего SSD диска, вы потеряете данные, которые не успели записаться на HDD. Хотя и не рекомендуется использовать этот режим на серверах с SSD без RAID, мне кажется с учетом надежности SSD дисков, это вполне рабочее решение.
- Writethrough — данные сразу пишутся одновременно на диск и в кэш, после чего наиболее часто используемые попадают в кэш. Это безопасный вариант, подходит для серверов с 1*SSD, но гораздо менее производительный.
После выполнения всех настроек, можно проверить кэш на наличие ошибок:
Если ошибок нет, значит вы все сделали верно. Данная команда покажет процент использования кэша. На данный момент размер кэша будет чуть практически нулевой.

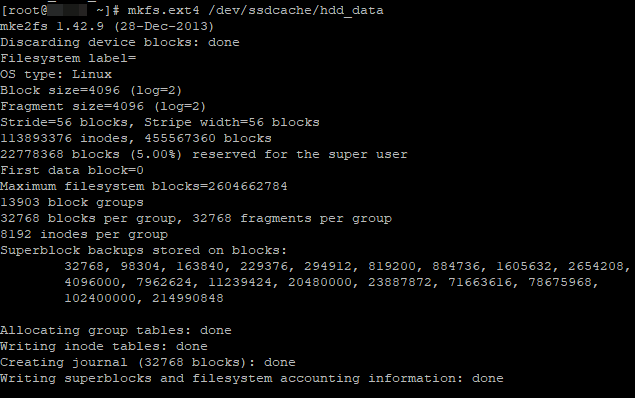
Теперь создадим файловую систему на новом LVM разделе:
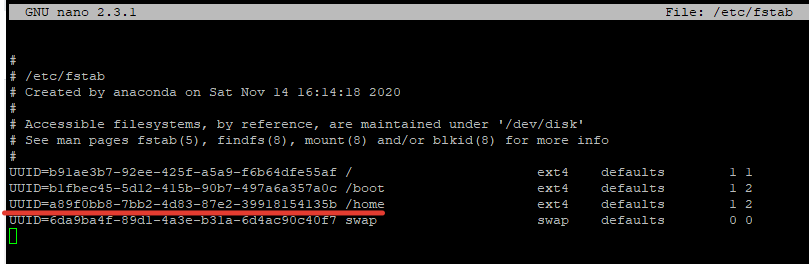
После создания раздела, нужно определить его UUID, чтобы заменить его в fstab:
Заменяем в /etc/fstab
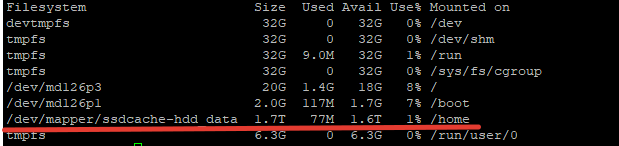
После замены UUID в fstab для нужного раздела, перезагрузите сервер и проверяем текущие настройки:
Чтобы узнать текущий режим работы SSD кэша, используйте команду:
# lvs -o+cache_mode ssdcache

Для смены режима, используются команды:
# lvchange —cachemode writeback ssdcache
# lvchange —cachemode writethrough ssdcache
Если вам нужно заменить SSD диск, обязательно нужно удалить кэш:
# lvconvert —uncache /dev/ssdcache/hdd_data
# lvremove /dev/ssdcache/ssd_meta
# vgreduce ssdcache /dev/sdb
# pvremove /dev/sdb
После этого вы смело можете отключить сервер, заменить диске и добавить кэш заново с помощью следующих команд:
# pvcreate /dev/sdb
# vgextend ssdcache /dev/sdb
# lvcreate -L 16G -n ssd_meta ssdcache /dev/sdb
# lvcreate -l 90%FREE -n ssd_data ssdcache /dev/sdb
# lvconvert —type cache-pool —poolmetadata ssdcache/ssd_meta ssdcache/ssd_data
# lvconvert —type cache —cachemode writeback —cachepool ssdcache/ssd_data
На этом работа по настройке SSD-кэширования окончена. Определить скорость работы ssd-кэша обычными утилитами для замера операций чтения/записи, невозможно. Скорость будет такая же как на обычном SATA диске, но это все из-за специфики работы кэша, как ранее мы описывали, он срабатывает именно для “горячих” данных. При тестировании работы в различных приложениях, повышение скорости действительно ощутимо, где-то в 3-4 раза.
Источник


