- SSD Samsung EVO и Windows Server 2012 Embedded. Установка. Будут ли проблеммы?
- Записки IT специалиста
- Файловый сервер. Влияние SSD на производительность.
- Что и как мы тестировали.
- Файловые операции.
- Мультимедиа
- Воспроизведение
- Запись.
- Выводы.
- Обеспечение высокой производительности Локальных дисковых пространств Performance tuning for Storage Spaces Direct
- Monitor Storage Tiers Performance in Windows Server 2012 R2
- In this topic
- How storage tiers optimize performance
- Leave room for tuning when you create storage spaces
- Recommended monitoring frequency
- What to use
- Save a report when Storage Tiers Optimization runs
- To change the Storage Tiers Optimization task to save a report (Task Scheduler)
- To change the Storage Tiers Optimization task to save a report (command line)
- Run Storage Tiers Optimization on demand
- To run Storage Tiers Optimization on demand (Task Scheduler)
- To run Storage Tiers Optimization on demand (Windows PowerShell)
- To optimize storage tiers using Defrag.exe
- What to watch for
- Is the SSD tier capacity sufficient for my workload?
- Provide additional SSD tier capacity for a workload
- To add capacity to the SSD tier (Server Manager)
- Are storage tiers being optimized frequently enough for the workload?
- Change the task frequency for Storage Tiers Optimization
- When should I consider pinning files to a storage tier?
- Pin a file to a storage tier
- Monitor the effects of pinned files on storage tiers performance
- Use performance counters to monitor storage tiers
- Counter descriptions: Tier object (Storage Spaces)
SSD Samsung EVO и Windows Server 2012 Embedded. Установка. Будут ли проблеммы?
Вчера пришел Samsung EVO 950, хотели поставить Windows Server 2008 r2.
Не получается. И диска не видит и другие проблемы при установке.
Процессор у меня core i7-7700, почитал, майкрософт не рекомендуют ставить процессоры 7-ого поколения на Windows 7 и Windows Server 2008.
Будем ставить Windows Server 2016. Хотя бубен уже достали, так как и он не видит Samsung EVO 950
(4) Сейчас наш сисадмин этим занимается. Ни разу такого не делал, изучает этот вопрос.
Но Windows Server 2016 решили ставить из-за рекомендации майкрософта, да и все таки Windows Server 2008 староват.
(8) Я вчера долго смеялся. 21 век, а windows поставить стало сложнее, чем 10 лет назад.
Раньше вставил диск. Далее, далее, далее, готово.
Сейчас: то ему не нравиться внешний DVD-привод, то драйверов на диски нет, то windows не та, то процессор не совместим, смешно )))
(8) ну так надо хоть немного быть в теме. Сколько уж лет надо биос обновлять под новые процы. Админ там в вакууме что-ли живет?
(10) сейчас еще проще. Ставил и Windows 10 и Windows Server 2016, на разные SSD, никаких проблем не было.
Возможно, есть нюансы с материнками и всякими UEFI режимами, о которых вы не подозреваете. Возможно, есть нюансы с SSD в исполнении PCI-E или M.2, но с SATA 2.5″ не было никаких проблем.
(12) Нет матплату пришлось вернуть, никакие прошивки БИОСа там не помогли.
Проблемы с установкой. Это я про отдельные случаи написал. В основном тоже проблем нет.
Но вот с этой железкой админ уже второй день мучается.
(10) представляешь, не все так просто с такой кучей разновидностей платформ и железа. Я уже 20+ лет с компами вожусь и каждый раз какая-то новая фигня или ошибка, и надо чуть подумать чтобы ее обойти.
На прошлой неделе ставил Win 10 с кардридера и SD карточка с фотоаппарата никак не виделась как загрузочная, в итоге выяснилось, что образ диска Rufus-ом не так записал на нее, поверил настройкам по-умолчанию. Всегда будут нюансы, и только с опытом более-менее быстро их разрешаешь.
Записки IT специалиста
Технический блог специалистов ООО»Интерфейс»
- Главная
- Файловый сервер. Влияние SSD на производительность.
Файловый сервер. Влияние SSD на производительность.

Около года назад мы провели тестирование различных ОС и файловых систем, изучая их влияние на производительность файлового сервера. Сегодня, когда в обиход плотно входят твердотельные накопители (SSD) и выпущен релиз Samba c поддержкой протокола SMB2, наступило время провести новое тестирование, чтобы на практике выяснить, какие новшества действительно несут увеличение производительности, а какие представляют собой маркетинговые ходы.
Что и как мы тестировали.
Наше сегодняшнее исследование преследует две цели: изучить влияние SSD на производительность файлового сервера и ознакомиться с возможностями новой Samba с поддержкой протокола SMB2. Тестовая платформа осталась прежней, что дает возможность сравнить сегодняшние результаты с результатами прошлогоднего тестирования.
Для тестирования использовались: жесткий диск Western Digital Caviar Blue емкостью 500 Гб массовой «синей» серии.
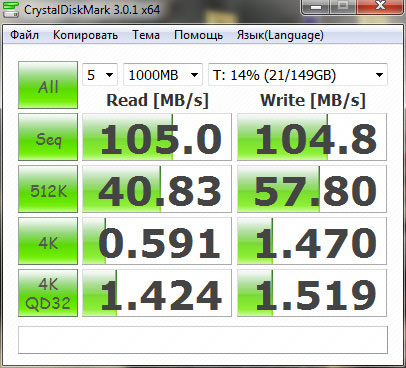
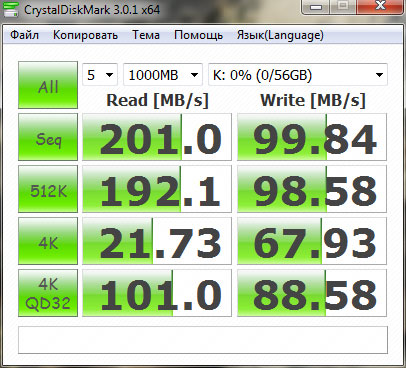
И твердотельный накопитель (SSD) OCZ Agility 2 емкостью 60 Гб, также относящийся к бюджетной серии.
Из программного обеспечения мы выбрали Windows Server 2008 R2 и Ubuntu Server 11.04, и файловые системы NTFS и ext4 соответственно. Почему Ubuntu Server 11.04, а не 10.04 LTS? Все просто, команда TRIM, без которой использование SSD лишено всякого смысла, поддерживается начиная с ядра 2.6.33 и в состав Ubuntu Server 11.04 входит Samba 3.5.8 которая поддерживает SMB2 (по умолчанию эта опция отключена).
Для тестирования использовался пакет Intel NASPT 1.0.7 работающий в среде Windows 7 32-бита. Для каждой конфигурации проводилось 5 прогонов теста, предварительно было проведено еще 5 прогонов для «прогрева» кэша. Ниже приведены средние результаты, округленные до целых значений.
Файловые операции.
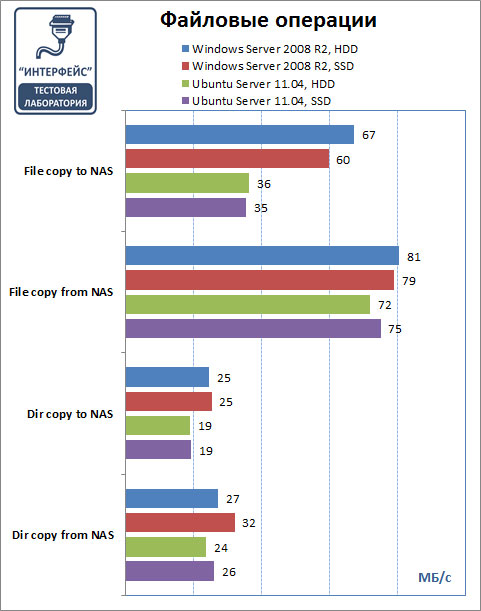
Появление поддержки SMB2 в Samba дает свои плоды, результаты Ubuntu Server, в большинстве тестов приближаются к результатам Windows Server 2008 R2 и говорить о безоговорочном лидерстве последнего уже не приходится. Однако Ubuntu Server имеет определенные проблемы с записью, что хорошо видно в тесте File copy to NAS.
Что касается SSD, то в данной группе тестов преимущество весьма сомнительно, очевидно, что в данном случае решающую роль играет реализация сетевого протокола, нежели быстродействие файловой системы, хотя в реальных условиях SSD все таки покажет лучшие результаты, об это мы расскажем ниже.
Мультимедиа
Воспроизведение
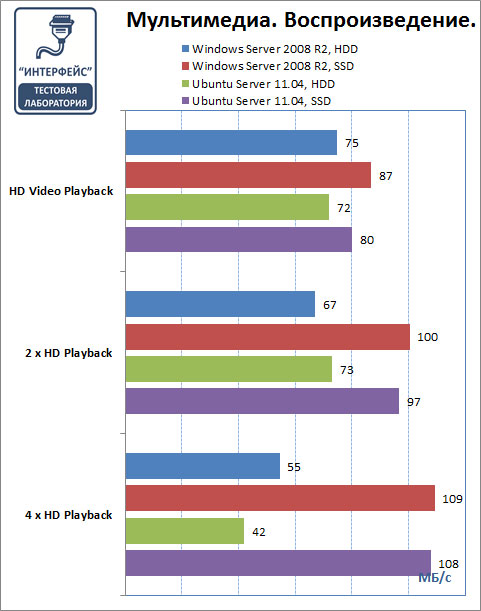
Здесь Ubuntu Server и Windows Server идут практически вровень и выделить лидера не представляется возможным, разница находится в области погрешности измерений. И как раз здесь SSD проявляют себя во всей красе: в то время как HDD с ростом числа клиентов начинает резко снижать производительность, SSD не только поддерживает ее на прежнем уровне, но и имеет тенденцию к увеличению. Собственно данный пример хорошо показывает различие меду механическими и твердотельными накопителями, последние имеют гораздо более высокую скорость произвольного доступа, что хорошо продемонстрировал данный тест. В условиях многопользовательского доступа SSD однозначно предпочтительнее HDD.
Запись.
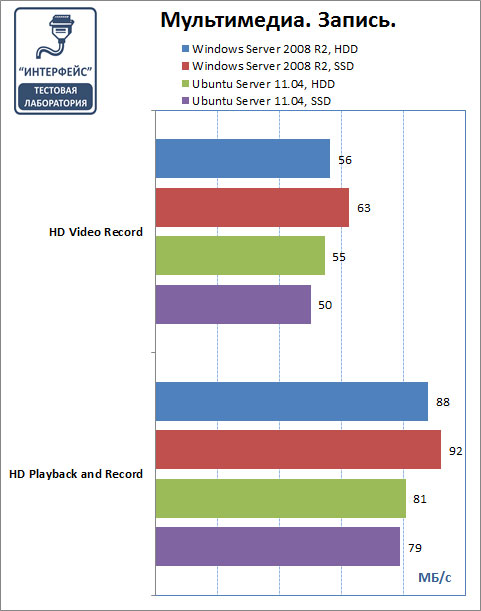
На запись результат довольно таки ровный, явного преимущества SSD здесь нет, т.е. опять на первый план выходят сетевые протоколы, а не быстродействие дисковой подсистемы. Что касается Ubuntu, то хорошо видны преимущества SMB2, система идет «дыша в затылок» Windows.
Выводы.
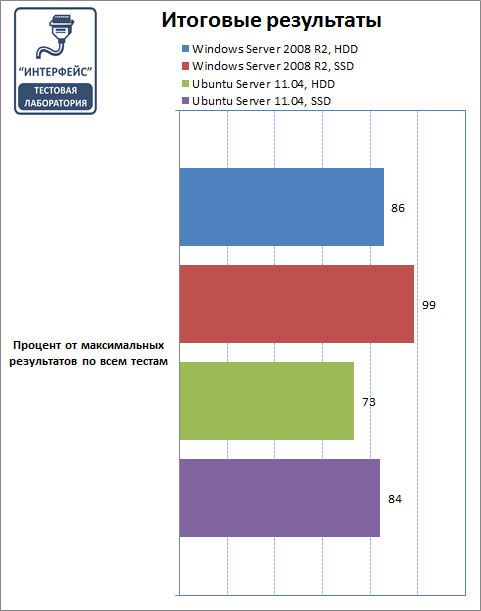
Итоговые результаты выглядят возможно не так, как представляли себе читатели. Да, приходится признать, для большинства операций файлового сервера SSD не дают никаких преимуществ. Однако следует принять во внимание, что SMB2 даже при использовании массовых HDD практически полностью использует гигабитный канал и дальнейший рост производительности ограничен пропускной способностью сети.
В то же время SSD показывает отличные характеристики при увеличении числа клиентов, в то время как HDD диски начинают довольно существенно снижать производительность. Из чего можно сделать вывод, что переход на SSD для файловых серверов оправдан при большом количестве клиентских подключений, если же вы ожидаете увеличение скорости доступа к общему ресурсу, то вынуждены вас разочаровать — этого не произойдет.
Также неоднозначно выглядит сравнение Windows Server и Ubuntu Server, последний показал более низкие, но вполне сравнимые результаты, а с учетом того, что Samba и Ubuntu Server ничего не стоят, данное решение является весьма привлекательным для малого и среднего бизнеса.
В общем, можно сказать следующее: хотите сэкономить — берите Ubuntu Server, нужна высокая нагрузочная способность — ставьте SSD. Windows Server R2 в роли файлового сервера рекомендуем использовать для высоконагруженных систем или когда требуется плотная интеграция с Active Directory.
Дополнительные материалы:
Помогла статья? Поддержи автора и новые статьи будут выходить чаще:
Или подпишись на наш Телеграм-канал: 
Обеспечение высокой производительности Локальных дисковых пространств Performance tuning for Storage Spaces Direct
Локальные дисковые пространства — это программно-определяемое хранилище на основе Windows Server. Оно автоматически оптимизирует свою производительность, избавляя от необходимости вручную указывать число столбцов, конфигурацию кэша оборудования, которое используется, и другие факторы, которые приходится настраивать вручную для общих хранилищ SAS. Storage Spaces Direct, a Windows Server-based software-defined storage solution, automatically tunes its performance, obviating the need to manually specify column counts, the cache configuration of the hardware you use, and other factors that must be set manually with shared SAS storage solutions. Справочные сведения см. в разделе Локальные дисковые пространства в Windows Server 2016. For background info, see Storage Spaces Direct in Windows Server 2016.
Кэш шины программного хранилища Локальных дисковых пространств настраивается автоматически в зависимости от типа хранилищ в системе. The Storage Spaces Direct Software Storage Bus Cache is automatically configured based on the types of storage present in the system. Распознаются три типа: жесткий диск, SSD и NVMe. Three types recognized: HDD, SSD and NVMe. Кэш использует самое быстрое хранилище для кэширования чтения и (или) записи соответственно, а более медленное хранилище используется для постоянного хранения данных. The cache claims the fastest storage for read and/or write caching, as appropriate, and uses the slower storage for persistent storage of data.
Ниже представлена сводная таблица конфигураций по умолчанию. The following table summarizes the defaults:
| Типы хранилищ Storage Types | Конфигурация кэша Cache Configuration |
|---|---|
| Любой отдельный тип Any Single Type | Если имеется хранилище только одного типа, то кэш шины программного хранилища не настраивается. If there is only one type of storage present, the Software Storage Bus Cache isn’t configured. |
| SSD и жесткие диски HDD или NVMe и жесткие диски SSD+HDD or NVMe+HDD | Самое быстрое хранилище настраивается в качестве уровня кэша и кэширует операции чтения и записи. The fastest storage is configured as the cache layer and caches both reads and writes. |
| SSD и SSD или NVMe и NVMe SSD+SSD or NVMe+NVMe | Комбинации быстрых носителей нацелены на сочетание хранилищ с низкой и высокой износостойкостью. Например, для кэша могут использоваться SSD-устройства флэш-памяти NAND, выдерживающие 10 перезаписей накопителя в день (DWPD), а для хранения данных — SSD-устройства флэш-памяти NAND с ресурсом в 1,5 DWPD. These fast+fast options are targeted to combinations of higher and lower endurance storage, for instance 10 drive writes per day (DWPD) NAND flash SSD for cache and 1.5 DWPD NAND flash SSD for capacity. Для реализации подобных систем Локальным дисковым пространствам предоставляется набор строк модели для определения устройств кэша. They’re enabled by giving Storage Spaces Direct a set of Model strings to identify cache devices with. Дополнительные сведения см. справочнике по командлету Enable-StorageSpacesDirect ( CacheDeviceModel ). For more information see the Enable-StorageSpacesDirect cmdlet reference ( CacheDeviceModel ). В системе, сочетающей только быстрые накопители, кэшируются только операции записи. In a fast+fast system, only writes are cached. Операции чтения не кэшируются. Reads aren’t cached. |
Обратите внимание на то, что кэширование устройств SSD и NVMe по умолчанию относится только к операциям записи. Note that caching over an SSD or NVMe device defaults to write caching, only. Это делается намеренно: так как накопитель работает быстро, то скорость перемещения считанного содержимого на устройства кэша ограничена его производительностью. The intention is that since the capacity device is fast, there is limited value in moving read content to the cache devices. Это не всегда так, однако следует соблюдать осторожность, так как включение кэша чтения может напрасно тратить ресурсы устройства кэша без видимого прироста производительности. There are cases where this may not hold, though care should be taken since enabling read cache may unnecessarily consume cache device endurance for no increase in performance. Ниже приведены возможные примеры. Examples may include:
- NVme и SSD Включение кэша чтения позволит ускорить операции ввода-вывода при чтении за счет преимуществ подключения PCIe и (или) более высокой производительности операций ввода-вывода устройств NVMe по сравнению с объединенными устройствами SSD. NVme+SSD Enabling read cache will allow read IO to take advantage of the PCIe connectivity and/or higher IOPS performance of the NVMe devices as compared to the aggregated SSD.
Это может иметь место в сценариях, ориентированных на пропускную способность, ввиду разницы в пропускной способности устройств NVMe и адаптера шины, подключающегося к устройствам SSD. This may be true for bandwidth-oriented scenarios due to the relative bandwidth capabilities of the NVMe devices vs. the HBA connecting to the SSD. Это может не иметь место в ситуациях, когда стоимость операций ввода-вывода в секунду для ЦП может ограничивать системы, не позволяя увеличить производительность. It may not be true for IOPS-oriented scenarios where CPU costs of IOPS may limit systems before the increased performance can be realized. - NVMe и NVMe Аналогично, если скорость чтения кэша NVMe выше, чем скорость совокупного хранилища NVMe, то включение кэша чтения может иметь смысл. NVMe+NVMe Similarly, if the read capability of the cache NVMe are greater than the combined capacity NVMe, there may be value in enabling read cache.
Удачные случаи применения кэша чтения в таких конфигурациях, скорее всего, будут нетипичными. Good cases for read cache in these configurations are expected to be unusual.
Чтобы просмотреть и изменить конфигурацию кэша, используйте командлеты Get-ClusterStorageSpacesDirect и Set-ClusterStorageSpacesDirect. To view and alter the cache configuration, use the Get-ClusterStorageSpacesDirect and Set-ClusterStorageSpacesDirect cmdlets. Свойства CacheModeHDD и CacheModeSSD определяют, как кэш функционирует на носителе указанного типа. The CacheModeHDD and CacheModeSSD properties define how the cache operates on capacity media of the indicated type.
Monitor Storage Tiers Performance in Windows Server 2012 R2
Applies To: Windows Server 2012 R2
To make sure your storage tiers are optimizing performance of your storage spaces efficiently in Windows Server 2012 R2, you should evaluate the performance of your storage configuration after a few days, when your workloads have run long enough to become established and predictable, and then check a few simple data points each week in a Storage Tier Optimization Report to make sure the storage tiers are performing optimally. Use performance counters for the Tier object to gather additional data about Reads and Writes to the tiers.
In this topic
How storage tiers optimize performance
If you’re using tiered storage spaces in Windows Server 2012 R2, Windows is automatically optimizing your storage performance by transparently moving the data that’s accessed most frequently to your faster solid-state drives (the SSDВ tier) and switching out less active data to your less expensive hard disk drives (the HDDВ tier).
Storage tiers optimization is a two-part process, as shown below:
Over the course of the day, Storage Spaces creates a heat map of the data based on how often each piece of data is accessed. (1)
During its nightly run (at 1:00 a.m., by default), the Storage Tiers Optimization task moves the most frequently accessed («hot») data to your faster solid-state drives (the SSDВ tier) and the «cooler» data to the less expensive hard disk drives (the HDDВ tier). (2)
.jpeg)
Optimization moves data, not files—The data is mapped and moved at a sub-file level. So if only 30В percent of the data on a virtual hard disk is «hot,» only that 30В percent moves to your solid-state drives.
A write-back cache backed by SSDs minimizes the impact of random writes—In addition, a 1 GB write-back cache backed by SSDs reduces the latency of random writes, which increases the overall throughput performance of the storage.
This typically delivers very efficient storage management with little or no intervention on your part. However, you might occasionally need to adjust the storage tiers configuration to get the performance you want for a specific workload.
Leave room for tuning when you create storage spaces
When you create storage spaces, plan ahead, and give yourself room to fine-tune the storage spaces after you observe your workloads in action. After a week or two of observing input/output operations per second (IOPS) and latency, you’ll be able to more accurately predict the storage requirements of each workload. Designing your storage spaces
Don’t allocate all available SSD capacity for your storage spaces immediately—Keep some SSD capacity in the storage pool in reserve (in addition to what you reserve for rebuilding failed disks) so you’ll be able to increase the size of an SSDВ tier when a workload needs it.
Don’t pin files to storage tiers until you see how well Storage Tiers Optimization can optimize storage performance—When a tenant or workload requires a particular level of performance, you can pin files to a storage tier to ensure that all I/O activity is performed on that tier. The entire file is moved to the tier, and then is excluded from Storage Tiers Optimization. If Storage Tiers Optimization can efficiently move only the frequently accessed data to the SSDВ tier, you can avoid storing entire large files such as virtual hard disks on your more expensive solid-state drives.
Do consider pinning the parent VHDX file to the SSD tier if you’re providing pooled desktops through VDI—If you’re using Virtual Desktop Infrastructure (VDI) to provide pooled desktops for users (you might know these as non-persistent desktops or dynamic desktops), consider pinning the master image that’s used to clone users’ desktops to the SSDВ tier if you have the needed SSD capacity. (You might also need to run Storage Tiers Optimization more than once a day.)
Recommended monitoring frequency
After you observe your workloads for a few days, review a Storage Tier Optimization Report, and then fine-tune the configuration of your storage spaces to meet workload requirements. To get a report, run Storage Tiers Optimization on demand.
After that, review a history of storage tiers optimizations weekly in the Storage Tier Optimization Report. The easiest way to get a report is to change the Storage Tiers Optimization scheduled task to save a report.
If you’re experiencing performance issues and want to optimize storage tiers outside the usual schedule, run Storage Tiers Optimization on demand.
What to use
Use the Storage Tier Optimization Report to check the performance of your storage tiers and identify changes that might optimize their performance.
Be aware that when you request a Storage Tier Optimization Report, your storage tiers are optimized as part of the reporting process before the report is displayed. That can take several hours. That’s why we recommend that you save a report automatically when the Storage Tiers Optimization task runs. That requires changing the scheduled task, as described below. To keep a record of storage tiers performance over time, configure the task to append the new data to the end of the file instead of overwriting it.
Save a report when Storage Tiers Optimization runs
You can change the Storage Tiers Optimization task to save a report by using Task Scheduler in Server Manager or from the command line.
To change the Storage Tiers Optimization task to save a report (Task Scheduler)
In Server Manager, open Task Scheduler (on the Tools menu).
In the Task Scheduler console tree, expand Task Scheduler Library > Microsoft > Windows, and click Storage Tiers Management.
Open the properties of the Storage Tiers Optimization task.
On the Actions tab, click Start a program, and then click Edit.
In Add arguments, add the instruction to save an output file to the default arguments:
Example entry: /c /h /g /# >> C:\Windows\StorageReports\StorageTiersOutput.txt
This string requires a literal path—you can’t use environment variables such as %windir% to indicate the system folder.
To change the Storage Tiers Optimization task to save a report (command line)
Run the following command at an elevated command prompt:
Run the example command as it is to save the data in a StorageTiersOutput.txt file in the Windows installation folder. You can substitute any path or filename.
The >> appends the latest data to the existing file so you can compare performance data over time. If you prefer to overwrite the previous data each time the task runs, use a single > instead.
Run Storage Tiers Optimization on demand
To perform Storage Tiers Optimization on demand, you can either run the Storage Tiers Optimization task—either in Task Scheduler or Windows PowerShell—or you can run defrag.exe with the appropriate parameters.
You can’t use some of the storage cmdlets with Windows PowerShell (x86) or Windows PowerShell ISE (x86). Instead, use the normal (64-bit) Windows PowerShell or Windows PowerShell ISE.
To run Storage Tiers Optimization on demand (Task Scheduler)
In the Task Scheduler console tree, expand Task Scheduler Library > Microsoft > Windows, and click Storage Tiers Management.
Right-click the Storage Tiers Optimization task, and click Run.
To run Storage Tiers Optimization on demand (Windows PowerShell)
Open Windows PowerShell with administrator rights, and run this command. (You’ll only get a report if you’ve updated the task to save one.)
To optimize storage tiers using Defrag.exe
Enter the following command at an elevated command prompt:
This command optimizes storage tiers (/g) on the volume, returning a Post Defragmentation Report and a Storage Tier Optimization Report. Include /h to process the job at normal priority instead of low priority (the default).
What to watch for
There are three things to monitor to ensure your storage tiers perform optimally for each workload:
Is the SSD tier capacity sufficient for my workload?
A quick look at a Storage Tier Optimization Report can tell you whether you have provided sufficient SSD tier capacity to get the I/O optimization—that is, the percentage of I/O serviced by the SSD tier—that you want for the workloads in the storage space. The appropriate performance goal depends on the nature and requirements of a workload.
Detection—If the percentage of I/Os that your SSD tier is currently servicing (at the bottom of the Storage Tier Optimization Report) is lower than the percentage you want for the workloads, check the table at the top of the report to find out the SSD tier size that is required to reach the desired percentage based on current activity of your workloads.
.jpeg)
- You can increase the size of the SSDВ tier or move a workload to a different storage space (to reduce the SSD capacity requirement of the current storage space) at any time. Moving a workload typically involves moving virtual machine storage, which is performed as a background task.
Provide additional SSD tier capacity for a workload
If additional SSD capacity is available for the storage space, you can enlarge the SSDВ tier to meet the needs of a workload. After you resize the tier, you will need to extend the partition and volume for the storage space. You can do this in Server Manager or in Windows PowerShell.
To add capacity to the SSD tier (Server Manager)
In Server Manager, open File and Storage Services (on the Tools menu).
If you’re already working in Server Manager, refresh the display to make sure you’re seeing any recent changes made in Windows PowerShell.
In the console tree, expand Volumes, and click Storage Pools.
Select the storage pool. Then, under Virtual Disks, right-click the storage space and click Extend virtual disk. For a tiered storage pool, you extend individual tiers.
To extend a tier, click Specify size, and enter the total amount of space to allocate to the tier—that is, current size plus the additional space that is needed. Then click OK.
Make sure the resized SSD tier will not encroach on the space that you reserved in the storage pool to support automatic rebuild when a physical disk fails. Guidelines for allocating capacity for storage pools and storage spaces
Open the properties of the storage pool. Note Allocated space (the sum of space allocated to both tiers). You will need to extend the volume to accommodate the allocation.
To extend the volume (this also extends the partition):
In the console tree, click Volumes.
Under Volumes, right-click the volume assigned to the storage space, and click Extend volume.
In the Extend Volume dialog box, enter a larger size to enable use of the expanded tier capacity.
Don’t assign the maximum size. You need to reserve some space for the GPT partitioning scheme. We recommend leaving 256 MB (0.25 GB). That is, resize the partition for a 66GB storage space to 65.75GB.
To add capacity to the SSD tier (Windows PowerShell)
Open Windows PowerShell as an administrator.
Before you resize the SSDВ tier, run the following commands to verify the health of the storage space, the current size of the tier you want to resize, and available capacity. Replace the $StorageSpaceName variable with the friendly name of the storage space.
Commands throughout this procedure use the $StorageSpaceName and $SSDtier variables, with the assumption that you will run all commands in the same Windows PowerShell session. If you open a new Windows PowerShell session, either define the variables again or substitute the friendly name of the storage space or SSD tier for the variable.
Sample output—Shows a tiered storage space, Space01, with:
64 GB capacity (SSD tier = 32 GB, HDD tier = 32 GB)
Volume (D) and partition size of 64.87 GB. Note that the volume and partition are slightly smaller than the storage space capacity. Remaining space is used for the GPT partitioning scheme.
Resiliency setting of Mirror
Add capacity to the SSDВ tier by running the following command. Enter the size in GBs, TBs, or MBs, using this format: 34GB.
Make sure the resized SSD tier will not encroach on the space that you reserved in the storage pool to support automatic rebuild when a physical disk fails. Guidelines for allocating capacity for storage pools and storage spaces
Update the virtualВ disk to incorporate the additional tier size:
Recheck the status of the storage space and its tiers by repeating the commands that you ran in StepВ 2, and note the size of the total allocated space (the sum of allocated capacity for both tiers).
Resize the partition for the storage space (this also resizes the volume). You’ll have to make the partition slightly smaller than the storage space capacity to leave space for the GPT partitioning scheme. We recommend that you reserve 256В MB (0.25В GB) for this purpose. That is, resize the partition for a 66GB storage space to 65.75GB.
Verify the changes to the partition and volume by running the following commands:
Sample output—Shows a healthy volume and partition enlarged to 65.75 GB.
Are storage tiers being optimized frequently enough for the workload?
By default, the Storage Tiers Optimization task runs daily at 1:00 a.m. For large, highly active workloads, more frequent volume optimization might be needed to maintain consistent storage performance throughout the day.
Detection—In the Storage Tier Optimization Report, check whether the actual percentage of I/Os being serviced by the SSDВ tier is about what’s expected for your SSDВ tier size, as shown below. The expected percentage for each tier size is calculated based on the heat map for your storage space. If the actual percentage is a lot lower than expected, you should schedule additional runs of the Storage Tiers Optimization task.
.jpeg)
If your workload is changing more frequently than the current Storage Tiers Optimization schedule supports, you can increase the task frequency or run Storage Tiers Optimization immediately.
Recommended maximum frequency: Every 6 hours
Change the task frequency for Storage Tiers Optimization
To change task frequency for Storage Tiers Optimization (command line)
At an elevated command prompt, enter the following command:
The example sets the run interval to every 360 minutes (6 hours) (/ri 360). There’s nothing to gain by running the task any more frequently.
To change task frequency for Storage Tiers Optimization (Task Scheduler)
In Server Manager, open Task Scheduler (on the Tools menu).
In the Task Scheduler console tree, expand Task Scheduler Library > Microsoft > Windows, and click Storage Tiers Management.
Open properties for the Storage Tiers Optimization task.
On the Triggers tab, click Daily, and then click Edit.
Under Advanced Settings, select Repeat task every, and type in 6 hours (if you want to run Storage Tiers Optimization four times daily). (The trigger should remain Daily.)
When should I consider pinning files to a storage tier?
An administrator can override Storage Tiers Optimization by pinning files to a storage tier to ensure the files are always accessed on the preferred tier.
That’s useful in some circumstances, but we recommend that you pin files sparingly—and only after you observe your workloads to see whether Storage Tiers Optimization can accomplish your goals. Each pinned file on the SSDВ tier reduces the space that can be used for data placement based on the heat map—and the pinned file typically takes up more space on your more expensive solid-state drives than the frequently accessed data that moves there during Storage Tiers Optimization.
When should you consider pinning files to a storage tier?
If you need to guarantee performance levels for workloads—You can pin files to differentiate tenant virtual machines, and the underlying VHD files, based on service-level agreements.
For workloads that require that certain files be pinned to a tier—For example, for VDI pooled desktops, you should pin the parent VHDX file that is used to clone the desktops at startup to the SSD tier.
For workloads that frequently access different data at different times—If a workload’s active working set is not stable, you can get churn from data moving often between the SSDВ tier and the HDDВ tier.
To debug performance issues relating to a tier
To remove streaming media from I/O servicing on the SSD tier—It can be useful to pin the VHDs that store videos and audio files to the HDD tier. These media are accessed sequentially, and can be handled fine by hard disk drives.
Detection–Whether to pin a file to a storage tier is the administrator’s choice based on the requirements and behavior of workloads. You should use pinning sparingly in situations like those noted earlier.
- You can pin a file at any time with no immediate effect on storage performance. Storage Tiers Optimization attempts to move the file to the desired tier during its next run. If you decide to optimize tiers immediately, bear in mind the trade-off between possibly reduced performance during the extra Storage Tiers Optimization run and the added benefit of immediate tier optimization.
Pin a file to a storage tier
Use Windows PowerShell to pin files to a storage tier. This feature is not available in Server Manager.
To be pinned a storage tier, a file must be on a volume that is hosted by the same tiered storage space.
To pin a file to a storage tier (Windows PowerShell)
Open Windows PowerShell as an administrator.
To get the friendly name of the storage tier, run this:
To pin the file to the tier, run this:
This pins the file but doesn’t move it immediately. Storage Spaces will attempt to move the pinned files to the desired volumes during its next Storage Tiers Optimization run.
If you want to move the file now, perform Storage Tiers Optimization on demand:
In Windows PowerShell, run: Get-ScheduledTask -TaskName «Storage Tiers Optimization» | Start-ScheduledTask
At an elevated command prompt, run: defrag : /g /h /#
To verify that a pinned file has been moved to the tier, run the following command in Windows PowerShell, and check the placement status and state of the file:
Sample output:
Monitor the effects of pinned files on storage tiers performance
If you pin files to your storage tiers, you should check the effects of the pinned files on I/O servicing when you review the Storage Tier Optimization Report. At the bottom of the report, you’ll see the total volume of pinned files on each tier, and the percentage of I/O on the tier accounted for by pinned files.
.jpeg)
How you interpret the data depends on why you pinned the files. For example, if you aren’t getting the storage performance that you need for a workload, and pinned files account for a large percentage of I/O serviced by the SSDВ tier, then it’s a good idea to review a list of the pinned files to make sure they all need to be pinned.
To view a list of files pinned to the storage tiers (Windows PowerShell)
Open Windows PowerShell as an administrator, and run the following command:
Use performance counters to monitor storage tiers
You can use the performance counters for the Tier object in Storage Spaces to get additional data that can help you evaluate the following aspects of storage tiers performance:
Check for bottlenecks on a tier—Two performance counters—Tier Transfers/Sec and Tier Queue Length—can probably give you a good idea of whether a bottleneck has developed on a tier.
Review Write latency—Ideally, the SSD tier and the HDD tier have similar Write latency because all Writes to the HDD tier are being absorbed by the write-back cache. A higher Write latency on the HDD tier can indicate a couple of things:
The write-back cache is full and is throttling. Check Bytes Used for the Cache object.
The Writes are large enough to bypass the write-back cache (Writes larger than 256 KB are not written to the cache). Compare Cache Writes/sec (Cache object) with Tier Writes/sec (Tier object).
Review Read performance—Be aware that for Reads, especially in random I/O, the HDD tier is expected to perform more slowly than the SSD tier.
Counter descriptions: Tier object (Storage Spaces)
Avg. Tier Bytes/Transfer
The average size of individual Read and Write requests (I/O size) to the storage tier for the capture interval.
Tier Transfer Bytes/sec
The transfer speed for Read and Write requests to the tier (in bytes per second).
Avg. Tier Queue Length
Measures latency over time—the average number of outstanding Read and Write requests to the tier, including requests currently in service and those waiting for service.
Avg. Tier sec/Transfer
The average time it takes to complete a Read or Write operation on the tier.
The number of transfers completed in the previous second—known as IOPS, or Inputs/Outputs per second. If the capture interval in Performance Monitor is greater than 1 second, the average of the values captured is presented.
Current Tier Queue Length
The number of outstanding Read and Write requests to the tier, including requests currently in service and requests waiting for service.
Avg. Tier Bytes/Write
The average size, including metadata, of individual Write requests that went to the storage tier during the capture interval.
Tier Write Bytes/sec
The average speed of Writes to the tier (in bytes per second).
Avg. Tier Write Queue Length
The average number of outstanding Write requests to the tier, including requests currently in service and requests waiting for service.
Avg. Tier sec/Write
The average number of seconds required per Write on the tier.
Writes per second on the tier. If the capture interval in Performance Monitor is greater than 1 second, the average of the values captured is displayed.
Avg. Tier Bytes/Read
The average size of individual Read requests (I/O size) on the storage tier for the capture interval (in bytes).
Tier Read Bytes/se
The average speed of Reads to the tier (in Bytes per second).
Avg. Tier Read Queue Length
The average number of outstanding Read requests to the tier, including requests currently in service and requests waiting for service.
Avg. Tier sec/Read
Average seconds per Read on the tier.
Reads per second on the tier. If the capture interval in Performance Monitor is greater than 1 second, the average of the values captured is presented.


