- How to install and use SSH on Linux
- Configure SSH on a Local Computer
- Configure SSH on a Remote Computer
- Install SSH server
- Check SSH status
- Find out Server’s IP
- Open SSH port in Firewall
- Connect using SSH
- SSH in FileZilla
- SSH in File Manager
- Forward X
- Transfer files
- Final thoughts
- Как подключиться по SSH
- Что такое SSH?
- Как подключиться по SSH
- 1. Подключение через SSH в Linux
- 2. Подключение через SSH в Windows
- Выводы
- Three SSH GUI Tools for Linux
- PuTTY
- EasySSH
- Terminator
- sudo apt-get install -y terminator
How to install and use SSH on Linux
SSH or Secure Shell allows you to connect between computers and encrypt traffic between them.
For example, I use SSH to connect to my virtual private server and to my office computer. Usually, it works only through the terminal. However, you can connect it to your file manager or use some graphical programs like FileZilla, if you do not want to type commands. You can also use graphical forwarding and open graphical programs from the remote server in your local computer.
SSH is a simple, reliable, and very secure way to establish a connection between computers. In this post, you will learn how to install, configure, and use SSH on Linux. In particular, I will show how to:
Configure SSH on a Local Computer
First, you need to set up your client Linux machine. This is the computer you will use to connect from.
You need to install openssh-client on your Linux computer.
If you also need to use Windows as a client install PuTTY.
Configure SSH on a Remote Computer
Next, configure the computer you want to connect to.
Install SSH server
On the remote computer, you need to install openssh-server .
Obviously, you will need to have physical access to the remote computer to install this package. For example, if it is my office computer, I will go to my office and install this openssh-server program.
Check SSH status
After the installation, check that SSH is running with:
You should see that it is active:
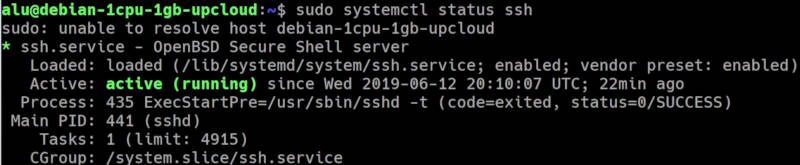
If it has not started, start it manually:
or simply reboot the system.
Find out Server’s IP
Next, you need to determine the IP address of this remote computer.
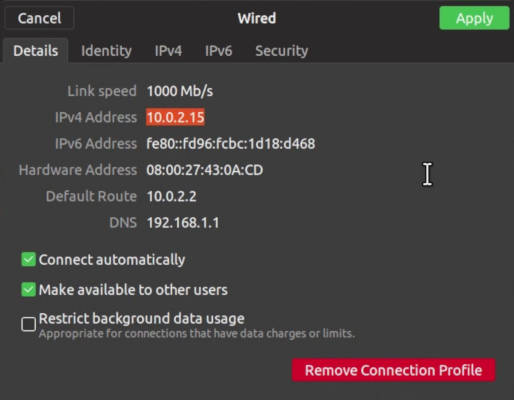
The easiest way is to check the network settings. If you have a graphical desktop in that computer, open the network settings and search for IP address.
This is how it looks in Plasma 5:
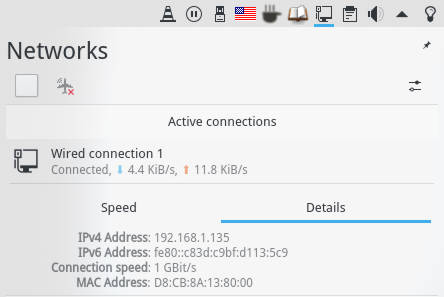
And in Ubuntu GNOME:
If you only have the command line, run:
Usually, you will see your IP address in the eth0 connection.
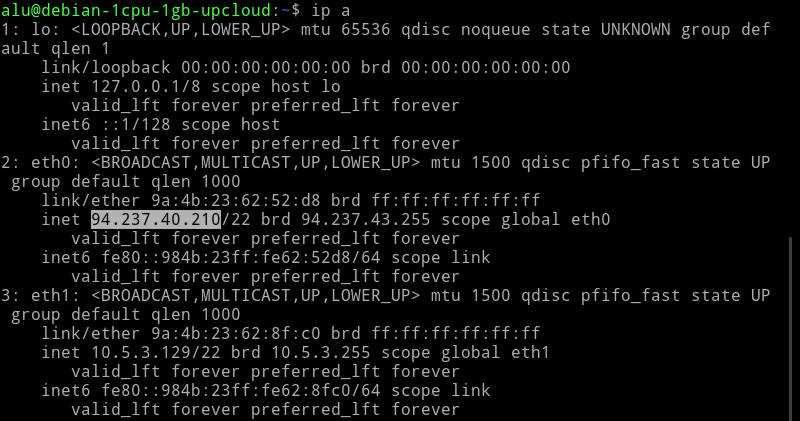
Write down this address, you will need it to be able to connect to this remote computer.
Open SSH port in Firewall
It is possible that you use a firewall and it may block your remote access. So, check open ports:
You should see that port 22 is open. If you do not find port 22 open among open ports, go to your firewall settings and open it.

If you use UFW run this command:
I discuss whether you need a firewall in Linux and how to use it in this post.
Connect using SSH
Now, I assume your remote computer is configured and you are sitting in front of your client Linux machine.
In your client Linux computer, run:
You use the username of the remote computer and the IP address is the address you wrote down in a previous step.
If you get a warning “Are you sure you want to continue connecting (yes/no)?”, type yes.
After you typed the password of your user at the remote computer, you will be logged in to a remote Linux computer.
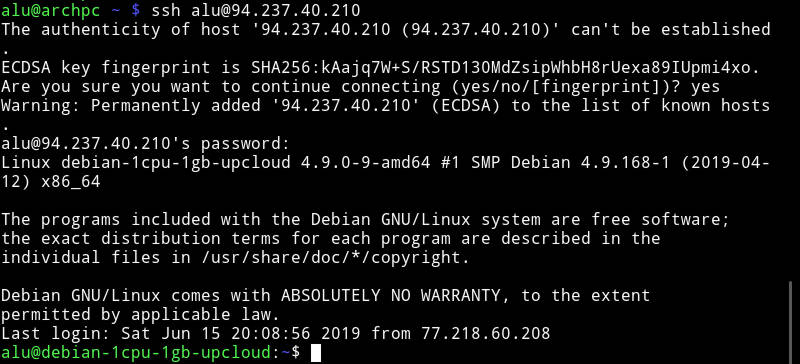
Now, you can work on this remote computer as if you would be sitting in front of that computer and using the terminal.
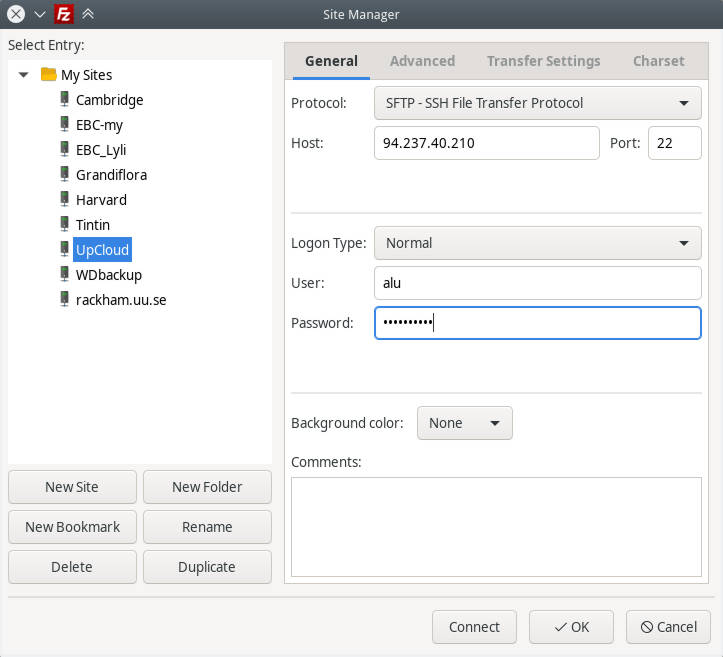
SSH in FileZilla
If you simply want to work with files without running any programs, you can also connect to your remote server with FileZilla.
In FileZilla, go to the Site manager and add a new site with SFTP protocol:
You will get your local files on the left and your remote files on the right.
![]()
You can navigate in FileZilla with your mouse and transfer files between your computers by simple drag-and-drop between these two panels.
SSH in File Manager
Similarly, you can add the remote server to your File Manager. I use Dolphin file manager of Plasma 5 but the procedure is very similar in other file managers.
Go to the Network in your file manager and add a Network folder:
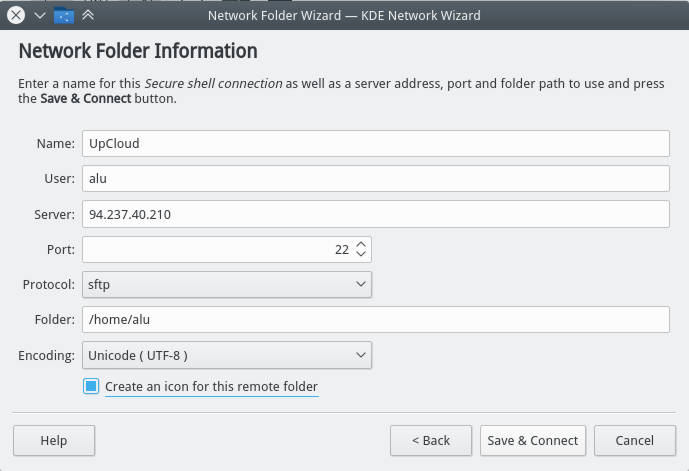
Among these options, select SFTP protocol, give a name to this folder, provide the user name of the remote account, IP address of the remote computer. In the field “remote folder path”, you can use your remote user home folder or any other folder you want to connect to.
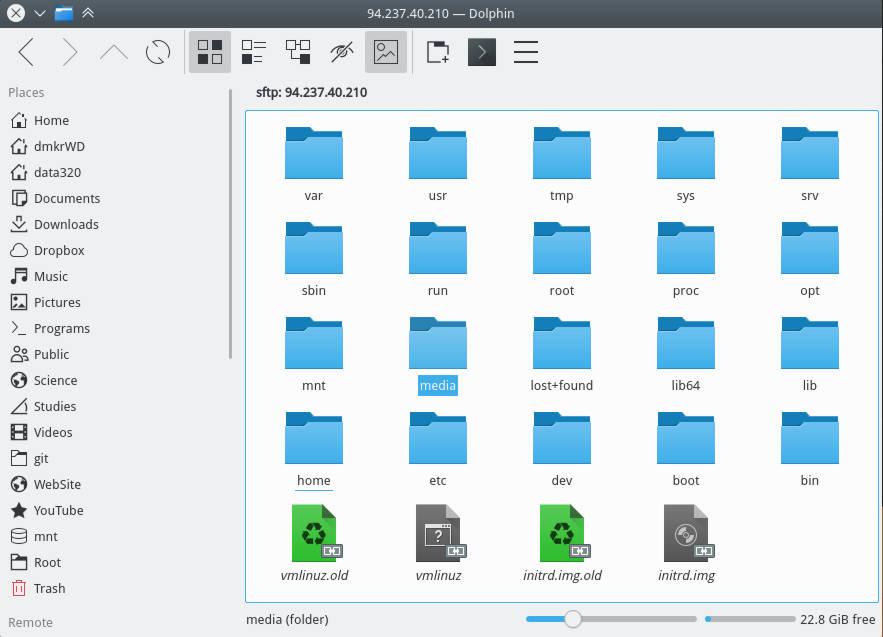
As a result, you will see all the folders and files of your remote computer in your file manager.
Forward X
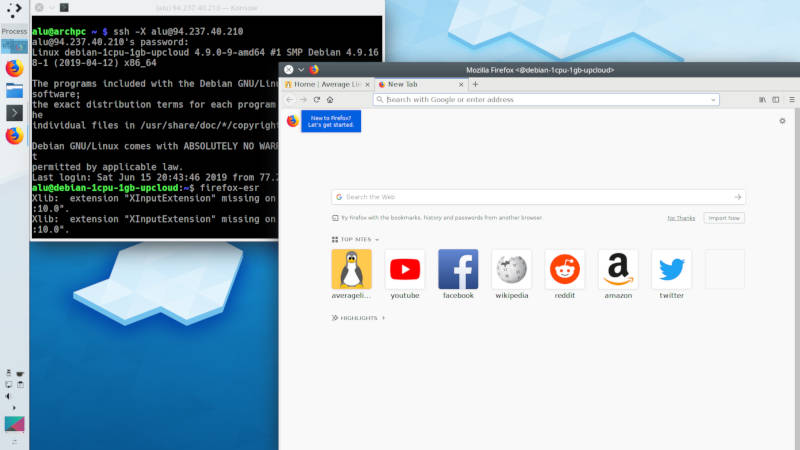
You can also forward graphical application from your remote computer to your local computer. To do that, you simply need to add the option -X during the login.
Now, if you start any graphical program in a remote computer, it will open in your local computer, like this Firefox on the screenshot.
Transfer files
To transfer a file to a remote computer in the terminal run:
And to transfer a file from a remote computer to your local computer simply type first the remote address and then local.
You can also use wild cards to transfer many files at the same time. I showed how to use wild cards in this YouTube video.
Final thoughts
As you have seen SSH is a pretty handy program. It is not difficult to install and use. However, there are some more configurations which I did not cover in this post. For example, you can enhance the security of your ssh connection with SSH keys and white-listed IP addresses. I will cover this topic in the next post. So, subscribe to this blog updates and you won’t miss it.
Источник
Как подключиться по SSH
SSH — это основной протокол для удаленного управления серверами на базе операционной системы Linux. Все действия при подключении к SSH выполняются в командной строке, но при достаточном уровне знаний и привилегий в системе там можно сделать практически все что угодно, в отличие от того же FTP где можно только передавать и редактировать файлы.
Если вы покупаете VPS сервер или продвинутый хостинг, обычно в письме вместе с другими данными авторизации есть данные доступа по SSH. В этой статье мы рассмотрим как подключиться по SSH к серверу из Linux или Windows.
Что такое SSH?
Поскольку эта статья рассчитана именно на новичков, то перед тем, как перейти дальше давайте подробнее разберемся что из себя представляет SSH. Исторически так сложилось что на большинстве серверов используется операционная система Linux, во многом этому посодействовала ее бесплатность. Графический интерфейс на серверах Linux не используется для экономии ресурсов, поэтому единственным способом администрирования сервера остается командная строка.
Но это не является недостатком, потому что в командной строке Linux можно сделать больше чем графическом интерфейсе. Протокол SSH позволяет вам выполнять команды в удаленной системе так, как будто вы это делаете в своей системе. Вам доступен буфер обмена, вы вводите команды и можете использовать их вывод. Недоступны разве что файлы из вашей файловой системы. Например, когда вы подключитесь к серверу по SSH из Ubuntu, то все будет выглядеть так, как будто вы открыли терминал в своей системе.
Как подключиться по SSH
Для подключения по SSH нам необходимо знать такие данные:
- ip адрес сервера, к которому мы собираемся подключится;
- порт, на котором ожидает подключения SSH сервер, по умолчанию используется 22, но в целях безопасности порт подключения ssh часто изменяют;
- имя и пароль пользователя на удаленном сервере.
Больше ничего не нужно, обычно эти данные присылают в письме вместе с описанием VPS. Теперь перейдем к практике.
1. Подключение через SSH в Linux
В Linux подключение по SSH выполняется с помощью утилиты ssh. Мы более подробно рассматривали работу с ней в статье как пользоваться ssh. Для подключения к удаленному компьютеру ее синтаксис будет выглядеть следующим образом:
$ ssh имя_пользователя @ айпи_адрес
Это самый простой вариант, если вам также нужно задать порт, используйте опцию -p:
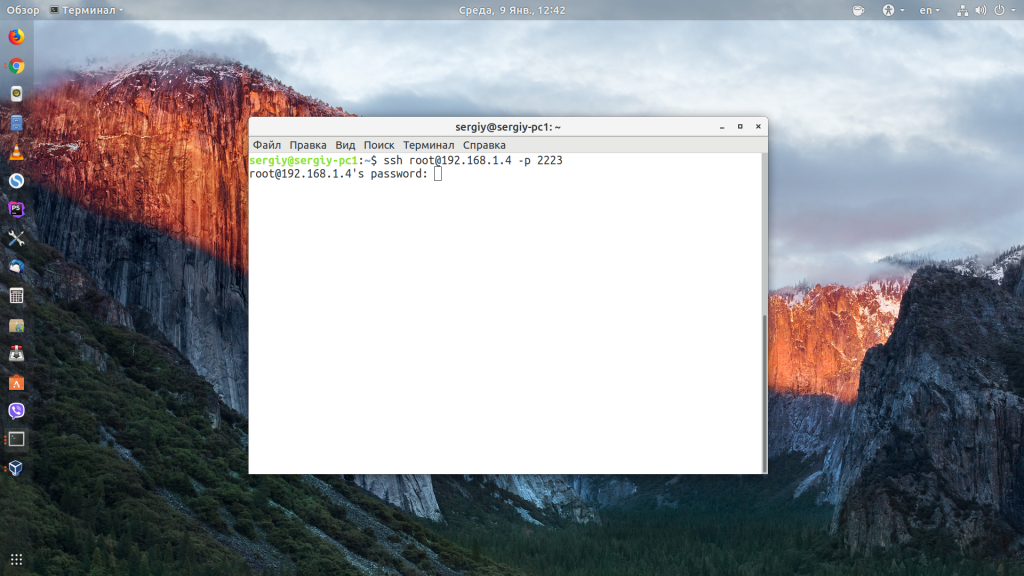
$ ssh имя_пользователя @ айпи_адрес -p порт
Чтобы выполнить подключение по SSH Linux нажмите Ctrl+Alt+T для открытия терминала и наберите команду, заменив нужные значения:
Или, с нестандартным портом:
ssh sergiy@192.168.1.2 -p 2223
Если ip_адрес и порт правильные, то на следующем шаге программа попросит у вас ввести пароль:
Если пытаетесь подключится через SSH к этому серверу первый раз, то утилита также попросит подтвердить добавление нового устройства в свой список известных устройств, здесь нужно набрать yes и нажать Enter:

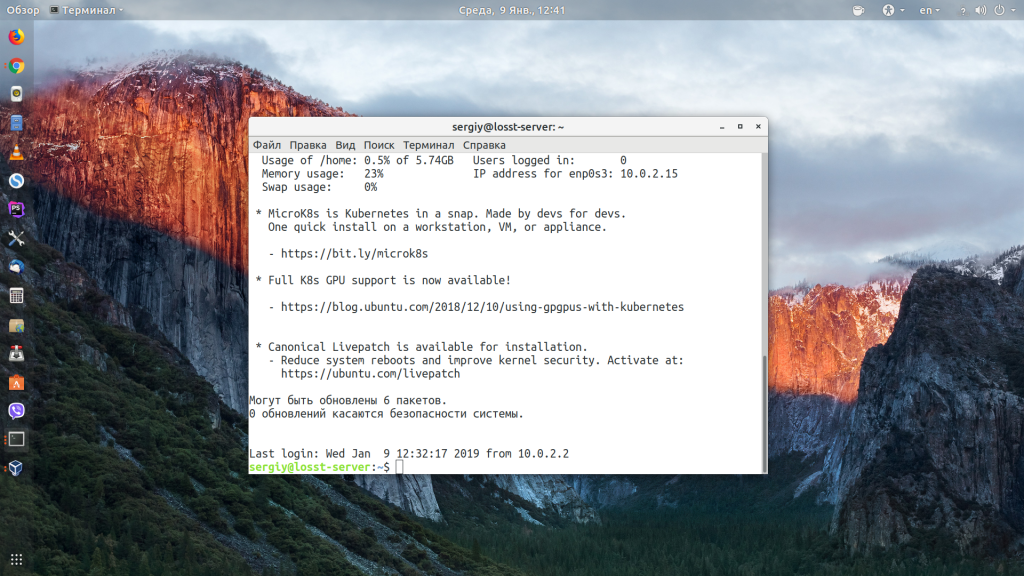
Теперь вы подключены, и все вводимые далее команды будут выполнены на удаленном сервере:
Если же произошла ошибка и IP адрес или порт введены неверно, то вы получите ошибку Connection Refused:
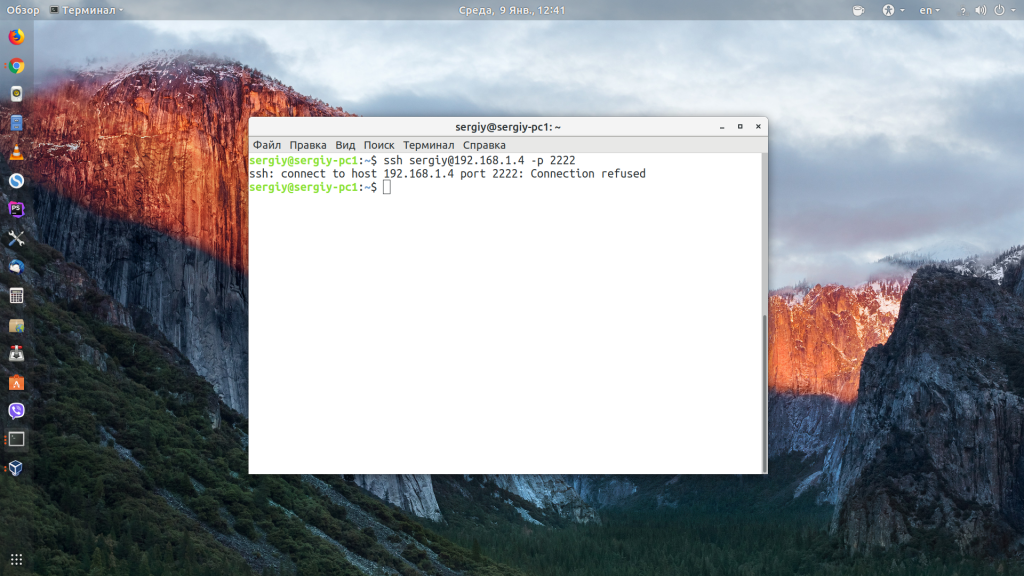
Просто убедитесь что порт введен верно. Если это ваш сервер, то, возможно на нем еще нужно разрешить подключение SSH в брандмауэре. В Ubuntu/Debian для этого на удаленном сервере выполните:
sudo ufw allow 22/tcp
А в CentOS/Fedora:
firewall-cmd —permanent —zone=public —add-port=22/tcp
Если вы используете другой порт для SSH, то замените 22 на свой порт. Для удобства подключения по SSH в дальнейшем можно настроить авторизацию по ключу ssh, чтобы не вводить каждый раз пароль.
Теперь вы знаете как подключиться по ssh linux и решить проблемы с подключением. А теперь перейдем к Windows.
2. Подключение через SSH в Windows
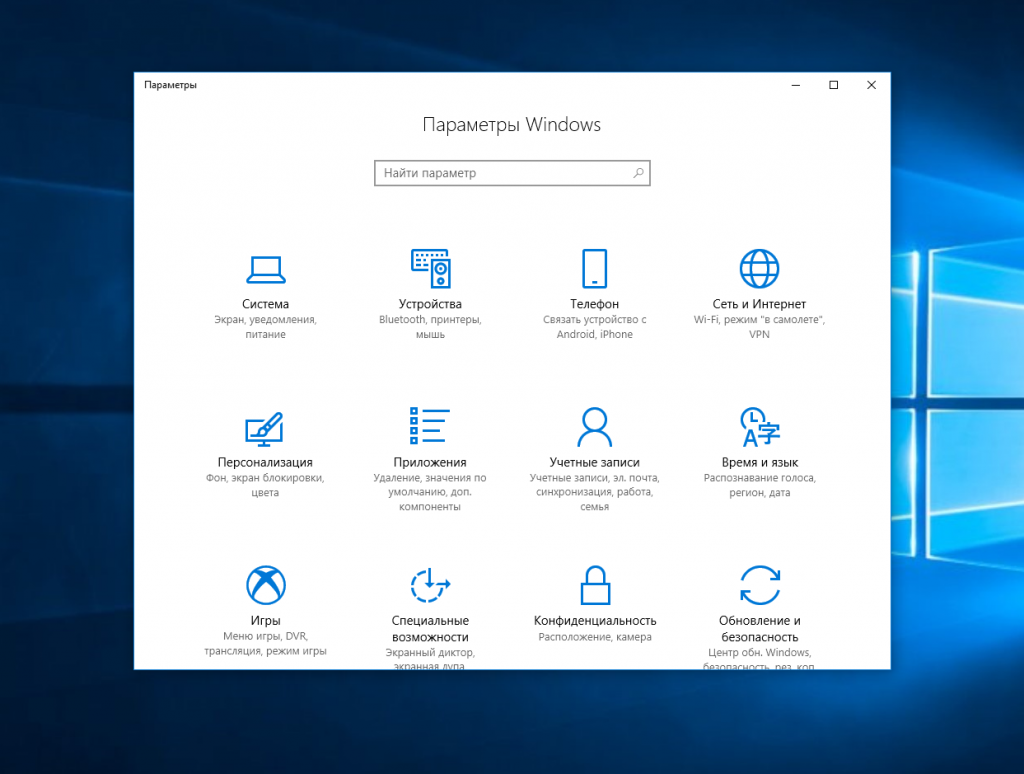
Раньше подключение по SSH из Windows выполнялось только с помощью сторонних утилит, например PuTTY. Но в Windows 10 был добавлен встроенный OpenSSH клиент и работает он точно так же, как и в Linux. По умолчанию этот компонент не активирован. Для его установки откройте Параметры -> Приложения:

Затем выберите Управление дополнительными компонентами:
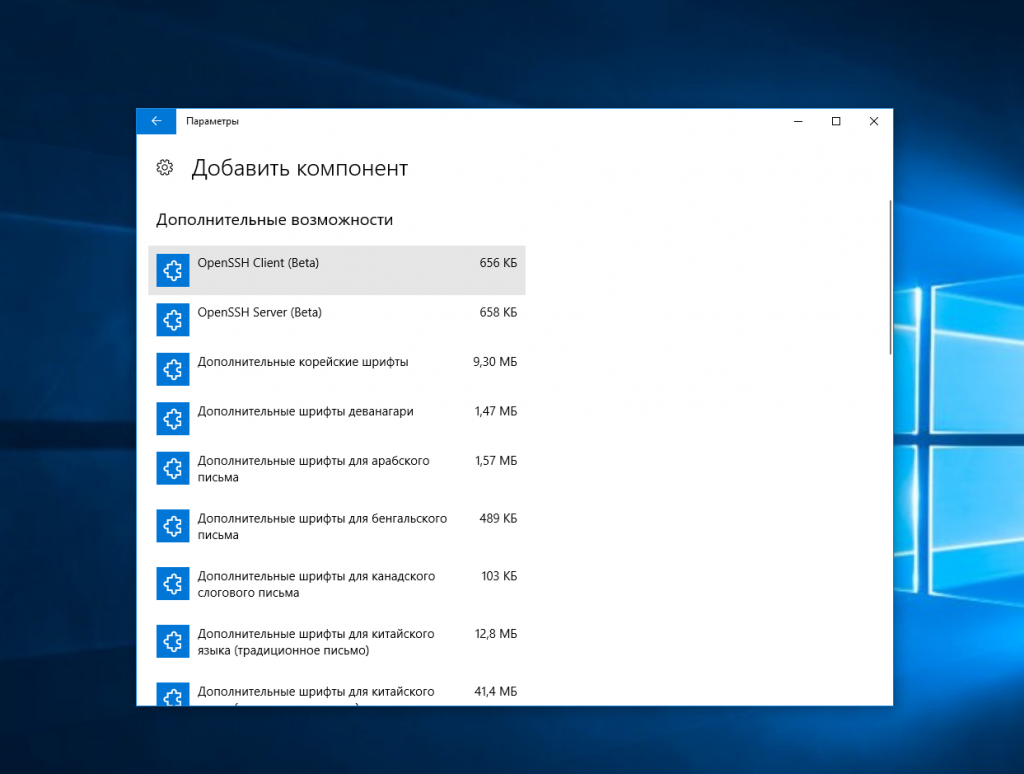
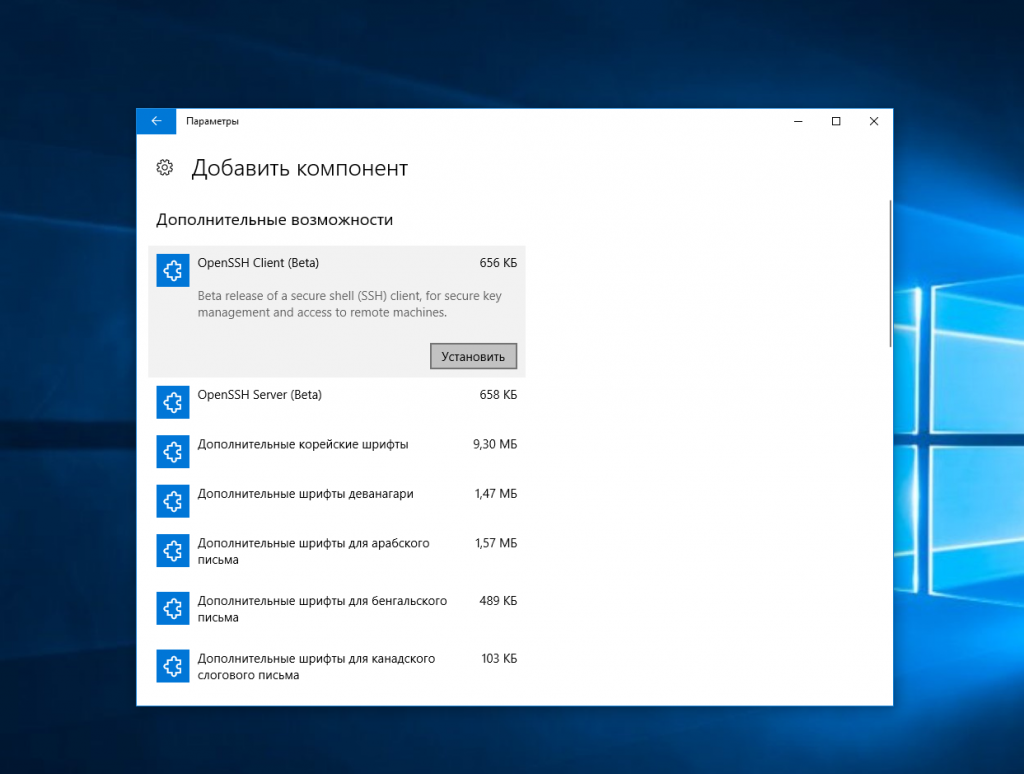
Здесь нажмите добавить новый компонент и в открывлемся меню выберите OpenSSH Client и нажмите Устанвоить:
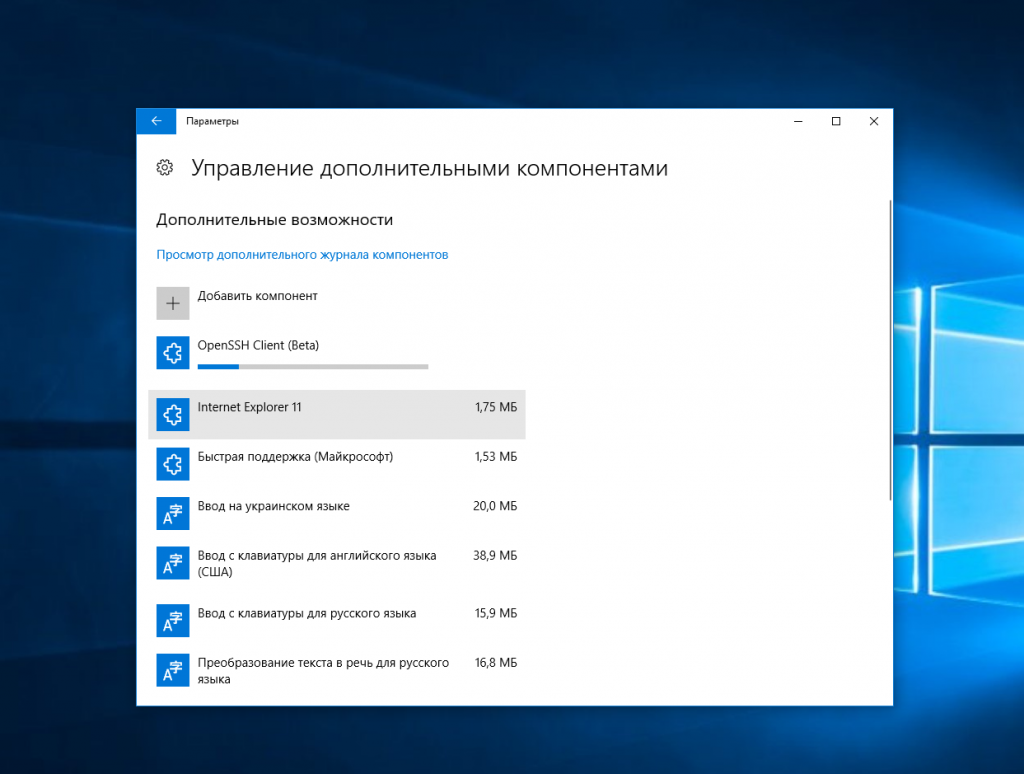
Дальше вернитесь назад и дождитесь завершения установки. После того, как SSH клиент будет установлен нужно обязательно перезагрузить компьютер.
После перезагрузки нажмите Win+R чтобы открыть окно запуска команд и наберите в нем cmd:
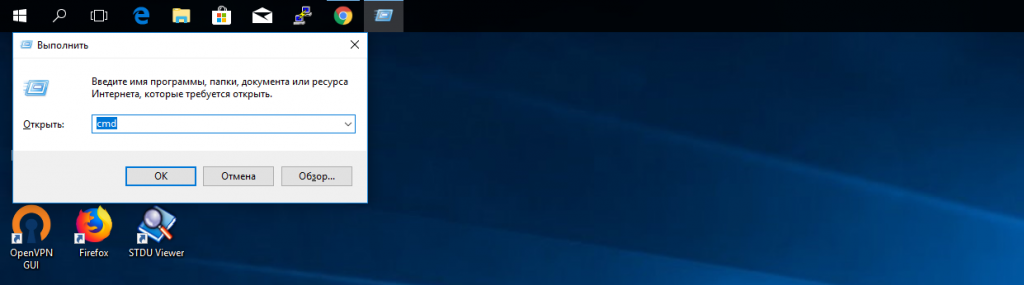
Далее нажмите Enter. Перед вами откроется командная строка Windows. Здесь можно использовать утилиту ssh. Синтаксис у нее абсолютно такой же, как и для Linux:
ssh имя_пользователя @ айпи_адрес -p порт
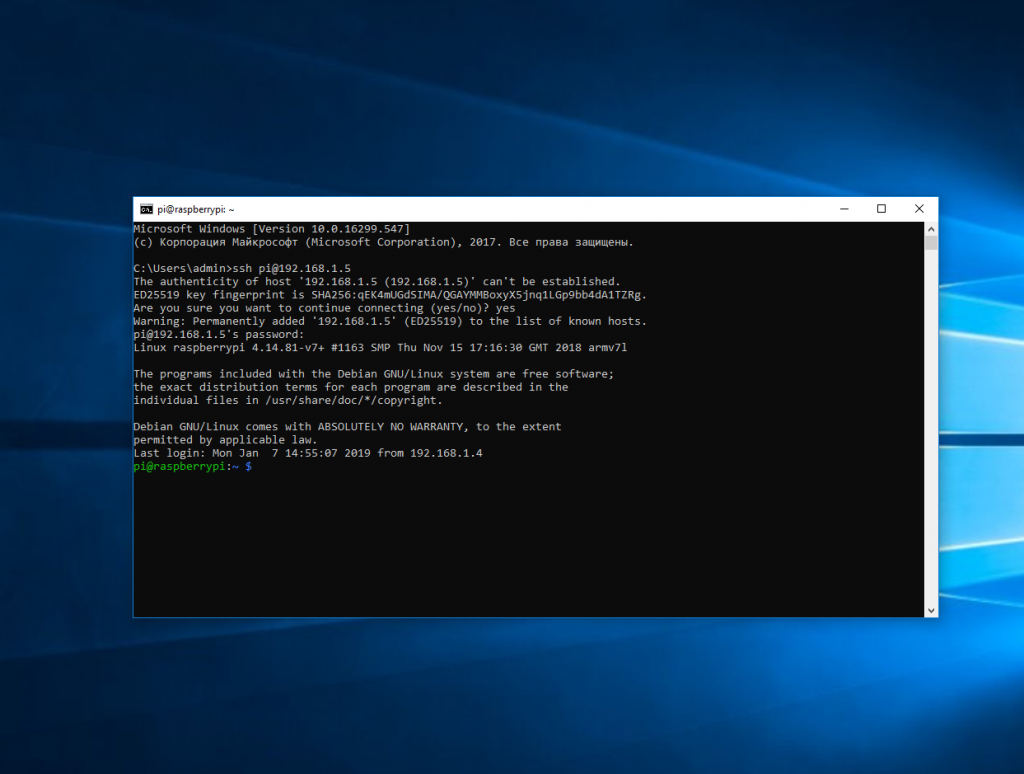
Например, такой командой можно подключится по SSH к Raspberry Pi, который находится в вашей локальной сети по адресу 192.168.1.5:
Утилита предложит добавить устройство в список известных:

Затем предложит ввести пароль:

Все следующие команды будут выполняться уже на Raspberry Pi или другой удаленной машине, к которой вы подключились.
Теперь подключиться к серверу по ssh из этой операционной системы также просто как и из Linux.
Выводы
В этой статье мы рассмотрели как выполняется подключение к серверу по SSH из Linux или Windows. Как видите, это очень просто. А дальше, для работы с удаленным сервером вам понадобятся команды терминала Linux.
Источник
Three SSH GUI Tools for Linux
At some point in your career as a Linux administrator, you’re going to use Secure Shell (SSH) to remote into a Linux server or desktop. Chances are, you already have. In some instances, you’ll be SSH’ing into multiple Linux servers at once. In fact, Secure Shell might well be one of the most-used tools in your Linux toolbox. Because of this, you’ll want to make the experience as efficient as possible. For many admins, nothing is as efficient as the command line. However, there are users out there who do prefer a GUI tool, especially when working from a desktop machine to remote into and work on a server.
If you happen to prefer a good GUI tool, you’ll be happy to know there are a couple of outstanding graphical tools for SSH on Linux. Couple that with a unique terminal window that allows you to remote into multiple machines from the same window, and you have everything you need to work efficiently. Let’s take a look at these three tools and find out if one (or more) of them is perfectly apt to meet your needs.
I’ll be demonstrating these tools on Elementary OS , but they are all available for most major distributions.
PuTTY
Anyone that’s been around long enough knows about PuTTY . In fact, PuTTY is the de facto standard tool for connecting, via SSH, to Linux servers from the Windows environment. But PuTTY isn’t just for Windows. In fact, from withing the standard repositories, PuTTY can also be installed on Linux. PuTTY’s feature list includes:
Connect via IP address or hostname.
Define alternative SSH port.
Connection type definition.
Options for keyboard, bell, appearance, connection, and more.
Local and remote tunnel configuration
X11 tunneling support
The PuTTY GUI is mostly a way to save SSH sessions, so it’s easier to manage all of those various Linux servers and desktops you need to constantly remote into and out of. Once you’ve connected, from PuTTY to the Linux server, you will have a terminal window in which to work. At this point, you may be asking yourself, why not just work from the terminal window? For some, the convenience of saving sessions does make PuTTY worth using.
Installing PuTTY on Linux is simple. For example, you could issue the command on a Debian-based distribution:
Once installed, you can either run the PuTTY GUI from your desktop menu or issue the command putty . In the PuTTY Configuration window ( Figure 1 ), type the hostname or IP address in the HostName (or IP address) section, configure the port (if not the default 22), select SSH from the connection type, and click Open.
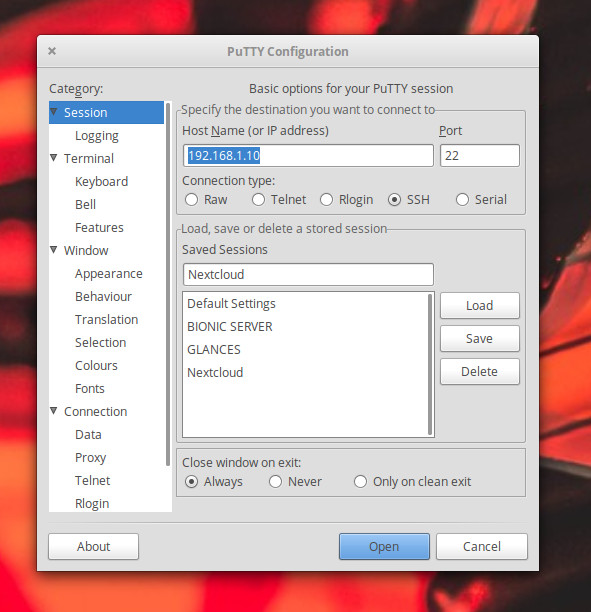 Figure 1: The PuTTY Connection Configuration Window.
Once the connection is made, you’ll then be prompted for the user credentials on the remote server ( Figure 2 ).
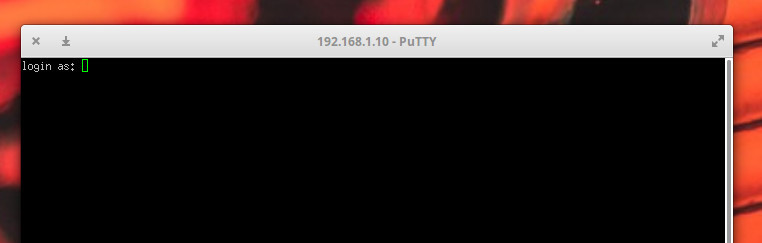 Figure 2: Logging into a remote server with PuTTY.
To save a session (so you don’t have to always type the remote server information), fill out the IP address (or hostname), configure the port and connection type, and then (before you click Open), type a name for the connection in the top text area of the Saved Sessions section, and click Save. This will then save the configuration for the session. To then connect to a saved session, select it from the saved sessions window, click Load, and then click Open. You should then be prompted for the remote credentials on the remote server.
EasySSH
Although EasySSH doesn’t offer the amount of configuration options found in PuTTY, it’s (as the name implies) incredibly easy to use. One of the best features of EasySSH is that it offers a tabbed interface, so you can have multiple SSH connections open and quickly switch between them. Other EasySSH features include:
Groups (so you can group tabs for an even more efficient experience).
Local and remote tunnel support.
Install EasySSH on a Linux desktop is simple, as the app can be installed via flatpak (which does mean you must have Flatpak installed on your system). Once flatpak is installed, add EasySSH with the commands:
Run EasySSH with the command:
The EasySSH app will open, where you can click the + button in the upper left corner. In the resulting window ( Figure 3 ), configure your SSH connection as required.
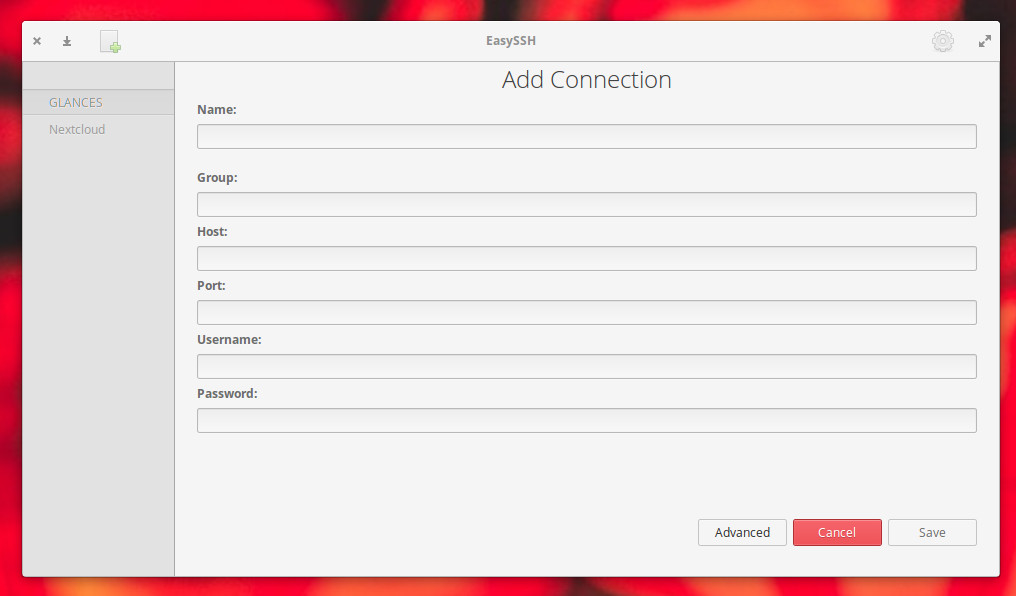 Figure 3: Adding a connection in EasySSH is simple.
Once you’ve added the connection, it will appear in the left navigation of the main window ( Figure 4 ).
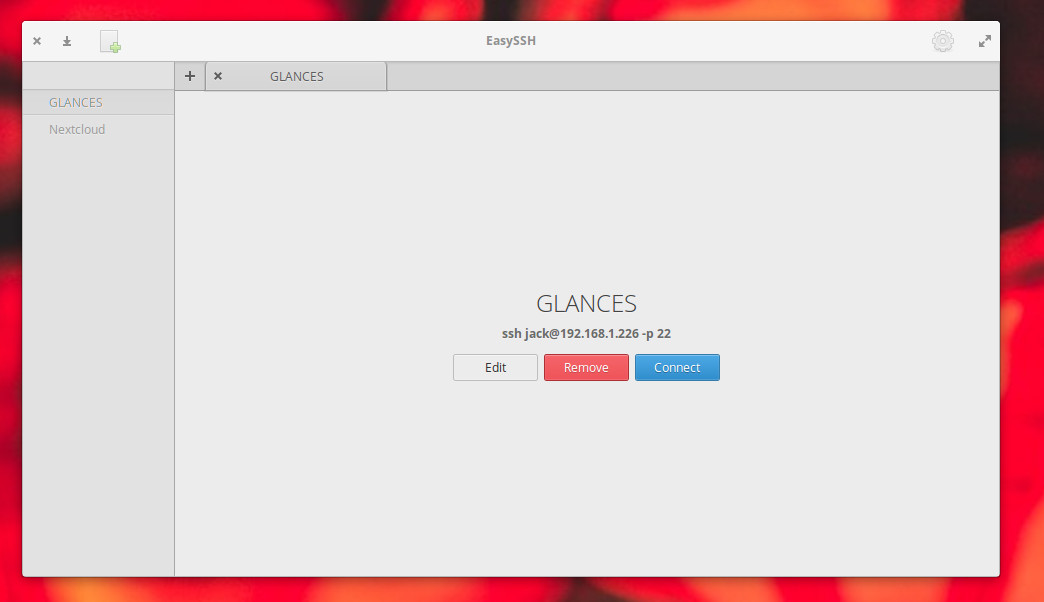 Figure 4: The EasySSH main window.
To connect to a remote server in EasySSH, select it from the left navigation and then click the Connect button ( Figure 5 ).
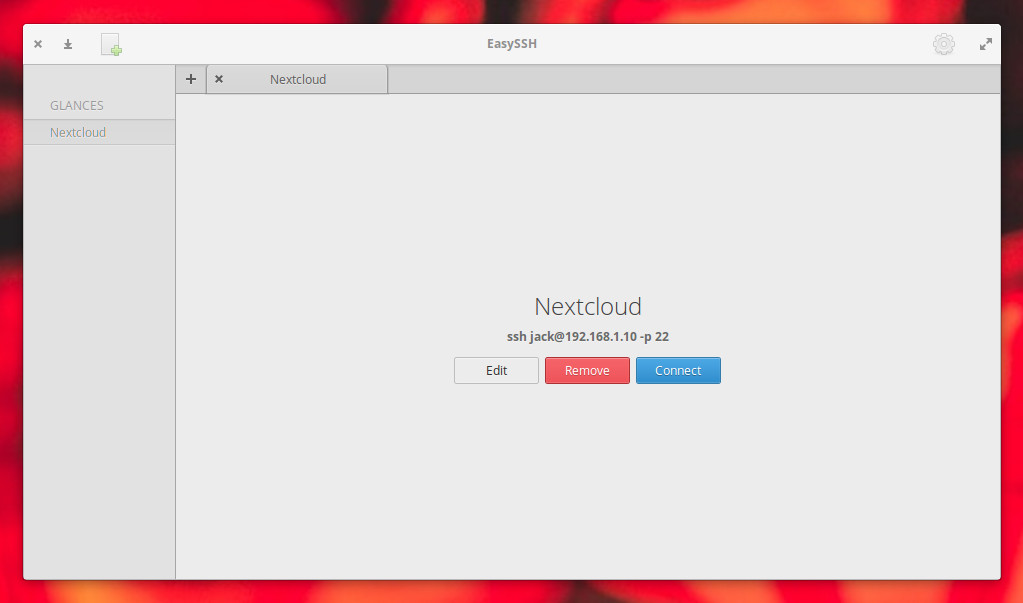 Figure 5: Connecting to a remote server with EasySSH.
The one caveat with EasySSH is that you must save the username and password in the connection configuration (otherwise the connection will fail). This means anyone with access to the desktop running EasySSH can remote into your servers without knowing the passwords. Because of this, you must always remember to lock your desktop screen any time you are away (and make sure to use a strong password). The last thing you want is to have a server vulnerable to unwanted logins.
Terminator
Terminator is not actually an SSH GUI. Instead, Terminator functions as a single window that allows you to run multiple terminals (and even groups of terminals) at once. Effectively you can open Terminator, split the window vertical and horizontally (until you have all the terminals you want), and then connect to all of your remote Linux servers by way of the standard SSH command ( Figure 6 ).
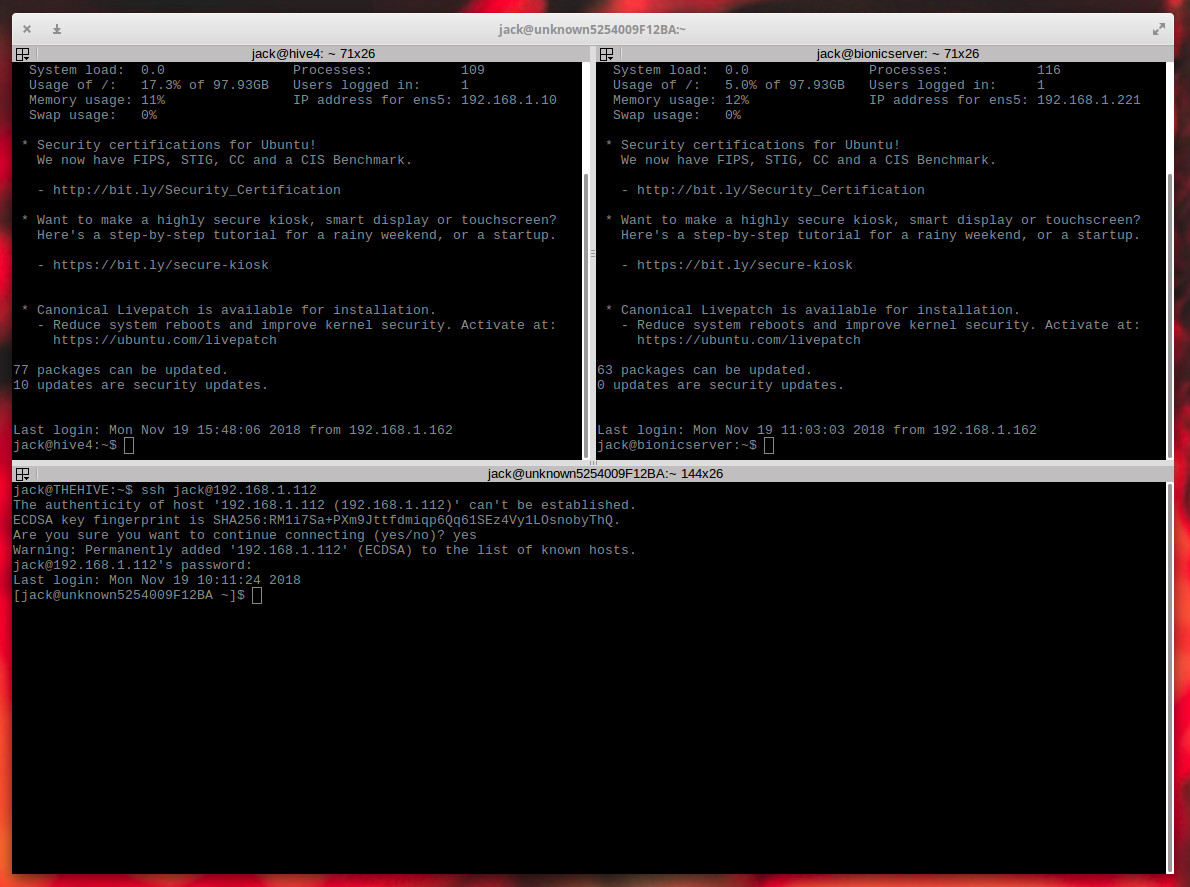 Figure 6: Terminator split into three different windows, each connecting to a different Linux server.
To install Terminator, issue a command like:
sudo apt-get install -y terminator
Once installed, open the tool either from your desktop menu or from the command terminator . With the window opened, you can right-click inside Terminator and select either Split Horizontally or Split Vertically. Continue splitting the terminal until you have exactly the number of terminals you need, and then start remoting into those servers.
The caveat to using Terminator is that it is not a standard SSH GUI tool, in that it won’t save your sessions or give you quick access to those servers. In other words, you will always have to manually log into your remote Linux servers. However, being able to see your remote Secure Shell sessions side by side does make administering multiple remote machines quite a bit easier.
Few (But Worthwhile) Options
There aren’t a lot of SSH GUI tools available for Linux. Why? Because most administrators prefer to simply open a terminal window and use the standard command-line tools to remotely access their servers. However, if you have a need for a GUI tool, you have two solid options and one terminal that makes logging into multiple machines slightly easier. Although there are only a few options for those looking for an SSH GUI tool, those that are available are certainly worth your time. Give one of these a try and see for yourself.
Источник


