- Использование встроенного SSH клиента в Windows 10
- Установка клиента OpenSSH в Windows 10
- Как использовать SSH клиенте в Windows 10?
- SCP: копирование файлов из/в Windows через SSH
- Basic SSH Commands That You Should Know About
- How to Access Remote Server
- The List of Basic SSH Commands
- 1. ls Command
- 2. cd Command
- 3. mkdir Command
- 4. touch Command
- 5. rm Command
- 6. cat Command
- 7. pwd Command
- 8. cp Command
- 9. mv Command
- 10. grep Command
- 11. find Command
- 12. vi/nano Command
- 13. history Command
- 14. clear Command
- 15. tar Command
- 16. wget Command
- 17. du Command
- Conclusion
Использование встроенного SSH клиента в Windows 10
В Windows 10 и Windows Server 2019 появился встроенный SSH клиент, который вы можете использовать для подключения к *Nix серверам, ESXi хостам и другим устройствам по защищенному протоколу, вместо Putty, MTPuTTY или других сторонних SSH клиентов. Встроенный SSH клиент Windows основан на порте OpenSSH и предустановлен в ОС, начиная с Windows 10 1809.
Установка клиента OpenSSH в Windows 10
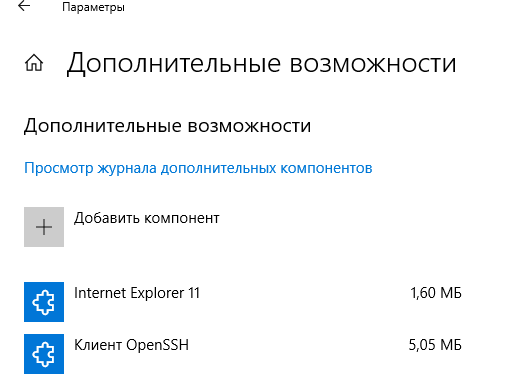
Клиент OpenSSH входит в состав Features on Demand Windows 10 (как и RSAT). Клиент SSH установлен по умолчанию в Windows Server 2019 и Windows 10 1809 и более новых билдах.
Проверьте, что SSH клиент установлен:
Get-WindowsCapability -Online | ? Name -like ‘OpenSSH.Client*’
В нашем примере клиент OpenSSH установлен (статус: State: Installed).
Если SSH клиент отсутствует (State: Not Present), его можно установить:
- С помощью команды PowerShell: Add-WindowsCapability -Online -Name OpenSSH.Client*
- С помощью DISM: dism /Online /Add-Capability /CapabilityName:OpenSSH.Client
0.0.1.0
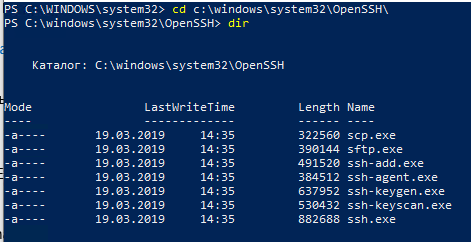
]Бинарные файлы OpenSSH находятся в каталоге c:\windows\system32\OpenSSH\.
- ssh.exe – это исполняемый файл клиента SSH;
- scp.exe – утилита для копирования файлов в SSH сессии;
- ssh-keygen.exe – утилита для генерации ключей аутентификации;
- ssh-agent.exe – используется для управления ключами;
- ssh-add.exe – добавление ключа в базу ssh-агента.
Как использовать SSH клиенте в Windows 10?
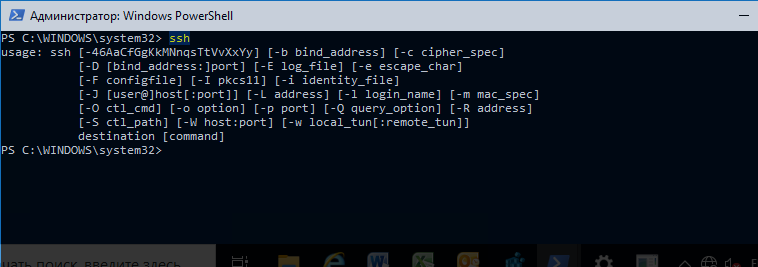
Чтобы запустить SSH клиент, запустите командную строку PowerShell или cmd.exe . Выведите доступные параметры и синтаксис утилиты ssh.exe, набрав команду:
ssh
usage: ssh [-46AaCfGgKkMNnqsTtVvXxYy] [-b bind_address] [-c cipher_spec]
[-D [bind_address:]port] [-E log_file] [-e escape_char]
[-F configfile] [-I pkcs11] [-i identity_file]
[-J [user@]host[:port]] [-L address] [-l login_name] [-m mac_spec]
[-O ctl_cmd] [-o option] [-p port] [-Q query_option] [-R address]
[-S ctl_path] [-W host:port] [-w local_tun[:remote_tun]]
destination [command]
Для подключения к удаленному серверу по SSH используется команда:
Если SSH сервер запущен на нестандартном порту, отличном от TCP/22, можно указать номер порта:
ssh username@host -p port
Например, чтобы подключиться к Linux хосту с IP адресом 192.168.1.202 под root, выполните:
При первом подключении появится запрос на добавление ключа хоста в доверенные, наберите yes -> Enter (при этом отпечаток ключа хоста добавляется в файл C:\Users\username\.ssh\known_hosts).
Затем появится запрос пароля указанной учетной записи, укажите пароль root, после чего должна открытся консоль удаленного Linux сервера (в моем примере на удаленном сервере установлен CentOS 8).
Если вы используете SSH аутентификацию по RSA ключам (см. пример с настройкой SSH аутентификации по ключам в Windows), вы можете указать путь к файлу с закрытым ключом в клиенте SSH так:
ssh root@192.168.1.92 -i «C:\Users\username\.ssh\id_rsa»
Также вы можете добавить ваш закрытый ключ в SSH-Agent. Сначала нужно включить службу ssh-agent и настроить ее автозапуск:
set-service ssh-agent StartupType ‘Automatic’
Start-Service ssh-agent
Добавим ваш закрытый ключ в базу ssh-agent:
Теперь вы можете подключиться к серверу по SSH без указания пути к RSA ключу, он будет использоваться автоматически. Пароль для подключения не запрашивается (если только вы не защитили ваш RSA ключ отдельным паролем):
Еще несколько полезных аргументов SSH:
- -C – сжимать трафик между клиентом и сервером (полезно на медленных и нестабильных подключениях);
- -v – вывод подробной информации обо всех действия клиента ssh;
- -R / -L – можно использовать для проброса портов через SSH туннель.
SCP: копирование файлов из/в Windows через SSH
С помощью утилиты scp.exe, которая входит в состав пакета клиента SSH, вы можете скопировать файл с вашего компьютера на SSH сервер:
scp.exe «E:\ISO\CentOS-8.1.1911-x86_64.iso» root@192.168.1.202:/home
Можно рекурсивно скопировать все содержимое каталога:
scp -r E:\ISO\ root@192.168.1.202:/home
И наоборот, вы можете скопировать файл с удаленного сервера на ваш компьютер:
scp.exe root@192.168.1.202:/home/CentOS-8.1.1911-x86_64.iso e:\tmp
Итак, теперь вы можете прямо из Windows 10 подключаться к SSH серверам, копировать файлы с помощью scp без установки сторонних приложений и утилит.
Basic SSH Commands That You Should Know About
In this tutorial, we are going to cover 17 basic SSH commands that you should know about. By learning them, you will understand how to navigate and manage your VPS or server using the command line.
How to Access Remote Server
Before we begin, make sure that you have access to a remote server. If you own a Hostinger VPS plan, the login details are located in the Servers tab of hPanel. However, if you use our shared hosting, you need to go to Hosting -> Advanced -> SSH Access.
SSH stands for Secure Shell, a protocol used to securely connect to a remote server/system. If you want to learn more about it, we have a detailed tutorial on how SSH works.
Now let’s start accessing your remote server:
- There are two recommended methods to establish an SSH connection:
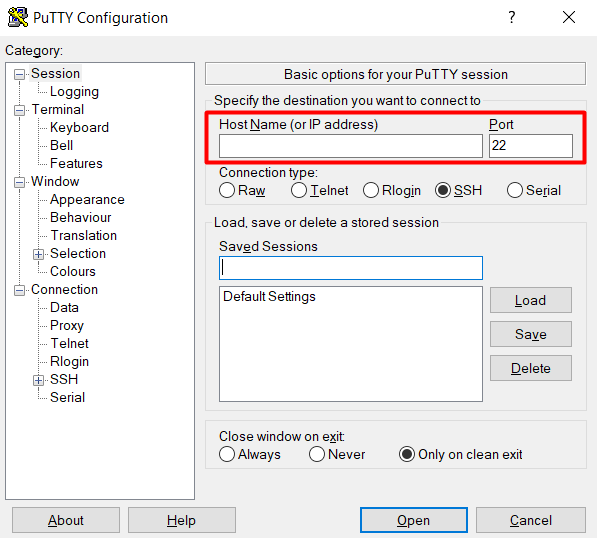
- Using an SSH client (PuTTY). It will require you to enter the server’s IP and the port number into the corresponding fields.
- Using the built-in command prompt (Windows) or terminal shell (Linux, macOS). You will need to write:
- Using an SSH client (PuTTY). It will require you to enter the server’s IP and the port number into the corresponding fields.
Remember to replace “user” with your real username and “serverip” with your server’s dedicated or shared IP address.
That’s it. Now you’re connected to the server and can start executing SSH commands.
The List of Basic SSH Commands
In this part, we will go through popular SSH commands, complete with their syntaxes and useful options.
Here’s a quick look of the basic SSH commands that we’ll cover in this article:
| SSH Command | Explanation |
|---|---|
| ls | Show directory contents (list the names of files). |
| cd | Change Directory. |
| mkdir | Create a new folder (directory). |
| touch | Create a new file. |
| rm | Remove a file. |
| cat | Show contents of a file. |
| pwd | Show current directory (full path to where you are right now). |
| cp | Copy file/folder. |
| mv | Move file/folder. |
| grep | Search for a specific phrase in file/lines. |
| find | Search files and directories. |
| vi/nano | Text editors. |
| history | Show last 50 used commands. |
| clear | Clear the terminal screen. |
| tar | Create & Unpack compressed archives. |
| wget | Download files from the internet. |
| du | Get file size. |
1. ls Command
This SSH command is used to list all files and directories. After entering ls, you will see an output that looks like this:
There are also a few useful options that you can combine with it:
- -l — displays the details of the files, such as size, modified date and time, the owner, and the permissions.
- -a — shows hidden files and directories.
2. cd Command
cd (Change Directory) is the command that we use to jump between directories. It’s a pretty simple command — just type cd followed by the name of the directory:
As such, if you want to enter the home directory of your server, you can type:
You may also write the full path of a certain directory if it is a few levels deep. For instance:
You are now in the AnotherDirectory.
To go back one level, you can simply enter “..” (two dots) after cd command. What’s cool, you can go back further by adding another two-dots and separating them with a forward slash (/):
By entering this line, you are in the home directory again.
3. mkdir Command
You can use mkdir (Make Directory) command to create a directory. This is the syntax:
Let’s assume you want to create a new folder named “myfolder”. You will need to type:
4. touch Command
This SSH command is used to create a new file. Here is the syntax:
If you want to create a .txt file named “myfile”, this is what you need to write:
The file extension could be anything you want. You can even create a file with no extension at all.
5. rm Command
rm command removes a chosen file or directory. To delete a file, enter:
For instance, if you want to remove myfile.txt, simply execute:
To delete a folder, you need to use the -r option to remove all the files and subfolders inside it:
6. cat Command
We use cat command to display the content of a file. Below is the syntax:
It also allows you to create a new file by merging multiple files. For example:
By executing this line, the content of info.txt and info2.txt will be saved into mergedinfo.txt.
7. pwd Command
pwd is a simple command that outputs the full path of your working directory. Once entered, you should see a result like this:
pwd command can come in really handy when you are accessing your shared hosting account through SSH. Oftentimes, shared servers don’t tell you the directory you are in.
8. cp Command
This SSH command will copy files and folders. The syntax is:
[source] is the file or folder you want to copy and [destination] is the duplicate.
Let’s say you have myfile.txt in your working directory, and you want to make a copy of it. The syntax would be:
If you want to make a copy in a different folder, run the following command:
Be careful when writing the name of the destination. If you provide two file names, the cp command will copy the content of the source file into the destination file. Thus, the destination file will be overwritten without any warning. However, if the destination file doesn’t exist, then the command will create a new file.
[options] is not mandatory. However, there are several options that you can use:
- -f — if you don’t have writing permission to the destination file, it’ll be deleted and the command will create a new file
- -u — copy the source file if it is newer than the destination file.
- -n — will not overwrite an existing file.
- -a — archive the files.
Unlike duplicating files, copying folders requires you to use the -R (recursive) option. The option allows all folders and files inside it to be copied.
9. mv Command
This command works similarly to cp. However, mv command will move the file or folder instead of copying it. This is the syntax:
Let’s say we want to move myfile.txt from /home/hostinger/ftp to /home/hostinger/myfolder/. The command should be:
Unlike cp command, you don’t need the -R option to move a folder. For instance:
This will automatically move all files and subfolders inside ftp to myfolder.
10. grep Command
grep command looks for a given string in files. For example:
The above command would search for ‘line’ in a file named “info.txt”. What’s great, the command will print the entire line that contains the matched text.
Keep in mind that this command is case sensitive. If you want to ignore letter cases, use -i option.
11. find Command
We enter this SSH command to search for a file or files that meet the given criteria (name, size, file type, etc). The following is the basic syntax:
[starting directory] is where you would like to start your search process. There are three main choices:
- / (slash) — search the whole system
- . (dot) — search the working directory
(tilde) — search the home directory
[options] is an additional argument that you can use to refine your search. Some of the most popular options are:
- -name — look for files based on their names
- -user — search for files that belong to a given user
- -size — look for files based on their sizes
[search term] is the keyword or number that you use to search for files.
Take a look at this example:
This command will return any files that have the word “index” on their names. And since we use “.” (dot), the command will only search the working directory.
We also have a great tutorial that provides an in-depth explanation about this SSH command.
12. vi/nano Command
Vi and Nano are two popular text editors that you can use in the command line. To open a file using Vi or Nano, you just need to enter:
If the specified file doesn’t exist, both text editors will automatically create it for you.
Unfortunately, some Linux distributions don’t offer Nano by default. Don’t worry, you can read our guide on how to install and use Nano.
13. history Command
This one is used to display the last used commands. You need to enter a number to limit the displayed results. For example:
As you probably guess, the example will show the 20 most recently entered commands.
14. clear Command
The function of clear command is simple — it clears all text from the terminal screen.
15. tar Command
tar is an SSH command that creates or extracts .tar.gz files. It is very popular because most third-party software binaries are in the .tar.gz format.
To archive a folder in .tar.gz format, use the following command:
To unpack a .tar.gz file, enter this command:
Notice that both commands use different four-character options — cvzf and xvzf. Each letter represents a specific instruction:
- x tells tar to extract files
- c tells tar to create an archive
- v stands for verbose. The option tells tar to display all file names that are processed by the command.
- z instructs tar to uncompress the archive
- f tells tar that you are supplying the name of the archive
16. wget Command
wget is used to download files from the internet. For example, to fetch a file from a website and store it in our current directory, we’ll use:
If you want to download multiple files, put all URLs into a file and use the -i option.
Let’s say the file containing the links is called downloads.txt. The command will look like this:
17. du Command
You can use du (Disk Usage) command to view the size of files and folders in a specified directory:
Unfortunately, the summary will show disk block numbers instead of bytes, kilobytes, and megabytes. Therefore, to show it in a human-readable format, you need to insert the -h option after du command:
The results will be more understandable:
Check out this article to read more about du command.
Conclusion
Learning SSH commands is crucial for managing Linux server or VPS. It is the most effective way to navigate through your system and modify files or folders.
Thankfully, you have learned 17 essential SSH commands that every webmaster should know. Now you can easily perform basic tasks on your remote machine, such as creating files, deleting them, jumping between directories, and so on.
Feel free to comment below if you have any questions!
Tautvydas started his career as a technical support agent and now walks the path of full-stack development. He strives to produce top-notch features, improvements, and outstanding user experience with every line of code. In his free time, Tautvydas likes to travel and play old school video games.

