- Как настроить SSH-вход без пароля
- Настройка SSH входа без пароля
- Отключение аутентификации по паролю SSH
- Выводы
- Perform SSH public key authentication with PSSH (without password) in Linux
- How login to Linux server works without password?
- Configure SSH public key authentication
- 1. Generate SSH key pair (private and public)
- 2. Copy public key to remote Linux machine (authorized_keys)
- 3. Configuring and Securing Login (sshd_config)
- Create ssh authenticating agent (ssh-agent)
- Install PSSH
- Perform parallel SSH (PSSH)
- Related Posts
- How to Setup SSH Passwordless Login in Linux [3 Easy Steps]
- Step 1: Create Authentication SSH-Keygen Keys on – (192.168.0.12)
- Step 2: Upload SSH Key to – 192.168.0.11
- Step 3: Test SSH Passwordless Login from 192.168.0.12
- If You Appreciate What We Do Here On TecMint, You Should Consider:
Как настроить SSH-вход без пароля
Secure Shell (SSH) — это криптографический сетевой протокол, используемый для безопасного соединения между клиентом и сервером и поддерживающий различные механизмы аутентификации. Двумя наиболее популярными механизмами являются аутентификация на основе паролей и аутентификация на основе открытого ключа.
В этом руководстве мы покажем вам, как настроить аутентификацию на основе ключа SSH, а также как подключиться к вашему серверу Linux без ввода пароля.
Настройка SSH входа без пароля
Чтобы настроить SSH-вход без пароля в Linux, все, что вам нужно сделать, это сгенерировать открытый ключ аутентификации и добавить его в файл
/.ssh/authorized_keys удаленных хостов.
Следующие шаги описывают процесс настройки входа по SSH без пароля:
Проверьте существующую пару ключей SSH.
Перед созданием новой пары ключей SSH сначала проверьте, есть ли у вас уже ключ SSH на вашем клиентском компьютере, потому что вы не хотите перезаписывать существующие ключи.
Выполните следующую команду ls, чтобы проверить наличие существующих ключей SSH:
Если есть существующие ключи, вы можете использовать их и пропустить следующий шаг или создать резервную копию старых ключей и сгенерировать новый.
Если вы видите No such file or directory или no matches found это означает, что у вас нет ключа SSH, и вы можете перейти к следующему шагу и сгенерировать новый.
Создайте новую пару ключей SSH.
Следующая команда сгенерирует новую пару ключей SSH 4096 бит с вашим адресом электронной почты в качестве комментария:
Нажмите Enter чтобы принять расположение и имя файла по умолчанию:
Затем инструмент ssh-keygen попросит вас ввести безопасную парольную фразу. Независимо от того, хотите ли вы использовать кодовую фразу, решать вам, если вы решите использовать кодовую фразу, вы получите дополнительный уровень безопасности. В большинстве случаев разработчики и системные администраторы используют SSH без парольной фразы, поскольку они полезны для полностью автоматизированных процессов. Если вы не хотите использовать кодовую фразу, просто нажмите Enter .
В целом взаимодействие выглядит так:
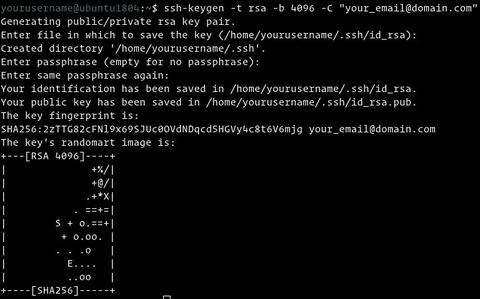
Чтобы убедиться, что ключи SSH сгенерированы, вы можете указать свои новые закрытые и открытые ключи с помощью:
Скопируйте открытый ключ
Теперь, когда вы сгенерировали пару ключей SSH, чтобы иметь возможность войти на свой сервер без пароля, вам необходимо скопировать открытый ключ на сервер, которым вы хотите управлять.
Самый простой способ скопировать ваш открытый ключ на сервер — использовать команду ssh-copy-id . На вашем локальном машинном терминале введите:
Вам будет предложено ввести пароль remote_username :
После аутентификации пользователя открытый ключ будет добавлен в файл authorized_keys удаленного пользователя, и соединение будет закрыто.
Если по какой-либо причине ssh-copy-id недоступна на вашем локальном компьютере, вы можете использовать следующую команду для копирования открытого ключа:
Войдите на свой сервер с помощью ключей SSH
После выполнения описанных выше действий вы сможете войти на удаленный сервер без запроса пароля.
Чтобы проверить это, просто попробуйте войти на свой сервер через SSH:
Если все прошло успешно, вы сразу же войдете в систему.
Отключение аутентификации по паролю SSH
Чтобы добавить дополнительный уровень безопасности к вашему серверу, вы можете отключить аутентификацию по паролю для SSH.
Перед отключением парольной аутентификации SSH убедитесь, что вы можете войти на свой сервер без пароля, а пользователь, с которым вы входите, имеет права sudo.
В следующих руководствах описывается, как настроить доступ sudo:
Войдите на удаленный сервер с помощью ключей SSH, либо как пользователь с привилегиями sudo, либо как пользователь root:
Откройте файл конфигурации SSH /etc/ssh/sshd_config , найдите следующие директивы и измените их следующим образом:
Как только вы закончите, сохраните файл и перезапустите службу SSH.
На серверах Ubuntu или Debian выполните следующую команду:
На серверах CentOS или Fedora выполните следующую команду:
Выводы
В этом руководстве вы узнали, как настроить аутентификацию на основе ключей SSH, позволяющую входить на удаленный сервер без ввода пароля пользователя. Вы можете добавить один и тот же ключ к нескольким удаленным серверам.
Мы также показали вам, как отключить аутентификацию по паролю SSH и добавить дополнительный уровень безопасности на ваш сервер.
Если у вас есть какие-либо вопросы или отзывы, не стесняйтесь оставлять комментарии.
Источник
Perform SSH public key authentication with PSSH (without password) in Linux
Table of Contents
SSH public key authentication. ssh authorized_keys. ssh with key. ssh key login. linux enable ssh public key authentication. generate ssh key and add ssh key to server. ssh login with private key without password using authorized_keys. add public key to server. how to ssh with private key. Linux login without password. create ssh key. ssh add key. ssh keygen. login to linux server using ssh key. where are ssh keys stored. ssh use public key centos. rhel ssh public key authentication. rhel ssh key exchange. login to linux server without password centos.

PSSH is a utility to perform SSH from one server to multiple client nodes in parallel and perform certain task as defined. By default PSSH has -A argument using which the tool will prompt for password which will be used to connect to all the target host.
But we can also configure PSSH to use SSH public key authentication. You can login to multiple Linux server using SSH Key, either with passphrase or password less (without password).
How login to Linux server works without password?
Secure Shell relies on a technology called public-key cryptography. It works similarly to a safe deposit box at the bank: You need two keys to open the box or at least multiple layers of security/checks have to be crossed. In the case of public-key cryptography, you need two mathematical keys: a public one and a private one.

The actual process of encrypting data and sending it from one person to the next requires several steps. We’ll use the popular “Alice and Bob” analogy and go through the process one step at a time as they both try to communicate in a secure manner with one another.
 Alice fetches Bob’s public key
 Alice uses Bob’s public key, along with her private key, to encrypt and sign the data, respectively.
 Alice sends the encrypted data to Bob.
 Bob fetches Alice’s public key.
 Bob uses Alice’s public key, along with his private key, to verify and decrypt the data, respectively
Configure SSH public key authentication
In the below steps I will configure SSH public key authentication between 3 nodes for root user.
I have 3 nodes with me using which I will configure SSH public key authentication to login to Linux server without password
- centos-master
- centos-client-1
- centos-client-2
Here, I will generate SSH key pair on centos-master using which we will attempt to login and connect to centos-client nodes without password (using ssh public key authentication)
SSH communication is secured using public key cryptography. When a user connects to the SSH-server using SSH-client for the first time, the SSH program stores the SSH-server public key in the user’s home directory inside a file, known_hosts , in a hidden folder named
1. Generate SSH key pair (private and public)
The first step would be to generate private and public ssh key. Here centos-master will be my master server.
In this step, the client uses a special utility, ssh-keygen, to generate an SSH key pair for authentication with the server. This utility is bundled with OpenSSH and by default it creates a 2048-bit RSA key pair. It supports RSA and DSA, both with different lengths of keys. A key length of 4096 bits is recommended for establishing a secure connection between two machines. The following diagram shows how to create a RSA (Rivest-Shamir-Adleman) key pair of 2048-bit:
2. Copy public key to remote Linux machine (authorized_keys)
When you connect to your remote host, SSH validates the key ID you’re providing against a list of authorized_keys . There is one utility, ssh-copy-id , which is also bundled with OpenSSH and can be used to copy the key to the remote system. It automatically copies the
/.ssh/id_rsa.pub file by default into the remote system
We use ssh-copy-id because it copies the public key and also appends the public key to the authorized_keys . Provide the path of the public key using -i argument. This public key will be copied to our centos-client-1 node and the content of the public SSH key will be appended to root user’s /root/.ssh/authorized_keys
Similarly I will copy SSH public key to centos-client-2 for root user’s authorized_keys
3. Configuring and Securing Login (sshd_config)
Additional security measures can be enabled by modifying the OpenSSH server configuration file /etc/ssh/sshd_config , on the remote host. Following are the some steps that can be taken to secure the SSH logins:
Now, since we have configured the SSH key-based authentication in the previous section, we can disable the password authentication to secure SSH logins in the SSH server configuration file. Edit the SSH daemon config file on the remote host running the SSH server and set the PasswordAuthentication directive value to no as shown here:
Prohibit direct login as the root user through SSH, as the root user has unrestricted privileges and exists by default on every Linux system. To secure the root user account through SSH, we can do following changes in configuration file:Comment the line with the directive PermitRootLogin as shown here:
Allow only key-based ssh login in the root account by setting the directive PermitRootLogin value as without-password as shown here:
After making changes in the SSH server configuration file /etc/ssh/sshd_config , restart the sshd service to bring the applied changes into effect, as shown here:
Create ssh authenticating agent (ssh-agent)
However, we did still have to enter the password we set on the private SSH key. If you have to do this each time you want to connect to a remote host, it defeats the purpose of setting up key-based authentication. SSH agent, a small daemon that keeps unlocked private SSH keys in memory.
ssh-agent is a program to hold private keys used for public key authentication (RSA, DSA, ECDSA, Ed25519). ssh-agent is usually started in the beginning of an X-session or a login session, and all other windows or programs are started as clients to the ssh-agent program.
Verify the process status
Install PSSH
Next you can install PSSH using yum
Perform parallel SSH (PSSH)
Now we are all setup with SSH public key authentication and we can execute PSSH without the need of giving any password. Additionally I am using some more SSHD options with PSSH to disable password based login and select passphrase based authentication.
As you see I did not use «-A» and yet the PSSH tool was able to connect to all the provided host without prompting for any password.
Lastly I hope the steps from the article to generate SSH Key pair and configure SSH public key authentication using PSSH with authorized_keys in RHEL/CentOS 7 Linux was helpful. So, let me know your suggestions and feedback using the comment section.
Related Posts
Didn’t find what you were looking for? Perform a quick search across GoLinuxCloud
If my articles on GoLinuxCloud has helped you, kindly consider buying me a coffee as a token of appreciation.

For any other feedbacks or questions you can either use the comments section or contact me form.
Thank You for your support!!
Источник
How to Setup SSH Passwordless Login in Linux [3 Easy Steps]
SSH (Secure SHELL) is an open-source and most trusted network protocol that is used to log in to remote servers for the execution of commands and programs. It is also used to transfer files from one computer to another computer over the network using a secure copy (SCP) command and Rsync command.
In this article, we will show you how to set up password-less login on RHEL-based Linux distributions such as CentOS, Fedora, Rocky Linux & AlmaLinux, and Debian-based distributions such as Ubuntu & Mint using ssh keys to connect to remote Linux servers without entering a password.
Using Password-less login with SSH keys will increase the trust between two Linux servers for easy file synchronization or transfer.
My Setup Environment
If you are dealing with a number of Linux remote servers, then SSH Password-less login is one of the best ways to automate tasks such as automatic backups with scripts, synchronization files using SCP command, and remote command execution.
In this example, we will set up SSH password-less automatic login from server 192.168.0.12 as user tecmint to 192.168.0.11 with user sheena.
Step 1: Create Authentication SSH-Keygen Keys on – (192.168.0.12)
First login into server 192.168.0.12 with user tecmint and generate a pair of public keys using the following command.
![]()
Step 2: Upload SSH Key to – 192.168.0.11
Use SSH from server 192.168.0.12 and upload a new generated public key (id_rsa.pub) on server 192.168.0.11 under sheena‘s .ssh directory as a file name authorized_keys.
Step 3: Test SSH Passwordless Login from 192.168.0.12
From now onwards you can log into 192.168.0.11 as sheena user from server 192.168.0.12 as a tecmint user without a password.
![]()
In this article, you’ve learned how to set up an SSH Passwordless login using an ssh key. I expect that the process was straightforward. If you have any questions, please post them in the comment section below.
If You Appreciate What We Do Here On TecMint, You Should Consider:
TecMint is the fastest growing and most trusted community site for any kind of Linux Articles, Guides and Books on the web. Millions of people visit TecMint! to search or browse the thousands of published articles available FREELY to all.
If you like what you are reading, please consider buying us a coffee ( or 2 ) as a token of appreciation.

We are thankful for your never ending support.
Источник


