- SSH доступ к Ubuntu в VirtualBox
- Комментарии (8)
- Ssh from windows to ubuntu virtualbox
- cfebs / guide.md
- Как подключиться к виртуальной машине VirtualBox по SSH
- Проброс портов для SSH
- Подключение через сетевой мост
- How To Ssh Into Ubuntu VM Virtualbox From Host Machine
- What is SSH?
- How to install openSSH server on Ubuntu
- Configure firewall and open port 22
- SSH to a VM VirtualBox
- Close GUI session in virtualbox without shutting down the VM
SSH доступ к Ubuntu в VirtualBox
В качестве гостевой ОС в VirtualBox запущена Ubuntu. На ней развернут LAMP, где гоняются тесты веб-приложений. Чтобы не возится с общими директориями, но иметь возможность общаться с файловой системой гостевой ОС из домашней, реализуем возможность доступа к гостевой ОС по ssh протоколу. FTP поднимать не будем, так как SFTP, мне кажется, будет более, чем достаточно.
- VM VirtualBox установлен с настройками по-умолчанию;
- домашняя ОС Windows 10;
- Ubuntu Server установленный с ISO.
В Ubuntu устанавливаем SSH сервер. Я никаких настроек не изменял. Начального конфига более, чем достаточно.
Останавливаем виртуальную машину. И переходим к её настройкам – Настройки > Сеть.
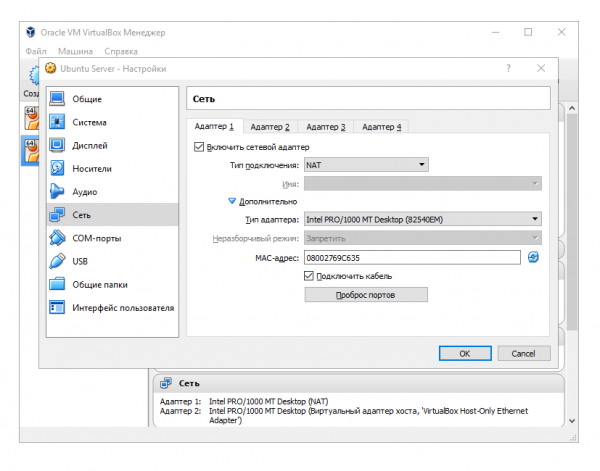
Приведите настройки Адаптера 1 к тем, что вы видите на скриншоте. Если в итоге у вас возникнут какие-то проблемы с сетью гостевой ОС, прежде всего, рекомендую попробовать использовать адаптер иного типа. Я ставлю Intel PRO/1000 MT исходя из железа, используемого на моей машине. Но вы можете попробовать «Паравиртуальную сеть (virtio-net)», например.
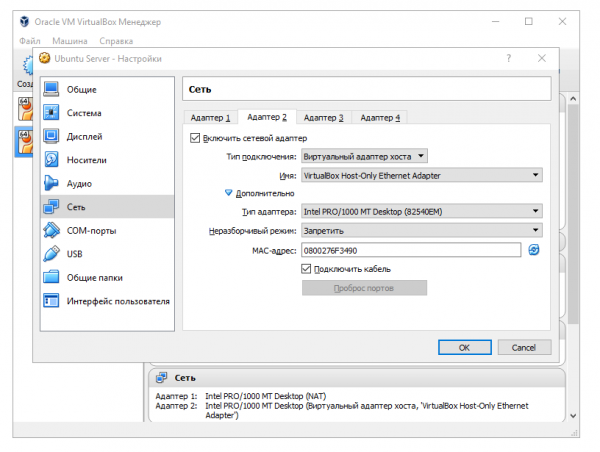
Переходите на вкладку Адаптер 2, включите его и также приведите состояние настроек в аналогичное тому, что на скриншоте. Комментарии по поводу типа адаптера не отличаются от предыдущего случая.
Запустите виртуальную машину. При запуске можете получить ошибку (многие сталкиваются на Windows 10, например), где сообщается о невозможности открыть сетевое соединение:
Failed to open/create the internal network ‘HostInterfaceNetworking-VirtualBox Host-Only Ethernet Adapter’ (VERR_INTNET_FLT_IF_NOT_FOUND).
Failed to attach the network LUN (VERR_INTNET_FLT_IF_NOT_FOUND).
Отправляемся в Панель управления\Сеть и Интернет\Сетевые подключения, находим там VirtualBox Host-Only Network соединение и переходим к просмотру его Свойств. В списке используемых компонентов находим VirtualBox NDIS6 Networking Driver и включаем его.
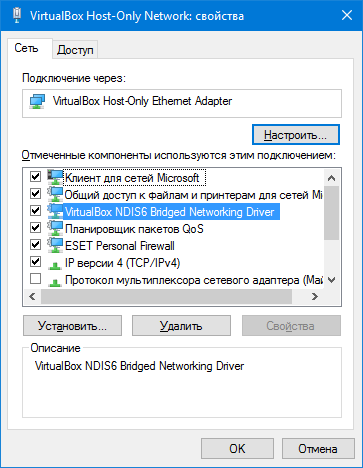
Ошибка не должна больше вас беспокоить. Запускаем виртуальную машину.
Переходим к настройке сетевых интерфейсов в гостевой ОС. Необходимо добиться того, чтобы гостевая ОС имела статический IP адрес, по которому вы и будете к ней подключаться.
С правами root пользователя открываем в режиме редактирования файл /etc/network/interfaces.
Настраиваем интерфейс enp0s8. Содержимое файла необходимо привести к следующему состоянию:
Подключаться к виртуальной машине вы будете по ip 192.168.56.10. Сохраняем измененный файл /etc/network/interfaces, перезагружаем виртуальную машину и пробуем подключиться к ней по SSH.
Комментарии (8)
В Windows 10 добавлена возможность работать с bash Ubuntu из коробки. Я у себя на компе настроил Lamp сервер именно в bash. Не думал на этот счет? Это же удобней чем выделять ресурсы на целую виртуальную машину.
Привычная среда для запуска веб-приложений — Unix. Поэтому, для финального тестирования, виртуальная машина мне нравится больше. Условия идентичны боевым. Для разработки мне удобнее и приятнее Docker.
Там тоже виртуальная машина, просто другая.
да и windows 10 очень любит новое железо, обновляться, и вообще плевать на пользователя.
Ssh from windows to ubuntu virtualbox
So, here are some steps you need to take for connecting from Windows to Ubuntu-onVirtualBox using putty through SSH:
1- before running the Ubuntu inside the virtual box check this setting:
Setting > Network > Adaptor 1 > Attached to> Bridge Connection
You can try using the Bridge Connection with option:
Intel Centrino Wireless-N 1030
or
Realtek PCIe GBE family Controller
2- Start the Ubuntu inside the virtual box
3- Open a Console (Ctrl + Alt + T)
4- Enter : ifconfig and check your virtual-box ubuntu IP. It should be in the same range as your main OS, for example both should be something like: 192.168.x.x (not: 10.2.x.x)
You may try different options for the Adapter in step.1 After each change, if you do not see any changes in the connection inside the VirtualBox, you can use the following commands to refresh the network connection:
5- In Windows run Putty (double-click)
6- Enter the IP address (from ubuntu) + select port 22 + check SSH —-> press OK
7- you should see a console asking for your username/password. Enter the information and hit enter. That’s it.
the default port for SSH connection is 22, but maybe it is different in your system, so you can check it if you are not sure:
it will show the port 22 , if it is listening, otherwise you need to set your ssh port / or maybe your firewall is blocking it.
cfebs / guide.md
- a Linux guest runnning on a Windows host
- the ability to ssh to the guest from the Windows host
- the ability to ssh to the guest from another machine on your home network
About 90% of this comes from: https://gist.github.com/pjdietz/5768124 just with a few fixes for the host only network
1 Create a host only network in the Virtualbox GUI
- File -> Preferences -> Network -> Host-Only Networks (tab) -> + icon
Make note of the network IP address in the GUI, for example: 192.168.99.1
2 Create a new VM and install Ubuntu Server (tested with 16.04.2)
In the machine settings you should add the Host-only adapter
- Settings -> Network -> Adapter2 -> Attached to: (select Host-only Adapter) then select the Host only network you just created
Do not select DHCP, we want the guest to assign a static ip
3 Make sure sshd is installed and running
After installation you should double check that sshd is running sudo service sshd status
If not installed sudo apt install sshd , it should start on port 22
4 Configure static host only interface
If you ifconfig vs ifconfig -a you will notice that one interface extra is listed but it’s not up and has no IP.
Make note of this interface name, example: enp0s8 or eth1
Add the following configuration
Remember to replace these two things
- 192.168.99.1 with the value of the host-only network IP from the virtualbox GUI
- 192.168.99.2 with a invented IP address on that subnet, simply picking something besides 1 and 255 will do (that is where the .2 comes from)
Now sudo reboot
When the machine comes up ifconfig and see if the interface has everything applied
You should be able to test by sshing or telnetting to the host only ip
5 Port forwarding from host to guest
Port forwarding is setup in the Vbox machine settings Network tab again.
This time, select Apdapter 1, the NAT adapter, and unfold Advanced, click Port Forwarding
On your guest ifconfig again and make note of the other interface, it will probably have an ip like 10.0.2.15
Create a new port forwarding rule. Security note: this will expose a port on your home network directly to the Vbox ssh port, so be aware of those consequences.
Make sure to replace your Guest IP with the NAT ip.
6 🍺
Now from another machine on your network like your shitty chromebook you should be able to:
Where HOSTIP is the ip of the host running the VM on your home network.
Как подключиться к виртуальной машине VirtualBox по SSH
После установки серверного дистрибутива Linux на виртуальную машину VirtualBox вы можете обнаружить, что подключение по SSH не работает. Это связано с тем, что по умолчанию на VirtualBox используется подключение к интернету с помощью NAT.
При таком способе подключения у вас нет возможности подключаться к виртуальной машине из своей реальной операционной системы. В частности, вы не сможете подключиться по SSH.
В данной статье мы рассмотрим сразу два способа, как можно решить эту проблему. Первый вариант – проброс портов через NAT, а второй – использование сетевого моста. Оба этих способа сохраняют доступ к интернету на виртуальной машине.
Проброс портов для SSH
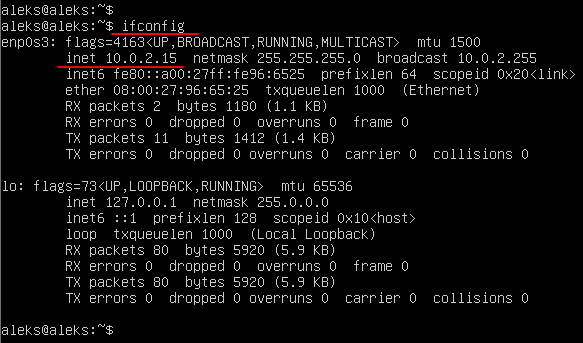
Для проброса портов вам нужно знать IP адрес, который присваивается виртуальной машине. Для этого запустите виртуальную машину и выполните на ней команду « ifconfig ». В ответ вы получите информацию о сетевых подключениях, в которой будет указан и IP адрес. В нашем случае был получен IP адрес – « 10.0.2.15 ».
Обратите внимание, если в вашей системе нет команды « ifconfig », то ее нужно будет установить отдельно. В случае Debian и Ubuntu Linux это можно сделать с помощью команды « apt-get install net-tools ».
После того как мы узнали IP адрес виртуальную машину нужно выключить и открыть ее настройки в программе VirtualBox.
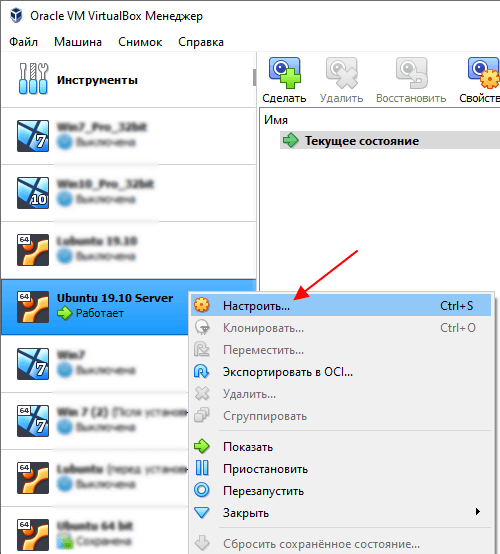
В настройках виртуальной машины нужно открыть раздел « Сеть », открыть дополнительные настройки и перейти к пробросу портов.

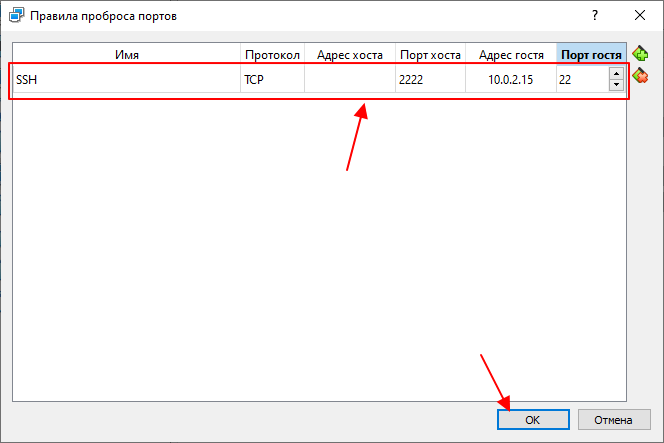
После этого откроется окно для проброса портов. Здесь нужно нажать на кнопку « Добавить » и заполнить следующие данные:
- Имя : SSH.
- Протокол : TCP.
- Адрес хоста : оставляем пустым или указываем 127.0.0.1.
- Порт хоста : любой свободный порт на вашей основной системе, например, 2222.
- Адрес гостя : IP адрес, который был присвоен вашей виртуальной машине. В нашем случае это 10.0.2.15.
- Порт гостя : порт SSH на виртуальной машине, по умолчанию – 22.
После проброса порта закрываем все окна с помощью кнопки « ОК ».
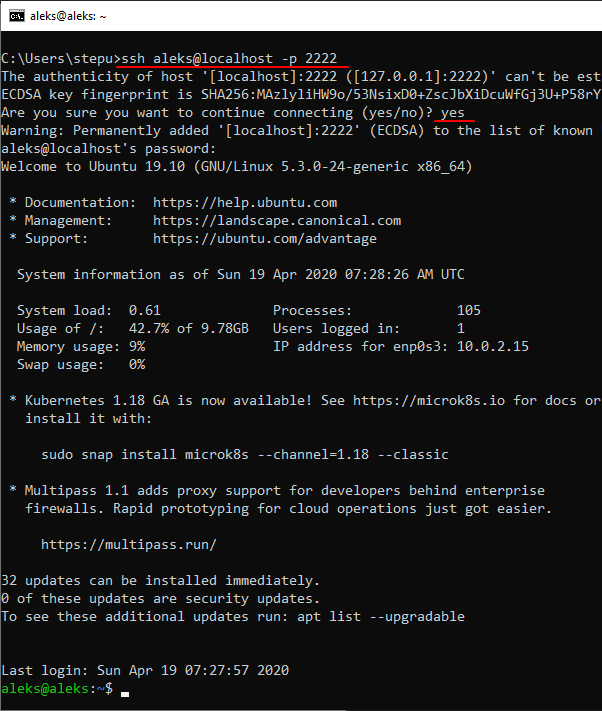
После этого можно подключаться к виртуальной машине по SSH. Для этого можно использовать клиент OpenSSH, который доступен в Windows 10. Поскольку порт « 2222 » на основной системе был проброшен на порт « 22 » на виртуальной машине, то для подключения по SSH нам нужно выполнить следующую команду:
Где « user » — это имя пользователя, а « 2222 » — используемый порт на основной системе.
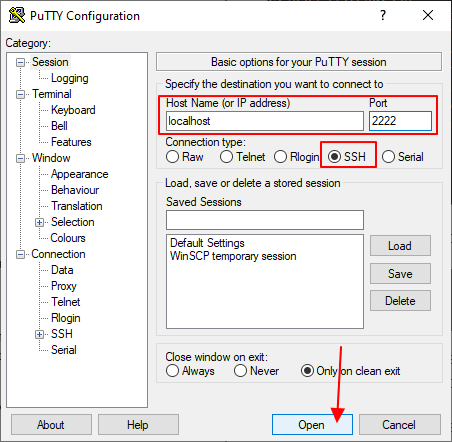
Аналогичным способом выполняется подключение с помощью PuTTY . В поле « Host Name » указываем « localhost », а в поле « Port » — « 2222 ». Более подробно об OpenSSH и PyTTY в отдельной статье о подключении по SSH.
Как видно по скриншоту вверху, данный способ отлично работает, и мы успешно подключились по SSH к виртуальной машине VirtualBox.
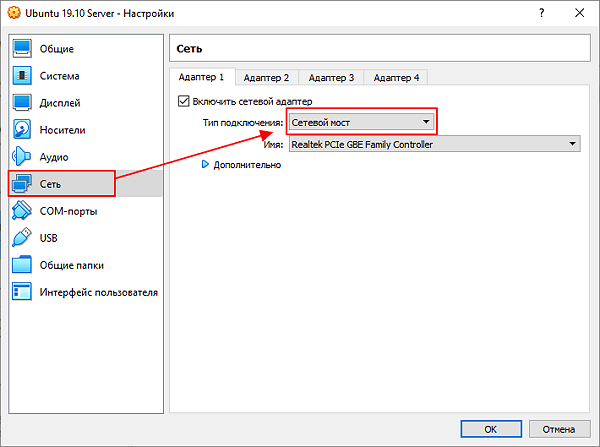
Подключение через сетевой мост
Также есть альтернативный способ подключения к виртуальной машине по SSH для этого нужно изменить тип подключения с « NAT » на « Сетевой мост ». В этом случае виртуальная машина будет подключена к вашей локальной сети и получит IP адрес от вашего роутера из того же диапазона, что и ваша основная система.
Для этого нужно выключить виртуальную машину и зайти в ее свойства в программе VirtualBox. В настройках нужно зайти в раздел « Сеть » и включить тип подключения « Сетевой мост ».
После этого нужно запустить виртуальную машину и выполнить на ней команду « ifconfig » для того, чтобы узнать, какой IP адрес она получила от роутера. В нашем случае был получен IP адрес « 192.168.1.214 ».
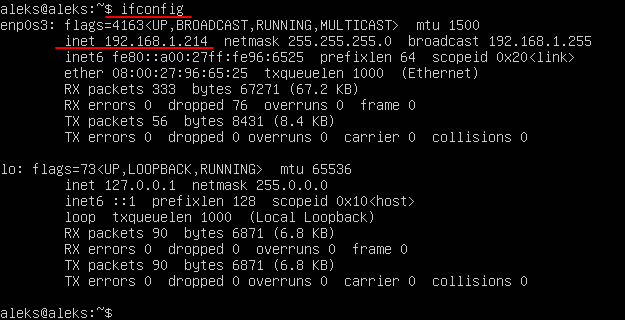
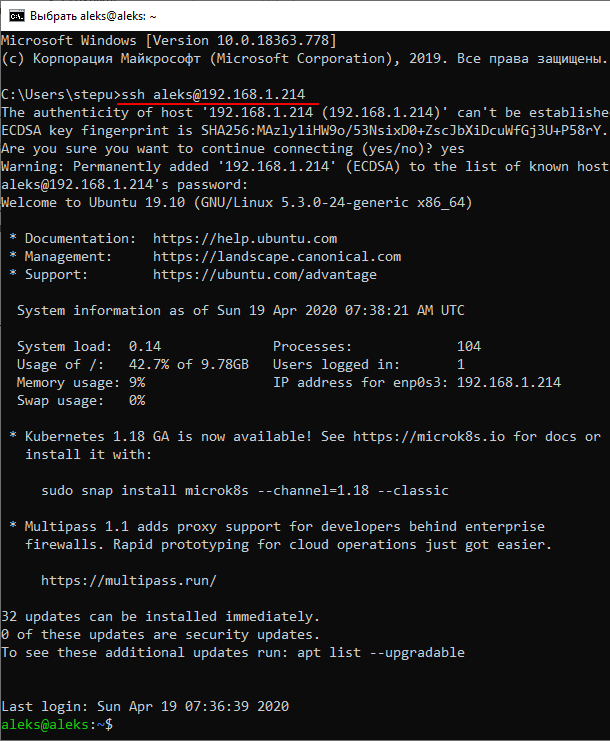
После этого к виртуальной машине можно подключаться по SSH. Для этого нужно просто использовать IP адрес, который был ей присвоен роутером. Например, для того чтобы подключиться с помощью клиента OpenSSH нужно выполнить следующую команду:
Где « user » — это имя пользователя, а « 192.168.1.214 » — это ее IP адрес.
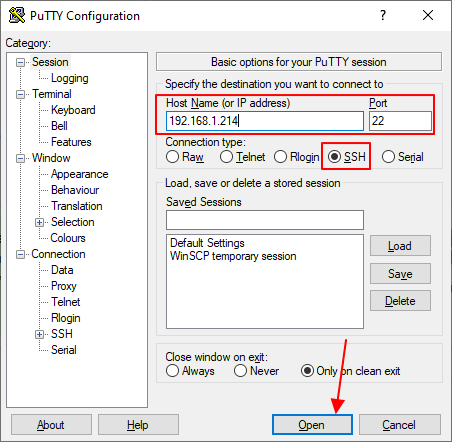
Аналогично работает и подключение с помощью PuTTY. Вводим « 192.168.1.214 » и подключаемся по стандартному порту « 22 ».
Как и предыдущий способ, вариант с использованием сетевого моста отлично работает, при этом виртуальная машина не теряет доступа к интернету.
How To Ssh Into Ubuntu VM Virtualbox From Host Machine
Hi guys, In this article we will see how to connect to VM virtualBox from host systeme
What is SSH?
SSH, Secure Shel also known as Secure Socket Shell, is a network protocol that gives system administrators, a secure way to access a computer over an unsecured network.
How to install openSSH server on Ubuntu
sshd : is the OpenSSH server process. It listens to incoming connections using the SSH protocol and acts as the server for the protocol. It handles user authentication, encryption, terminal connections, file transfers, and tunnelling.
Let’s start to install openssh-server.
First update the system
To install openssh-server package, run:
Once installed, the SSH service should be started automatically. If necessary, you can start (or stop, restart) the service manually via command:
Verify that ssh service running

Configure firewall and open port 22
Before enabling the UFW firewall we need to add a rule which will allow incoming SSH connections. If you’re connecting to your server from a remote location, which is almost always the case and you enable the UFW firewall before explicitly allow incoming SSH connections you will no longer be able to connect to your Ubuntu server.
To configure your UFW firewall to allow incoming SSH connections, type the following command:
Now we can enable UFW firewall by typing:
You can check the status of UFW with the following command:
SSH to a VM VirtualBox
The best way to login to a guest Linux VirtualBox VM is port forwarding. By default, you should have one interface already which is using NAT.
Then go to the Network settings and click advanced, Click on the Port Forwarding button. 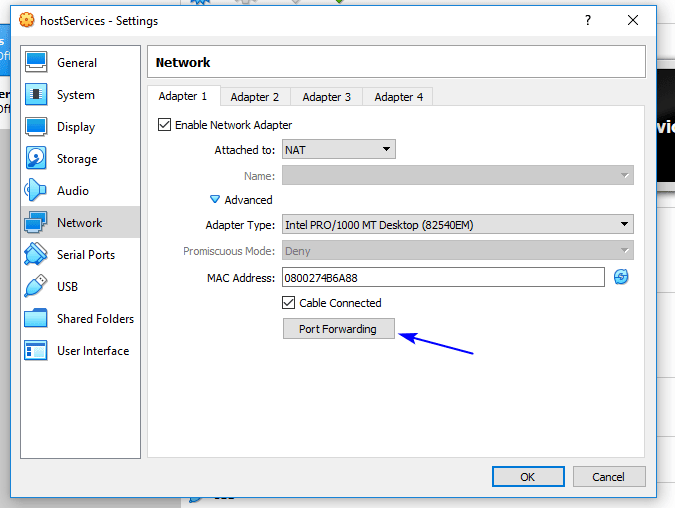
Add a new Rule. As value :
rule name = «ssh», «Protocol’ = «TCP», «Host port» = 2222, «Guest port» = 22.
VirtualBox will create a private network (10.0.2.x) which will be connected to your host network using NAT, To get Guest IP, type the following command in you VM ubuntu :
Everything else of the rule can be left blank. 
This way, we can point putty or MobaXterm to Port 22 of 127.0.1.1 and VirtualBox will redirect this connection to our VM where its ssh daemon will answer it, allowing us to log in.
In my case I use MobaXtrem, To SSH into the guest VM, write:
*Where user is your username within the VM. 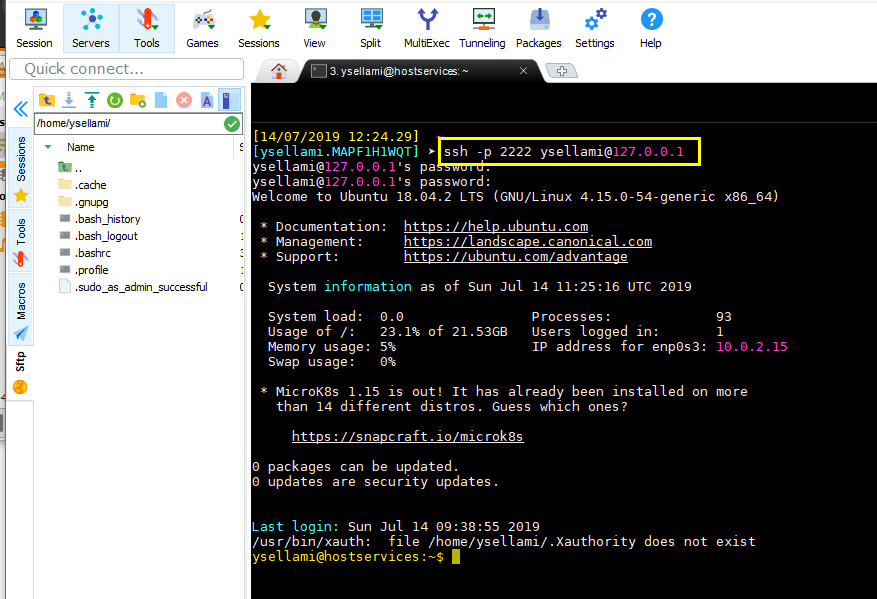
Close GUI session in virtualbox without shutting down the VM
There is an extra dropdown menu next to the Start button with an even better option:
Detachable Start! It is a hybrid start option where they run the VM process in the background, and simply display a headless VM client that you can easily close. 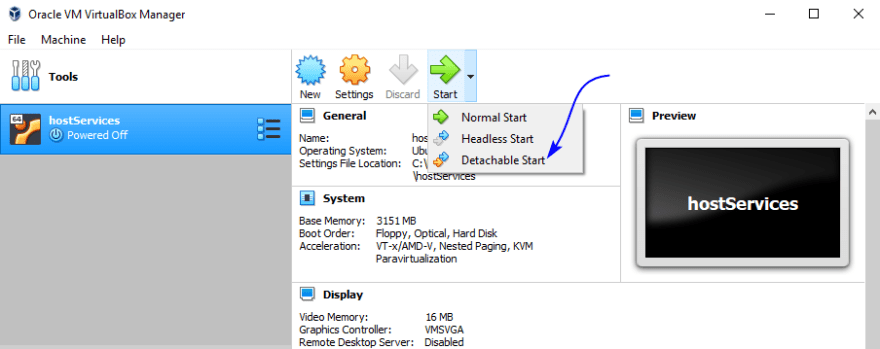
Then you can close VirtualBox GUI, by choosing «Continue ruining in the background»: 
Enjoy the fact that you can now SSH into your VM!


