- Руководство: SSH в Терминале Windows Tutorial: SSH in Windows Terminal
- Создание профиля Create a profile
- Указание начального каталога Specify starting directory
- Setting up the Cygwin environment
- Bonus to this chapter
- Использование встроенного SSH клиента в Windows 10
- Установка клиента OpenSSH в Windows 10
- Как использовать SSH клиенте в Windows 10?
- SCP: копирование файлов из/в Windows через SSH
- Secure Shell (SSH)
- Using the Windows 10 OpenSSH client
- Using PuTTY
- Download an SSH client
- Connect to your device
- Update account password
- Configure your Windows IoT Core device
- Commonly used utilities
Руководство: SSH в Терминале Windows Tutorial: SSH in Windows Terminal
В Windows 10 встроен клиент SSH, который можно использовать в Терминале Windows. Windows 10 has a built-in SSH client that you can use in Windows Terminal.
В этом руководстве содержатся сведения о настройке профиля в Терминале Windows, использующем SSH. In this tutorial, you’ll learn how to set up a profile in Windows Terminal that uses SSH.
Создание профиля Create a profile
Вы можете запустить сеанс SSH в командной строке, выполнив ssh user@machine . После этого вам будет предложено ввести пароль. You can start an SSH session in your command prompt by executing ssh user@machine and you will be prompted to enter your password. Вы можете создать профиль Терминала Windows, выполняющий этот процесс при запуске, добавив параметр commandline в профиль в файле settings.json file. You can create a Windows Terminal profile that does this on startup by adding the commandline setting to a profile in your settings.json file.
Указание начального каталога Specify starting directory
Чтобы указать начальный каталог для сеанса SSH, вызываемого с помощью Терминала Windows, можно использовать следующую команду: To specify the starting directory for a ssh session invoked by Windows Terminal, you can use this command:
Флаг -t приводит к выделению псевдотерминала. The -t flag forces pseudo-terminal allocation. Эту возможность можно использовать для выполнения произвольных интерактивных программ на удаленном компьютере, например при реализации служб меню. This can be used to execute arbitrary screen-based programs on a remote machine, e.g. when implementing menu services. Вам потребуется использовать экранированные двойные кавычки, так как производные оболочки Bourne shell не выполняют дополнительную обработку строки в одинарных кавычках. You will need to use escaped double quotes as bourne shell derivatives don’t do any additional parsing for a string in single quotes.
Дополнительная информация: For more information, see:
Setting up the Cygwin environment
After the installation is completed we can set up our Cygwin from the desktop shortcut. Start the application as administrator! We are now going to set up our SSH host and client configurations by executing the following commands in the Unix terminal:
“New local accout ‘sshd’?” > yes
“Do you want to install sshd as a service” > yes
“CYGWIN for daemon” > ntsec
“Do you want to use different name” > no
(so we will use the default cyg_server)
“Create new privileged user account” > yes
Password > ******** (type something for a password and remember it)
We are done here! You can check the screenshot below to verify your inputs. Now we are going to configure the user by typing ssh-user-config.
Select ‘yes’ when prompted for connecting this machine with this identity.
SSH2 DSA identity > yes
Use this identity > yes
Do the same for ECDSA algorithm!

Very important step before we continue is to execute the following command: $ net start sshd (to start the service). Now that we have everything set up in Cygwin, in order to make our SSH connection work on Windows we need to perform a few more crucial steps in configuring the Windows security policy. Within the Cygwin bash we can write > $ ssh -v localhost
On the prompts that follows, we answer with ‘yes’ and enter the password.
Now we started the ssh locally but if we try to start it remotely from our host machine we will get an error message with connection refused. To prevent this, we go to Control Panel, Users and select Change User Account Control settings (UAC). We set the bar to the minimum protection. (This could be just a temporary setting. We do this because the UAC policy is preventing remote connections to be done). This is the best time to run my registry file “Disable UAC”. Now we can go to our host computer and install PuTTY. After the installation is done we can open it and type our IP address of the remote machine with the SSH configuration.

We can click Open and establish a connection. For the security authentication we can select ‘yes’. Our username now is cyg_server and the password we specified. Whatever you try to attempt will always result in “Access Denied” so don’t be upset. Your password is right but there are a few more things that needs to be done… On the remote machine open Cygwin bash terminal and write these two commands just to be sure that they are not causing troubles in future:
$ mkpasswd.exe -l > /etc/passwd
$ mkgroup — local > /etc/group
Now run > $ cyglsa-config (This is optional Local Security Authority) Okay, let’s move on! Click the Windows Start button and select run (hold start + r). Type there gpedit.msc
Now read careful!

You can also delete the user account name from “Deny log on through remote desktop services” as well. However, it doesn’t affect much our login.
Okay get out of there quickly! We can now go to Control Panel and go to Users > Manage Accounts and we will see our User Account “cyg_server” appearing there and we don’t want this. On the next restart of the remote machine we will be held on the Windows Log on Welcome screen to choose which username we are going to use. Most probably we don’t want this as well. We can run Microsoft’s netplwiz application to set our main user to login automatically but this is pretty unprofessional. Now is the time to run the regkey that I provided in my Toolbox which is “HideUserOnWelcomeScreen”. Run that or write it manually! It will hide the username cyg_server and we won’t see it again, but we will be able to still use it in our remote login!
After all of this is done… We can go back to the host machine and run PuTTY again! Type the IP address 192.168.2.50 on port 22. Type username cyg_server and the password.
If you performed everything step by step it should have brought you here!
Now we got a great SSH remote connection!

Keep reading and I will show you how to make SSH Tunnels with PuTTY and how to establish a remote VNC connection. You will learn how to execute commands from our Unix terminal on the remote machine, how to start and close system processes with GUI or without a GUI. I will teach you how to control the remote system sound levels with just a console and much more.
Bonus to this chapter
In a real situation, we would definitely want our remote machine to keep its Firewall on. In this matter go to Control Panel -> Windows Firewall and fully activate it. While you are still in Windows Firewall, on the left side you will see Advanced Settings. Go there and it will open a new window. Select Inbound Rules and from the right side of the window choose New Rule… Select Port and click next. For specific ports write 21–23 and click next. Allow the connection and go next. Click next again and on the last window type a name SSH and description CYGWIN. If you want to have a terminal package manager so you can install any future apps with an ease, follow the instructions bellow!
Использование встроенного SSH клиента в Windows 10
В Windows 10 и Windows Server 2019 появился встроенный SSH клиент, который вы можете использовать для подключения к *Nix серверам, ESXi хостам и другим устройствам по защищенному протоколу, вместо Putty, MTPuTTY или других сторонних SSH клиентов. Встроенный SSH клиент Windows основан на порте OpenSSH и предустановлен в ОС, начиная с Windows 10 1809.
Установка клиента OpenSSH в Windows 10
Клиент OpenSSH входит в состав Features on Demand Windows 10 (как и RSAT). Клиент SSH установлен по умолчанию в Windows Server 2019 и Windows 10 1809 и более новых билдах.
Проверьте, что SSH клиент установлен:
Get-WindowsCapability -Online | ? Name -like ‘OpenSSH.Client*’

В нашем примере клиент OpenSSH установлен (статус: State: Installed).
Если SSH клиент отсутствует (State: Not Present), его можно установить:
- С помощью команды PowerShell: Add-WindowsCapability -Online -Name OpenSSH.Client*
- С помощью DISM: dism /Online /Add-Capability /CapabilityName:OpenSSH.Client
0.0.1.0
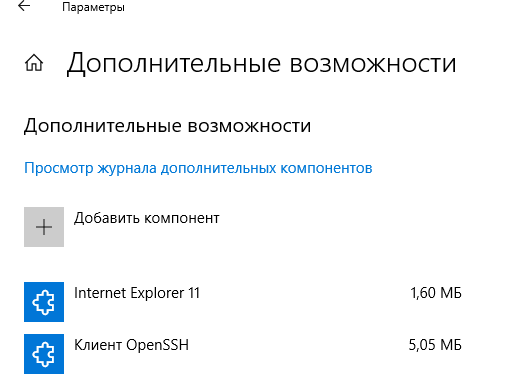
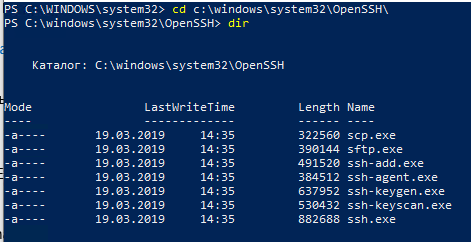
]Бинарные файлы OpenSSH находятся в каталоге c:\windows\system32\OpenSSH\.
- ssh.exe – это исполняемый файл клиента SSH;
- scp.exe – утилита для копирования файлов в SSH сессии;
- ssh-keygen.exe – утилита для генерации ключей аутентификации;
- ssh-agent.exe – используется для управления ключами;
- ssh-add.exe – добавление ключа в базу ssh-агента.
Как использовать SSH клиенте в Windows 10?
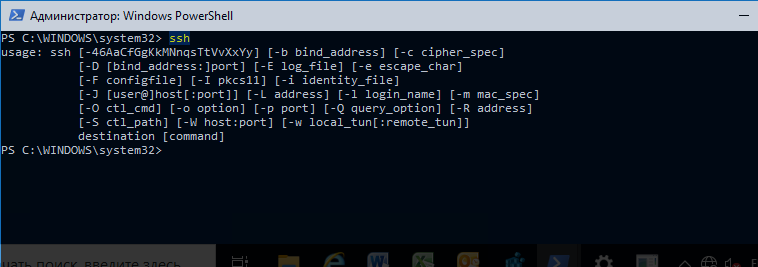
Чтобы запустить SSH клиент, запустите командную строку PowerShell или cmd.exe . Выведите доступные параметры и синтаксис утилиты ssh.exe, набрав команду:
ssh
usage: ssh [-46AaCfGgKkMNnqsTtVvXxYy] [-b bind_address] [-c cipher_spec]
[-D [bind_address:]port] [-E log_file] [-e escape_char]
[-F configfile] [-I pkcs11] [-i identity_file]
[-J [user@]host[:port]] [-L address] [-l login_name] [-m mac_spec]
[-O ctl_cmd] [-o option] [-p port] [-Q query_option] [-R address]
[-S ctl_path] [-W host:port] [-w local_tun[:remote_tun]]
destination [command]
Для подключения к удаленному серверу по SSH используется команда:
Если SSH сервер запущен на нестандартном порту, отличном от TCP/22, можно указать номер порта:
ssh username@host -p port
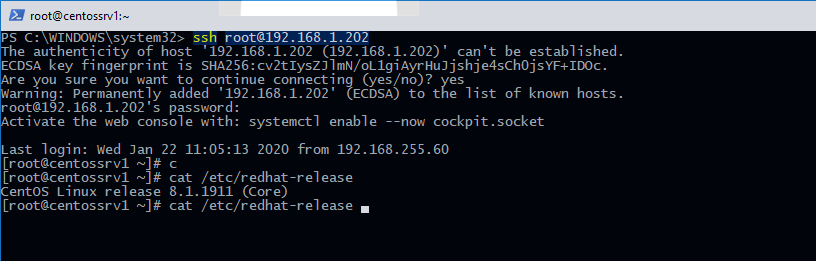
Например, чтобы подключиться к Linux хосту с IP адресом 192.168.1.202 под root, выполните:
При первом подключении появится запрос на добавление ключа хоста в доверенные, наберите yes -> Enter (при этом отпечаток ключа хоста добавляется в файл C:\Users\username\.ssh\known_hosts).
Затем появится запрос пароля указанной учетной записи, укажите пароль root, после чего должна открытся консоль удаленного Linux сервера (в моем примере на удаленном сервере установлен CentOS 8).
Если вы используете SSH аутентификацию по RSA ключам (см. пример с настройкой SSH аутентификации по ключам в Windows), вы можете указать путь к файлу с закрытым ключом в клиенте SSH так:
ssh root@192.168.1.92 -i «C:\Users\username\.ssh\id_rsa»
Также вы можете добавить ваш закрытый ключ в SSH-Agent. Сначала нужно включить службу ssh-agent и настроить ее автозапуск:
set-service ssh-agent StartupType ‘Automatic’
Start-Service ssh-agent
Добавим ваш закрытый ключ в базу ssh-agent:
Теперь вы можете подключиться к серверу по SSH без указания пути к RSA ключу, он будет использоваться автоматически. Пароль для подключения не запрашивается (если только вы не защитили ваш RSA ключ отдельным паролем):
Еще несколько полезных аргументов SSH:
- -C – сжимать трафик между клиентом и сервером (полезно на медленных и нестабильных подключениях);
- -v – вывод подробной информации обо всех действия клиента ssh;
- -R / -L – можно использовать для проброса портов через SSH туннель.
SCP: копирование файлов из/в Windows через SSH
С помощью утилиты scp.exe, которая входит в состав пакета клиента SSH, вы можете скопировать файл с вашего компьютера на SSH сервер:
scp.exe «E:\ISO\CentOS-8.1.1911-x86_64.iso» root@192.168.1.202:/home 
Можно рекурсивно скопировать все содержимое каталога:
scp -r E:\ISO\ root@192.168.1.202:/home
И наоборот, вы можете скопировать файл с удаленного сервера на ваш компьютер:
scp.exe root@192.168.1.202:/home/CentOS-8.1.1911-x86_64.iso e:\tmp
Итак, теперь вы можете прямо из Windows 10 подключаться к SSH серверам, копировать файлы с помощью scp без установки сторонних приложений и утилит.
Secure Shell (SSH)
Secure Shell (SSH) allows you to remotely administer and configure your Windows IoT Core device
Using the Windows 10 OpenSSH client
The Windows OpenSSH client requires that your SSH client host OS is Windows 10 version 1803(17134). Also, the Windows 10 IoT Core device must be running RS5 Windows Insider Preview release 17723 or greater.
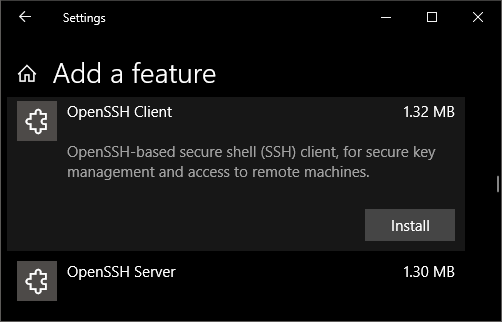
The OpenSSH Client was added to Windows 10 in 1803 (build 17134) as an optional feature. To install the client, you can search for Manage Optional Features in Windows 10 settings. If the OpenSSH Client is not listed in the list of installed features, then choose Add a feature.

Next select OpenSSH Client in the list and click Install.
To login with a username and password use the following command:
Where host is either the IP address of the Windows IoT Core device or the device name.
The first time you connect you see a message like the following:
Type yes and press enter.
If you need to login as DefaultAccount rather than as administrator, you will need to generate a key and use the key to login. From the desktop that you intend to connect to your IoT Device from, open a PowerShell window and change to your personal data folder (e.g cd
Register the key with ssh-agent (optional, for single sign-on experience). Note that ssh-add must be performed from a folder that is ACL’d to you as the signed-in user (Builtin\Administrators and the NT_AUTHORITY\System user are also ok). By default cd
from PowerShell should be sufficient as shown below.
If you receive a message that the ssh-agent service is disabled you can enable it with sc.exe config ssh-agent start=auto
To enable single sign, append the public key to the Windows IoT Core device authorized_keys file. Or if you only have one key you copy the public key file to the remote authorized_keys file.
If the key is not registered with ssh-agent, it must be specified on the command line to login:
If the private key is registered with ssh-agent, then you only need to specify DefaultAccount@host:
The first time you connect you see a message like the following:
Type yes and press enter.
You should now be connected as DefaultAccount
To use single sign-on with the administrator account, append your public key to c:\data\ProgramData\ssh\administrators_authorized_keys on the Windows IoT Core device.
You will also need to set the ACL for administrators_authorized_keys to match the ACL of ssh_host_dsa_key in the same directory.
To set the ACL using PowerShell
If you see a REMOTE HOST IDENTIFICATION CHANGED message after making changes to the Windows 10 IoT Core device, then edit C:\Users .ssh\known_hosts and remove the host that has changed.
Using PuTTY
Download an SSH client
In order to connect to your device using SSH, you’ll first need to download an SSH client, such as PuTTY.
Connect to your device
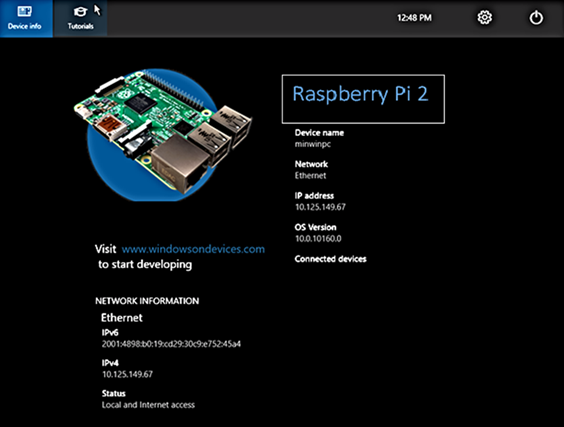
In order to connect to your device, you need to first get the IP address of the device. After booting your Windows IoT Core device, an IP address will be shown on the screen attached to the device:
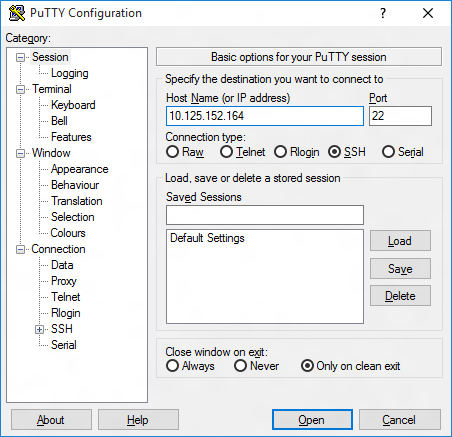
Now launch PuTTY and enter the IP address in the Host Name text box and make sure the SSH radio button is selected. Then click Open .
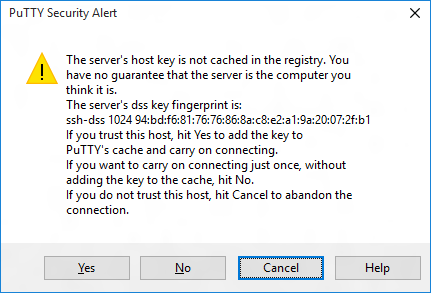
If you’re connecting to your device for the first time from your computer, you may see the following security alert. Just click Yes to continue.
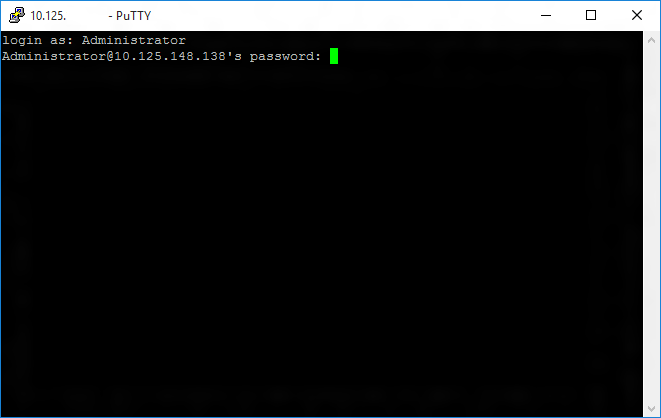
If the connection was successful, you should see login as: on the screen, prompting you to login.
Enter Administrator and press enter. Then enter the default password p@ssw0rd as the password and press enter.
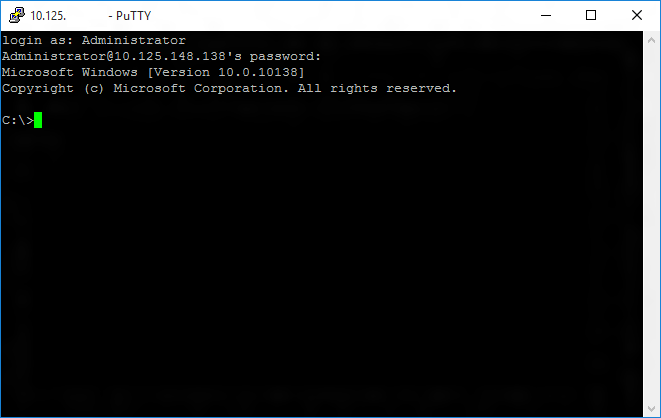
If you were able to login successfully, you should see something like this:
Update account password
It is highly recommended that you update the default password for the Administrator account.
To do this, enter the following command in the PuTTY console, replacing [new password] with a strong password:
Configure your Windows IoT Core device
To be able to deploy applications from Visual Studio 2017, you will need to make sure the Visual Studio Remote Debugger is running on your Windows IoT Core device. The remote debugger should launch automatically at machine boot time. To double check, use the tlist command to list all the running processes from PowerShell. There should be two instances of msvsmon.exe running on the device.
It is possible for the Visual Studio Remote Debugger to time out after long periods of inactivity. If Visual Studio cannot connect to your Windows IoT Core device, try rebooting the device.
If you want, you can also rename your device. To change the ‘computer name’, use the setcomputername utility:
You will need to reboot the device for the change to take effect. You can use the shutdown command as follows:
Commonly used utilities
See the Command Line Utils page for a list of commands and utilities you can use with SSH.


