- Question: Q: ssh «Permission denied (publickey,keyboard-interactive)»
- All replies
- How to Fix SSH Failed Permission Denied (publickey,gssapi-keyex,gssapi-with-mic)
- What is Causing SSH Permission Denied (publickey,gssapi-keyex,gssapi-with-mic)?
- How to fix SSH Permission denied
- Solution 1: Enable Password Authentication
- Solution 2: Change File System Permissions
- Error: Permission denied (publickey)
- Help us make these docs great!
- Permission denied (publickey) — mac
- 2 Answers 2
Question: Q: ssh «Permission denied (publickey,keyboard-interactive)»
Trying to ssh and I get the following message:
Permission denied (publickey,keyboard-interactive)
The first time I ran ssh it added the (RSA) to the list of know hosts. But then drop’d to the command line with the above message. Any ideas, why?
iMac, Mac OS X (10.4.10)
Posted on Sep 19, 2007 5:57 PM
All replies
Loading page content
Page content loaded
Sep 19, 2007 6:48 PM
Then you will not be prompted for a password.
Sep 20, 2007 7:08 AM
Sep 21, 2007 7:59 PM
.ssh/authorized_keys
or
cat /Volumes/NameOfMemStick/id_dsa.pub >>
.ssh/authorized_keys2
(assuming that you physically delivered it to the other computer via memstick) depending on what kind of key pair you created.
Sep 21, 2007 11:49 PM
I only use DSA keys to login to the servers I administrate. The command to generate a public and private key is
ssh-keygen -b 1024 -t dsa
you will then be prompted where to save the keys press enter to save them in the default location.
Generating public/private dsa key pair.
Enter file in which to save the key (/Users/user/.ssh/id_dsa):
The keys will then be saved
then you will be prompted to enter a passphrase. Dont enter a passphrase just press enter twice.
Enter passphrase (empty for no passphrase):
The terminal will now display the key fingerprint.
Now in your .ssh directory you need to copy id_dsa.pub to your user account on the server and add it to the file authorized_keys2
they way I do this is to use the scp command
scp /Users/user/.ssh/id_dsa.pub serveraddress:
I then ssh into the server and issue this command
cat id_dsa.pub >> /Users/user/.ssh/authorized_keys2
This is useful as it will add the key to the end of the file authorized_keys2. so if you add any subsequent keys you will not overwrite the previous key. This is useful if you login to servers from different computers.
Once you have your public key working you can disabled password authentication and use public key authentication only. This makes your server very secure.
Источник
How to Fix SSH Failed Permission Denied (publickey,gssapi-keyex,gssapi-with-mic)
Home » SysAdmin » How to Fix SSH Failed Permission Denied (publickey,gssapi-keyex,gssapi-with-mic)
The SSH Permission denied error appears after permission-related settings are modified on the SSH server. Usual scenarios include a new package installation or the creation of new users.
In this tutorial, you will learn how to troubleshoot the SSH Permission denied error and reconnect to your SSH server.
- SSH client on the local machine and SSH server on the remote system
- A user account to access the remote server (for password-based login)
- A user account with sudo or root privileges
What is Causing SSH Permission Denied (publickey,gssapi-keyex,gssapi-with-mic)?
The SSH Permission denied error appears when trying to SSH into a server:

Following the Permission denied statement, the bracket contains the attempted authentication methods that failed at the initiation of the connection. The error suggests that the public key is the issue, which is misleading.
One reason for the error may be sshd_config , the file that contains SSH server configuration. The other possibility is that the authorized_keys file has insufficient permissions. This file contains the list of public keys for the clients allowed to SSH into the server. Consequently, the system’s inability to read from the file results in the Permission denied error.
How to fix SSH Permission denied
Both solutions contain steps you need to perform on the server-side. Start by opening the terminal on your server and proceed with one of the solutions below.
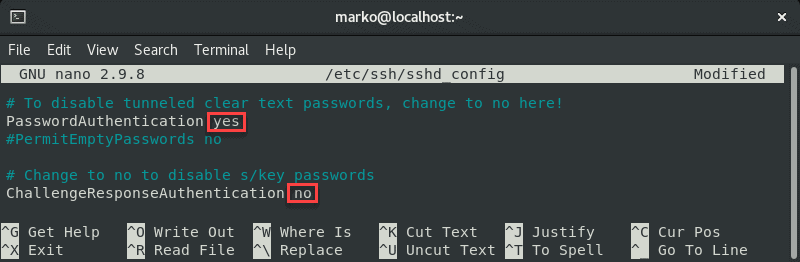
Solution 1: Enable Password Authentication
If you want to use a password to access the SSH server, a solution for fixing the Permission denied error is to enable password login in the sshd_config file.
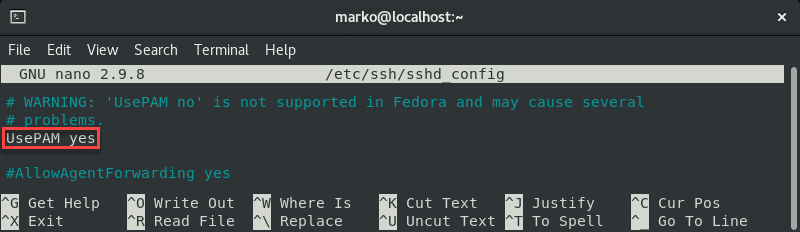
To do this, open the file in a text editor. This example uses the nano editor:
In the file, find the PasswordAuthentication line and make sure it ends with yes .
Find the ChallengeResponseAuthentication option and disable it by adding no .
If lines are commented out, remove the hash sign # to uncomment them.
Save the file and exit.
Restart the SSH service by typing the following command:
Solution 2: Change File System Permissions
Using the password-based login as the SSH authentication method is not recommended due to security concerns. Therefore, the following solution may be preferable since it troubleshoots the public key authentication method.
First, open the sshd_config file using a text editor:
In the file, make sure the following options are set as follows:
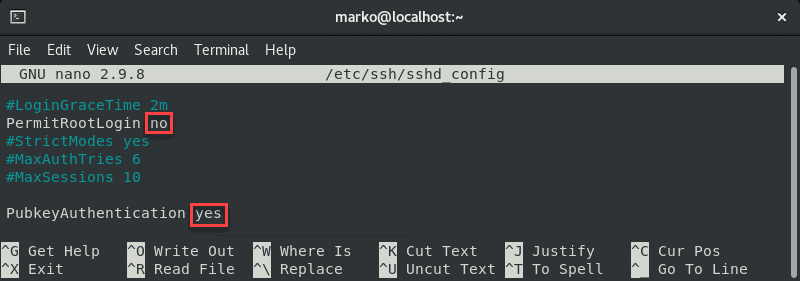
Note: The steps above are considered best security practices. If you need to use root login, set the relevant line to yes .
Comment out the GSSAPI-related options by adding the hash sign at the beginning of the line:
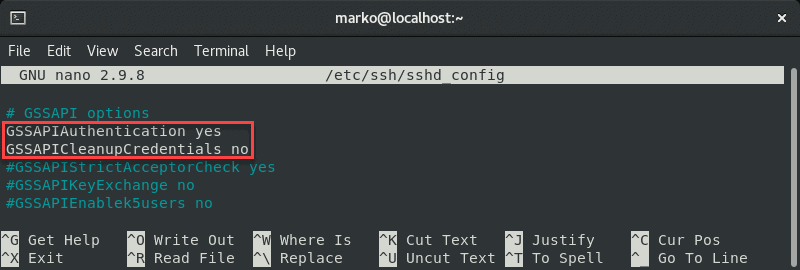
Also, make sure the UsePAM line is set to yes :
Save the file and restart the sshd service:
Now navigate to your home folder and check the permissions:

If your owner permissions are not set to read, write, and execute ( drwx—— ), use the chmod command to change them:
Now go to the .ssh folder and recheck the permissions:

This directory should also have read, write, and execute permissions for the file owner. To enforce them, use chmod again:
The .ssh folder contains the authorized_keys file. Check its permissions with:

The file owner should have read and write permissions. To set them, use:
Now try logging in with the key pair again. The output below shows a successful login attempt.

Note: For more information about Linux file permission, read the Linux File Permissions Tutorial.
This tutorial covered the steps necessary to troubleshoot the SSH Permission denied (publickey,gssapi-keyex,gssapi-with-mic) error. By completing the steps in the guide, you should fix the error and successfully SSH into your server.
Источник
Error: Permission denied (publickey)
A «Permission denied» error means that the server rejected your connection. There could be several reasons why, and the most common examples are explained below.
Should the sudo command be used with Git?
You should not be using the sudo command with Git. If you have a very good reason you must use sudo , then ensure you are using it with every command (it’s probably just better to use su to get a shell as root at that point). If you generate SSH keys without sudo and then try to use a command like sudo git push , you won’t be using the same keys that you generated.
Check that you are connecting to the correct server
Typing is hard, we all know it. Pay attention to what you type; you won’t be able to connect to «githib.com» or «guthub.com». In some cases, a corporate network may cause issues resolving the DNS record as well.
To make sure you are connecting to the right domain, you can enter the following command:
The connection should be made on port 22, unless you’re overriding settings to use SSH over HTTPS.
Always use the «git» user
All connections, including those for remote URLs, must be made as the «git» user. If you try to connect with your GitHub username, it will fail:
If your connection failed and you’re using a remote URL with your GitHub username, you can change the remote URL to use the «git» user.
You should verify your connection by typing:
Make sure you have a key that is being used
- Open Terminal Terminal Git Bash .
- Verify that you have a private key generated and loaded into SSH.
If you have GitHub Desktop installed, you can use it to clone repositories and not deal with SSH keys.
If you are using Git Bash, turn on ssh-agent:
If you are using another terminal prompt, such as Git for Windows, turn on ssh-agent:
Verify that you have a private key generated and loaded into SSH.
- Open Terminal Terminal Git Bash .
- Verify that you have a private key generated and loaded into SSH.
The ssh-add command should print out a long string of numbers and letters. If it does not print anything, you will need to generate a new SSH key and associate it with GitHub.
Tip: On most systems the default private keys (
/.ssh/identity ) are automatically added to the SSH authentication agent. You shouldn’t need to run ssh-add path/to/key unless you override the file name when you generate a key.
Getting more details
You can also check that the key is being used by trying to connect to git@github.com :
In that example, we did not have any keys for SSH to use. The «-1» at the end of the «identity file» lines means SSH couldn’t find a file to use. Later on, the «Trying private key» lines also indicate that no file was found. If a file existed, those lines would be «1» and «Offering public key», respectively:
Verify the public key is attached to your account
You must provide your public key to GitHub to establish a secure connection.
Start SSH agent in the background.
Find and take a note of your public key fingerprint.
In the upper-right corner of any page, click your profile photo, then click Settings. 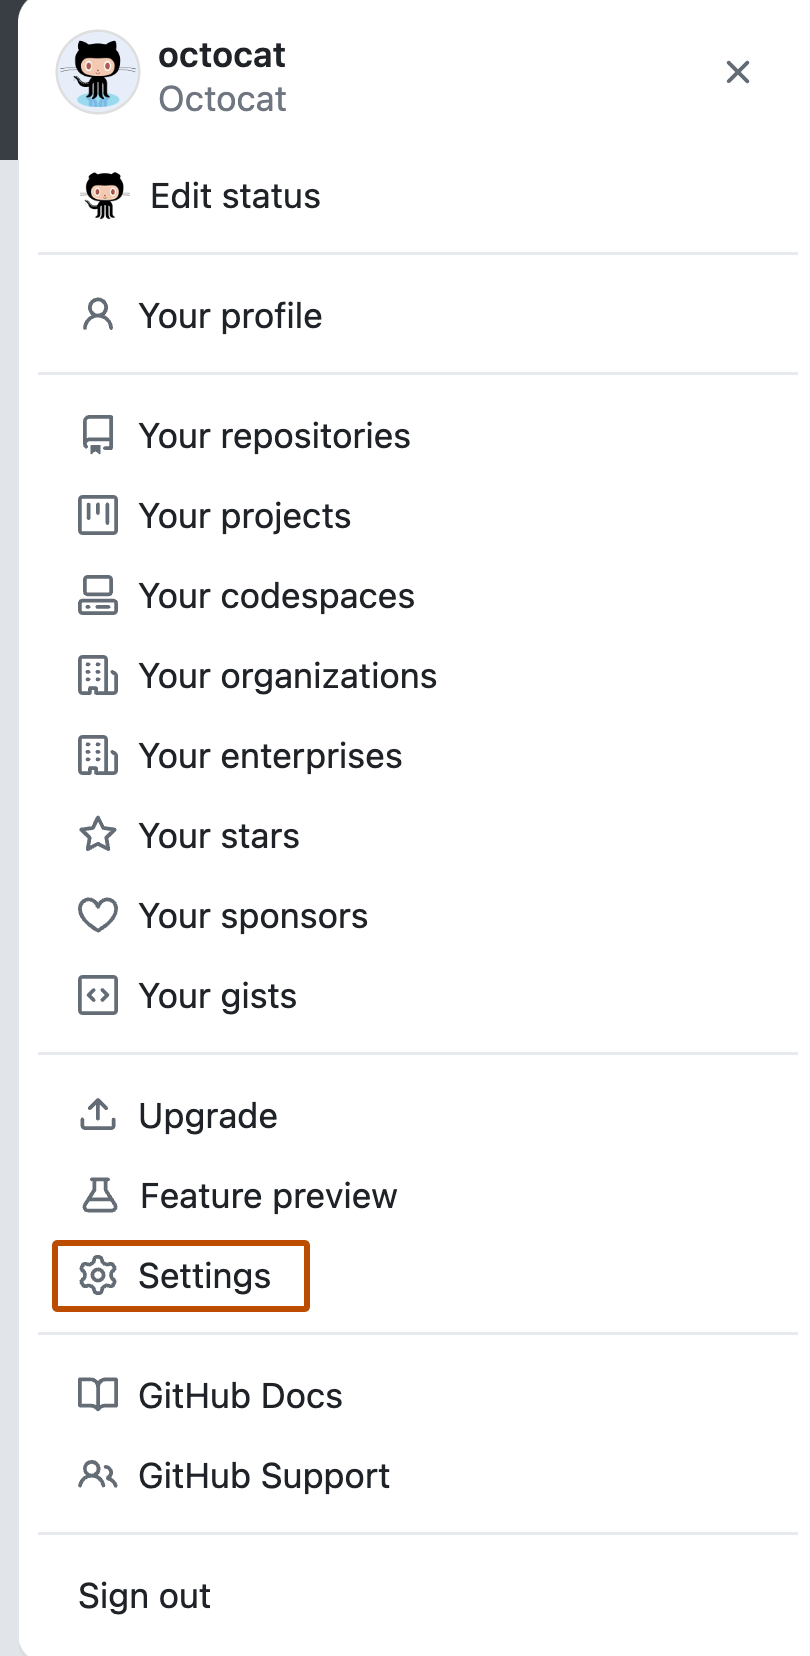
In the user settings sidebar, click SSH and GPG keys. 
Compare the list of SSH keys with the output from the ssh-add command. 
Open the command line.
Start SSH agent in the background.
Find and take a note of your public key fingerprint.
In the upper-right corner of any page, click your profile photo, then click Settings.
In the user settings sidebar, click SSH and GPG keys.
Compare the list of SSH keys with the output from the ssh-add command.
Start SSH agent in the background.
Find and take a note of your public key fingerprint. If you’re using OpenSSH 6.7 or older:
If you’re using OpenSSH 6.8 or newer:
In the upper-right corner of any page, click your profile photo, then click Settings.
In the user settings sidebar, click SSH and GPG keys.
Compare the list of SSH keys with the output from the ssh-add command.
If you don’t see your public key in GitHub, you’ll need to add your SSH key to GitHub to associate it with your computer.
Warning: If you see an SSH key you’re not familiar with on GitHub, delete it immediately and contact GitHub Support, for further help. An unidentified public key may indicate a possible security concern. For more information, see «Reviewing your SSH keys.»
Help us make these docs great!
All GitHub docs are open source. See something that’s wrong or unclear? Submit a pull request.
Источник
Permission denied (publickey) — mac
I can’t log into my droplet. This is another post I made about the issue that did not solve my problem, but explains some of what I have tried. https://stackoverflow.com/questions/52917470/permission-denied-publickey-digital-ocean/52972508?noredirect=1#comment92856534_52972508
What I just tried:
ssh-key gen . Naming the keys portfolio . Could this naming be a problem? The only keys that work on my machine are the keys with the default name id_rsa , but there cannot be more than one set with that name. There is a line in the debug that says Offering public key: RSA SHA256:blahblah /Users/ME/.ssh/id_rsa so it looks like it connecting to the wrong key. I have tried ssh -i
/.ssh/portfolio ME@139.xx.xx.xxx to connect to a specific private key called portfolio . Nope. Permission denied (publickey).
Log into server inside DO console. nano /.ssh/authorized_keys . Copy in my public key called portfolio. Got this here
Big fat Permission denied (publickey). Obviously logging in does not work either. Why? The keys match and are in place yet still do not find each other.
Further debugging: Using the digital ocean console, currently the only way I can access my droplet, I see that copy/paste does not work. Pasting in a public key results in a string of totally different characters than the real key. This even happens in nano.

2 Answers 2
I wanted to update how I solved this. The problem was that:
- The key was not making it to the server correctly. Or an incorrect version was making it.
- Once I got the correct keys placed, my local machine and the server were not finding the correct keys to match each other.
Solved 1. — ssh-copy-id -i
/.ssh/mykey root@MY-IP for trying to copy the public key did not work. I also tried pasting it directly into
/.ssh/authorized_keys in the Digital Ocean console since I was locked out locally, but many of the pasted characters were wrong. Something was screwey about the pasting function there and Digital Ocean staff didn’t know anything about that.
So to work locally I reset root PW on DO console then ssh myUser@123.456.789.10 on my local machine but with a password. Then in
/.ssh/authorized_keys I pasted in the public key and used a diff tool to make sure they were the same. This time there were.
Solved 2. — The keys still were not connecting. I could connect using only using -i flag (which means identity _file and connects the keys manually) ssh -i
/.ssh/mykey myUser@123.456.789.10 but I didn’t want to type type this every time so I make a
Then, going ssh myappp I am able to login. Not sure why all these things are occurring. I thought maybe since I did not name them properly since id_rsa works okay, but id_rsa2 does not so not sure what would work then, but these workarounds solved this issue.
Источник


