- Scripting and Task Automation
- Using Scripting
- Checking Results
- Commands Syntax
- Command Parameters with Spaces
- Environment Variables
- Timestamp
- Script Arguments
- Case Sensitivity of File Names
- Comments
- Commands
- The Console Interface Tool
- Verifying the Host Key or Certificate in Script
- Running a Script under a Different Account (e.g., Using a Scheduler)
- Sharing Configuration with Graphical Mode
- Generating Script
- Example
- Converting Script to Code Based on .NET Assembly
- Использование встроенного SSH клиента в Windows 10
- Установка клиента OpenSSH в Windows 10
- Как использовать SSH клиенте в Windows 10?
- SCP: копирование файлов из/в Windows через SSH
Scripting and Task Automation
This article contains detailed description of scripting/automation functionality. You may want to see simplified guide to the functionality instead.
In addition to graphical interface, WinSCP offers scripting/console interface with many commands. The commands can be typed in interactively, or read from script file or another source.
Using scripting interface directly is recommended for simple tasks not requiring any control structures. For complex tasks, using WinSCP .NET assembly is preferred.
Using Scripting
Enter the console/scripting mode by using winscp.com ; or /console command-line parameter with winscp.exe . For details see console/scripting command-line parameters.
For automation, commands can be read from a script file specified by /script switch, passed from the command-line using the /command switch, or read from standard input of winscp.com .
When running commands specified using /script or /command , batch mode is used implicitly and overwrite confirmations are turned off. In an interactive scripting mode, the user is prompted in the same way as in GUI mode. To force batch mode (all prompts are automatically answered negatively) use the command option batch abort . For batch mode it is recommended to turn off confirmations using option confirm off to allow overwrites (otherwise the overwrite confirmation prompt would be answered negatively, making overwrites impossible).
Multiple sessions can be opened simultaneously. Use the session command to switch between them.
Note that the first connection to an SSH server requires verification of the host key. Also the first connection to FTPS or WebDAVS host with certificate signed by untrusted authority requires verification of the certificate.
Checking Results
WinSCP executables return exit code 1 when any command is interrupted due to an error or any prompt is answered Abort (even automatically in batch mode). Otherwise it returns the exit code 0.
To further analyze results of scripted operations, you will find XML logging useful.
Commands Syntax
All WinSCP commands have syntax:
Command Parameters with Spaces
Command parameters that include space(s) have to be surrounded by double-quotes. To use double-quote literally, double it:
Note that when you are specifying commands on command-line using /command , you need to surround each command by double-quote and escape the in-command double-quotes by doubling them.
To debug the quoting, enable session logging on level Debug 1 ( /loglevel=1 ). The log will show how WinSCP understands both your command-line and individual scripting commands.
Environment Variables
You can use environment variables in the commands, with syntax %NAME% :1
Note that variable expansion is different than in Windows batch files:
- You cannot use any string processing syntax.
- You cannot use dynamic/pseudo environment variables, such as %DATE% or %RANDOM% .
- References to undefined variables are kept intact (not removed).
- You can use %WINSCP_PATH% to refer to WinSCP executable path.
Timestamp
WinSCP automatically resolves %TIMESTAMP[rel]#format% to a real time (optionally to a past or future time) with the given format. The format may include yyyy for year, mm for month, dd for day, hh for hour, nn for minute and ss for second. For example, the %TIMESTAMP#yyyy-mm-dd% resolves to 2016-06-22 on 22 June 2016. See other formats you can use.
The optional rel part, with syntax [-+]time[YDHNS] , produces past ( — ) or future ( + ) timestamps. One of the following units must be used: Y (years), D (days), H (hours), N (minutes) or S (seconds). For example, the %TIMESTAMP-1D#yyyy-mm-dd% (the -1D meaning one day in the past) resolves to 2016-06-21 on 22 June 2016.
To use %TIMESTAMP. % on a command-line in a batch file, you need to escape the % by doubling it to %%TIMESTAMP. %% , to avoid a batch file interpreter trying to resolve the variable.
Script Arguments
You can reference script arguments (passed on command-line using parameter /parameter ) using syntax %N% , where N is ordinal number of argument:1
Case Sensitivity of File Names
Note that WinSCP treats filenames in case sensitive manner. So even if your server treats filenames in case insensitive manner, make sure you specify case properly.2
Comments
To insert comments into the script file, start the line with # (hash):
Commands
The following commands are implemented.
To see help for the command, read respective documentation article below or type command help directly in console.
| Command | Description |
|---|---|
| call | Executes arbitrary remote shell command |
| cd | Changes remote working directory |
| checksum | Calculates checksum of remote file |
| chmod | Changes permissions of remote file |
| close | Closes session |
| cp | Duplicates remote file |
| echo | Prints message onto script output |
| exit | Closes all sessions and terminates the program |
| get | Downloads file from remote directory to local directory |
| help | Displays help |
| keepuptodate | Continuously reflects changes in local directory on remote one |
| lcd | Changes local working directory |
| lls | Lists the contents of local directory |
| ln | Creates remote symbolic link |
| lpwd | Prints local working directory |
| ls | Lists the contents of remote directory |
| mkdir | Creates remote directory |
| mv | Moves or renames remote file |
| open | Connects to server |
| option | Sets or shows value of script options |
| put | Uploads file from local directory to remote directory |
| pwd | Prints remote working directory |
| rm | Removes remote file |
| rmdir | Removes remote directory |
| session | Lists connected sessions or selects active session |
| stat | Retrieves attributes of remote file |
| synchronize | Synchronizes remote directory with local one |
The Console Interface Tool
Learn about winscp.com , the console interface tool.
Verifying the Host Key or Certificate in Script
The first connection to an SSH server requires verification of the host key. To automate the verification in script, use -hostkey switch of open command to accept the expected host key automatically.
You can find the key fingerprint on Server and Protocol Information Dialog. You can also copy the key fingerprint to clipboard from the confirmation prompt on the first (interactive) connection using Copy key fingerprints to clipboard command (in the script, use SHA-256 fingerprint of the host key only). Learn more about obtaining host key fingerprint.
FTPS/WebDAVS TLS/SSL certificate signed by untrusted authority may also need to be verified. To automate the verification in script, use -certificate switch of open command to accept the expected certificate automatically.
Running a Script under a Different Account (e.g., Using a Scheduler)
If you are going to run the script under a different account (for example using the Windows scheduler), don’t forget that WinSCP still needs to access its configuration. Note that when using registry as configuration storage, the settings are accessible only for your Windows account, so in such a case you may need to either transfer the configuration from your account registry to the other account’s registry or use the INI file instead.
Note that the configuration also includes verified SSH host keys and FTPS/WebDAVS TLS/SSL certificates.
Sharing Configuration with Graphical Mode
In scripting/console mode, WinSCP shares configuration with graphical mode by default. While this can be useful in some cases, it can also be a disadvantage.
The disadvantage is that change to configuration in graphical mode may break your script (common example is enabling Existing files only option for synchronization). Also the script is not portable to other machines, when it relies on an external configuration.
If you want to protect your script from such inadvertent change or if you want to make the script portable, you should isolate its configuration from graphical mode explicitly.
The best way to do that is to configure all the options you need using script commands only ( option command, switches of other commands, session URL), or if no such command is available, using raw site settings and raw configuration. Finally force scripting mode to start with the default configuration using /ini=nul command-line parameter.
Alternatively export your configuration to a separate INI file and reference it using /ini= command-line parameter. Also consider setting the INI file read-only, to prevent WinSCP writing to it, when exiting. Particularly, if you are running multiple scripts in parallel, to prevent different instances of WinSCP trying to write it at the same time.
Generating Script
Example
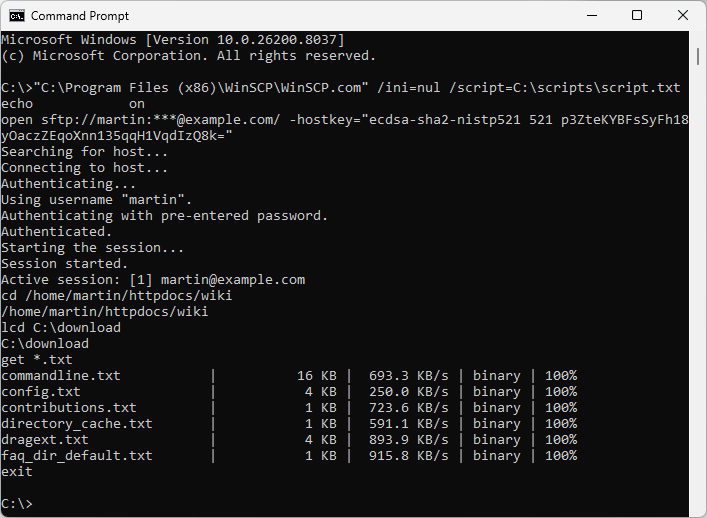
In the example below, WinSCP connects to example.com server with account user , downloads file and closes the session. Then it connects to the same server with the account user2 and uploads the file back.
Save the script to the file example.txt . To execute the script file use the following command.
For simple scripts you can specify all the commands on command-line using /command switch:
In Windows batch file, you can use ^ to split too long command-line to separate lines by escaping following new-line character:
Converting Script to Code Based on .NET Assembly
When you find yourself limited by scripting capabilities, you may consider converting your script to code that uses WinSCP .NET assembly.
Использование встроенного SSH клиента в Windows 10
В Windows 10 и Windows Server 2019 появился встроенный SSH клиент, который вы можете использовать для подключения к *Nix серверам, ESXi хостам и другим устройствам по защищенному протоколу, вместо Putty, MTPuTTY или других сторонних SSH клиентов. Встроенный SSH клиент Windows основан на порте OpenSSH и предустановлен в ОС, начиная с Windows 10 1809.
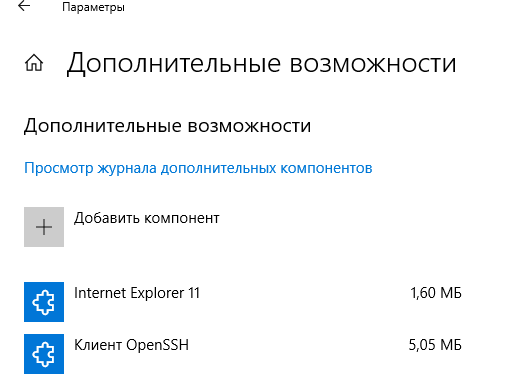
Установка клиента OpenSSH в Windows 10
Клиент OpenSSH входит в состав Features on Demand Windows 10 (как и RSAT). Клиент SSH установлен по умолчанию в Windows Server 2019 и Windows 10 1809 и более новых билдах.
Проверьте, что SSH клиент установлен:
Get-WindowsCapability -Online | ? Name -like ‘OpenSSH.Client*’

В нашем примере клиент OpenSSH установлен (статус: State: Installed).
Если SSH клиент отсутствует (State: Not Present), его можно установить:
- С помощью команды PowerShell: Add-WindowsCapability -Online -Name OpenSSH.Client*
- С помощью DISM: dism /Online /Add-Capability /CapabilityName:OpenSSH.Client
0.0.1.0
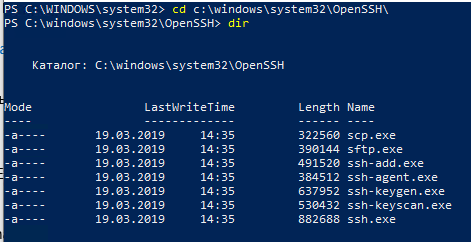
]Бинарные файлы OpenSSH находятся в каталоге c:\windows\system32\OpenSSH\.
- ssh.exe – это исполняемый файл клиента SSH;
- scp.exe – утилита для копирования файлов в SSH сессии;
- ssh-keygen.exe – утилита для генерации ключей аутентификации;
- ssh-agent.exe – используется для управления ключами;
- ssh-add.exe – добавление ключа в базу ssh-агента.
Как использовать SSH клиенте в Windows 10?
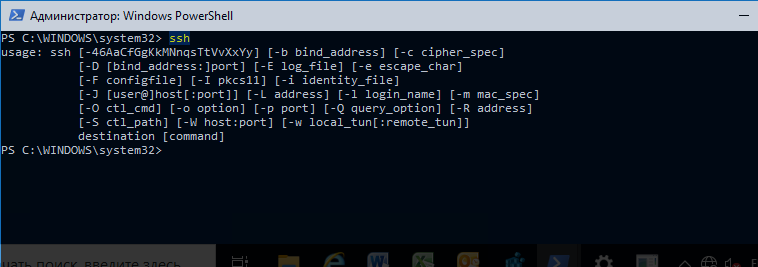
Чтобы запустить SSH клиент, запустите командную строку PowerShell или cmd.exe . Выведите доступные параметры и синтаксис утилиты ssh.exe, набрав команду:
ssh
usage: ssh [-46AaCfGgKkMNnqsTtVvXxYy] [-b bind_address] [-c cipher_spec]
[-D [bind_address:]port] [-E log_file] [-e escape_char]
[-F configfile] [-I pkcs11] [-i identity_file]
[-J [user@]host[:port]] [-L address] [-l login_name] [-m mac_spec]
[-O ctl_cmd] [-o option] [-p port] [-Q query_option] [-R address]
[-S ctl_path] [-W host:port] [-w local_tun[:remote_tun]]
destination [command]
Для подключения к удаленному серверу по SSH используется команда:
Если SSH сервер запущен на нестандартном порту, отличном от TCP/22, можно указать номер порта:
ssh username@host -p port
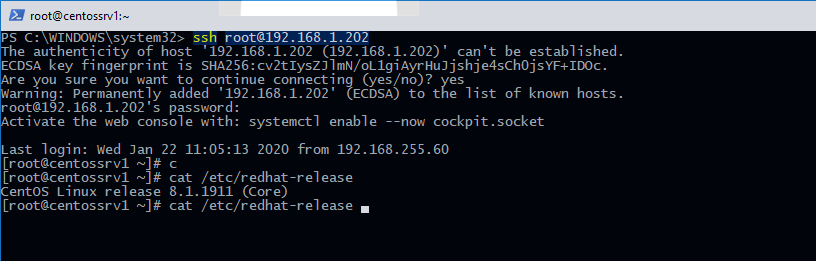
Например, чтобы подключиться к Linux хосту с IP адресом 192.168.1.202 под root, выполните:
При первом подключении появится запрос на добавление ключа хоста в доверенные, наберите yes -> Enter (при этом отпечаток ключа хоста добавляется в файл C:\Users\username\.ssh\known_hosts).
Затем появится запрос пароля указанной учетной записи, укажите пароль root, после чего должна открытся консоль удаленного Linux сервера (в моем примере на удаленном сервере установлен CentOS 8).
Если вы используете SSH аутентификацию по RSA ключам (см. пример с настройкой SSH аутентификации по ключам в Windows), вы можете указать путь к файлу с закрытым ключом в клиенте SSH так:
ssh root@192.168.1.92 -i «C:\Users\username\.ssh\id_rsa»
Также вы можете добавить ваш закрытый ключ в SSH-Agent. Сначала нужно включить службу ssh-agent и настроить ее автозапуск:
set-service ssh-agent StartupType ‘Automatic’
Start-Service ssh-agent
Добавим ваш закрытый ключ в базу ssh-agent:
Теперь вы можете подключиться к серверу по SSH без указания пути к RSA ключу, он будет использоваться автоматически. Пароль для подключения не запрашивается (если только вы не защитили ваш RSA ключ отдельным паролем):
Еще несколько полезных аргументов SSH:
- -C – сжимать трафик между клиентом и сервером (полезно на медленных и нестабильных подключениях);
- -v – вывод подробной информации обо всех действия клиента ssh;
- -R / -L – можно использовать для проброса портов через SSH туннель.
SCP: копирование файлов из/в Windows через SSH
С помощью утилиты scp.exe, которая входит в состав пакета клиента SSH, вы можете скопировать файл с вашего компьютера на SSH сервер:
scp.exe «E:\ISO\CentOS-8.1.1911-x86_64.iso» root@192.168.1.202:/home 
Можно рекурсивно скопировать все содержимое каталога:
scp -r E:\ISO\ root@192.168.1.202:/home
И наоборот, вы можете скопировать файл с удаленного сервера на ваш компьютер:
scp.exe root@192.168.1.202:/home/CentOS-8.1.1911-x86_64.iso e:\tmp
Итак, теперь вы можете прямо из Windows 10 подключаться к SSH серверам, копировать файлы с помощью scp без установки сторонних приложений и утилит.


