- Configure SSH Server on Tiny Core Linux using openSSH
- PART – A: Install and Configure SSH
- 1. Install OpenSSH Package:
- 2. Create SSH Config from Template:
- 3. Start the SSH Service:
- 4. Change the “tc” User Password:
- 5. Check the IP Address:
- 6. Verify SSH Service:
- 7. SHH from a Client Machine:
- PART – B: Make the SSH Config Persistent:
- 1. Edit the ‘.filetool.lst‘ File:
- 2. Backup Config Files Defined in ‘.filetool.lst‘ File:
- 3. Edit the Startup File:
- PART – C: Configure SSH to Login without Passwords:
- 1. Create SSH Keys on the Client Machine:
- 2. Upload the Public Key from Client Machine to SSH Server:
- 3. Move and Rename the Client Public Key on SSH Server:
- 4. Make the Certificate File Persistent:
- 5. Test Password-less SSH Login:
- piCore (Tiny Core) Linux on Raspberry Pi
- Why is Tiny Core special?
- Step 1. Download the piCore image:
- 2. Download and Install Etcher:
- 3. Burn the piCore image into SD Card:
- 4. Boot Raspberry Pi with piCore:
- 5. SD Card Partitions:
- 6. Expand the /dev/mmcblk0p2 Partition:
- 7. Reinstall SSH Extension
- Install and Configure SSH
- 1. Install OpenSSH Package:
- 2. Create SSH Config from Template:
- 3. Start the SSH Service:
- 4. Change the “tc” User Password:
- 5. Check the IP Address:
- 6. Verify SSH Service:
- 7. SSH from a Client Machine:
- Related
- Harshvardhan Mishra
- A Firewall Engineer
- Everything about Cisco ASA, PIX, Check Point, Firewall, GNS3, Linux, Unix, Microsoft Windows, Networking, Network Security
- How to install and configure OpenSSH (SSH Server) in Tiny Core Linux
Configure SSH Server on Tiny Core Linux using openSSH
Pradeep Singh | 18th Aug 2017
Tiny Core (Core) Linux doesn’t come with any default SSH Server, which means you can’t do ssh login if you wish to configure this incredibly sim operating system remotely. If you wish to run Tiny Core on a headless machine and want to configure it remotely over ssh login session, follow this article to configure SSH Server on Tiny Core –
PART – A: Install and Configure SSH
1. Install OpenSSH Package:
Install OpenSSH package using the following command –
2. Create SSH Config from Template:
Copy the example configuration file into the ssh_config file using the following commands –
3. Start the SSH Service:
Start the SSH service using the following command –
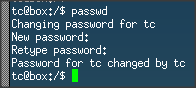
4. Change the “tc” User Password:
Change the Password for default “tc” user, so that you can enter this password on ssh user/password prompt. Use the following command to change the password –
Note: If you want to change the Root Password, you can switch to root using “sudo su” and then use the “passwd” command to change the root password.
5. Check the IP Address:
To ssh into your Tiny Core Machine you need the IP Address assigned to it. You can get hold of IP Address using the following command
I am assuming you are using DHCP server. In case you aren’t, follow this article to assign static IP to your Tiny Core machine – Assign Persistent Static IP Address to Tiny Core Linux
6. Verify SSH Service:
You can grep the “sshd” (ps | grep ssh) process or you can check if your machine is listening on port 22 using the following command –
7. SHH from a Client Machine:
From Linux client machine you can use “ssh tc@IP_Address” command to login to your Tiny Core instance. On windows machines, you can use something like putty client for SSH login.
PART – B: Make the SSH Config Persistent:
As Tiny Core Linux runs into the system memory (RAM), it looses all the configuration changes if the system reboots. To make the configuration persistent you may follow these steps –
1. Edit the ‘.filetool.lst‘ File:
The text file “/opt/.filetool.lst” lists files and directories to be backed up at power down (manually using ‘filetool.sh -b’ command) and restored (automatically) after reboot. Add Ssh and Password shadow files paths to this file using following 2 commands –
Following is the console output for the same, along with the “cat” command output to display the final contents of the “.filetool.lst” file –
2. Backup Config Files Defined in ‘.filetool.lst‘ File:
Tiny Core includes the ‘filetool‘ utility for saving personal settings and data using the paths defined in ‘/opt/.filetool.lst’. You can trigger the backup using the following command –
Following is the console output for this command –
3. Edit the Startup File:
To load a library or execute a command every time the computer boots up, you need to add it into the ‘/opt/bootlocal.sh‘ file. Execute the following command to start the Ssh service automatically after system reboot –
backup the configuration using the following command –
Following is the console output for the same, along with the “cat” command output to display the final contents of the “ bootlocal.sh ” file –
With this, you are ready to reboot the system to test if the SSH still works. If you want you may reboot the system using “sudo reboot” command.
PART – C: Configure SSH to Login without Passwords:
1. Create SSH Keys on the Client Machine:
On the Linux client machine shell, use “ ssh-keygen -t rsa ” command to generate the SSH RSA Certificate File.
Make a note of Public Key name and the path from this console output (For example, my Key’s name and the location is mentioned in this line – “ Your public key has been saved in /Users/pradeesi/.ssh/id_rsa.pub.”). You will need it in next step.
2. Upload the Public Key from Client Machine to SSH Server:
From the Linux client machine, you can use sftp command to upload the ssh keys onto the Tiny Core machine (On Windows machine, you can use some tool like FileZilla) –
Use “tc” user’s password for authentication.
3. Move and Rename the Client Public Key on SSH Server:
On MicroCore / Tiny Core machine, move the uploaded ssh keys from the home directory to “.ssh” directory (you may need to create .ssh directory using “mkdir .ssh” command) and rename the key file as “authorized_keys” –
4. Make the Certificate File Persistent:
Without making the configuration persistent, you will lose all the configuration changes made during the runtime, if the TinyCore machine reboots. Use following commands to make the config persistent –
Following is the console output of “.filetool.lst” file –
5. Test Password-less SSH Login:
With this, you should be able to login to your Tiny Core instance without password –
Источник
piCore (Tiny Core) Linux on Raspberry Pi
Tiny Core, a unique and minimalist distribution of the Linux operating system and tools. piCore is the Raspberry Pi port of Tiny Core Linux, which is an independent system architected by Robert Shingledecker and now developed by a small team of developers with strong community support. As piCore runs entirely in RAM, boot media is not used after boot and there is no installation in conventional terms.
Tiny Core Linux is not a traditional distribution but a toolkit to create your own customized system. It offers not only flexibility, small footprint but a very recent kernel and set of applications making it ideal for custom system, appliances as well as to learn Linux specially on the Raspberry Pi.
Why is Tiny Core special?
- Very Small. At 10 megabytes, Tiny Core is 1/400 to 1/100 the size of the most widely used operating systems in the world (even compared to most Linux distros). That makes Tiny Core flexible enough to be stored and run from usb sticks, a just-about-full CD, or even embedded devices. hardware.
- Linux. Tiny Core uses the Linux Kernel and a set of command-line (text interface) tools including busybox.
- A GUI Desktop. Tiny Core has a flexible and fully-customizable Graphical User Interface Desktop. Mouse, keyboard, and screen support basically works out-of-the-box thanks to FLWM, the FLTK Desktop. You can also quickly install and try out a variety of other desktops and interfaces including Fluxbox, XFCE, OpenBox, IceWM, Joe’s WM, LXDE, and others.
- Minimal. Tiny Core does not ‘ship’ with most end-user software. Instead, Tiny Core lets you quickly and easily compare, select, download, and install your preferred web browser, word processor, music player, and other software.
- Unusually Stable. Every time Tiny Core loads, it is brand-spanking new. That means Tiny Core just doesn’t get a blue screen. Instead of installing programs into the system file space and risking damage to the system files, Tiny Core uses program ‘extensions’ that are re-prepared at each reboot … and they are prepared fast.
- Unusually Fast. Unlike most operating systems, the Tiny Core can run completely from RAM. Individuals with RAM to spare can even use Tiny Core to load and run their programs from RAM (you didn’t know your computer could run Open Office and Firefox so quick). Experienced users can still install Tiny Core to disk, but Tiny Core can run in 48 megabytes of RAM … or less.
- Internet ready. Tiny Core almost always finds your network card right right away. You’ll be adding applications and tools after an unusually quick boot. You can even come back here and ransack the forums if you find you need help.
- Available even smaller. Linophiles that get things done without a GUI can get the MicroCore, a version of Tiny Core without X that is under 7 MB.
- An open source community. Tiny Core is under active community development, led by a team of really dedicated people. You can find answers and ask questions in the forum, add your own experiences to the wiki, help add extensions (programs) to the Tiny Core Repository, and read enough Tiny Core to make your head spin.
Now Follow given Steps:
Step 1. Download the piCore image:
You can download the latest piCore image from the following download link (for this article I am using the piCore-9.0.3.zip image) –
2. Download and Install Etcher:
After downloading the piCore image, you need to flash it into the SD Card of your Raspberry Pi. Etcher is a great utility to flash the OS images into SD Cards or USB Drives. You can download it from Etcher home page –
3. Burn the piCore image into SD Card:
Connect your SD Card with your computer and use Etcher to flash it with OS.
4. Boot Raspberry Pi with piCore:
Connect the flashed SD Card on your Raspberry Pi and power it on.
5. SD Card Partitions:
The first partition (/dev/mmcblk0p1) is Win95 FAT32 (VFAT) type partition; it contains the basic piCore system and the Raspberry Pi boot loader, firmware and other support files. This partition is unmounted during operation, and the system does not use it after the boot process gets completed.
The second one (/dev/mmcblk0p2) is ext4 type partition; it is used for pre-installed extensions like ssh. However, the size of this partition is very small and it won’t allow you to install any additional extensions. You must expand this partition to have enough free space for additional extensions and backups.
6. Expand the /dev/mmcblk0p2 Partition:
6.1 Start fdisk partitioning tool as root, using the following command –
6.2 Now list partitions with ‘p‘ command and write down the starting and
ending cylinders of the second partition.
6.3 Delete the second partition with ‘d‘ command and then enter ‘2‘ as ‘Partition Number’.
6.4 Create a new partition using ‘n‘ command. Select ‘p’ for ‘Primary Partition‘ and ‘2‘ for ‘Partition Number’. For ‘First Cylinder’ use the same value as you had in the original partition (you made note of this value in step # 6.2). You may use the default value for ‘Last Cylinder’ or may use the smaller value if you want to create more partitions (for ex: swap disk).
6.5 Reboot the system using the following command –
6.6 After the system boots up, expand the ‘/dev/mmcblk0p2‘ partition using the “sudo resize2fs /dev/mmcblk0p2” command –
With this, your Raspberry Pi is ready with piCore.
The default user ssh or shell user for piCore is “tc” and its default password is “piCore“.
For “root” user, login to piCore shell using “tc” user and run “sudo passwd” command to change the root password.
7. Reinstall SSH Extension
piCore comes with SSH extension included, if you aren’t careful during the partition expansion process, it may stop working (if you lose tce directory from /dev/mmcblk0p2 partition).
Install and Configure SSH
1. Install OpenSSH Package:
Install OpenSSH package using the following command –
2. Create SSH Config from Template:
Copy the example configuration file into the ssh_config file using the following commands –
3. Start the SSH Service:
Start the SSH service using the following command –
4. Change the “tc” User Password:
Change the Password for default “tc” user, so that you can enter this password on ssh user/password prompt. Use the following command to change the password –
Note: If you want to change the Root Password, you can switch to root using “sudo su” and then use the “passwd” command to change the root password.
5. Check the IP Address:
To ssh into your Tiny Core Machine you need the IP Address assigned to it. You can get hold of IP Address using the following command
6. Verify SSH Service:
You can grep the “sshd” (ps | grep ssh) process or you can check if your machine is listening on port 22 using the following command –
7. SSH from a Client Machine:
From Linux client machine you can use “ssh [email protected]_Address” command to login to your Tiny Core instance. On windows machines, you can use something like putty client for SSH login.
I hope you like this post”piCore (Tiny Core) Linux on Raspberry Pi”. Do you have any questions? Leave a comment down below! Thanks for reading. If you like this post probably you might like my next ones, so please support me by subscribing my blog.
Explore Some more Raspberry Pi Tutorials :
Related
Harshvardhan Mishra
Hi, I’m Harshvardhan Mishra. I am a tech blogger and an IoT Enthusiast. I am eager to learn and explore tech related stuff! also, I wanted to deliver you the same as much as the simpler way with more informative content. I generally appreciate learning by doing, rather than only learning. If you want to help support me on my journey, consider sharing my articles, or Buy me a Coffee! Thank you for reading my blog! Happy learning!
Источник
A Firewall Engineer
Everything about Cisco ASA, PIX, Check Point, Firewall, GNS3, Linux, Unix, Microsoft Windows, Networking, Network Security
How to install and configure OpenSSH (SSH Server) in Tiny Core Linux
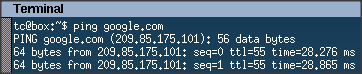
1. Make sure Tiny Core Linux is connected to the internet. Simple ping test to google.com is enough. If there is reply from google.com, it means that internet is working fine. However, if there is no reply, then you need to check the connection.
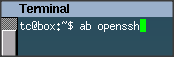
2. Open terminal and type “ab openssh”. Ab is stand for AppBrowser.
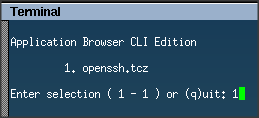
3. Once the Ab (AppBrowser) found the OpenSSH package which is openssh.tcz, enter “1” to select it.
4. The following menu explaining about openssh.tcz will be presented. Enter “q” to quit from the info page.
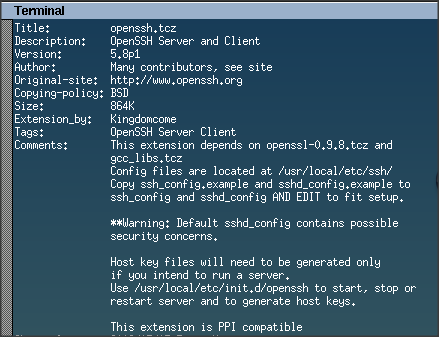
5. Enter “i” to install the openssh package.

6. Wait for a few minutes as OpenSSH package and the necessary dependencies will be downloaded to your Tiny Core Linux box.

Another quick way to install openssh is by using tce-load command as follows:
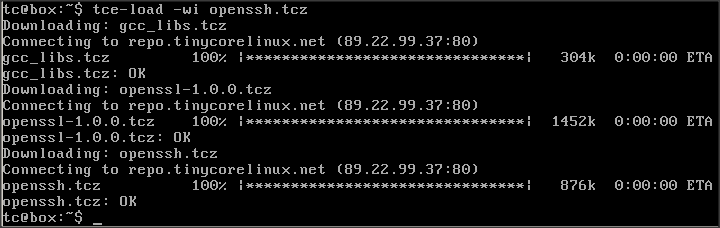
7. Change your directory to “/usr/local/etc/ssh” by typing:
8. You’ll find there are three files in it by typing

9. Copy sshd_config.example to sshd_config by executing command
sudo cp sshd_config.example sshd_config

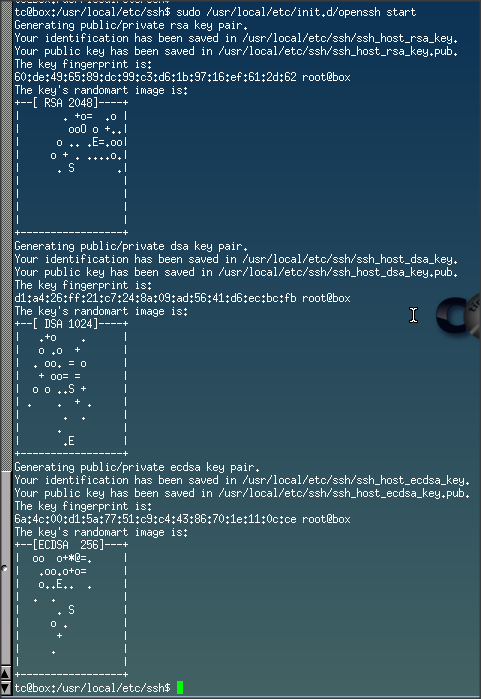
10. The next step is to start the OpenSSH service by typing
sudo /usr/local/etc/init.d/openssh start

11. Once the OpenSSH service started, you’ll find the TCP port 22 is listening. You can verify this by executing command

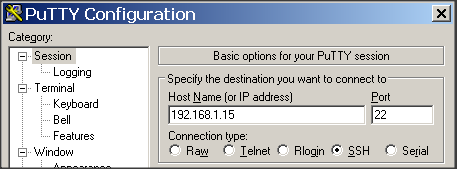
12. Test your OpenSSH configuration by from ssh client. I’ll be using PuTTY for this purpose.
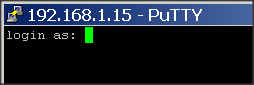
13. If your SSH configuration is working, you’ll be presented by login prompt
14. To login, change the tc user’s password by using “passwd” command.
15. Go back to the putty client, and login with the new password of tc user.
16. Congratulation! You’ve just successfully configured a OpenSSH server for your Tiny Core Linux
Источник


