- Как подключиться по SSH из Windows 10
- Подключение по SSH с помощью OpenSSH
- Подключение по SSH через PuTTY
- Putty, the Command Line and NO clicky clicky
- Installation
- Start PuTTY
- Getting to grunter
- Starting Windows programs on the Command Line
- Fastest Way to open the the command line ….
- Fastest way for Notepad would be ….
- Where’s PuTTY ?
- It’s all about system paths
- To the Control Panel System tab then
- Alrighty then, lets try that again
- But you’re right, I want even less clicking…..
- ALRIGHT.
- A little review then
- More options
- Other Posts in This Series
- About Greg Ferro
Как подключиться по SSH из Windows 10
Для настройки и управления удаленными серверами на базе Linux обычно используется протокол SSH. С помощью SSH на удаленный компьютер можно передавать данные и команды, которые будут выполняться так как бы они выполнялись на локальной машине.
В этой инструкции мы рассмотрим процесс подключения к SSH из Windows 10. Первый способ будет актуален для Windows 10 версии 1809 и выше, а второй можно использовать как на Windows 10, так и на Windows 7.
Подключение по SSH с помощью OpenSSH
Раньше для подключения к Linux серверу по SSH из Windows компьютера требовалась установка программы PuTTy или какого-то другого SSH-клиента. Но, в операционной системе Windows 10 (начиная с версии 1809 ) доступен клиент OpenSSH, с помощью которого можно подключаться к Linux серверам по SSH. Это позволяет работать с терминалом Linux прямо из командной строки Windows 10, при этом не требуется установка никаких сторонних программ.
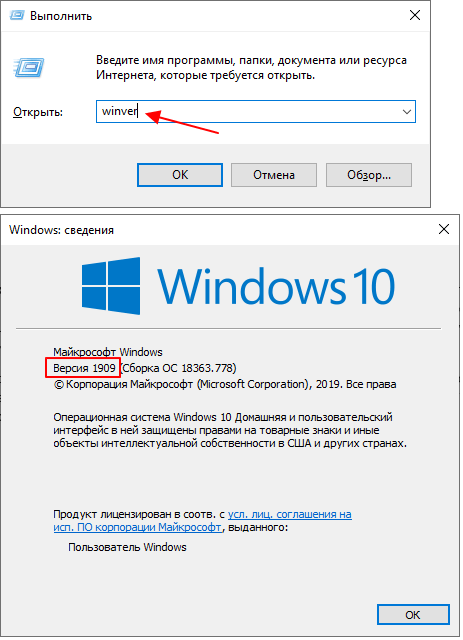
Перед тем как использовать данный способ подключения необходимо проверить версию Windows 10. Для этого нажмите комбинацию клавиш Win-R и выполните команду « winver ». Если на вашем компьютере установлена Windows 10 с версией 1809 или выше, то все нормально, в противном случае сначала нужно выполнить обновление.
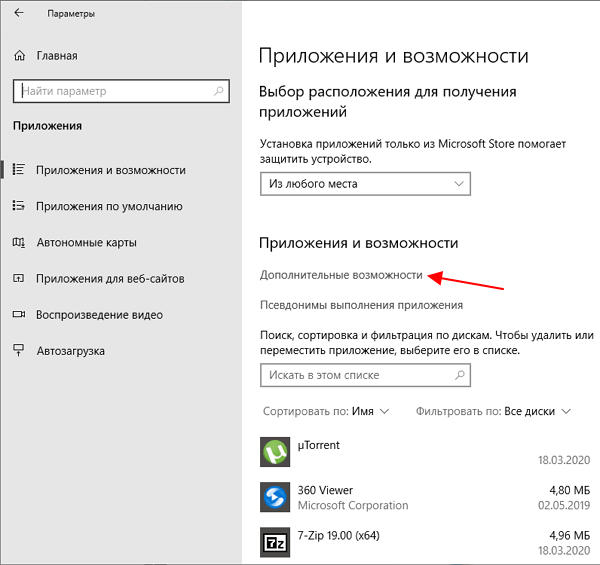
Также нужно открыть меню « Параметры » и зайти в раздел « Приложения – Дополнительные возможности ».
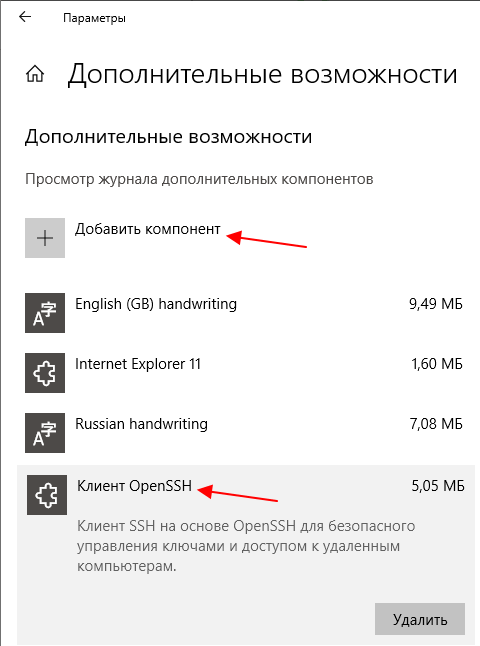
Здесь нужно пролистать список установленных дополнительных компонентов и найти в нем « Клиент OpenSSH ». Если такой компонент присутствует, значит все нормально и можно переходить к следующему шагу. Если нет, то его нужно сначала установить с помощью меню « Добавить компонент ».
Обратите внимание, не нужно путать « Клиент OpenSSH » и « Сервер OpenSSH ». Для подключения по SSH вам нужен именно клиент.
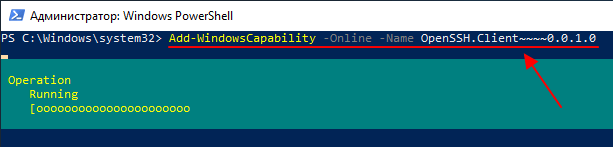
Также клиент OpenSSH можно установить с помощью PowerShell. Для этого запустите консоль PowerShell с правами администратора и выполните следующую команду:
Более подробно об установке и удалении клиента OpenSSH можно почитать в официальной документации Майкрософт.
Если версия Windows 10 подходящая и клиент OpenSSH установлен, то можно начинать подключение по SSH. Для этого запустите обычную командную строку Windows и введите команду « ssh ». В ответ вы должны получить информацию о работе с данной командой.
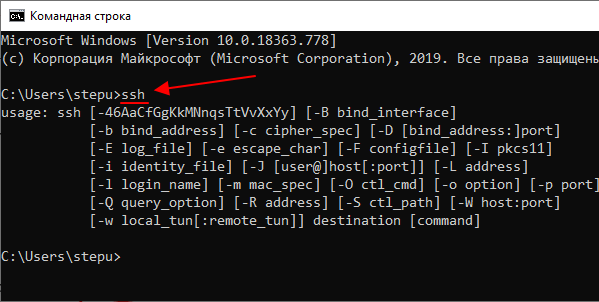
В общем случае синтаксис команды « ssh » выглядит следующем образом:
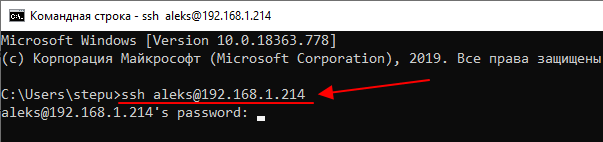
Где « user » — это имя пользователя на удаленном сервере, а « server » — это имя компьютера или его ip адрес.
Например, если наш сервер доступен по ip адресу « 192.168.1.214 », а имя пользователя это « aleks », то команда для подключения будет выглядеть так:
После ввода данной команды появится запрос пароля и после этого мы получим доступ к удаленному серверу. Также при первом подключении с помощью ssh будет появляться запрос на добавление сервера в список известных.
По умолчанию для SSH используется порт 22. Для того чтобы это изменить нужно использовать параметр « -p ». Например, для подключения по порту 2222 нужно выполнить вот такую команду.
Если подключение предполагает использование ключей, то они должны находиться в папке « C:\Users\user\.ssh ». А при подключении путь к приватному ключу нужно указать с помощью параметра « -i ». Например, чтобы использовать ключ « C:\Users\stepu\.ssh\id_rsa » нужно выполнить:
Более подробную информацию о команде « ssh » и ее параметрам можно получить на сайте man.openbsd.org/ssh или на opennet.ru (перевод).
Подключение по SSH через PuTTY
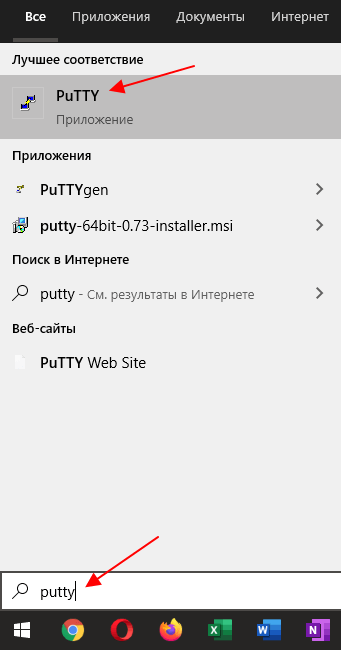
В тех случаях, когда версия Windows 10 не поддерживает OpenSSH (или используется Windows 7) к SSH можно подключаться с помощью программы PyTTY. Скачать установщик данной программы можно на официальном сайте www.putty.org.
После установки программы PyTTY ее можно будет запустить с помощью поиска в меню « Пуск »
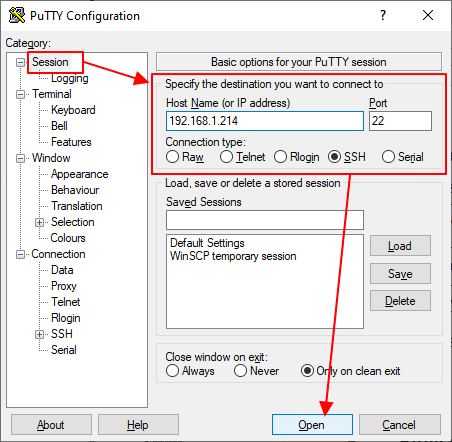
Сразу после запуска программы PuTTY появляется окно с настройками подключения. Основными параметры здесь находятся на вкладке « Session », здесь нужно ввести:
- Имя компьютера или IP адрес;
- Порт для подключения (по умолчанию, 22);
- Способ подключения (SSH);
После ввода этих данных можно запускать подключение с помощью кнопки « Open ».
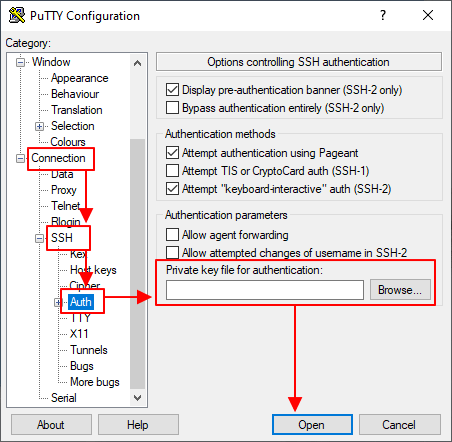
Если для подключения к SSH используются ключи, то путь к приватному ключу нужно указать в разделе « Connection – SSH – Auth ».
Обратите внимание, ключ должен быть сгенерирован программой PuTTYgen, которая устанавливается вместе с PuTTY. Если вы сгенерировали ключи с помощью OpenSSH, то их можно загрузить в PuTTYgen и сохранить в формате подходящем для PuTTy.
Если информация для подключения правильная, то вы увидите консоль с запросом на ввод имени пользователя пароля. Также при первом запуске появится запрос на добавление компьютера в список известных.
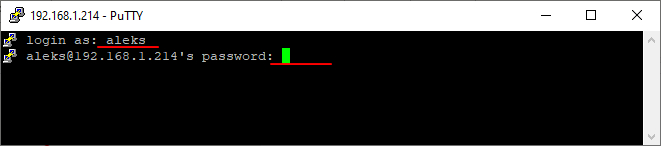
После ввода этих данных вы будете подключены к удаленному серверу по SSH.
Putty, the Command Line and NO clicky clicky
I believe that you should only use the mouse when you don’t know what are doing. That is why graphical interfaces exist. If you have a repetitive task, then clicking the same thing over and over shows that you are poor engineer. You need to take control of your tools to work in the smartest way.
PuTTY is a fine example of having both options. You can clicky-clicky all you want and waste hours of of your life pushing your mouse around the screen. Or you can run a lot of the repetitive PuTTY actions from the command line.
But first thing is to introduce to using the keyboard to get around Windows and open the DOS box. It always surprising how so few people know that Windows can actually be driven using the keyboard and very rarely need to use the mouse.
Installation
You need to note the directory that you installed PuTTY to, something like this would be the default.

and now we are ready to go:

Start PuTTY
So, we are ready to start PuTTY, click start, and PuTTY menu will be clearly displayed.

So lets create a telnet session for a device in our network by entering the details, entering a name in the Saved Sessions box and the clicking on the Save button

Getting to grunter
So normal people would click on Start, All Programs, PuTTY, PuTTY, Click grunter and the Open.
Lot of clicking for not much gain I would say.
Starting Windows programs on the Command Line
You can start just about any program in Windows from the commad line. I am always surprised by how many people don’t know this. Lets look at starting Windows Notepad from the CLI. That is, from a DOS box, just type the command “notepad” and the away it will go.

None of this clicky clicky business.
But we can make this even faster.
Fastest Way to open the the command line ….
The fastest way to open the Windows Start box is to press Control-Escape which will open the Windows Start menu (as if you had clicked on the Start button).
Then press the “r” key (for Run), and type “cmd” and the Windows DOS box (or whatever you choose to call it) will open on your screen.

Fastest way for Notepad would be ….
If you are thinging laterally, you would realise that the fastest way to open Notepad would be:
- press Command-Escape (together)
- press R
- type “notepad”
- and press enter

Ok, now we are starting to get much quicker at getting things done.
Where’s PuTTY ?
So you might think that it would be very easy to just type PuTTY using the same technique. But alas, it does not. Give it a go and do something like this:


It’s all about system paths
MS Windows uses a concept of paths to go searching for where programs are located on your hardware. When using the DOS box, the operating system has no context about where your programs are located on the hard drive. When using the GUI, the information about where the program is located, is contained in the Shortcut that you are clicking on.
You could start PuTTY by typing something like this:

but that is too much typing for me.
We can tell Windows that the directory where the PuTTY program is and to look in there for the program as needed.
To the Control Panel System tab then
In the Control Panel, System Properties, select the Environment Variables button at the bottom:

and then select Path in the System Variables section, and press the Edit button.


and it will look like this ( you need to be a little bit careful here not to delete the content, if you think you have mis-types then just press escape and start over), on the end of the line enter the following text exactly (including the semi colon):
;C:Program FilesPuTTY

This set the path variables to include the PuTTY program directory in the search path. You only have to do this once. Windows will set the the Environment Variable permanently from now on.
You will need to logout at this point, or restart. The Path Variables are only read once at boot time.
When you come back, open the DOS box again (Ctrl-Escape, R, cmd, Enter – just to remind you), and type path to confirm the variables are in place.

Alrighty then, lets try that again
Ctrl-Escape, R (for run), PuTTY

and we get PuTTY opening just like we were doing clicky-clicky all day.

Ahh, the speed and the comfort!! Can you feel that ?
But you’re right, I want even less clicking…..
BUT, I still have to click on grunter and then open with my mouse hand. Is strikes me that PuTTY was built by people who are really CLI centric so there would have to be options for doing more.
Sure enough. In Section 3.8 of the Help file, cleverly titled “The PuTTY command line” we get the following details.
To start a connection to a server called host:
putty.exe [-ssh | -telnet | -rlogin | -raw] [[email protected]]host
If this syntax is used, settings are taken from the Default Settings (see section 4.1.2); user overrides these settings if supplied. Also, you can specify a protocol, which will override the default protocol (see section 3.8.3.2).
For telnet sessions, the following alternative syntax is supported (this makes PuTTY suitable for use as a URL handler for telnet URLs in web browsers):
putty.exe telnet://host[:port]/
In order to start an existing saved session called sessionname, use the -load option (described in section 3.8.3.1).
putty.exe -load “session name”
ALRIGHT.
Even better is this bit
The -load option causes PuTTY to load configuration details out of a saved session. If these details include a host name, then this option is all you need to make PuTTY start a session.
You need double quotes around the session name if it contains spaces.
So now I can open a DOS box (Ctrl-Escape, R, cmd, Enter – just to remind you again), then type:

YES! Freedom from the mouse!
A little review then
If you spend all day connecting to equpment, you need to get the connection done as fast as possible. Spending all your life clicky-clicky on the cute little mousey is just distracting you from the task at the hand. It just not geek enough, and you need to be hardcore.
This technique shows a really fast way to get connected to your devices. It works best for SSH devices although it does, kind of support telnet, just not very well.
You can now use the Windows Command Line to connect directly to a SSH host by using this syntax:
or you can use telnet
You will need to spend some time learning the keyboard shortcuts that I talked about. Pretty quickly they will become second nature and you will have even more speed and confidence as you move around your network.
More options
This really is only just the start of what can do with PuTTY, and there are lots more things. If you have a favorite then please contact me using the contact form or put something in the comments and I would be pleased to add it or write it up.
Other Posts in This Series
- Putty — Fixing Right Click Paste (9th January 2011)
- Putty, the Command Line and NO clicky clicky (5th October 2009)
- Putty — Recommended Default Settings for a Network Engineer (21st September 2009)
- Setting the Defaults for PUTTY (20th September 2009)
About Greg Ferro
Greg is surprisingly passionate about treating people as humans working as profit-generating productivity tools instead of ‘fleshy IT robot cost centres’. Survived 25 years of Corporate IT across many verticals and tens of companies working on a wide range of networking solutions & products.


