- Manually generating your SSH key in macOS
- About Terminal
- Generating an SSH key
- Importing your SSH key
- Troubleshooting
- What are my next steps?
- Как подключиться к серверу по SSH с помощью пароля или ключа
- Проверка службы SSH на сервере
- Использование пароля
- Подключение на Windows
- Подключение на Linux и macOS
- Mac Terminal Keeps Asking for Password When Using PPK with SSH
- 7 Answers 7
- Can I automatically login to ssh using passwords from OS X keychain?
- 3 Answers 3
- Non-interactive SSH sessions
- Interactive SSH sessions using sshpass
Manually generating your SSH key in macOS
You generate an SSH key through macOS by using the Terminal application. Once you upload a valid public SSH key, the Triton Compute Service uses SmartLogin to copy the public key to any new SmartMachine you provision.
Joyent recommends RSA keys because the node-manta CLI programs work with RSA keys both locally and with the ssh agent. DSA keys will work only if the private key is on the same system as the CLI, and not password-protected.
About Terminal
Terminal is the terminal emulator which provides a text-based command line interface to the Unix shell of macOS.
To open the macOS Terminal, follow these steps:
- In Finder, choose Utilities from the Applications folder.
- Find Terminal in the Utilities listw.
- Open Terminal.
The Terminal window opens with the commandline prompt displaying the name of your machine and your username.
Generating an SSH key
An SSH key consists of a pair of files. One is the private key, which should never be shared with anyone. The other is the public key. The other file is a public key which allows you to log into the containers and VMs you provision. When you generate the keys, you will use ssh-keygen to store the keys in a safe location so you can bypass the login prompt when connecting to your instances.
To generate SSH keys in macOS, follow these steps:
Enter the following command in the Terminal window.
This starts the key generation process. When you execute this command, the ssh-keygen utility prompts you to indicate where to store the key.
Press the ENTER key to accept the default location. The ssh-keygen utility prompts you for a passphrase.
You will need to enter the passphrase a second time to continue.
After you confirm the passphrase, the system generates the key pair.
Your private key is saved to the id_rsa file in the .ssh directory and is used to verify the public key you use belongs to the same Triton Compute Service account.
| Never share your private key with anyone! |
|---|
Your public key is saved to the id_rsa.pub ;file and is the key you upload to your Triton Compute Service account. You can save this key to the clipboard by running this:
Importing your SSH key
Now you must import the copied SSH key to the portal.
- After you copy the SSH key to the clipboard, return to your account page.
- Choose to Import Public Key and paste your SSH key into the Public Key field.
- In the Key Name field, provide a name for the key. Note: although providing a key name is optional, it is a best practice for ease of managing multiple SSH keys.
- Add the key. It will now appear in your table of keys under SSH.

Troubleshooting
You may see a password prompt like this:
This is because:
- You did not enter the correct passphrase.
- The private key on your Macintosh ( id_rsa ) does not match the public key stored with your Triton Compute Service account.
- The public key was not entered correctly in your Triton account.
What are my next steps?
In order to use the Terminal to create instances, set up triton and CloudAPI as well as the triton-docker commandline tool.
Источник
Как подключиться к серверу по SSH с помощью пароля или ключа
SSH — зашифрованный протокол для удаленного управления серверами. Для подключения через него вы можете каждый раз вводить пароль или настроить авторизацию по ключу. Второй вариант безопаснее, но у него есть свои особенности. В этой статье мы рассмотрим оба метода подключения, а вы уже сами выберите, какой способ удобнее.
Проверка службы SSH на сервере
Доступ по SSH обычно можно включить при создании сервера или во время настройки конфигурации. Убедиться в том, что он разрешен, можно через консоль. Она доступна в панели управления сервером.
Например, у меня VDS на Timeweb. Чтобы попасть в консоль, я авторизуюсь по логину и паролю, выданному хостером, выбираю свой сервер в списке VDS и перехожу на вкладку «Консоль».
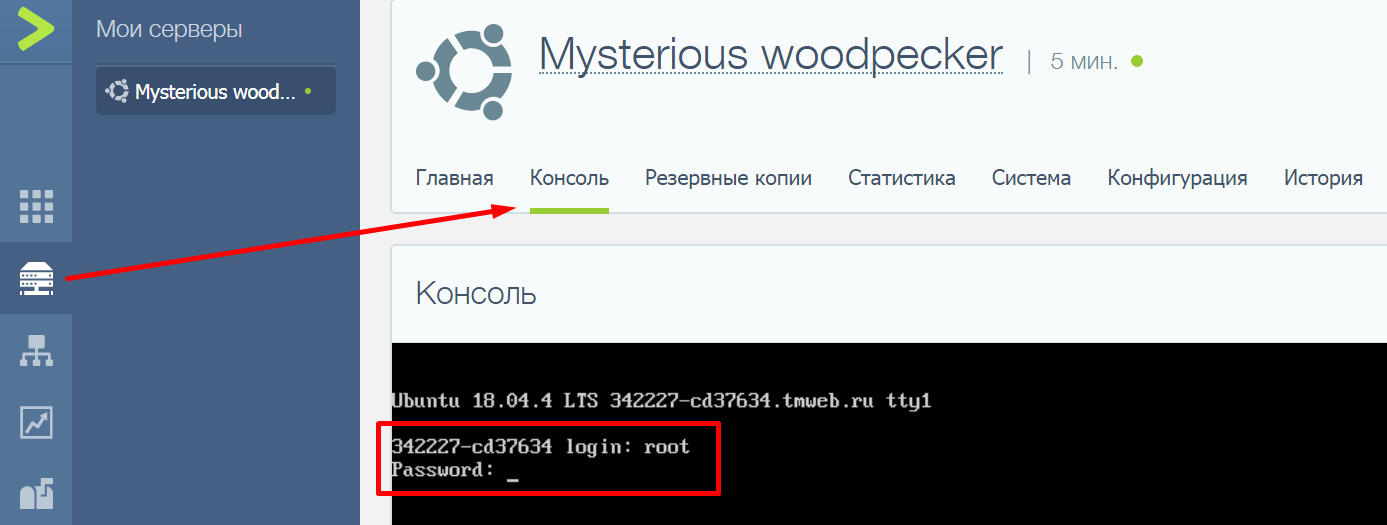
Чтобы пользоваться консолью, нужно авторизоваться. Логин и пароль для доступа к серверу хостер присылает в письме. Сначала нужно ввести логин и нажать на клавишу Enter. Появится строка Password. В ней необходимо ввести пароль и снова нажать на клавишу Enter.
Важно: в целях безопасности при вводе пароля на экране не отображаются никакие символы, даже привычные звездочки.
После авторизации в консоли можно проверить, запущена ли служба SSH на сервере.
- Выполните команду systemctl status sshd.
- Обратите внимание на строчку Active. В ней должна быть выделенная зеленым запись active (running). Это состояние говорит о том, что служба запущена.
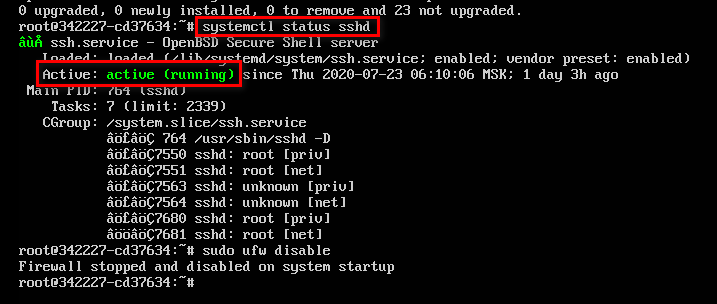
Если служба не активна, добавьте ее самостоятельно. Выполните команду sudo apt install openssh-server и подтвердите установку пакетов.
Кроме того, для подключения вам может понадобиться настройка брандмауэра. Чтобы межсетевой экран не блокировал входящие соединения, можно на время отключить его командой sudo ufw disable.
Использование пароля
Начнем с инструкции о том, как подключиться к удаленному серверу через SSH по логину и паролю. Это самый простой способ. Хостер предоставляет вам IP-адрес, логин и пароль. Этого достаточно для того, чтобы установить соединение с удаленным сервером.
Подключение на Windows
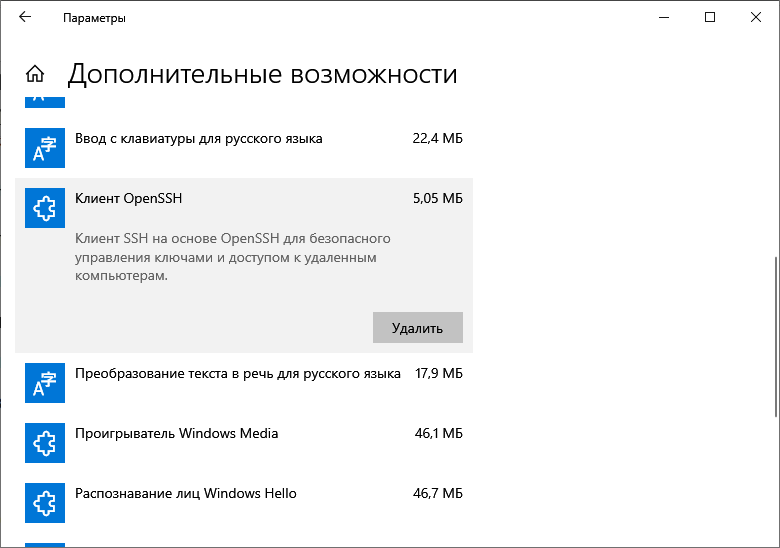
Моя основная система — Windows. Раньше для подключения к серверу через SSH я пользовался сторонней утилитой PuTTY, потому что в операционной системе не было встроенного компонента. В «десятке» он появился, так что теперь можно подключаться к SSH через командную строку (cmd).
Чтобы включить встроенный в систему OpenSSH:
- Откройте «Параметры» (Win + I) и перейдите в раздел «Приложения».
- Выберите опцию «Управление дополнительными компонентами».
- Нажмите «Добавить компонент».
- Выберите в списке OpenSSH Client и нажмите «Установить».
- После завершения установки перезагрузите систему.
Теперь разберемся, как подключиться к SSH через cmd. Запустите командную строку и выполните запрос вида ssh root@185.104.114.90.
Значение root — логин для подключения, вы получили его в письме при создании сервера. 185.104.114.90 — IP-адрес сервера. Его можно посмотреть в панели управления сервером или в том же письме, которое прислал хостер. У команды может быть также дополнительный параметр -p, после которого прописывается номер порта. По умолчанию используется порт 22. Если у вас настроен другой порт, нужно явно его указать, — например, полный адрес может выглядеть так: ssh root@185.104.114.90 -p 150.
После выполнения команды клиент SSH предложит добавить устройство в список известных. Введите в командной строке yes и нажмите на Enter. Затем укажите пароль для доступа к серверу. На этом подключение завершено — теперь все команды будут выполняться на удаленной машине, к которой вы подключились.
На версиях младше Windows 10 1809 нет встроенной поддержки протокола OpenSSH. В таком случае понадобится сторонняя утилита. Смотрим, как через PuTTY подключиться по SSH:
- Запустите PuTTY.
- На вкладке Session укажите Host Name (IP-адрес сервера), Port (по умолчанию 22, но если вы в конфигурации сервера указали другой порт, нужно задать его номер).
- Убедитесь, что тип соединения установлен SSH.
- Нажмите на кнопку Open, чтобы подключиться.
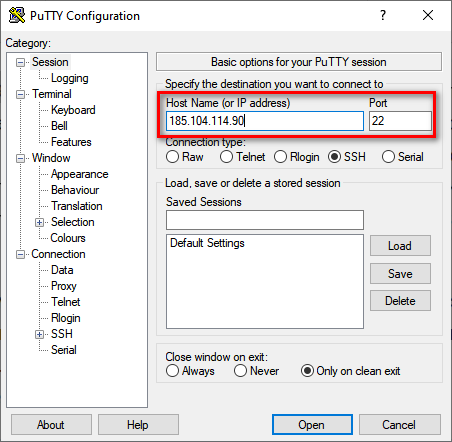
Если вы ввели правильные данные, появится окно консоли, в котором нужно указать логин и пароль для подключения к серверу. При первом запуске также отобразится запрос на добавление устройства в список известных.
Подключение на Linux и macOS
Теперь посмотрим, как подключиться по SSH через терминал на Linux. Для этого не требуется установка дополнительных компонентов, все работает «из коробки».
- Запустите терминал. Обычно для этого используется сочетание клавиш Ctrl+Alt+T. Найти терминал также можно по пути «Главное меню» — «Приложения» — «Система».
- Выполните команду для подключения. Синтаксис такой же, как на Windows, — ssh root@ 185.104.114.90 . Если порт не стандартный, то нужно явно его указать: например, ssh root@ 185.104.114.90 -p 150. Вместо root вы указываете свое имя пользователя, а вместо 185.104.114.90 — IP-адрес своего сервера.
- Если хост и порт указаны верно, на следующем шаге появится запрос на ввод пароля. При первом подключении также будет предложение добавить новое устройство в список известных. Для этого введите yes и нажмите на клавишу Enter.
На этом подключение завершено. Теперь все команды, которые вы вводите в терминале, будут выполняться на удаленной машине.
Если IP-адрес или порт указаны неверно, то на экране появится сообщение об ошибке — Connection Refused. Это может также говорить о том, что доступ запрещен брандмауэром на удаленном сервере (если вы его не отключили). Чтобы разрешить подключение через SSH:
- на сервере с Ubuntu/Debian выполните команду $ sudo ufw allow 22/tcp;
- на сервере CentOS/Fedora выполните команду $ firewall-cmd —permanent —zone=public —add-port=22/tcp.
Цифра 22 в синтаксисе — номер порта. Если вы используете другой порт, то укажите его явно.
Если вы знаете как подключиться через SSH на Linux, то справитесь с этой задачей и на macOS. В операционной системе Apple тоже есть встроенный терминал. Синтаксис команды для подключения не меняется: ssh root@ 185.104.114.90 , где root — ваш логин, а 185.104.114.90 — IP-адрес сервера, с которым вы устанавливаете соединение.
Источник
Mac Terminal Keeps Asking for Password When Using PPK with SSH
I am attempting to connect to an Amazon EC2 Server via Mac Terminal. I have a PPK file that does not have a password attached to it, but when I try to connect I get a popup box that says «Enter the password for the SSH Private Key.»
So we tried creating a PPK that has a password — but it does not accept the password, it still rejects the connection.
I have a Windows user who is able to connect using the same PPK on Putty.
Has anyone experienced this issue?
7 Answers 7
The mac is looking for a .pem key. The ppk is generated specifically for putty. If you don’t have the original ppk key.
sgtatham/putty/download.html Then go to conversions -> export OpenSSH key. Save the output as a .pem file and try using that with the mac.
If this doesn’t work can you post the command you’re running from mac. Its possible you’ve got some extra parameter or something.
Maybe your problem is with permissions for your key. I know in linux its required to change the permissions.
Clear the contents of your
/.ssh directory and set the directory permissions to 700 (directories need to be «executable») $ rm
Generate your rsa key pair (there are variations for this, but this is the version I used): $ ssh-keygen -t rsa
Set the permissions for all files in
/.ssh to 600 $ chmod 600
Copy your id_rsa.pub key to your server’s .ssh/authorized_keys file
Add your passphrase to your keychain using this command: $ ssh-add -K (you will see Enter passphrase for [your system]/.ssh/id_rsa: )

/.ssh/id_rsa — there are two different versions (with a lower and uppercase K option that do entirely different things) and only the one in /usr/bin will permanently store your passphrase in your Keychain — otherwise when you logout or reboot it’ll forget it again (this is intentional security on Linux systems.) To verify permanent storage, open the KeyChain Access app and search for ‘id_rsa’, it should show up immediately.)
Источник
Can I automatically login to ssh using passwords from OS X keychain?
I need to login to an ssh server which doesn’t support key based authentication. And I don’t want to type the passwords every time.
I am using OS X Lion (10.7.2). I have added the passwords to the OS X keychain[1]. Now I can retrieve the password automatically from the keychain using /usr/bin/security , however I can’t find a way to send this password to the ssh prompt.
I also tried sshpass . However when I try to run it ssh exits with the following error:
Is there anyway I can login to this server without having to enter the password every time?
Notes
- The scheme I use in keychain looks like this
- Kind: Internet password
- Account: username
- Where: ssh://server-name
3 Answers 3
Non-interactive SSH sessions
If you don’t need to have an interactive session on the remote server, you can execute ssh in an environment without tty , e.g. as part of a Run Shell Script action in Automator.
You need to create a program that when called prints the password to standard out, e.g. the following bash script you need to make executable using chmod +x pwd.sh :
Then, set the SSH_ASKPASS environment variable to the path to this program, and then run ssh in the Automator action, like this:
When there is no tty , but SSH_ASKPASS and DISPLAY (for X11, set by default) are set, SSH executes the program specified by SSH_ASKPASS and uses its output as password. This is intended to be used in graphical environments, so that a window can pop up asking for your password. In this case, we just skipped the window, returning the password from our program. You can use security to read from your keychain instead, like this:
ls (on the ssh command line) is the command executed when ssh has logged in, and its output is printed in Automator. You can, of course, redirect it to a file to log output of the program you start.
Interactive SSH sessions using sshpass
I downloaded, compiled and installed sshpass and it worked perfectly. Here’s what I did:
- Get the Apple developer tools
- Download and open sshpass-1.05.tar.gz
- Open a shell to the directory sshpass-1.05
- Run ./configure
- Run make
- Run make install (you might need sudo for it)
Now the program is installed to /usr/local/bin/sshpass . Execute using a line like the following:
You can read the password from security just before doing that, and use it like this:
Источник


