- How to Setup SSTP VPN Client in Windows Using Certificate from Mikrotik
- Creating SSL Certificates CA, Server, and Client in Mikrotik
- SSL CA Certificate Sign:
- Sign Certificate SSL Server:
- Select [IP > Firewall]
- WINDOWS 10: INSTALL THE “CA” CERTIFICATE
- WINDOWS 10: CREATE THE VPN/NETWORK ADAPTER (NON-SPLIT TUNNEL)
- Just a Random Microsoft Azure and Computing Tech info
- 01 – lets verify the network configuration for VPN Server. (Please Refer to the Pictures)
- 02 – Creating VPNUsers OU & User in Active Directory.
- 03 – Installation
- 04 – Configuration
- 05 – Client Connectivity Testing
- Summary
How to Setup SSTP VPN Client in Windows Using Certificate from Mikrotik
Creating SSL Certificates CA, Server, and Client in Mikrotik

- In the column, Name fill CA.
- In the Common Name, field fill in the IP Address (public) or domain name of the SMTP Server.
- For other columns please tailored to your respective data

SSL CA Certificate Sign:
Sign Certificate SSL Server:


10. Configre and enable the SSTP server:
Select PPP on the left-hand side of Winbox and navigate to the Interface tab. Select the SSTP Server button and apply the following settings to configure/enable the SSTP Server. Note that the Default Profile field is using the recently created SSTP01 profile and that the Certificate field is using the “Server” certificate that was created at the beginning of this guide. Also, notice the port that is being used – port 443. We’ll be using this port in the next step to create the firewall rule.

NOTE 04/25/18: In the screenshot above, TLS Version is currently set to “only-1.2”. The VPN connection will fail if the Operating System does not support TLS 1.2. I ran into this issue with Windows 7 SSTP clients. To resolve the connection issue, I changed this particular setting from “only-1.2” to “any”.
11.Create SSTP firewall filter and nat rules
Select [IP > Firewall]
In this example, keep in mind that once the VPN is established, the VPN client(s) will be pulling IP addresses from the previously created DHCP VPN IP Pool (10.10.100.10 – 10.10.100.254).


The following commands will add additional rules that will allow traffic from the VPN’s subnet to/through the router. Once the rules have been created, they need to be placed under the previously created “Allow SSTP” rule (the screenshots above). Again, these rules are very broad, they will allow all traffic from the VPN’s subnet to/through the MikroTik. These rules may need to be modified or additional rules created to comply with your network security policy. Keep in mind that the subnet 10.10.100.0/24 represents the previously created VPN DHCP pool and that the “src-address” value of “ether1” represents the MirkoTik’s WAN interface – change this value as needed.
In addition, if VPN clients require internet access through the VPN, the following NAT (masquerade) rule will need to be added.
12. Allow remote DNS request
Select IP > DNS and tick the Allow Remote Requests box shown in the screenshot below.
It would be advisable to create a firewall rule to drop DNS requests from the WAN. I’ve provided the following commands below to accomplish this. These commands can be pasted directly into the MikroTik Terminal. Keep in mind that the “in-interface” value will need to reflect the name of the WAN port on your Mikrotik
 Allow remote DNS request


WINDOWS 10: INSTALL THE “CA” CERTIFICATE
We’ve completed the SSTP VPN setup for SiteX on the Mikrotik and will now need to configure the VPN on the client-side for ClientX’s Windows 10 machine. Earlier in this guide, we exported the “CA” certificate using the MikroTik at SiteX.
- In Winbox, select Files on the left-hand side. If you’ve been following the naming conventions of this guide, the file should be named “cert_export_CA.crt”. Drag or Download (right-click > download) the file to a safe location on your computer.
- Now that the CA certificate has been downloaded from the MikroTik, we will need to transfer the certificate to ClientX’s Windows 10 machine, I’ll let you decide how this is done.
- After transferring the CA certificate to ClientX, right-click on the certificate and select “Install Certificate” from the context menu and use the following screenshots below to complete the CA certificate setup for ClientX’s SSTP VPN:


WINDOWS 10: CREATE THE VPN/NETWORK ADAPTER (NON-SPLIT TUNNEL)
We’ve completed the Windows 10 “CA” certificate install for ClientX and now need to create ClientX’s Windows 10 VPN/network adapter. In the Windows 10 Control Panel, open Network and Sharing Center. Select “Set up a new connection or network” and use the following screenshots below to create the VPN/network adapter.
Just a Random Microsoft Azure and Computing Tech info
Installing and configuring a VPN server using Windows Server 2016 is easy way. By following the guidance in this article, a VPN server can be implemented in just a few minutes.
VPN provides secure access to organizations’ internal data and applications to clients and devices that are using the Internet.
To properly implement and support a VPN environment within your organization, you must understand how to select a suitable tunnelling protocol, configure VPN authentication, and configure the server role to support your chosen configuration.
For this demo purposes, i will be using 2 VM, and 1 Windows 10 client VM which is all running in Hyper-V.
Lets get started VPN configuration.
01 – lets verify the network configuration for VPN Server. (Please Refer to the Pictures)
1 – VPN Server Require 2 NIC :
- Ethernet 1 : LAN
- Ethernet 2 : Internet

Ethernet 1 : LAN

Ethernet 2 : Internet

2 – Windows 10 Client.
- Require 1 NIC :
- Ethernet 1 : Internet

02 – Creating VPNUsers OU & User in Active Directory.
1 – Create a new OU – In the New Object – Organizational Unit dialog box, in the Name box, type VPNUsers, and then click OK.


2 – In the Active Directory Users and Computers console, expand Windows.ae, right-click VPNUsers OU, click New, and then click User.


3 – right-click user, Properties, Allow Access enabled for Remote Access to connect to your VPN Server. and Okay. (Please Refer to the Pictures)


03 – Installation
1 – open your Server Manager and click on Add Roles and Features.

2 – click on Next.

3 – Now select Role-based or feature-based installation option and click on Next.

4 – Now select desired server you’d like to install Routing and Remote Access on.

5 – From the Roles lists select Remote Access and click on Next.

6 – Click Next, no additional features required at this point.

7 – Just click on Next.

8 – In next tab you need to select DirectAccess and VPN (RAS), Click Add Features in the popup window.


9 – On confirmation page click Install to begin.

10 – After installation process is finished, click on Open the Getting Started Wizard.


11 – In this tab press Deploy VPN only.

04 – Configuration
1 – Right click on your server and choose Configure and Enable Routing and Remote Access.

2 – Click on Next.

3 – On the new wizard select Remote Access (dial-up or VPN).

4 – On the next page select VPN.

5 – Here select network adapter that connects your server to the Internet.

6 – Here select network adapter that connects your server to the VPN Clients.

7 – Here you can choose the method of distribution for IP addresses – via DHCP or manually. Select the second way.
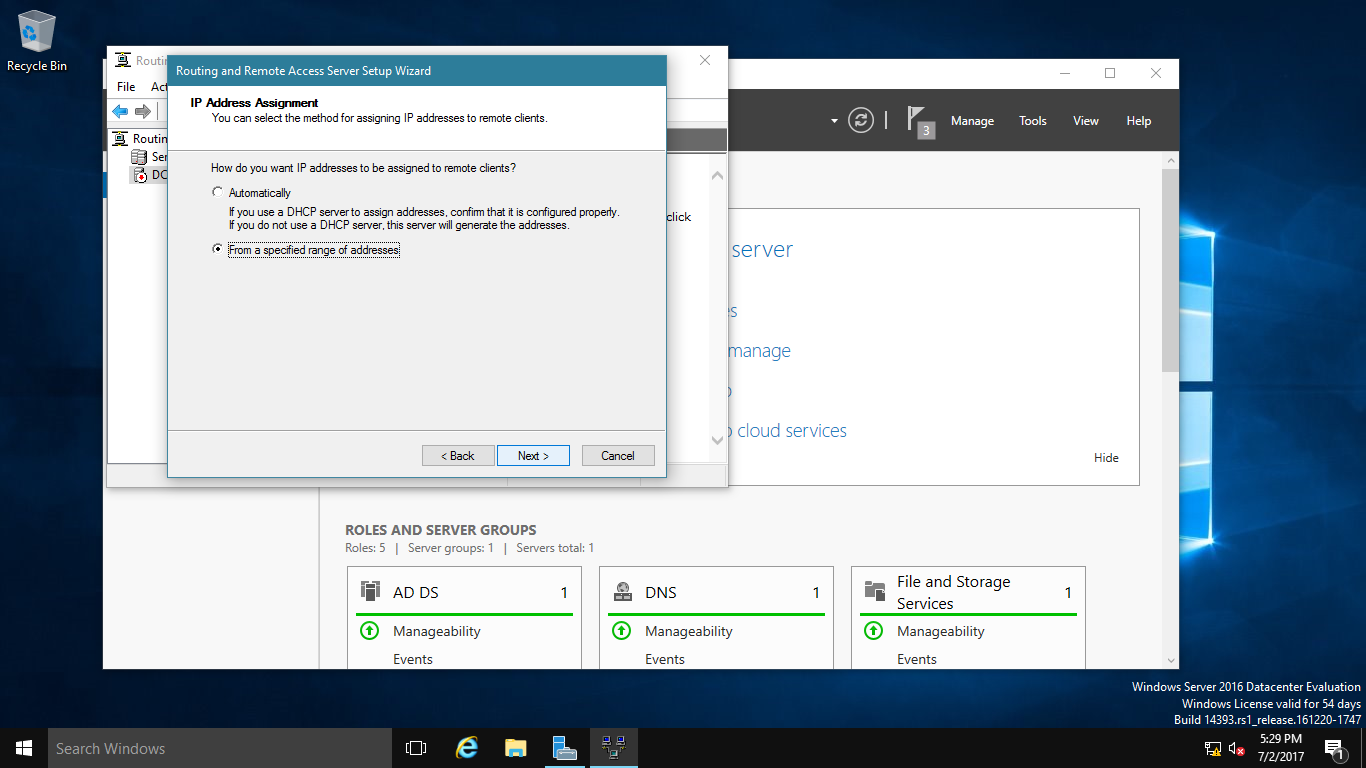
8 – In this tab press New.

9 – In popup window specify range of IP addresses, press OK, return to previous tab and click on Next.

10 – In this tab you can choose the method of authentification. Select Routing and Remote Access.

11 – Press Finish. and Click Okay, Now configuration is finished.


12 – Next, in the Routing and Remote Access console, expand DC-CLOUD, right-click ports, click Properties.

13 – Verify that 128 ports exist for SSTP, IKEv2, PPTP, and L2TP, then double-click WAN Miniport (SSTP). Maximum ports box, type 5, and then click OK, Routing and Remote Access message box, click Yes.


14 – Repeat the same step no:13 for IKEv2, PPTP, and L2TP, then click OK.

05 – Client Connectivity Testing
1 – On the Windows 10 client PC, open Network and Sharing Center, then click Set up a new connection or network.

2 – Next, on the Choose a connection option interface, click Connect to a workplace, and then click Next.

3 – On the How do you want to connect? interface, click Use my Internet connection (VPN).

4 – On the Connect to a Workplace interface, click I’ll set up an Internet connection later.

5 – In the Internet address box, type 131.107.0.10 (DC-CLOUD VPN Server IP Address).
— In the Destination name box, type NewHelpTech VPN connection, select Allow other people to use this connection checkbox, and then click Create. —

6 – Next, right click NewHelpTech VPN connection, and then click Connect.


7 – In the sign-in dialog box, type the domain user from VPNUsers OU Name Sifad and box, type Password, and then click OK.

8 – Verify that you are connected to Windows by using a PPTP connection, right click NewHelpTech VPN connection, and then click Status.

 Orait, that all for now, we’ve connected to NewHelpTech VPN connection successfully.
Summary
Implementing a client-based VPN solution for secure remote access using Windows Server 2016 has many advantages over dedicated and proprietary security appliances. Windows-based VPN servers are easy to manage, cost effective, and offer greater deployment flexibility. However, at this point additional configuration is required to properly secure incoming connections.
that’s all for now. any Doubts type a commend.. 🙂


