- Customize and export Start layout
- Customize the Start screen on your test computer
- Export the Start layout
- Configure a partial Start layout
- Manage Windows 10 Start and taskbar layout
- Start options
- Taskbar options
- Taskbar configuration applied to clean install of Windows 10
- Taskbar configuration applied to Windows 10 upgrades
- Start layout configuration errors
Customize and export Start layout
Applies to
The easiest method for creating a customized Start layout to apply to other WindowsВ 10 devices is to set up the Start screen on a test computer and then export the layout.
After you export the layout, decide whether you want to apply a full Start layout or a partial Start layout.
When a full Start layout is applied, the users cannot pin, unpin, or uninstall apps from Start. Users can view and open all apps in the All Apps view, but they cannot pin any apps to Start.
When a partial Start layout is applied, the contents of the specified tile groups cannot be changed, but users can move those groups, and can also create and customize their own groups.
Partial Start layout is only supported on WindowsВ 10, version 1511 and later.
You can deploy the resulting .xml file to devices using one of the following methods:
Customize the Start screen on your test computer
To prepare a Start layout for export, you simply customize the Start layout on a test computer.
To prepare a test computer
Set up a test computer on which to customize the Start layout. Your test computer should have the operating system that is installed on the users’ computers (Windows 10 Pro, Enterprise, or Education). Install all apps and services that the Start layout should display.
Create a new user account that you will use to customize the Start layout.
To customize Start
Sign in to your test computer with the user account that you created.
Customize the Start layout as you want users to see it by using the following techniques:
Pin apps to Start. From Start, type the name of the app. When the app appears in the search results, right-click the app, and then click Pin to Start.
To view all apps, click All apps in the bottom-left corner of Start. Right-click any app, and pin or unpin it from Start.
Unpin apps that you don’t want to display. To unpin an app, right-click the app, and then click Unpin from Start.
Drag tiles on Start to reorder or group apps.
Resize tiles. To resize tiles, right-click the tile and then click Resize.
Create your own app groups. Drag the apps to an empty area. To name a group, click above the group of tiles and then type the name in the Name group field that appears above the group.
In Windows 10, version 1703, if the Start layout includes tiles for apps that are not installed on the device that the layout is later applied to, the tiles for those apps will be blank. The blank tiles will persist until the next time the user signs in, at which time the blank tiles are removed. Some system events may cause the blank tiles to be removed before the next sign-in.
In earlier versions of Windows 10, no tile would be pinned.
Export the Start layout
When you have the Start layout that you want your users to see, use the Export-StartLayout cmdlet in Windows PowerShell to export the Start layout to an .xml file. Start layout is located by default at C:\Users\username\AppData\Local\Microsoft\Windows\Shell\
If you include secondary Microsoft Edge tiles (tiles that link to specific websites in Microsoft Edge), see Add custom images to Microsoft Edge secondary tiles for instructions.
To export the Start layout to an .xml file
While signed in with the same account that you used to customize Start, right-click Start, and select Windows PowerShell.
On a device running Windows 10, version 1607, 1703, or 1803, at the Windows PowerShell command prompt, enter the following command:
On a device running Windows 10, version 1809 or higher, run the Export-StartLayout with the switch -UseDesktopApplicationID. For example:
In the previous command, -path is a required parameter that specifies the path and file name for the export file. You can specify a local path or a UNC path (for example, \\FileServer01\StartLayouts\StartLayoutMarketing.xml).
Use a file name of your choice—for example, StartLayoutMarketing.xml. Include the .xml file name extension. The Export-StartLayout cmdlet does not append the file name extension, and the policy settings require the extension.
Example of a layout file produced by Export-StartLayout :
(Optional) Edit the .xml file to add a taskbar configuration or to modify the exported layout. When you make changes to the exported layout, be aware that the order of the elements in the .xml file is critical.
If the Start layout that you export contains tiles for desktop (Win32) apps or .url links, Export-StartLayout will use DesktopApplicationLinkPath in the resulting file. Use a text or XML editor to change DesktopApplicationLinkPath to DesktopApplicationID. See Specify Start tiles for details on using the app ID in place of the link path.
All clients that the start layout applies to must have the apps and other shortcuts present on the local system in the same location as the source for the Start layout.
For scripts and application tile pins to work correctly, follow these rules:
Executable files and scripts should be listed in \Program Files or wherever the installer of the app places them.
Shortcuts that will pinned to Start should be placed in \ProgramData\Microsoft\Windows\Start Menu\Programs.
If you place executable files or scripts in the \ProgramData\Microsoft\Windows\Start Menu\Programs folder, they will not pin to Start.
Start on Windows 10 does not support subfolders. We only support one folder. For example, \ProgramData\Microsoft\Windows\Start Menu\Programs\Folder. If you go any deeper than one folder, Start will compress the contents of all the subfolder to the top level.
Three additional shortcuts are pinned to the start menu after the export. These are shortcuts to %ALLUSERSPROFILE%\Microsoft\Windows\Start Menu\Programs, %APPDATA%\Microsoft\Windows\Start Menu\Programs, and %APPDATA%\Microsoft\Windows\Start Menu\Programs\System Tools.
Configure a partial Start layout
A partial Start layout enables you to add one or more customized tile groups to users’ Start screens or menus, while still allowing users to make changes to other parts of the Start layout. All groups that you add are locked, meaning users cannot change the contents of those tile groups, however users can change the location of those groups. Locked groups are identified with an icon, as shown in the following image.

When a partial Start layout is applied for the first time, the new groups are added to the users’ existing Start layouts. If an app tile is in both an existing group and in a new locked group, the duplicate app tile is removed from the existing (unlocked) group.
When a partial Start layout is applied to a device that already has a StartLayout.xml applied, groups that were added previously are removed and the groups in the new layout are added.
If the Start layout is applied by Group Policy or MDM, and the policy is removed, the groups remain on the devices but become unlocked.
To configure a partial Start screen layout
Open the layout .xml file. There is a element. Add LayoutCustomizationRestrictionType=»OnlySpecifiedGroups» to the DefaultLayoutOverride element as follows:
Save the file and apply using any of the deployment methods.
Manage Windows 10 Start and taskbar layout
Applies to
- WindowsВ 10, Windows Server 2016 with Desktop Experience, Windows Server 2019 with Desktop Experience
Organizations might want to deploy a customized Start and taskbar configuration to devices running WindowsВ 10 Pro, Enterprise, or Education. A standard, customized Start layout can be useful on devices that are common to multiple users and devices that are locked down for specialized purposes. Configuring the taskbar allows the organization to pin useful apps for their employees and to remove apps that are pinned by default.
Taskbar configuration is available starting in Windows 10, version 1607.
Start and taskbar configuration can be applied to devices running Windows 10 Pro, version 1703.
For information on using the layout modification XML to configure Start with roaming user profiles, see Deploy Roaming User Profiles.
Using CopyProfile for Start menu customization in Windows 10 isn’t supported. For more information Customize the Default User Profile by Using CopyProfile
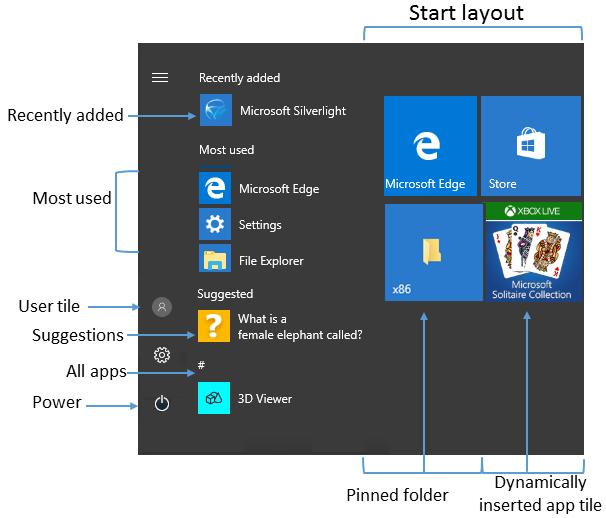
Start options
Some areas of Start can be managed using Group Policy. The layout of Start tiles can be managed using either Group Policy or Mobile Device Management (MDM) policy.
The MDM policy settings in the table can also be configured in a provisioning package using Policies > Start. See the reference for Start settings in Windows Configuration Designer.
The following table lists the different parts of Start and any applicable policy settings or Settings options. Group Policy settings are in the User Configuration\Administrative Templates\Start Menu and Taskbar path except where a different path is listed in the table.
| Start | Policy | Local setting |
|---|---|---|
| User tile | MDM: Start/HideUserTile Start/HideSwitchAccount Start/HideSignOut Start/HideLock Start/HideChangeAccountSettings Group Policy: Remove Logoff on the Start menu | none |
| Most used | MDM: Start/HideFrequentlyUsedApps Group Policy: Remove frequent programs from the Start menu | Settings > Personalization > Start > Show most used apps |
| Suggestions -and- Dynamically inserted app tile | MDM: Allow Windows Consumer Features Group Policy: Computer Configuration\Administrative Templates\Windows Components\Cloud Content\Turn off Microsoft consumer experiences Note: This policy also enables or disables notifications for a user’s Microsoft account and app tiles from Microsoft dynamically inserted in the default Start menu. | Settings > Personalization > Start > Occasionally show suggestions in Start |
| Recently added | MDM: Start/HideRecentlyAddedApps Group Policy: Computer configuration\Administrative Template\Start Menu and Taskbar\Remove «Recently Added» list from Start Menu (for Windows 10, version 1803) | Settings > Personalization > Start > Show recently added apps |
| Pinned folders | MDM: AllowPinnedFolder | Settings > Personalization > Start > Choose which folders appear on Start |
| Power | MDM: Start/HidePowerButton Start/HideHibernate Start/HideRestart Start/HideShutDown Start/HideSleep Group Policy: Remove and prevent access to the Shut Down, Restart, Sleep, and Hibernate commands | none |
| Start layout | MDM: Start layout ImportEdgeAssets Group Policy: Prevent users from customizing their Start screen Note: When a full Start screen layout is imported with Group Policy or MDM, the users cannot pin, unpin, or uninstall apps from the Start screen. Users can view and open all apps in the All Apps view, but they cannot pin any apps to the Start screen. When a partial Start screen layout is imported, users cannot change the tile groups applied by the partial layout, but can modify other tile groups and create their own. Start layout policy can be used to pin apps to the taskbar based on an XML File that you provide. Users will be able to change the order of pinned apps, unpin apps, and pin additional apps to the taskbar. | none |
| Jump lists | MDM: Start/HideRecentJumplists Group Policy: Do not keep history of recently opened documents | Settings > Personalization > Start > Show recently opened items in Jump Lists on Start or the taskbar |
| Start size | MDM: Force Start size Group Policy: Force Start to be either full screen size or menu size | Settings > Personalization > Start > Use Start full screen |
| App list | MDM: Start/HideAppList | Settings > Personalization > Start > Show app list in Start menu |
| All Settings | Group Policy: Prevent changes to Taskbar and Start Menu Settings | none |
| Taskbar | MDM: Start/NoPinningToTaskbar | none |
In local Settings > Personalization > Start, there is an option to Show more tiles. The default tile layout for Start tiles is 3 columns of medium sized tiles. Show more tiles enables 4 columns. To configure the 4-column layout when you customize and export a Start layout, turn on the Show more tiles setting and then arrange your tiles.
Taskbar options
Starting in Windows 10, version 1607, you can pin additional apps to the taskbar and remove default pinned apps from the taskbar. You can specify different taskbar configurations based on device locale or region.
There are three categories of apps that might be pinned to a taskbar:
Apps pinned by the user
Default Windows apps, pinned during operating system installation (Microsoft Edge, File Explorer, Store)
Apps pinned by the enterprise, such as in an unattended Windows setup
We recommend using the layoutmodification.xml method to configure taskbar options, rather than the earlier method of using TaskbarLinks in an unattended Windows setup file.
The following example shows how apps will be pinned — Windows default apps to the left (blue circle), apps pinned by the user in the center (orange triangle), and apps that you pin using XML to the right (green square).

In operating systems configured to use a right-to-left language, the taskbar order will be reversed.
Whether you apply the taskbar configuration to a clean install or an update, users will still be able to:
- Pin additional apps
- Change the order of pinned apps
- Unpin any app
In Windows 10, version 1703, you can apply an MDM policy, Start/NoPinningToTaskbar , to prevents users from pinning and unpinning apps on the taskbar.
Taskbar configuration applied to clean install of Windows 10
In a clean install, if you apply a taskbar layout, only the apps that you specify and default apps that you do not remove will be pinned to the taskbar. Users can pin additional apps to the taskbar after the layout is applied.
Taskbar configuration applied to Windows 10 upgrades
When a device is upgraded to Windows 10, apps will be pinned to the taskbar already. Some apps may have been pinned to the taskbar by a user, and others may have been pinned to the taskbar through a customized base image or by using Windows Unattend setup.
The new taskbar layout for upgrades to Windows 10, version 1607 or later, will apply the following behavior:
- If the user pinned the app to the taskbar, those pinned apps remain and new apps will be added to the right.
- If the user didn’t pin the app (it was pinned during installation or by policy) and the app is not in updated layout file, the app will be unpinned.
- If the user didn’t pin the app and the app is in the updated layout file, the app will be pinned to the right.
- New apps specified in updated layout file are pinned to right of user’s pinned apps.
Start layout configuration errors
If your Start layout customization is not applied as expected, open Event Viewer and navigate to Applications and Services Log > Microsoft > Windows > ShellCommon-StartLayoutPopulation > Operational, and check for one of the following events:
- Event 22 is logged when the xml is malformed, meaning the specified file simply isn’t valid xml. This can occur if the file has extra spaces or unexpected characters, or if the file is not saved in the UTF8 format.
- Event 64 is logged when the xml is valid, but has unexpected values. This can happen when the desired configuration is not understood, elements are not in the required order, or source is not found, such as a missing or misspelled .lnk.


