FIX: Start Menu not working in Windows 10

- There are two possible scenarios of why your Start Menu is not working. The first one implies a minor issue, which is probably caused by some third-party software, and could be resolved easily. The second might be caused by your system being affected by Start Menu bugs, which slipped out of sight of Windows 10 developers.
- The more serious scenario can be fixed by entering Safe mode and disabling your antivirus software among other solutions described in our guide below.
- The fact that we have a whole hub about Start Menu errors & issues can tell you of how wide spread this problem is. But you can also find the solutions there.
- Windows 10 is the most stable iteration of the most wide-spread OS, but that doesn’t mean it’s free of issues. Check our Windows 10 errors hub for more problems and solutions.
Start Menu is one of the most important additions in Windows 10, and the reason why many people love it.
But, after a few days of using the new OS, some people reported that their Start Menu is not working.
And the only thing we know, for now, is that this issue needs to be resolved as soon as possible. Actually, there are two possible scenarios.
First: you’re facing a minor Start Menu issue, which is probably caused by some third-party software, and could be resolved easily.
Second: your system is affected by widely-reported Start Menu bugs, which slipped out of sight of Windows 10 developers, and they still don’t have a proper solution for it.
So, let’s talk about both scenarios and see if there’s anything you can do, or you’re just forced to sit and wait for Microsoft to deliver the patch through the Windows Update.
How can I fix Start Menu problems in Windows 10?
1. Start Menu not working due to minor system issues
OK, so before you start panicking about how your Start Menu is broken and the only thing you can do is watch, you should go and determine the cause of the problem.
There’s a possibility that your system isn’t affected by the critical bug, and something else is preventing your Start Menu from work.
There are two known solutions (if the critical bug is not an issue), a registry tweak and a simple PowerShell command.
So, you should perform these fixes first, and if they don’t work, then you can start panicking.
1.1. Solve the Start Menu problem with the PowerShell
This was the most common solution for Start Menu problems in the Technical Preview, and I hope it still can be helpful. So, here’s what you need to do:
- Right-click on the Start Menu button and open Command Prompt (Admin)
- Enter PowerShell in the command line
- Paste the following line in the Administrator: PowerShell Window:
- Get-AppXPackage -AllUsers | Foreach
- Wait for the PowerShell to execute the command (ignore a few red error codes)
Check if your Start Menu is working now, if not try the following solution.
1.2. Fix the Start Menu problem in the Registry Editor
If the PowerShell fix didn’t do anything, try this simple Registry Editor tweak. Here’s what you need to do:
- Go to Search, type regedit and open Registry Editor
- Go to the following path: HKEY_LOCAL_MACHINESOFTWAREMicrosoftWindowsCurrentVersionImmersiveShellLauncher
- Click Edit, New, DWORD (32-bit) Value, and name it UseExperience
- Double-click the newly created item and set the value to 0
- Click OK, close the Registry Editor and then restart your computer
I hope your Start Menu now works if not, I’m sorry, but you’re the ‘victim’ of the critical bug in Windows 10, and you’ll have to wait until Microsoft comes up with the solution.
2. Critical error with Start Menu in Windows 10
Now that we’ve investigated the first case scenario, let’s try and see how we can resolve the critical errors that cause the Start Menu to stop working.
2.1. Enter the Safe Mode
According to some users entering the Safe Mode can resolve this problem, somehow. So, it won’t hurt if you try that. Here’s how to enter the Safe Mode in Windows 10:
- With Windows 10 running, press Windows Key + L to log out.
- Click the Power button in the bottom right corner, hold Shift on your keyboard, and click Restart.
- Your computer should now restart to boot options. Go to Troubleshoot > Advanced options > Startup Settings. Click the Restart button.
- Once your computer restarts again, press F5 to access Safe Mode with Networking.
- Just by entering the Safe Mode your problem should be resolved. All you have to do now is to restart your computer.
2.2. Disable your antivirus
You probably already know by now that third-party antivirus programs can interfere with some Windows 10 features.
So, to make sure it doesn’t render the Start Menu unusable, disable your antivirus for a couple of minutes.
If the Start Menu works with the antivirus off, consider changing your primary security solution or switch to Windows Defender.
2.3. Restart the Local Security Authority process
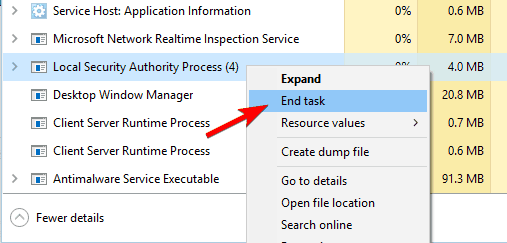
Another solution that may be useful is restarting the Local Security Authority process. Here’s how to do that:
- Open Task Manager by pressing Ctrl + Shift + Esc.
- When Task Manager opens, go to the Processes tab and locate Local Security Authority Process. Right-click it and choose End task.

- Close Task Manager and restart your computer. After your computer restarts, check if the issue is resolved.
2.4. Disable Internet Explorer
You probably don’t use Internet Explorer. Which is perfect, because Windows 10’s legacy browser may cause the Start Menu issues.
So, the best solution, in that case, is to simply disable Internet Explorer.
- Go to Search, type appwiz.cpl, and press Enter.
- Programs and Features window will now open. Click on Turn Windows features on or off.
- Locate Internet Explorer 11 on the list and uncheck it (if you get a warning message just click Yes).
- Restart your computer.

2.5. Make sure Windows is up to date
As Windows 10 continuously receives updates, Microsoft delivers various patches for various problems through Windows Update. So, just make sure your system is up to date.
To check for updates, simply go to Settings > Updates & Security, and check for updates.
2.6. Switch to another administrator account and delete TileDataLayer directory
Some users also reported that switching to another administrator account and deleting the TileDataLayer directory also resolves the problem. Here’s how to do that:
- Press Ctrl + Shift + Esc to open the Task Manager.
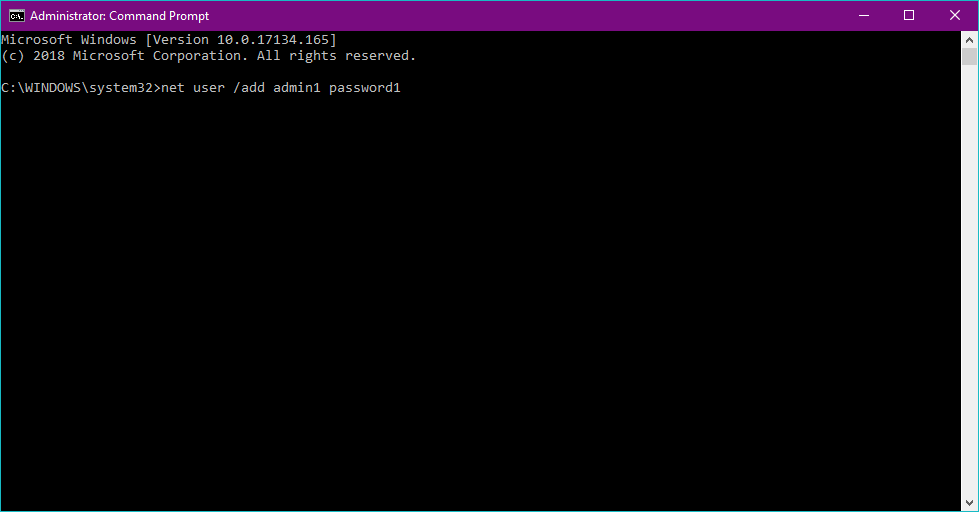
- When Task Manager opens, click on File > Run new task.
- Type cmd, check Create this task with administrative privileges and click OK.
- When Command Prompt starts, enter the following and press Enter to run it:
- net user /add admin1 password1
- net user /add admin1 password1
- This will create a new user account named admin1 with password password1. You can use any other values for username or password.
- Now you need to turn newly added user, admin1 in our example, to administrator by entering the following:
- net localgroup administrators admin1 /add
- net localgroup administrators admin1 /add
- Close Command Prompt, sign out of your current account and go to newly created admin1 account. Use password1 to log in.
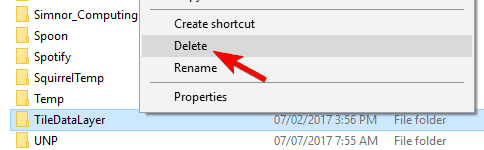
- Press Windows Key + R and enter %localappdata%. Click OK or press Enter.
- Locate TileDataLayer folder and delete it.
- Sign out of admin1 account and switch back to your regular account.
That’s about it, if you have any comments, questions or suggestions, just let us know in the comments down below.
Fix problems with the Start menu
If you can’t see Start on your taskbar, the taskbar may be hidden.
Show a hidden taskbar
Press the Windows logo key + I, then select Personalization > Taskbar .
Turn on Lock the taskbar.
Turn off Automatically hide the taskbar in desktop mode or Automatically hide the taskbar in tablet mode.
If that doesn’t resolve the issue you’re experiencing, select any of the following headings to see steps you can try to get it working again.
Press Ctrl + Shift + Esc to open Task Manager. You may need to select More details at the bottom of the window to see everything.
Select the Processes tab.
Scroll down to Windows Explorer, select it, then select Restart.
The process may take a few seconds, and your taskbar and Start menu may not be visible while Windows Explorer restarts. You can close Task Manager when the process is complete.
Press the Windows logo key + I.
In Settings, choose Update & security > Windows Update , and then select Check for updates. Install any available updates and restart your computer if required.
Note: Need another way to get to Settings? Press the Windows logo key + R, then type ms-settings: (note the colon) in the Open box. Select OK to open Settings.
If you didn’t have any updates that required a restart, it’s still a good idea to restart your device to make sure any pending updates are installed.
To restart your device when you can’t access Start , press Ctrl + Alt + Delete, select Power and then select Restart .
Note: You can also manually shut down your device by pressing and holding the power button. Shutting down this way risks losing unsaved data, so first be sure to save and close everything you’re working on. If you shut down this way, you can restart your device by pressing the power button again.
While it’s likely you have the most recent drivers, if you’re still having trouble with the Start menu, you can try fixing it by manually updating your graphics or audio drivers. For more info, see Update drivers in Windows 10.
If you still can’t fix your problem with the Start menu, try creating a new local administrator account.
If you’re signed in with your Microsoft account, remove the link to that account first by doing the following (if that’s not how you’re signed in, skip to creating a new administrator account):
Press the Windows logo key + I.
In Settings, select Accounts > Your info (in some versions, it may be under Email & accounts instead).
Select Sign in with a local account instead. You’ll see this link only if you’re using a Microsoft account, and you may not see it if your device is on a network.
Type your Microsoft account password and select Next.
Choose a new account name, password, and password hint, and then select Finish and sign out.
Create the new administrator account:
Press the Windows logo key + I.
In Settings, select Accounts > Family & other people (or Other users , if you’re using Windows 10 Enterprise).
Under Other users , select Add someone else to this PC.
On Windows 10 Home and Windows 10 Professional, provide a name for the user and a password, and then select Next. On Windows 10 Enterprise, select I don’t have this person’s sign-in information, and then select Add a user without a Microsoft account.
Set a user name, password, and password hint. Then select Next > Finish.
Next, make the new account an administrator account:
Under Family & other people (or Other users , if you’re using Windows 10 Enterprise), choose the account you created, and then select Change account type.
Under Account type, select Administrator > OK.
Sign out of your account and then sign in to your new account. If everything is fixed, move your personal data and files to the new account.
To move your personal files from your old account to your new account, try opening File Explorer, expanding This PC > OSDisk (C:), and looking in the Users folder, where you should see folders for both accounts. You can then copy and paste your files from the old account folder to similar locations in the new account folder. Or if you prefer, you can upload your files from your old account to OneDrive, and then sign into the new account and download the files from OneDrive.
If the problem still isn’t fixed, try deleting the old administrator account:
Under Other users, select the old administrator account, then select Remove > Delete account and data.
After the old account is removed, restart your device and sign in with the new account again.
If you were using a Microsoft account to sign in before, associate the Microsoft account with the new administrator account.
In Settings , select Accounts > Your info (in some versions, it may be under Email & accounts instead).
Select Sign in with a Microsoft account instead and enter your account info. You’ll see this link only if you’re using a local account, and you may not see it if your device is on a network.
Note: Need another way to get to Settings? Press Windows logo key + R, then type ms-settings: (note the colon) in the Open box. Select OK to open Settings.
If none of the previous options work, try resetting your PC using Recovery options in Windows 10.


