- I can’t start Microsoft Outlook or receive the error “Cannot start Microsoft Office Outlook. Cannot open the Outlook Window”
- Switch from working offline to online
- Status: Working Offline
- Status: Disconnected
- Tips for reconnecting to Outlook
- Support for Office 2010 ended on October 13, 2020
- When you might want to work offline
- Work offline with a Microsoft Exchange Server account
- Quick setup
- Customized setup
- About working offline
- If you have a Microsoft Exchange account
- Quick setup
- Customized setup
- If you use your Exchange account in Cached Exchange Mode
- If you use a POP3, IMAP, or HTTP account
I can’t start Microsoft Outlook or receive the error “Cannot start Microsoft Office Outlook. Cannot open the Outlook Window”
Are you having trouble starting Outlook 2016, Outlook 2013, or Outlook 2010, or receiving «Cannot start Microsoft Outlook. Cannot open the Outlook window» error messages? We can fix the problem for you, or you can use the troubleshooting steps we’re providing below to help resolve these startup issues.
We can diagnose and fix several common Outlook issues for you. If our automated tool can’t fix your issue, or if you’d like to fix it yourself, see the next section.
Sometimes add-ins can conflict with Outlook. Starting Outlook in safe mode, which starts Outlook without add-ins loaded, can tell you if an add-in is the problem.
Note: If you enabled an ABBYY FineReader add-in, an outdated version of the software might cause an Outlook startup error. For more information, see Office programs may crash with the FineReader add-in installed.
Start Outlook in safe mode
Choose Start > Run.
Type Outlook /safe , and choose OK.
In the Choose Profiles dialog box, accept the default setting of Outlook and choose OK.

If prompted, enter your password and choose Accept.
How do you know you’re working in safe mode? You’ll see a label similar to the one below at the top of the screen.

The Outlook  icon on your taskbar also alerts you the program isn’t operating normally.
If Outlook does start in safe mode, then the problem is likely with one of your add-ins. You’ll need to disable all of your add-ins before restarting Outlook.
In the upper-left corner of Outlook, choose File > Options > Add-ins.
At the bottom of the View and manage Office Add-ins, make sure the Manage box shows COM Add-ins, and then choose Go.
As a precaution, when the COM Add-ins listing of your current add-ins opens, do one of the following:
Manually record the title of every selected add-in listed under Available Add-ins.
Take a screenshot of the property sheet and save the image to a location of your choice.
After you’ve captured the titles of the selected add-ins, clear all selected check boxes, and then choose OK.
Caution: Click a check box to clear it. Don’t select an add-in and choose Remove. If you have administrator rights, you could actually delete the add-in. For this troubleshooting exercise, you want to disable, not delete, an add-in.
Choose File > Exit.
Choose Start > Run, and in the Open box, type Outlook.
Note: If the program loads properly, it’s likely that one of your add-ins is the source of the error and you need to identify which one. To determine which add-in is the problem, enable one add-in at a time.
In the upper-left corner of Outlook, choose File > Options > Add-ins.
Select the check box next to an add-in you want to re-enable, and then choose OK.
Repeat all steps until you’ve re-enabled all of the original add-ins and revealed the source of the error.
Important: Remember, if Outlook opens in safe mode, you’ve revealed the add-in you just enabled as a source of the error.
Restart Outlook again and disable the add-in you enabled that produced the problem, and then start Outlook.
Make sure you go through the restart-disable-restart process for every add-in that was originally enabled in Outlook. An error could be caused by more than one add-in.
Your profile contains your Outlook settings. Occasionally, that profile can become corrupted. You can determine if it’s corrupt by creating a new profile and changing which profile is used when Outlook starts.
To open the Control Panel, do one of the following:
For Windows Vista or Windows 7, choose Start > Control Panel.
For Windows 8 and Windows 10, choose Start, and then type Control Panel.
Note: For Windows 10, in Control Panel, make sure the View by box in the upper-right corner is set to Category.
In the Mail Setup — Outlook dialog box, choose Show Profiles > Add.

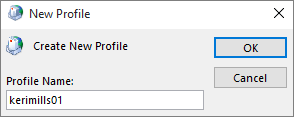
In the Profile Name box, type the name you want to use for your new profile.
On the Auto Account Setup page for the Add Account Wizard, under E-mail Account, fill in Your Name, E-mail Address, and Password, and then choose Next.
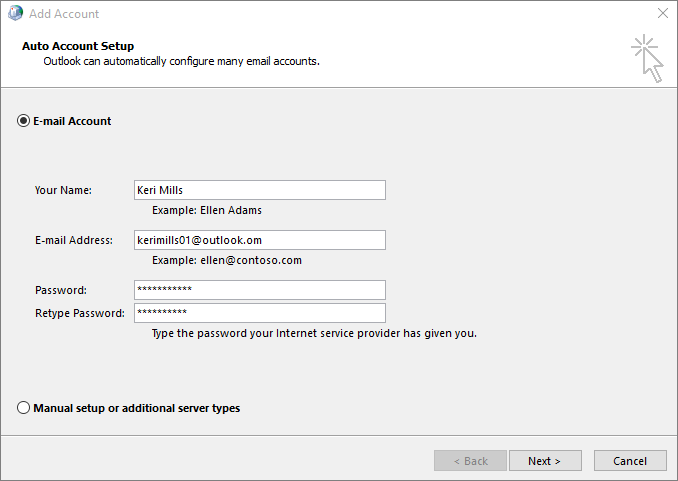
Note: The Add Account Wizard automatically searches for your mail server settings.
Choose Finish and you’ll find the new profile name you added listed on the General tab in the Mail dialog box.
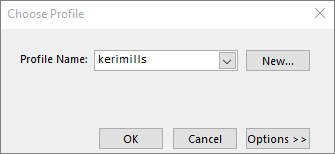
Under When starting Microsoft Outlook, use this profile, choose Prompt for a profile to be used, and then choose OK.
Use a different profile
In the drop-down list in the Choose Profile dialog box, choose the new profile name you created.
Note: If Outlook starts normally, then you’ve identified your Outlook profile as being corrupt and the source of your problem.
Should you decide to remove a profile, back up the data files first. All offline cached content will be deleted when you choose Remove. For more information, see Introduction to Outlook Data Files (.pst and .ost).
Outlook stores all your email messages, meetings and events, contacts, and tasks in data files. These files occasionally might become corrupted. You can run the Inbox Repair Tool ( scanpst.exe) to scan your Outlook data files and repair errors.
Exit Outlook to use the Inbox Repair Tool.
Note: The content in the left pane is determined by the Outlook version you’re using.
Visit the links below for instructions based on your version of Outlook.
The navigation pane is the leftmost pane in Outlook where you’ll find your folder list and the icons to move between Mail, Calendar, People, and Tasks. Running the /resetnavpane command removes all customizations to the navigation pane.
Note: If you have more than one computer, run the command on all computers because the navigation pane customizations are specific to the local Outlook on a computer.
Choose Start > Run.
In the Open box, type Outlook.exe /resetnavpane , and then choose OK.
Compatibility mode is designed to help a program run on an older operating system. If Outlook is running in compatibility mode, you can turn that off and see if it fixes the problem.
Note: This step is for Outlook 2013 or Outlook 2010. Outlook 2016 doesn’t have a Compatibility tab.
Find the Outlook.exe file on your computer.
For Outlook 2013, you can find this file in C:\Program Files\Microsoft Office\Office 15\ or C:\Program Files (x86)\Microsoft Office\Office 15\
For Outlook 2010, you can find this file in C:\Program Files\Microsoft Office\Office 14\ or C:\Program Files (x86)\Microsoft Office\Office 14\
Right-click the Outlook.exe file, choose Properties, and then choose the Compatibility tab.
If any of the boxes on the Compatibility tab are checked, uncheck them, then choose Apply > OK.
Switch from working offline to online
In Outlook, you have the flexibility to make Outlook work online or offline with your mail server.
How do you know when you’re working offline or online in Outlook? There are visual cues, starting with the status bar at the bottom of your Outlook window. If either of the following status indicators are shown, it means Outlook isn’t connected to your mail server.
 or
or 
You can’t send or receive email until you reconnect.
Status: Working Offline
Working offline usually is a choice. Returning to an online work mode is a simple process.
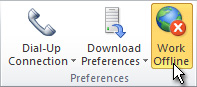
In Outlook, on the Send/Receive tab, choose Work Offline to reconnect.
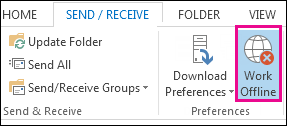
If the background of the Work Offline button is shaded (as shown in the image above), you’re not connected. But if the background is clear, you are connected.
If you don’t see the Work Offline button and your email account is a Microsoft Exchange Server account or a Microsoft 365 account, Cached Exchange Mode might be turned off. Follow the steps in Turn on Cached Exchange Mode to change that setting. Or contact the person who manages the Exchange server for your organization.
We recommend always turning on Cached Exchange Mode with a Microsoft 365 account.
Status: Disconnected
There can be different reasons why you’re disconnected from Outlook. What follows are just a few examples of some of the possible reasons.
If your Internet connection is working, there might be a problem with the mail server.
If you can log onto your email from a website—for example, http://outlook.com—check to see whether you can receive and send email that way. If email isn’t working on the website, call your technical support for your email service provider for help.
If you can send and receive mail on the website, then your mail server is fine. But your computer might need updates or there might be a problem with your account settings.
Tips for reconnecting to Outlook
Here are some suggested ways to reconnect to Outlook.
Reset the Work Offline status
On the Send/Receive tab, choose Work Offline, and check your status bar. If the status shows Working Offline, repeat the action until the status changes to connected.
Check for updates
Read the check for updates topic and install any required updates.
Create a new profile
To eliminate the possibility that there’s a fault in your current Outlook profile, create a new profile. If you open Outlook using the new profile and it’s still disconnected, try removing your account and then adding it back again.
In the Folder pane, right-click your account name, and then choose Remove .
Follow the steps in adding the account again to proceed.
Support for Office 2010 ended on October 13, 2020
Upgrade to Microsoft 365 to work anywhere from any device and continue to receive support.
If the status bar at the bottom of your Microsoft Outlook window shows Working Offline, it means Outlook’s disconnected from your mail server. You can’t send or receive email until you reconnect.

The first thing to check is your Internet connection by trying to connect to a website. If your Internet connection is working, try reconnecting to the mail server. Here’s how:
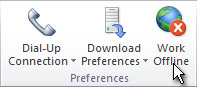
Notice that when Outlook is set to Work Offline, the button is highlighted.
Click Work Offline to return to working online.
After you reconnect to the server, the Work Offline button has a plain background:
Still no luck? If you can use that email account with a website, such as Outlook.com, see whether you can receive and send new mail using that site. If you can’t, call your technical support or your email service provider for help.
If you can get and send mail on the website, the mail server’s fine. But Outlook might need updates or there might be a problem with the mail account settings. If you’re using an Exchange account, check for updates and install any required ones. (It’s always a good idea to keep current with updates.)
Desperate? Maybe your email account needs a fresh start. Try creating a new mail profile.
When you might want to work offline
When you work online with Outlook and your mail server, you receive new mail as it arrives, and mail that you send is sent immediately. However, there can be times when working online isn’t practical. For example, maybe there’s no network connection available. Or maybe there is a network available, but you don’t want to connect to it because you’ve exceeded your data plan or will be charged a fee.
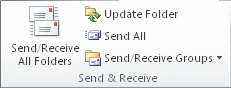
In Outlook, you have the flexibility to choose whether you want to work online or offline, and you can do so either automatically or manually. If you elected to work offline, but are ready to manually start a send/receive operation, just click Send/Receive > Send/Receive All Folders.
Work offline with a Microsoft Exchange Server account
If you’re using a Microsoft Exchange Server account, your messages are saved in your mailbox on the server. When you’re connected to the server and you work online, you can use all of the functionality in Outlook, such as opening items, moving them between folders, and deleting items. However, when you work offline, you lose access to all items on the server. That is when offline folders, which are saved in an offline Outlook Data File (.ost) on your computer, are useful.
The offline Outlook Data File (.ost) file is a replica or copy of your Exchange mailbox. When you are online, this file is automatically synchronized with the server so that both copies are the same, and changes made in either copy are made to the other. You can configure Outlook to automatically start offline if a connection to Exchange cannot be established. You can also manually switch between the online and offline connection states and choose which Exchange folders are kept up-to-date locally on your computer.
If you use an Exchange account, it is recommended that you use it with Cached Exchange Mode. Most of the reasons to work offline are eliminated when you use Cached Exchange Mode. The lack of a network connection is virtually transparent to you because you can continue to work with your items.
By default, Cached Exchange Mode creates and uses an offline Outlook Data File (.ost) and then downloads and maintains a synchronized copy of the items in all folders in your mailbox. You work with your information on your computer, and Outlook synchronizes it with the server.
Whether you are at the office, at home, or on an airplane, network changes or availability are transparent to you. When your connection to Exchange is interrupted, you can continue to work with your data. When a connection is restored, Outlook automatically synchronizes changes, and the folders and items on the server and on your computer are once again identical. Outlook manages your connection to the server and keeps your data up-to-date. There is no need to switch to working offline and to keep trying to reconnect to the server — it is all automatic.
Cached Exchange Mode also frees you from having to set up Send/Receive groups because it chooses the folders that you want to be available offline and keeps those folders synchronized.
The only time when you might still choose to work offline is when you want greater control over what is downloaded to the local copy of your Exchange mailbox. This can include situations where you are using a connection device or service that bases the charges on the amount of data that you transfer. Cached Exchange Mode keeps everything up-to-date. Working offline allows you to use Send/Receive groups to refine the type and amount of information that is synchronized.
What if you aren’t using an Exchange account? Many people use a POP3 or IMAP account from their Internet service provider (ISP) or a Web-based account, such as Outlook.com (formerly Hotmail).
The fastest way to work offline is to use the default Outlook settings. If you want to customize the settings, including where to save the offline Outlook Data File (.ost), use the Customized setup instructions.
Quick setup
On the Send / Receive tab, in the Preferences group, click Work Offline.
To set up an offline Outlook Data File (.ost), click OK.
By default, the Prompt me at startup so I may choose to work offline or online check box is selected. If you want Outlook to always work online when a connection is available, clear this check box.
After the offline Outlook Data File (.ost) file is created, when you exit and restart Outlook, you must synchronize your Exchange mailbox with the new file. The fastest way to do this is as follows: On the Send / Receive tab, in the Send & Receive group, click Send/Receive All Folders.
Customized setup
If you want to customize the offline Outlook Data File (.ost) settings, such as where the file is saved on your computer, do the following:
If you have not already done so, create an offline Outlook Data File (.ost).
Create an offline Outlook Data File (.ost)
Click the File tab.
Click Account Settings, and then click Account Settings.
On the E-mail tab, select the Exchange Server account, and then click Change.
Click More Settings.
Click the Advanced tab, and then click Offline Folder File Settings.
In the File box, type the path to the file that you want to use as the .ost file.
The default file name is Outlook.ost. If this file already exists, you are prompted for a new name.
Click the File menu,
Click Account Settings, and then click Account Settings.
On the E-mail tab, select the Exchange account, and then click Change.
Click More Settings.
Do one of the following:
Always start Outlook offline Click Manually control connection state, and then click Work offline and use dial-up networking.
Choose whether to work offline or online each time you start Outlook Click Manually control connection state, and then select the Choose the connection type when starting check box.
Always connect to the network Click Manually control connection state, and then click Connect with the network.
Outlook automatically detects whether a connection to the server is available Click Automatically detect connection state. If Outlook is unable to connect with the mail server, it starts in offline mode automatically.
Note: To specify the amount of time to wait for a response from the server before you are notified to retry or work offline, type a number in the Seconds Until Server Connection Timeout box.
About working offline
When you work online with Outlook 2007 and your mail server, you receive new mail as it arrives, and mail that you send is sent immediately. However, there are times when working online is not practical. For example, there can be times when a network connection is not available because of your location. There are also instances when even though a connection might be available, you don’t want to use it to avoid incurring connection fees.
If your account connects to Exchange, your messages are saved in your server’s mailbox. When you are connected to the server and work online, you can use all of the functionality in Outlook, such as opening items, moving them between folders, and deleting items. However, when you work offline, you lose access to all items on the server. That is when offline folders, which are saved in an Offline Folder file (.ost) on your computer, are useful.
The .ost file is a replica or copy of your Exchange mailbox. When you are online, this .ost file is automatically synchronized with the server so that both copies are the same, and changes made in either copy are made to the other. You can configure Outlook to automatically start offline if a connection to Exchange cannot be established. You can also manually switch between the online and offline connection states and choose which Exchange folders are kept up-to-date locally on your computer.
If you use an Exchange account, it is recommended that you use it with Cached Exchange Mode. Most of the reasons to work offline are eliminated when you use Cached Exchange Mode. The lack of a network connection is virtually transparent to you because you can continue to work with your items.
By default, Cached Exchange Mode creates and uses an Offline Folder file (.ost) and then downloads and maintains a synchronized copy of the items in all folders in your mailbox. You work with your information on your computer, and Outlook synchronizes it with the server.
Whether you are at the office, at home, or on an airplane, network changes or availability are transparent to you. When your connection to Exchange is interrupted, you can continue to work with your data. When a connection is restored, Outlook automatically synchronizes changes, and the folders and items on the server and on your computer are once again identical. Outlook manages your connection to the server and keeps your data up-to-date. There is no need to switch to working offline and to keep trying to reconnect to the server — it is all automatic.
Cached Exchange Mode also frees you from having to set up Send/Receive groups because it chooses the folders that you want to be available offline and keeps those folders synchronized.
The only time when you might still choose to work offline is when you want greater control over what is downloaded to the local copy of your Exchange mailbox. This can include situations where you are using a connection device or service that bases the charges on the amount of data that you transfer. Cached Exchange Mode keeps everything up-to-date. Working offline allows you to use Send/Receive groups to refine the type and amount of information that is synchronized.
What if you aren’t using an Exchange account? Many people use a POP3 or IMAP account from their Internet service provider (ISP) or an HTTP account, such as Microsoft Windows Live Mail. When you are online, this means that a connection to the mail server is available, and Outlook sends and receives messages immediately for Exchange, IMAP, and HTTP e-mail accounts. For POP3 e-mail accounts, messages are sent immediately if the Send immediately when connected check box is selected on the Mail Setup tab ( Tools menu, Options command). When you are offline, all accounts use the scheduling send/receive time in the Send/Receive Groups dialog box. Also, for IMAP e-mail accounts, folders are not available when offline.
When you work offline, Outlook connects to the mail server only when you choose for it to do so. When offline, Outlook does not try to connect to your mail server to check for new messages, download headers that you marked for download, or send messages.
If you have a Microsoft Exchange account
You must restart Outlook 2007 to switch between working online and offline. Consider using Cached Exchange Mode for greater flexibility when you switch between online and offline connection states.
The fastest way to work offline is to use the default Outlook settings. If you want to customize the settings, including where to save the Offline Folder file (.ost), use the Customized setup instructions.
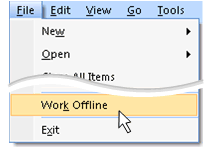
Quick setup
On the File menu, click Work Offline.
To set up an Offline Folder file (.ost), click OK.
By default, the Prompt me at startup so I may choose to work offline or online check box is selected. If you want Outlook to always work online when a connection is available, clear this check box.
After the .ost file is created, when you exit and restart Outlook, you must synchronize your Exchange mailbox with the .ost file. The fastest way to do this is as follows: On the Tools menu, point to Send/Receive, and then click Send/Receive All.
Customized setup
If you want to customize the Offline Folder file (.ost) settings, such as where the .ost file is saved on your computer, do the following:
If you have not already done so, create an Offline Folder file (.ost).
Create an Offline Folder file (.ost)
On the Tools menu, click Account Settings.
On the E-mail tab, select the Exchange account, and then click Change.
Click More Settings.
Click the Advanced tab, and then click Offline Folder File Settings.
In the File box, type the path to the file that you want to use as the .ost file.
The default file name is Outlook.ost. If this file already exists, you are prompted for a new name.
On the Tools menu, click Account Settings.
On the E-mail tab, select the Exchange account, and then click Change.
Click More Settings.
Do one of the following:
Always start Outlook offline Click Manually control connection state, and then click Work offline and use dial-up networking.
Choose whether to work offline or online each time you start Outlook Click Manually control connection state, and then select the Choose the connection type when starting check box.
Always connect to the network Click Manually control connection state, and then click Connect with the network.
Outlook automatically detects whether a connection to the server is available Click Automatically detect connection state. If Outlook is unable to connect with the mail server, it starts in offline mode automatically.
Note: To specify the amount of time to wait for a response from the server before you are notified to retry or work offline, type a number in the Seconds Until Server Connection Timeout box.
If you use your Exchange account in Cached Exchange Mode
On the File menu, click Work Offline.
If you use a POP3, IMAP, or HTTP account
On the File menu, click Work Offline.


