- Как установить Node.js
- Установка Node.js на Windows
- Установка Node.js на OS X
- Как запустить JavaScript с помощью Node.js
- Давайте попробуем
- Усложняем задачу
- Что мы сделали
- Set up your Node.js development environment directly on Windows
- Install nvm-windows, node.js, and npm
- Alternative version managers
- Install your favorite code editor
- Install Git (optional)
- Get started using Node.js on Windows for beginners
- Prerequisites
- Types of Node.js applications
- Try using Node.js in VS Code
- Set up a basic web app framework by using Express
- Try using a Node.js module
Как установить Node.js
29 октября 2020

Устанавливаем программную платформу Node.js, для того чтобы дать JavaScript возможность взаимодействовать с устройствами ввода-вывода через свой API и подключать разные внешние библиотеки.
Установка Node.js на Windows
Для начала необходимо установить правильную консоль для WIndows.
После этого можно переходить к установке Node.js. Для Windows есть только один способ.
Необходимо перейти на официальный сайт https://nodejs.org и на главной странице скачать последнюю стабильную версию.
 Официальный сайт https://nodejs.org.
После загрузки инсталлятор следует запустить и установить Node.js, как любую другую программу.
Убедимся, что всё установилось. Для этого в cmder проверим версию Node.js с помощью команды node -v и npm -v .
 Проверка версии и установка пакета.
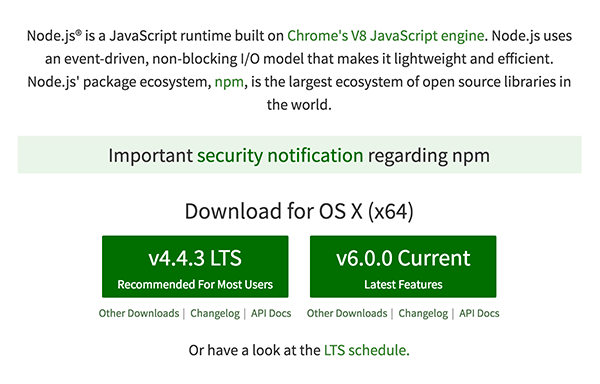
Установка Node.js на OS X
Заходим на сайт https://nodejs.org и на главной странице скачиваем последнюю стабильную версию, нажав на соответствующую кнопку.
Официальный сайт https://nodejs.org.
После скачивания достаточно установить пакет через инсталлятор и можно начинать пользоваться.
Как запустить JavaScript с помощью Node.js
27 сентября 2018

Если вы только сели за изучение JavaScript, то у вас очень быстро возникнет вопрос: а как запустить код?
Простой скрипт можно запустить прямо в браузере. Большинство из них сегодня позволяют сделать это в пару кликов. Но возможностей браузера не хватит, если задача — разработка сложного приложения, работающего с базами данных и файлами. Здесь на помощь приходит Node.js.
Node.js — среда выполнения JavaScript-кода. Она создана на базе движка V8, который крутится в сердце браузера Chrome. Эта среда позволяет запускать JavaScript-сценарии в окружении операционной системы, а не браузера.
Кроме стандартных возможностей JavaScript, Node.js даёт инструменты для работы с сетью, вводом и выводом, файловой системой и не только. В придачу к среде идёт и пакетный менеджер npm, который позволяет разработчикам ставить сторонние пакеты в одну строку.
Разобраться с базовыми функциями будет просто, если вы уже знаете JavaScript или другой скриптовый язык.
Давайте попробуем
Сначала установим среду с сайта разработчиков и проверим в консоли, что всё прошло нормально.
Введём простую команду:
Результат, который мы получили:
Готово! Среда успешно установлена и готова к действиям. Теперь запустить скрипт можно прямо в консоли, предварительно запустив node .
Рассмотрим пару простых примеров. По традиции выведем Hello world! :
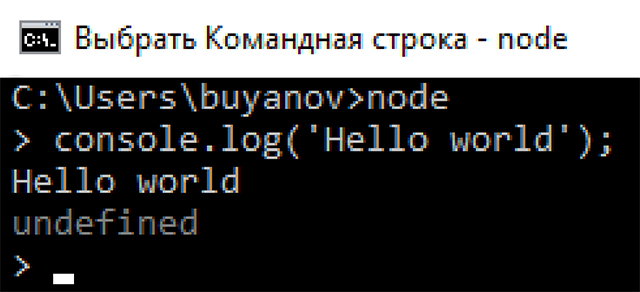 Hello world!
Вроде ничего неожиданного, кроме undefined в конце. Дело в том, что в JavaSсript функция всегда возвращает какое-то значение. Если автор функции опустил return , то считается, что она возвращает undefined . Именно это значение и выводит нам Node.js.
Попробуем пример сложнее, например, цикл выводов. Как консоль отреагирует на него?
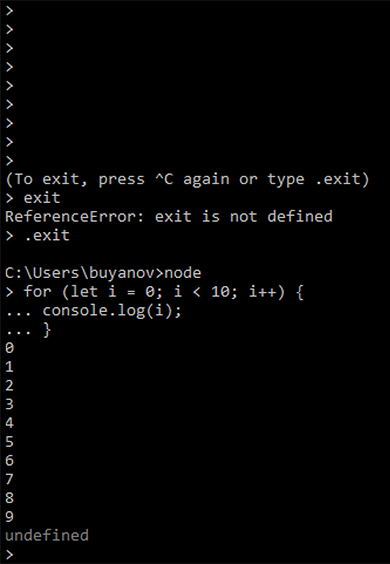 Цикл выводов.
Node.js отлично справляется и с более сложными конструкциями, даже самостоятельно выстраивая лесенку. В случае обнаружения ошибки, он тут же сообщит об этом, остановив скрипт.
Например, случайно пропустим букву в команде:
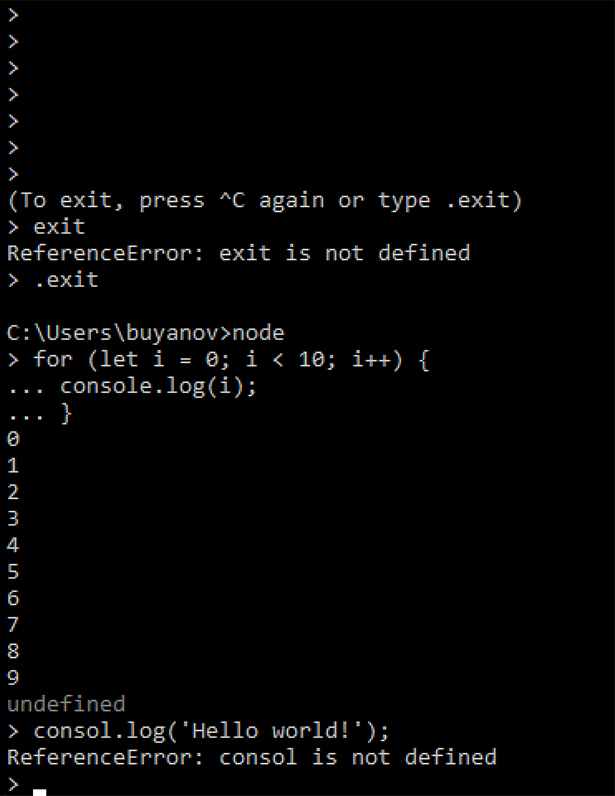 Упс, ошибка.
Ну вот, всё необходимое для написания простых и компактных приложений есть. Но писать большое приложение на десятки строк кода в консоли будет не слишком-то удобно. Да и такой подход не сработает, если приложение разбито на несколько скриптов, лежащих в разных файлах.
Усложняем задачу
Попробуем перейти к чуть более продвинутому использованию среды.
Создайте на жёстком диске папку для проекта и положите туда ваш готовый скрипт. Назовите его index.js — так принято. Если под рукой скрипта нет, то возьмите цикл с выводом простого значения, с которого мы начали.
Для инициализации проекта необходимо создать файл package.json . Как это сделать?
Первый способ — открыть папку проекта в консоли и выполнить команду npm init . Это запустит инициализацию проекта. Пользователю предстоит ввести имя, версию и ряд других значений. Как результат, в папке проекта появится файл package.json .
Второй способ — самостоятельно создать текстовый файл, назвать его package.json и заполнить все необходимые поля. Файл будет представлением приложения, в котором содержится его имя, версия, авторы и зависимости. На данном этапе может выглядеть так:
Вопросы может вызвать поле scripts , и я уже подозреваю какие. Давайте разберёмся с ним.
Раздел содержит набор команд, которые можно будет использовать при работе с приложением. Создание стартового скрипта start считается правилом хорошего тона. Кроме того, это удобно: для запуска скрипта необходимо ввести команду npm start , находясь в папке проекта.
Воспринимайте npm start как синоним команды node index.js . Учитывая, что окно терминала встроено в большинство современных сред разработки, синоним помогает ускорить работу над приложением.
Но вводить команду постоянно — не слишком рациональное расходование времени. Давайте упростим себе жизнь.
- Находясь в папке проекта введём команду npm install express —save . Пакетный менеджер установит в папку компоненты фреймворка express , в котором содержатся необходимые компоненты для написания простого HTTP-сервера.
- После установки файл package.json изменится, в нём появится поле dependencies .
- Теперь создадим рядом в папке проекта новый файл static-file-server.js . В нём будет содержаться код сервера.
Скопируйте в файл следующий код:
Подробнее про команды можно прочитать здесь.
Что мы сделали
Теперь при вводе команды npm start будет запускаться наш сервер, который будет обрабатывать всё содержимое нашего приложения.
Один раз запустив команду, мы всегда сможем получить актуальный результат выполнения скрипта, стоит только зайти на страницу localhost:8080/ .
Set up your Node.js development environment directly on Windows
The following is a step-by-step guide to get you started using Node.js in a native Windows development environment.
Install nvm-windows, node.js, and npm
There are multiple ways to install Node.js. We recommend using a version manager as versions change very quickly. You will likely need to switch between multiple versions based on the needs of different projects you’re working on. Node Version Manager, more commonly called nvm, is the most popular way to install multiple versions of Node.js, but is only available for Mac/Linux and not supported on Windows. Instead, we will walk through the steps to install nvm-windows and then use it to install Node.js and Node Package Manager (npm). There are alternative version managers to consider as well covered in the next section.
It is always recommended to remove any existing installations of Node.js or npm from your operating system before installing a version manager as the different types of installation can lead to strange and confusing conflicts. This includes deleting any existing nodejs installation directories (e.g., «C:\Program Files\nodejs») that might remain. NVM’s generated symlink will not overwrite an existing (even empty) installation directory. For help with removing previous installations, see How to completely remove node.js from Windows.)
Open the windows-nvm repository in your internet browser and select the Download Now link.
Download the nvm-setup.zip file for the most recent release.
Once downloaded, open the zip file, then open the nvm-setup.exe file.
The Setup-NVM-for-Windows installation wizard will walk you through the setup steps, including choosing the directory where both nvm-windows and Node.js will be installed.

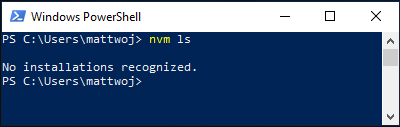
Once the installation is complete. Open PowerShell and try using windows-nvm to list which versions of Node are currently installed (should be none at this point): nvm ls
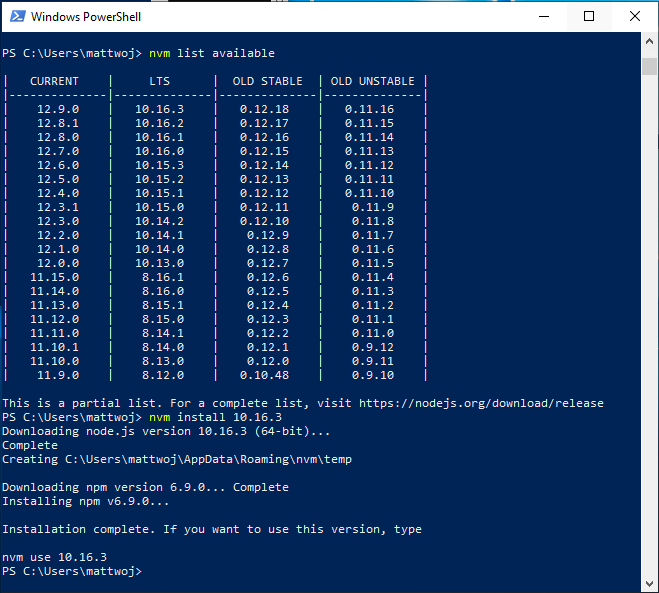
Install the current release of Node.js (for testing the newest feature improvements, but more likely to have issues than the LTS version): nvm install latest
Install the latest stable LTS release of Node.js (recommended) by first looking up what the current LTS version number is with: nvm list available , then installing the LTS version number with: nvm install (replacing with the number, ie: nvm install 12.14.0 ).
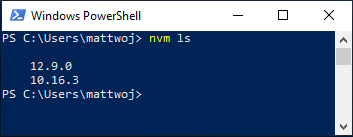
List what versions of Node are installed: nvm ls . now you should see the two versions that you just installed listed.
After installing the Node.js version numbers you need, select the version that you would like to use by entering: nvm use (replacing with the number, ie: nvm use 12.9.0 ).
To change the version of Node.js you would like to use for a project, create a new project directory mkdir NodeTest , and enter the directory cd NodeTest , then enter nvm use replacing with the version number you’d like to use (ie v10.16.3`).
Verify which version of npm is installed with: npm —version , this version number will automatically change to whichever npm version is associated with your current version of Node.js.
Alternative version managers
While windows-nvm is currently the most popular version manager for node, there are alternatives to consider:
nvs (Node Version Switcher) is a cross-platform nvm alternative with the ability to integrate with VS Code.
Volta is a new version manager from the LinkedIn team that claims improved speed and cross-platform support.
To install Volta as your version manager (rather than windows-nvm), go to the Windows Installation section of their Getting Started guide, then download and run their Windows installer, following the setup instructions.
You must ensure that Developer Mode is enabled on your Windows machine before installing Volta.
To learn more about using Volta to install multiple versions of Node.js on Windows, see the Volta Docs.
Install your favorite code editor
We recommend you install VS Code, as well as the Node.js Extension Pack, for developing with Node.js on Windows. Install them all or pick and choose which seem the most useful to you.
To install the Node.js extension pack:
- Open the Extensions window (Ctrl+Shift+X) in VS Code.
- In the search box at the top of the Extensions window, enter: «Node Extension Pack» (or the name of whatever extension you are looking for).
- Select Install. Once installed, your extension will appear in the «Enabled» folder of your Extensions window. You can disable, uninstall, or configure settings by selecting the gear icon next to the description of your new extension.
A few additional extensions you may want to consider include:
- Debugger for Chrome: Once you finish developing on the server side with Node.js, you’ll need to develop and test the client side. This extension integrates your VS Code editor with your Chrome browser debugging service, making things a bit more efficient.
- Keymaps from other editors: These extensions can help your environment feel right at home if you’re transitioning from another text editor (like Atom, Sublime, Vim, eMacs, Notepad++, etc).
- Settings Sync: Enables you to synchronize your VS Code settings across different installations using GitHub. If you work on different machines, this helps keep your environment consistent across them.
Install Git (optional)
If you plan to collaborate with others, or host your project on an open-source site (like GitHub), VS Code supports version control with Git. The Source Control tab in VS Code tracks all of your changes and has common Git commands (add, commit, push, pull) built right into the UI. You first need to install Git to power the Source Control panel.
Download and install Git for Windows from the git-scm website.
An Install Wizard is included that will ask you a series of questions about settings for your Git installation. We recommend using all of the default settings, unless you have a specific reason for changing something.
If you’ve never worked with Git before, GitHub Guides can help you get started.
Get started using Node.js on Windows for beginners
If you’re brand new to using Node.js, this guide will help you to get started with some basics.
Prerequisites
This guide assumes that you’ve already completed the steps to set up your Node.js development environment on native Windows, including:
- Install a Node.js version manager.
- Install Visual Studio Code.
Installing Node.js directly on Windows is the most straightforward way to get started performing basic Node.js operations with a minimal amount of set up.
Once you are ready to use Node.js to develop applications for production, which typically involves deploying to a Linux server, we recommend that you set up your Node.js development environment with WSL2. Though it’s possible to deploy web apps on Windows servers, it is much more common to use Linux servers to host your Node.js apps.
Types of Node.js applications
Node.js is a JavaScript runtime primarily used for creating web applications. Put another way, it’s a server-side implementation of JavaScript used for writing the backend of an application. (Though many Node.js frameworks can also handle the frontend.) Here are a few examples of what you might create with Node.js.
- Single-page apps (SPAs): These are web apps that work inside a browser and don’t need to reload a page every time you use it to get new data. Some example SPAs include social networking apps, email or map apps, online text or drawing tools, etc.
- Real-time apps (RTAs): These are web apps that enable users to receive information as soon as it’s published by an author, rather than requiring that the user (or software) check a source periodically for updates. Some example RTAs include instant messaging apps or chat rooms, online multiplayer games that can be played in the browser, online collaboration docs, community storage, video conference apps, etc.
- Data streaming apps: These are apps (or services) that send data/content as it arrives (or is created) while keeping the connection open to continue downloading further data, content, or components as needed. Some examples include video- and audio-streaming apps.
- REST APIs: These are interfaces that provide data for someone else’s web app to interact with. For example, a Calendar API service could provide dates and times for a concert venue that could be used by someone else’s local events website.
- Server-side rendered apps (SSRs): These web apps can run on both the client (in your browser / the front-end) and the server (the back-end) allowing pages that are dynamic to display (generate HTML for) whatever content is known and quickly grab content that is not known as it’s available. These are often referred to as “isomorphic” or “universal” applications. SSRs utilize SPA methods in that they don’t need to reload every time you use it. SSRs, however, offer a few benefits that may or may not be important to you, like making content on your site appear in Google search results and providing a preview image when links to your app are shared on social media like Twitter or Facebook. The potential drawback being that they require a Node.js server constantly running. In terms of examples, a social networking app that supports events that users will want to appear in search results and social media may benefit from SSR, while an email app may be fine as an SPA. You can also run server-rendered no-SPA apps, which my be something like a WordPress blog. As you can see, things can get complicated, you just need to decide what’s important.
- Command line tools: These allow you to automate repetitive tasks and then distribute your tool across the vast Node.js ecosystem. An example of a command line tool is cURL, which stand for client URL and is used to download content from an internet URL. cURL is often used to install things like Node.js or, in our case, a Node.js version manager.
- Hardware programming: While not quite as popular as web apps, Node.js is growing in popularity for IoT uses, such as collecting data from sensors, beacons, transmitters, motors, or anything that generates large amounts of data. Node.js can enable data collection, analyzing that data, communicating back and forth between a device and server, and taking action based on the analysis. NPM contains more than 80 packages for Arduino controllers, raspberry pi, Intel IoT Edison, various sensors, and Bluetooth devices.
Try using Node.js in VS Code
Open your command line (Command prompt, PowerShell, or whatever you prefer) and create a new directory: mkdir HelloNode , then enter the directory: cd HelloNode
Create a JavaScript file named «app.js» with a variable named «msg» inside: echo var msg > app.js
Open the directory and your app.js file in VS Code: : code .
Add a simple string variable («Hello World»), then send the contents of the string to your console by entering this in your «app.js» file:
To run your «app.js» file with Node.js. Open your terminal right inside VS Code by selecting View > Terminal (or select Ctrl+`, using the backtick character). If you need to change the default terminal, select the dropdown menu and choose Select Default Shell.
In the terminal, enter: node app.js . You should see the output: «Hello World».
Notice that when you type console in your ‘app.js’ file, VS Code displays supported options related to the console object for you to choose from using IntelliSense. Try experimenting with Intellisense using other JavaScript objects.
Try the new Windows terminal if you plan to use multiple command lines (Ubuntu, PowerShell, Windows Command Prompt, etc) or if you want to customize your terminal, including text, background colors, key bindings, multiple window panes, etc.
Set up a basic web app framework by using Express
Express is a minimal, flexible, and streamlined Node.js framework that makes it easier to develop a web app that can handle multiple types of requests, like GET, PUT, POST, and DELETE. Express comes with an application generator that will automatically create a file architecture for your app.
To create a project with Express.js:
- Open your command line (Command Prompt, Powershell, or whatever you prefer).
- Create a new project folder: mkdir ExpressProjects and enter that directory: cd ExpressProjects
- Use Express to create a HelloWorld project template: npx express-generator HelloWorld —view=pug
We are using the npx command here to execute the Express.js Node package without actually installing it (or by temporarily installing it depending on how you want to think of it). If you try to use the express command or check the version of Express installed using: express —version , you will receive a response that Express cannot be found. If you want to globally install Express to use over and over again, use: npm install -g express-generator . You can view a list of the packages that have been installed by npm using npm list . They’ll be listed by depth (the number of nested directories deep). Packages that you installed will be at depth 0. That package’s dependencies will be at depth 1, further dependencies at depth 2, and so on. To learn more, see Difference between npx and npm? on Stackoverflow.
Examine the files and folders that Express included by opening the project in VS Code, with: code .
The files that Express generates will create a web app that uses an architecture that can appear a little overwhelming at first. You’ll see in your VS Code Explorer window (Ctrl+Shift+E to view) that the following files and folders have been generated:
- bin . Contains the executable file that starts your app. It fires up a server (on port 3000 if no alternative is supplied) and sets up basic error handling.
- public . Contains all the publicly accessed files, including JavaScript files, CSS stylesheets, font files, images, and any other assets that people need when they connect to your website.
- routes . Contains all the route handlers for the application. Two files, index.js and users.js , are automatically generated in this folder to serve as examples of how to separate out your application’s route configuration.
- views . Contains the files used by your template engine. Express is configured to look here for a matching view when the render method is called. The default template engine is Jade, but Jade has been deprecated in favor of Pug, so we used the —view flag to change the view (template) engine. You can see the —view flag options, and others, by using express —help .
- app.js . The starting point of your app. It loads everything and begins serving user requests. It’s basically the glue that holds all the parts together.
- package.json . Contains the project description, scripts manager, and app manifest. Its main purpose is to track your app’s dependencies and their respective versions.
You now need to install the dependencies that Express uses in order to build and run your HelloWorld Express app (the packages used for tasks like running the server, as defined in the package.json file). Inside VS Code, open your terminal by selecting View > Terminal (or select Ctrl+`, using the backtick character), be sure that you’re still in the ‘HelloWorld’ project directory. Install the Express package dependencies with:
- At this point you have the framework set up for a multiple-page web app that has access to a large variety of APIs and HTTP utility methods and middleware, making it easier to create a robust API. Start the Express app on a virtual server by entering:
The DEBUG=myapp:* part of the command above means you are telling Node.js that you want to turn on logging for debugging purposes. Remember to replace ‘myapp’ with your app name. You can find your app name in the package.json file under the «name» property. Using npx cross-env sets the DEBUG environment variable in any terminal, but you can also set it with your terminal specific way. The npm start command is telling npm to run the scripts in your package.json file.
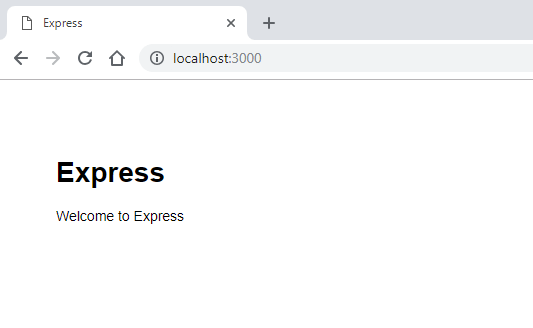
You can now view the running app by opening a web browser and going to: localhost:3000
Now that your HelloWorld Express app is running locally in your browser, try making a change by opening the ‘views’ folder in your project directory and selecting the ‘index.pug’ file. Once open, change h1= title to h1= «Hello World!» and selecting Save (Ctrl+S). View your change by refreshing the localhost:3000 URL on your web browser.
To stop running your Express app, in your terminal, enter: Ctrl+C
Try using a Node.js module
Node.js has tools to help you develop server-side web apps, some built in and many more available via npm. These modules can help with many tasks:
| Tool | Used for |
|---|---|
| gm, sharp | Image manipulation, including editing, resizing, compression, and so on, directly in your JavaScript code |
| PDFKit | PDF generation |
| validator.js | String validation |
| imagemin, UglifyJS2 | Minification |
| spritesmith | Sprite sheet generation |
| winston | Logging |
| commander.js | Creating command-line applications |
Let’s use the built-in OS module to get some information about your computer’s operating system:


