Recovery options in Windows 10
If you’re having problems with your PC, the following table can help you decide which recovery option to use.
See this section
Your PC isn’t working well and you recently installed an update.
Your PC isn’t working well and it’s been a while since you installed an app, driver, or update.
Your PC won’t start, you haven’t created a recovery drive, and resetting your PC didn’t work.
Your PC won’t start and you haven’t created a recovery drive.
Your PC won’t start and you’ve created a recovery drive.
You want to reinstall your previous operating system.
Your PC isn’t working well and you recently installed an app.
Click one of the recovery options below and follow the steps to try to get things working again.
If you’ve recently installed a Windows update, uninstall the update to try to resolve the issue.
Select the Start button, then select Settings > Update & Security > Windows Update > View your update history > Uninstall updates.
View update history settings
Right-click the update you want to remove, and then select Uninstall.
Important: If you’ve encrypted your device, you’ll need your BitLocker key to reset your PC If you don’t know your BitLocker key, see Find my BitLocker recovery key.
Resetting reinstalls Windows 10, but lets you choose whether to keep your files or remove them, and then reinstalls Windows. You can reset your PC from Settings, the sign-in screen, or by using a recovery drive or installation media.
Reset your PC from Settings
Select the Start button, then select Settings > Update & Security > Recovery .
Open Recovery settings
Under Reset this PC, select Get started and then choose from the options and/or settings in the table below.
Keep my files > Change settings > Preinstalled apps On
Reinstalls Windows 10 and keeps your personal files.
Removes apps and drivers you installed.
Removes changes you made to settings.
Restores any apps your PC manufacturer installed if your PC came with Windows 10.
Keep my files > Change settings > Preinstalled apps Off
Reinstalls Windows 10 and keeps your personal files.
Removes apps and drivers you installed.
Removes changes you made to settings.
Removes any apps your PC manufacturer installed.
Reinstalls Windows 10 and removes your personal files.
Removes apps and drivers you installed.
Removes changes you made to settings.
Removes any apps your PC manufacturer installed. (If your PC came with Windows 10, apps from your PC manufacturer will be reinstalled.)
Note: Remove everything > Change settings gives you two options.
Data erasure On removes files and cleans the drive. If you’re planning to donate, recycle, or sell your PC, use this option. This might take an hour or two, but it makes it harder for other people to recover files you’ve removed.
Data erasure Off just removes files. It takes less time, but is less secure.
Reset your PC from the sign-in screen
If you can’t open Settings, you can reset your PC from the sign-in screen. Here’s how:
Press Windows logo key + L to get to the sign-in screen, and then restart your PC by pressing the Shift key while you select the Power button > Restart in the lower-right corner of the screen.
Your PC will restart in the Windows Recovery Environment (WinRE) environment.
On the Choose an option screen, select Troubleshoot > Reset this PC, and then choose one of the options in the previous table.

Connect the installation media you created to your PC and reinstall Windows 10.
Open File Explorer and select the drive with the installation media.
From the root directory of the drive, double-click setup.exe, and then select Yes when asked if you’d like to allow the app to make changes to your device.
Select Change what to keep.
Select one of the following options, and then select Next:
Keep personal files and apps – This will preserve your personal data, apps, and settings.
Keep personal files only – This will preserve your personal data and settings, but all your apps will be removed.
Keep nothing – This will remove all personal data, settings, and apps.
Warning: You cannot undo a reinstallation of Windows 10. Be sure to back up your files first if you choose the Keep nothing option.
To finish, select Install to start reinstalling Windows 10 on your PC.
Your PC will restart several times during the resinstallation.
Important: If you’ve encrypted your device, you’ll need your BitLocker key to use a recovery drive to restore or reset your PC If you don’t know your BitLocker key, see Find my BitLocker recovery key.
If your PC won’t start and you haven’t created a recovery drive, download installation media and use it to restore from a system restore point or reset your PC.
Download the Windows 10 media creation tool and then run it.
Select Create installation media for another PC.
Choose a language, edition, and architecture (64-bit or 32-bit).
Follow the steps to create installation media, and then select Finish.
Connect the installation media you created to your nonfunctional PC, and then turn it on.
On the initial setup screen, enter your language and other preferences, and then select Next. If you don’t see the setup screen, your PC might not be set up to boot from a drive. Check your PC manufacturer’s website for info on how to change your PC’s boot order, and then try again.
Select Repair your computer.
On the Choose an option screen, select Troubleshoot. From there, you can:
Restore from a system restore point by selecting Advanced options > System Restore. This will remove recently installed apps, drivers, and updates that might be causing your PC problems. Restoring from a restore point won’t affect your personal files.
Important: If you’ve encrypted your device, you’ll need your BitLocker key to use a recovery drive to restore or reset your PC If you don’t know your BitLocker key, see Find my BitLocker recovery key.
If your PC won’t start, you can use a recovery drive to restore from a system restore point or recover your PC. For info on how to create a recovery drive on a working PC, see Create a recovery drive.
Note: If you are using a Surface, see Creating and using a USB recovery drive for Surface to download and create a USB recovery image specifically for your Surface device.
To restore or recover using the recovery drive:
Connect the recovery drive and turn on your PC.
Press Windows logo key + L to get to the sign-in screen, and then restart your PC by pressing the Shift key while you select the Power button> Restart in the lower-right corner of the screen.
Your PC will restart in the Windows Recovery Environment (WinRE) environment.
On the Choose an option screen, select Troubleshoot, and then select one of the following two options. (If you don’t see the Choose your option screen, your PC might not be set up to boot from a drive. Check your PC manufacturer’s website for info on how to change your PC’s boot order.)
To restore from a system restore point, select Advanced Options > System Restore. This won’t affect your personal files, but it will remove recently installed apps, drivers, and updates that might be causing your PC problems.
To reinstall Windows 10, select Advanced Options > Recover from a drive. This will remove your personal files, apps and drivers you installed, and changes you made to settings.
For a limited time after upgrading to Windows 10, you’ll be able to go back to your previous version of Windows by selecting the Start button, then select Settings > Update & Security > Recovery and then selecting Get started under Go back to the previous version of Windows 10. This will keep your personal files, but it’ll remove apps and drivers installed after the upgrade, as well as any changes you made to settings. In most cases, you’ll have 10 days to go back.
Open Recovery settings
To go back, you’ll need to:
Keep everything in the windows.old and $windows.
bt folders after the upgrade.
Remove any user accounts you added after the upgrade.
Know the password you used to sign in to Windows 7 or Windows 8.1 (if you used one).
Have the USB drive you used to upgrade to Windows 10 (if you used one).
Note: If you go back to Windows 8.1, some apps that came with Windows, like Mail and People, might not work anymore. To fix the apps, reinstall them from the Microsoft Store.
Note: The option in Settings to go back to your previous version of Windows is only available for a limited time after upgrading.
Info for Windows Insiders
If you’re an Insider and the current preview build isn’t working for you, select the Start button, then select Settings > Update & Security > Recovery . Under Go back to the previous version of Windows 10, select Get Started. This won’t remove your personal files, but it’ll remove recently installed apps and drivers, and change settings back to their defaults.
Going back to an earlier build won’t remove you from the Insider Program. When the next preview build is ready, it’ll be installed on your PC.
This option takes your PC back to an earlier point in time, called a system restore point. Restore points are generated when you install a new app or driver, and when you create a restore point manually. Restoring won’t affect your personal files, but it will remove apps, drivers, and updates installed after the restore point was made.
In the search box on the taskbar, type control panel,andthen choose it from the list of results
In the Control Panel search box, type recovery.
Select Recovery > Open System Restore.
In the Restore system files and setting box, select Next.
Select the restore point that you want to use in the list of results, and then select Scan for affected programs.
If you don’t see the restore point that you want to use, select the Show more restore points check box to see more restore points.
If you’re not seeing any restore points, it might be because system protection isn’t turned on. Here’s how to check:
In the search box on the taskbar, type control panel,andthen choose it from the list of results.
In the Control Panel search box, type recovery.
Select Recovery > Configure System Restore > Configure and see if the Turn on system protection option is selected.
If the Turn on system protection option is not selected, system protection isn’t turned on and there aren’t any restore points. In this scenario, you won’t be able to recovery your PC using a system restore point and will need to use one of the other recovery options listed on this page.
If the Turn on system protection option is selected, continue with step 6.
You’ll see a list of items that will be deleted if you remove this restore point. If you’re OK with the deletions, select Close> Next > Finish.
Manage Windows 10 Start and taskbar layout
Applies to
- WindowsВ 10, Windows Server 2016 with Desktop Experience, Windows Server 2019 with Desktop Experience
Organizations might want to deploy a customized Start and taskbar configuration to devices running WindowsВ 10 Pro, Enterprise, or Education. A standard, customized Start layout can be useful on devices that are common to multiple users and devices that are locked down for specialized purposes. Configuring the taskbar allows the organization to pin useful apps for their employees and to remove apps that are pinned by default.
Taskbar configuration is available starting in Windows 10, version 1607.
Start and taskbar configuration can be applied to devices running Windows 10 Pro, version 1703.
For information on using the layout modification XML to configure Start with roaming user profiles, see Deploy Roaming User Profiles.
Using CopyProfile for Start menu customization in Windows 10 isn’t supported. For more information Customize the Default User Profile by Using CopyProfile
Start options
Some areas of Start can be managed using Group Policy. The layout of Start tiles can be managed using either Group Policy or Mobile Device Management (MDM) policy.
The MDM policy settings in the table can also be configured in a provisioning package using Policies > Start. See the reference for Start settings in Windows Configuration Designer.
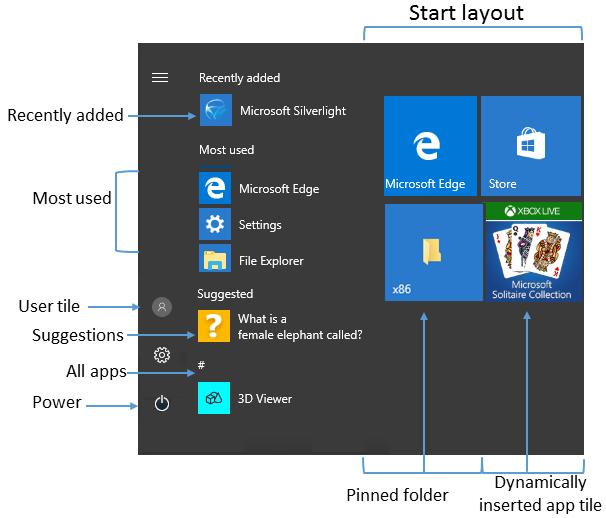
The following table lists the different parts of Start and any applicable policy settings or Settings options. Group Policy settings are in the User Configuration\Administrative Templates\Start Menu and Taskbar path except where a different path is listed in the table.
| Start | Policy | Local setting |
|---|---|---|
| User tile | MDM: Start/HideUserTile Start/HideSwitchAccount Start/HideSignOut Start/HideLock Start/HideChangeAccountSettings Group Policy: Remove Logoff on the Start menu | none |
| Most used | MDM: Start/HideFrequentlyUsedApps Group Policy: Remove frequent programs from the Start menu | Settings > Personalization > Start > Show most used apps |
| Suggestions -and- Dynamically inserted app tile | MDM: Allow Windows Consumer Features Group Policy: Computer Configuration\Administrative Templates\Windows Components\Cloud Content\Turn off Microsoft consumer experiences Note: This policy also enables or disables notifications for a user’s Microsoft account and app tiles from Microsoft dynamically inserted in the default Start menu. | Settings > Personalization > Start > Occasionally show suggestions in Start |
| Recently added | MDM: Start/HideRecentlyAddedApps Group Policy: Computer configuration\Administrative Template\Start Menu and Taskbar\Remove «Recently Added» list from Start Menu (for Windows 10, version 1803) | Settings > Personalization > Start > Show recently added apps |
| Pinned folders | MDM: AllowPinnedFolder | Settings > Personalization > Start > Choose which folders appear on Start |
| Power | MDM: Start/HidePowerButton Start/HideHibernate Start/HideRestart Start/HideShutDown Start/HideSleep Group Policy: Remove and prevent access to the Shut Down, Restart, Sleep, and Hibernate commands | none |
| Start layout | MDM: Start layout ImportEdgeAssets Group Policy: Prevent users from customizing their Start screen Note: When a full Start screen layout is imported with Group Policy or MDM, the users cannot pin, unpin, or uninstall apps from the Start screen. Users can view and open all apps in the All Apps view, but they cannot pin any apps to the Start screen. When a partial Start screen layout is imported, users cannot change the tile groups applied by the partial layout, but can modify other tile groups and create their own. Start layout policy can be used to pin apps to the taskbar based on an XML File that you provide. Users will be able to change the order of pinned apps, unpin apps, and pin additional apps to the taskbar. | none |
| Jump lists | MDM: Start/HideRecentJumplists Group Policy: Do not keep history of recently opened documents | Settings > Personalization > Start > Show recently opened items in Jump Lists on Start or the taskbar |
| Start size | MDM: Force Start size Group Policy: Force Start to be either full screen size or menu size | Settings > Personalization > Start > Use Start full screen |
| App list | MDM: Start/HideAppList | Settings > Personalization > Start > Show app list in Start menu |
| All Settings | Group Policy: Prevent changes to Taskbar and Start Menu Settings | none |
| Taskbar | MDM: Start/NoPinningToTaskbar | none |
In local Settings > Personalization > Start, there is an option to Show more tiles. The default tile layout for Start tiles is 3 columns of medium sized tiles. Show more tiles enables 4 columns. To configure the 4-column layout when you customize and export a Start layout, turn on the Show more tiles setting and then arrange your tiles.
Taskbar options
Starting in Windows 10, version 1607, you can pin additional apps to the taskbar and remove default pinned apps from the taskbar. You can specify different taskbar configurations based on device locale or region.
There are three categories of apps that might be pinned to a taskbar:
Apps pinned by the user
Default Windows apps, pinned during operating system installation (Microsoft Edge, File Explorer, Store)
Apps pinned by the enterprise, such as in an unattended Windows setup
We recommend using the layoutmodification.xml method to configure taskbar options, rather than the earlier method of using TaskbarLinks in an unattended Windows setup file.
The following example shows how apps will be pinned — Windows default apps to the left (blue circle), apps pinned by the user in the center (orange triangle), and apps that you pin using XML to the right (green square).

In operating systems configured to use a right-to-left language, the taskbar order will be reversed.
Whether you apply the taskbar configuration to a clean install or an update, users will still be able to:
- Pin additional apps
- Change the order of pinned apps
- Unpin any app
In Windows 10, version 1703, you can apply an MDM policy, Start/NoPinningToTaskbar , to prevents users from pinning and unpinning apps on the taskbar.
Taskbar configuration applied to clean install of Windows 10
In a clean install, if you apply a taskbar layout, only the apps that you specify and default apps that you do not remove will be pinned to the taskbar. Users can pin additional apps to the taskbar after the layout is applied.
Taskbar configuration applied to Windows 10 upgrades
When a device is upgraded to Windows 10, apps will be pinned to the taskbar already. Some apps may have been pinned to the taskbar by a user, and others may have been pinned to the taskbar through a customized base image or by using Windows Unattend setup.
The new taskbar layout for upgrades to Windows 10, version 1607 or later, will apply the following behavior:
- If the user pinned the app to the taskbar, those pinned apps remain and new apps will be added to the right.
- If the user didn’t pin the app (it was pinned during installation or by policy) and the app is not in updated layout file, the app will be unpinned.
- If the user didn’t pin the app and the app is in the updated layout file, the app will be pinned to the right.
- New apps specified in updated layout file are pinned to right of user’s pinned apps.
Start layout configuration errors
If your Start layout customization is not applied as expected, open Event Viewer and navigate to Applications and Services Log > Microsoft > Windows > ShellCommon-StartLayoutPopulation > Operational, and check for one of the following events:
- Event 22 is logged when the xml is malformed, meaning the specified file simply isn’t valid xml. This can occur if the file has extra spaces or unexpected characters, or if the file is not saved in the UTF8 format.
- Event 64 is logged when the xml is valid, but has unexpected values. This can happen when the desired configuration is not understood, elements are not in the required order, or source is not found, such as a missing or misspelled .lnk.


