- Restart your Mac in macOS or Windows
- How to start up in macOS from Windows
- How to start up in Windows from macOS
- Learn more
- Get started with Windows 10
- Start building Windows 10 devices
- Design hardware with the latest features
- Customize Windows images to reflect your brand
- Develop Universal Windows Drivers
- Test system components for compatibility and performance
- Manufacturing – putting it all together
- Start PXE over IPv4 — что это такое в Windows и как это исправить
- Решение 1. Включение загрузочного устройства
- Решение 2. Отключите Wake on LAN в BIOS
- Решение 3: обновить BIOS
- Overview of Windows as a service
- Building
- Deploying
- Application compatibility
- Device compatibility
- Servicing
- Naming changes
- Feature updates
- Quality updates
- Servicing channels
- Semi-Annual Channel
- Long-term Servicing Channel
- Windows Insider
- Servicing tools
Restart your Mac in macOS or Windows
After installing Microsoft Windows on your Mac, you can choose whether your Mac starts up in macOS or Windows.
How to start up in macOS from Windows
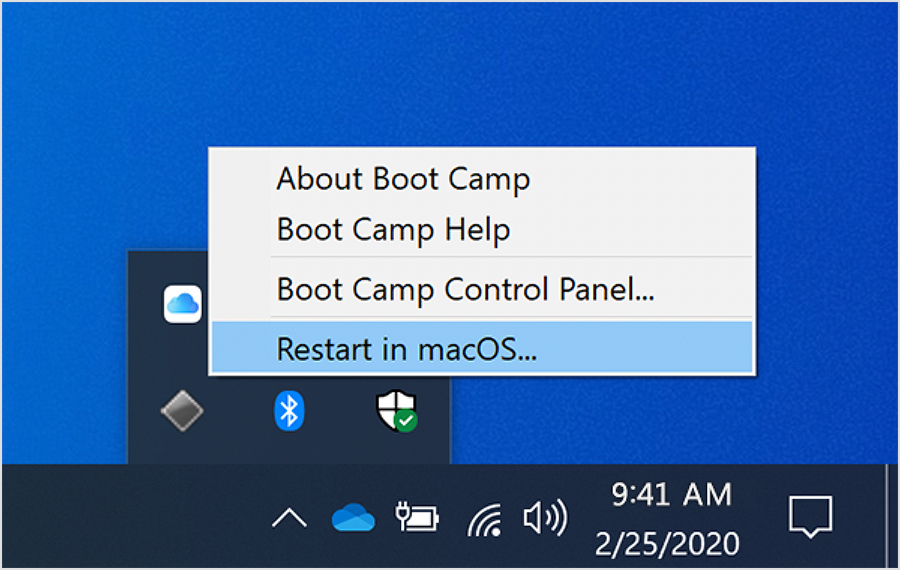
- From the notification area on the right side of the Windows taskbar, click to show hidden icons.
- Click the Boot Camp icon .
- From the menu shown, choose Restart in macOS.
If you haven’t installed the latest Boot Camp updates, you might get the message ”Could not locate the OS X boot volume.»
Or use Startup Manager as your Mac starts up:
- Restart your Mac from the Start menu in Windows.
- Press and hold the Option (or Alt) ⌥ key as your Mac begins to restart.
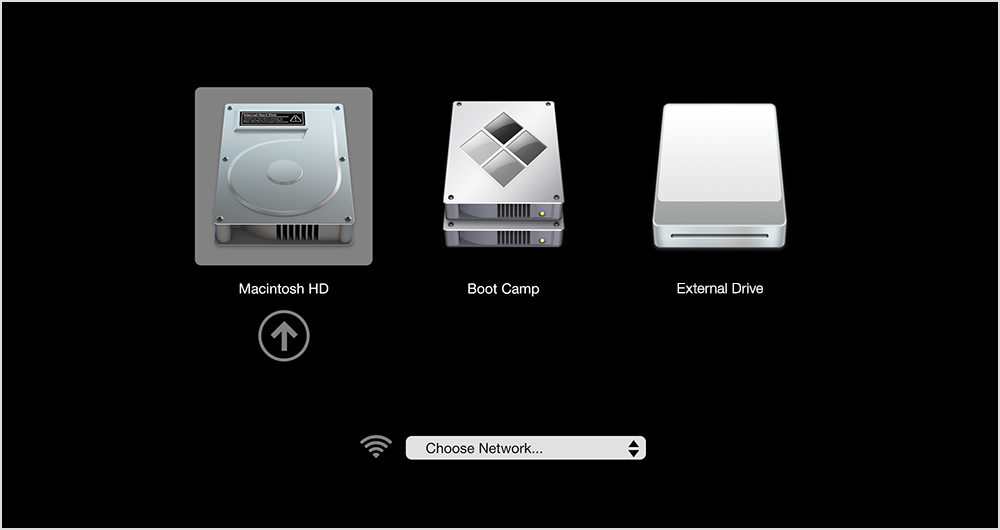
- Select your Mac startup volume (Macintosh HD) in the Startup Manager window, then press Return or click the up arrow:
How to start up in Windows from macOS
- Use Startup Manager to choose your Windows (Boot Camp) volume during startup.
- Or select your Boot Camp volume in Startup Disk preferences, then restart.
Learn more
- If you’re having difficulty using VoiceOver or another screen reader to complete these steps, please contact Apple Support.
- Learn how to install Windows 10 on your Mac.
Information about products not manufactured by Apple, or independent websites not controlled or tested by Apple, is provided without recommendation or endorsement. Apple assumes no responsibility with regard to the selection, performance, or use of third-party websites or products. Apple makes no representations regarding third-party website accuracy or reliability. Contact the vendor for additional information.
Get started with Windows 10
Build innovative and differentiated devices with Windows 10. Windows 10 runs on a broad set of devices—from desktops, notebooks, phones, and Internet of Things (IoT) devices. The operating system’s common core works across platforms with 80-inch screens, 4-inch screens, or devices with no screens at all.
You can create devices to use touch/pen, mouse/keyboard, controller/gesture—or you can build them to switch between input types.
Start building Windows 10 devices
| Build a Windows PC | Build drivers for a Windows device |
|---|---|
| Download the Windows ADK to start building Windows PCs | Download the WDK to start building drivers |
| What’s new in Windows 10 | What’s new in driver development |
| Design your deployment | Develop Universal Windows Drivers |
| Customize your Windows PC | Sign drivers |
| Create an end-to-end deployment | Test drivers |
See Kits and tools overview to learn how our kits and tools enable you to work with Windows.
Design hardware with the latest features
Building a great Windows 10 device starts with selecting the right components. Understanding the difference between minimum and optimal hardware requirements will ensure the best usability and performance. Our guidelines explain the requirements to implement Windows features like Cortana, Windows Hello, Touch, Windows Pen, and Continuum.
Customize Windows images to reflect your brand
For desktop PCs, you can use your existing settings file (Unattend.xml) to add settings during Windows installation.
Develop Universal Windows Drivers
Learn fundamental concepts about drivers.
Create a single driver that runs across multiple device types, from embedded systems to tablets and desktop PCs. UMDF and KMDF templates are included in Visual Studio to help you get started.
Test system components for compatibility and performance
Write and run test automations with the Test Authoring and Execution Framework (TAEF). Share your tests across disciplines and teams.
Test your hardware with the Windows Hardware Lab Kit.
Analyze system and application performance using the Windows Performance Toolkit.
Manufacturing – putting it all together
For desktop PCs, learn strategies to build a set of images for specific markets to meet different customers’ needs.
Learn about deploying Windows 10 S, a configuration of Windows 10 Pro that offers a familiar, productive Windows experience that’s streamlined for security and performance.
Build IoT Core devices, applying apps, drivers, and settings to new devices.
OEMs and ODMs can build and test mobile devices and drivers.
Start PXE over IPv4 — что это такое в Windows и как это исправить

PXE Boot — это загрузка системы по сети, где IPv4 подразумевается в сети на основе IPv4 и IPv6. Если на экране вы видите надпись «start pxe over ipv4» это означает, что ПК пытается загрузиться с PXE, который обычно является последним источником на загрузку системы при запуске. В этой статье вы узнаете что делать при появлении этой ошибки.
Это также может означать, что другие загрузочные устройства, такие как ваш жесткий диск, не были доступны для загрузки. Есть несколько способов решить эту проблему, поэтому ознакомьтесь со статьей, чтобы узнать как это исправить.

Решение 1. Включение загрузочного устройства
Когда появляется ошибка, подобная этой, она может иногда сбрасывать определенные настройки, связанные с правильным порядком загрузки системы при включении ПК, и вам может понадобиться снова добавить жесткий диск в качестве загрузочного устройства по умолчанию. Этот процесс включает в себя изменение очень важных настроек, поэтому будьте внимательны и следуйте инструкциям.
- Включите компьютер и сразу несколько раз нажимайте клавишу «Del», примерно раз в секунду, пока не откроется программа настройки компьютера (BIOS). Эта клавиша должна отображаться на вашем ПК в виде Нажмите _, чтобы запустить программу установки.
- С помощью клавиши со стрелкой вправо выберите меню «Безопасность»/Security, с помощью клавиши со стрелкой вниз выберите «Безопасная конфигурация загрузки»/Security Boot Configuration и нажмите Enter.
- Прежде чем вы сможете использовать это меню, появится предупреждение. Нажмите F10, чтобы перейти к меню конфигурации безопасной загрузки.
- Откроется меню конфигурации безопасной загрузки.
- Используйте клавишу со стрелкой вниз, чтобы выбрать Безопасная загрузка/Secure Boot, и используйте клавишу со стрелкой вправо, чтобы изменить настройку на Отключить/Disabled.
- С помощью клавиши со стрелкой вниз выберите Legacy Support, а затем с помощью клавиши со стрелкой вправо измените настройку на «Включить»/Enabled.
- Нажмите F10, чтобы принять изменения.
- С помощью клавиши со стрелкой влево выберите меню «Файл», с помощью клавиши со стрелкой вниз выберите «Сохранить изменения и выйти», затем нажмите клавишу «Ввод», чтобы выбрать «Да»/OK.
- Программа настройки компьютера закроется, и компьютер перезагрузится. После перезагрузки компьютера используйте кнопку питания, чтобы выключить компьютер.
Если вы не знаете как поставить загрузку с жесткого диска, вам нужно знать, какой вариант выбрать при открытии меню загрузки. Он спросит вас, с какого устройства вы хотите загрузить свой компьютер. Следуйте инструкциям ниже, чтобы легко загрузиться с жесткого диска.
- Нажмите кнопку питания, чтобы включить компьютер. Как только компьютер запускается, появляется сообщение о том, что режим загрузки изменился.
- Введите четырехзначный код, указанный в сообщении, затем нажмите Enter, чтобы подтвердить изменение.
ПРИМЕЧАНИЕ. Текстовое поле для кода не отображается. Это ожидаемое поведение. Когда вы набираете цифры, код записывается без текстового поля.
- Нажмите кнопку питания, чтобы выключить компьютер, подождите несколько секунд, затем включите компьютер и сразу несколько раз нажимайте клавишу Escape/Delete, примерно раз в секунду, пока не откроется меню «Пуск».
- Нажмите F9, чтобы открыть меню загрузки.
- Используйте клавишу со стрелкой вниз, чтобы выбрать жесткий диск из меню загрузки и убедитесь, что вы выбрали его, нажав клавишу Enter. Перезагрузите компьютер и проверьте, решена ли проблема.
Проблема часто возникает в системе аппаратной визуализации hyper-v, также на ноутбуках lenovo и dell
Решение 2. Отключите Wake on LAN в BIOS
Отключение этой опции решило проблему у людей, которые не смогли добиться успеха ни с каким другим методом, и этот метод довольно легко реализовать, если вы умеете как ставить систему для загрузки в BIOS самостоятельно, и вы попробовали метод выше!
- Выключите компьютер, перейдя в меню Пуск >> Кнопка питания >> Завершение работы.
- Снова включите компьютер и войдите в BIOS, нажав клавишу BIOS во время загрузки системы. Ключ BIOS обычно отображается на экране загрузки с надписью «Нажмите ___, чтобы войти в программу установки». Общие ключи BIOS — это F1, F2, Del, Esc и F10. Обратите внимание, что вам нужно быстро среагировать, поскольку сообщение исчезает довольно быстро.
- Опция Wake on LAN, которую вам нужно изменить, находится на разных вкладках инструментов прошивки BIOS, изготовленных разными производителями, и не существует уникального способа найти его. Обычно он находится в разделе «Электропитание» или что-то похожее, например «Расширенные настройки».
- Когда вы найдете параметр Wake-On-LAN в любой области экрана настроек BIOS, перейдите к нему и измените его значение на Отключено.
- Перейдите в раздел «Выход» и выберите «Выход из сохранения изменений». Это продолжит загрузку, поэтому проверьте, появляется ли ошибка по-прежнему.
Решение 3: обновить BIOS
Если что-то не так с BIOS вашего компьютера, трудно сказать, что что-то сможет решить проблему, кроме полного обновления BIOS. Обновление BIOS может быть сложным процессом, и проблема в том, что он сильно отличается в зависимости от производителя вашего ПК. Вот почему вы должны внимательно следовать инструкциям, если хотите получить нужные результаты.
- Чтобы узнать текущую версию BIOS, установленную на вашем компьютере, введите msinfo в строке поиска в меню «Пуск».
- Найдите версию BIOS под вашей моделью процессора и скопируйте или перепишите что-нибудь в текстовый файл или на лист бумаги.
- Вспомните, был ли ваш компьютер собран на заводе или был собран вручную, приобретая все компоненты по отдельности. Это важно, потому что вы не хотите использовать BIOS, созданный для одного компонента вашего ПК, когда он не будет применяться к другим вашим устройствам, и вы перепишете BIOS на неправильный, что приведет к серьезным ошибкам и системным проблемам.
- Подготовьте свой компьютер к обновлению. Если вы обновляете свой ноутбук, убедитесь, что его аккумулятор полностью заряжен, и подключите его на всякий случай к сети электропитания. Если вы обновляете компьютер, рекомендуется использовать источник бесперебойного питания (ИБП), чтобы убедиться, что ваш компьютер не выключается во время обновления из-за сбоя питания.
- Обновите BIOS.
Overview of Windows as a service
Applies to
Looking for consumer information? See Windows Update: FAQ
The Windows 10 operating system introduces a new way to build, deploy, and service Windows: Windows as a service. Microsoft has reimagined each part of the process, to simplify the lives of IT pros and maintain a consistent Windows 10 experience for its customers. These improvements focus on maximizing customer involvement in Windows development, simplifying the deployment and servicing of Windows client computers, and leveling out the resources needed to deploy and maintain Windows over time.
Building
Prior to Windows 10, Microsoft released new versions of Windows every few years. This traditional deployment schedule imposed a training burden on users because the feature revisions were often significant. That schedule also meant waiting long periods without new features — a scenario that doesn’t work in today’s rapidly changing world, a world in which new security, management, and deployment capabilities are necessary to address challenges. Windows as a service will deliver smaller feature updates two times per year, around March and September, to help address these issues.
In the past, when Microsoft developed new versions of Windows, it typically released technical previews near the end of the process, when Windows was nearly ready to ship. With Windows 10, new features will be delivered to the Windows Insider community as soon as possible — during the development cycle, through a process called flighting — so that organizations can see exactly what Microsoft is developing and start their testing as soon as possible.
Microsoft also depends on receiving feedback from organizations throughout the development process so that it can make adjustments as quickly as possible rather than waiting until after release. For more information about the Windows Insider Program and how to sign up, see the section Windows Insider.
Of course Microsoft also performs extensive internal testing, with engineering teams installing new builds daily, and larger groups of employees installing builds frequently, all before those builds are ever released to the Windows Insider Program.
Deploying
Deploying Windows 10 is simpler than with previous versions of Windows. When migrating from earlier versions of Windows, an easy in-place upgrade process can be used to automatically preserve all apps, settings, and data. And once running Windows 10, deployment of Windows 10 feature updates will be equally simple.
One of the biggest challenges for organizations when it comes to deploying a new version of Windows is compatibility testing. Whereas compatibility was previously a concern for organizations upgrading to a new version of Windows, Windows 10 is compatible with most hardware and software capable of running on Windows 7 or later. Because of this high level of compatibility, the app compatibility testing process can be greatly simplified.
Application compatibility
Application compatibility testing has historically been a burden when approaching a Windows deployment or upgrade. With Windows 10, application compatibility from the perspective of desktop applications, websites, and apps built on the Universal Windows Platform (UWP) has improved tremendously. Microsoft understands the challenges organizations experienced when they migrated from the Windows XP operating system to Windows 7 and has been working to make Windows 10 upgrades a much better experience.
Most Windows 7–compatible desktop applications will be compatible with Windows 10 straight out of the box. Windows 10 achieved such high compatibility because the changes in the existing Win32 application programming interfaces were minimal. Combined with valuable feedback via the Windows Insider Program and diagnostic data, this level of compatibility can be maintained through each feature update. As for websites, Windows 10 includes Internet Explorer 11 and its backward-compatibility modes for legacy websites. Finally, UWP apps follow a compatibility story similar to desktop applications, so most of them will be compatible with Windows 10.
For the most important business-critical applications, organizations should still perform testing on a regular basis to validate compatibility with new builds. For remaining applications, consider validating them as part of a pilot deployment process to reduce the time spent on compatibility testing. Desktop Analytics is a cloud-based service that integrates with Configuration Manager. The service provides insight and intelligence for you to make more informed decisions about the update readiness of your Windows endpoints, including assessment of your existing applications. For more, see Ready for modern desktop retirement FAQ.
Device compatibility
Device compatibility in Windows 10 is also very strong; new hardware is not needed for Windows 10 as any device capable of running Windows 7 or later can run Windows 10. In fact, the minimum hardware requirements to run Windows 10 are the same as those required for Windows 7. Most hardware drivers that functioned in Windows 8.1, Windows 8, or Windows 7 will continue to function in Windows 10.
Servicing
Traditional Windows servicing has included several release types: major revisions (e.g., the Windows 8.1, Windows 8, and Windows 7 operating systems), service packs, and monthly updates. With Windows 10, there are two release types: feature updates that add new functionality twice per year, and quality updates that provide security and reliability fixes at least once a month.
With Windows 10, organizations will need to change the way they approach deploying updates. Servicing channels are the first way to separate users into deployment groups for feature and quality updates. With the introduction of servicing channels comes the concept of a deployment ring, which is simply a way to categorize the combination of a deployment group and a servicing channel to group devices for successive waves of deployment. For more information about developing a deployment strategy that leverages servicing channels and deployment rings, see Plan servicing strategy for Windows 10 updates.
For information about each servicing tool available for Windows 10, see Servicing tools.
To align with this new update delivery model, Windows 10 has three servicing channels, each of which provides different levels of flexibility over when these updates are delivered to client computers. For information about the servicing channels available in Windows 10, see Servicing channels.
Naming changes
There are currently two release channels for Windows 10:
- The Semi-Annual Channel receives feature updates twice per year.
- The Long-Term Servicing Channel, which is designed to be used only for specialized devices (which typically don’t run Office) such as those that control medical equipment or ATM machines, receives new feature releases every two to three years.
With each Semi-Annual Channel release, we recommend beginning deployment right away to devices selected for early adoption (targeted validation) and ramp up to full deployment at your discretion. This will enable you to gain access to new features, experiences, and integrated security as soon as possible. The «Semi-Annual Channel (Targeted)» designation is no longer used. For more information, see the blog post Windows 10 and the «disappearing» SAC-T.
For additional information, see the section about Servicing Channels.
You can also read the blog post Waas simplified and aligned, with details on this change.
Devices on the Semi-Annual Channel must have their diagnostic data set to 1 (Basic) or higher, in order to ensure that the service is performing at the expected quality. For instructions to set the diagnostic data level, see Configure the operating system diagnostic data level.
Feature updates
With Windows 10, Microsoft will package new features into feature updates that can be deployed using existing management tools. Because feature updates are delivered more frequently than with previous Windows releases — twice per year, around March and September, rather than every 3–5 years — changes will be in bite-sized chunks rather than all at once and end user readiness time much shorter.
Quality updates
Monthly updates in previous Windows versions were often overwhelming because of the sheer number of updates available each month. Many organizations selectively chose which updates they wanted to install and which they didn’t, and this created countless scenarios in which organizations deployed essential security updates but picked only a subset of non-security fixes.
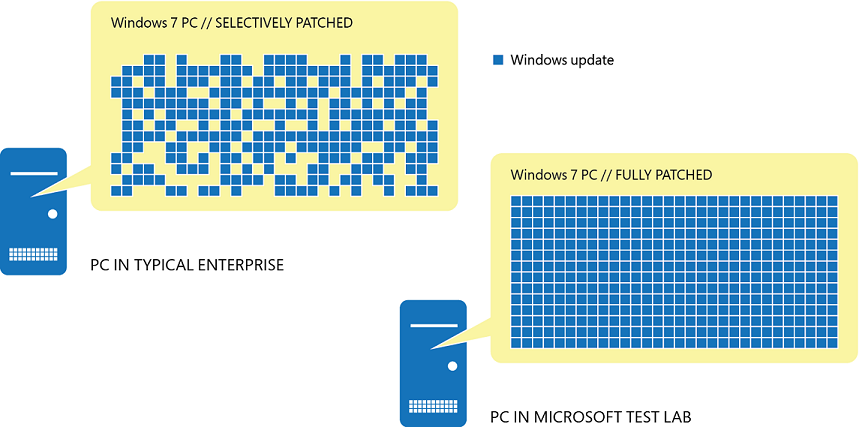
In Windows 10, rather than receiving several updates each month and trying to figure out which the organization needs, which ultimately causes platform fragmentation, administrators will see one cumulative monthly update that supersedes the previous month’s update, containing both security and non-security fixes. This approach makes patching simpler and ensures that customers’ devices are more closely aligned with the testing done at Microsoft, reducing unexpected issues resulting from patching. The left side of Figure 1 provides an example of Windows 7 devices in an enterprise and what their current patch level might look like. On the right is what Microsoft’s test environment devices contain. This drastic difference is the basis for many compatibility issues and system anomalies related to Windows updates.
Figure 1
Servicing channels
To align with the new method of delivering feature updates and quality updates in Windows 10, Microsoft introduced the concept of servicing channels to allow customers to designate how frequently their individual devices are updated. For example, an organization may have test devices that the IT department can update with new features as soon as possible, and then specialized devices that require a longer feature update cycle to ensure continuity.
With that in mind, Windows 10 offers three servicing channels. The Windows Insider Program provides organizations with the opportunity to test and provide feedback on features that will be shipped in the next feature update. The Semi-Annual Channel provides new functionality with twice-per-year feature update releases. Organizations can choose when to deploy updates from the Semi-Annual Channel. The Long-Term Servicing Channel, which is designed to be used only for specialized devices (which typically don’t run Office) such as those that control medical equipment or ATM machines, receives new feature releases every two to three years. For details about the versions in each servicing channel, see Windows 10 release information.
The concept of servicing channels is new, but organizations can use the same management tools they used to manage updates and upgrades in previous versions of Windows. For more information about the servicing tool options for Windows 10 and their capabilities, see Servicing tools.
Servicing channels are not the only way to separate groups of devices when consuming updates. Each channel can contain subsets of devices, which staggers servicing even further. For information about the servicing strategy and ongoing deployment process for Windows 10, including the role of servicing channels, see Plan servicing strategy for Windows 10 updates.
Semi-Annual Channel
In the Semi-Annual servicing channel, feature updates are available as soon as Microsoft releases them. Windows 10, version 1511, had few servicing tool options to delay feature updates, limiting the use of the Semi-Annual servicing channel. Starting with Windows 10, version 1607, more servicing tools that can delay feature updates for up to 365 days are available. This servicing model is ideal for pilot deployments and testing of Windows 10 feature updates and for users such as developers who need to work with the latest features immediately. Once the latest release has gone through pilot deployment and testing, you will be able to choose the timing at which it goes into broad deployment.
When Microsoft officially releases a feature update for Windows 10, it is made available to any device not configured to defer feature updates so that those devices can immediately install it. Organizations that use Windows Server Update Services (WSUS), Microsoft Endpoint Configuration Manager, or Windows Update for Business, however, can defer feature updates to selective devices by withholding their approval and deployment. In this scenario, the content available for the Semi-Annual Channel will be available but not necessarily immediately mandatory, depending on the policy of the management system. For more details about Windows 10 servicing tools, see Servicing tools.
Organizations are expected to initiate targeted deployment on Semi-Annual Channel releases. All customers, independent software vendors (ISVs), and partners should use this time for testing and piloting within their environments. After 2-4 months, we will transition to broad deployment and encourage customers and partners to expand and accelerate the deployment of the release. For customers using Windows Update for Business, the Semi-Annual Channel provides three months of additional total deployment time before being required to update to the next release.
All releases of Windows 10 have 18 months of servicing for all editions—these updates provide security and feature updates for the release. However, fall releases of the Enterprise and Education editions will have an additional 12 months of servicing for specific Windows 10 releases, for a total of 30 months from initial release. This extended servicing window applies to Enterprise and Education editions starting with Windows 10, version 1607.
Organizations can electively delay feature updates into as many phases as they wish by using one of the servicing tools mentioned in the section Servicing tools.
Long-term Servicing Channel
Specialized systems—such as devices that control medical equipment, point-of-sale systems, and ATMs—often require a longer servicing option because of their purpose. These devices typically perform a single important task and don’t need feature updates as frequently as other devices in the organization. It’s more important that these devices be kept as stable and secure as possible than up to date with user interface changes. The LTSC servicing model prevents Windows 10 Enterprise LTSB devices from receiving the usual feature updates and provides only quality updates to ensure that device security stays up to date. With this in mind, quality updates are still immediately available to Windows 10 Enterprise LTSB clients, but customers can choose to defer them by using one of the servicing tools mentioned in the section Servicing tools.
Windows 10 Enterprise LTSB is a separate Long-Term Servicing Channel version.
Long-term Servicing channel is not intended for deployment on most or all the devices in an organization; it should be used only for special-purpose devices. As a general guideline, a device with Microsoft Office installed is a general-purpose device, typically used by an information worker, and therefore it is better suited for the Semi-Annual servicing channel.
Microsoft never publishes feature updates through Windows Update on devices that run Windows 10 Enterprise LTSB. Instead, it typically offers new LTSC releases every 2–3 years, and organizations can choose to install them as in-place upgrades or even skip releases over a 10-year life cycle.
Windows 10 LTSB will support the currently released processors and chipsets at the time of release of the LTSB. As future CPU generations are released, support will be created through future Windows 10 LTSB releases that customers can deploy for those systems. For more information, see Supporting the latest processor and chipsets on Windows in Lifecycle support policy FAQ — Windows Products.
The Long-term Servicing Channel is available only in the Windows 10 Enterprise LTSB edition. This edition of Windows doesn’t include a number of applications, such as Microsoft Edge, Microsoft Store, Cortana (though limited search capabilities remain available), Microsoft Mail, Calendar, OneNote, Weather, News, Sports, Money, Photos, Camera, Music, and Clock. These apps are not supported in Windows 10 Enterprise LTSB edition, even if you install by using sideloading.
If an organization has devices currently running Windows 10 Enterprise LTSB that it would like to change to the Semi-Annual Channel, it can make the change without losing user data. Because LTSB is its own SKU, however, an upgrade is required from Windows 10 Enterprise LTSB to Windows 10 Enterprise, which supports the Semi-Annual Channel.
Windows Insider
For many IT pros, gaining visibility into feature updates early—before they’re available to the Semi-Annual Channel — can be both intriguing and valuable for future end user communications as well as provide the means to test for any issues on the next Semi-Annual Channel release. With Windows 10, feature flighting enables Windows Insiders to consume and deploy preproduction code to their test machines, gaining early visibility into the next build. Testing the early builds of Windows 10 helps both Microsoft and its customers because they have the opportunity to discover possible issues before the update is ever publicly available and can report it to Microsoft.
Microsoft recommends that all organizations have at least a few devices enrolled in the Windows Insider Program and provide feedback on any issues they encounter. For information about the Windows Insider Program for Business, go to Windows Insider Program for Business.
Microsoft recommends that all organizations have at least a few devices enrolled in the Windows Insider Program, to include the Windows Insider Program in their deployment plans and to provide feedback on any issues they encounter to Microsoft via our Feedback Hub app.
The Windows Insider Program isn’t intended to replace Semi-Annual Channel deployments in an organization. Rather, it provides IT pros and other interested parties with pre-release Windows builds that they can test and ultimately provide feedback on to Microsoft.
Servicing tools
There are many tools with which IT pros can service Windows as a service. Each option has its pros and cons, ranging from capabilities and control to simplicity and low administrative requirements. The following are examples of the servicing tools available to manage Windows as a service updates:
- Windows Update (stand-alone) provides limited control over feature updates, with IT pros manually configuring the device to be in the Semi-Annual Channel. Organizations can target which devices defer updates by selecting the Defer upgrades check box in Start\Settings\Update & Security\Advanced Options on a Windows 10 device.
- Windows Update for Business is the second option for servicing Windows as a service. This servicing tool includes control over update deferment and provides centralized management using Group Policy. Windows Update for Business can be used to defer updates by up to 365 days, depending on the version. These deployment options are available to clients in the Semi-Annual Channel. In addition to being able to use Group Policy to manage Windows Update for Business, either option can be configured without requiring any on-premises infrastructure by using Intune.
- Windows Server Update Services (WSUS) provides extensive control over Windows 10 updates and is natively available in the Windows Server operating system. In addition to the ability to defer updates, organizations can add an approval layer for updates and choose to deploy them to specific computers or groups of computers whenever ready.
- Microsoft Endpoint Configuration Manager provides the greatest control over servicing Windows as a service. IT pros can defer updates, approve them, and have multiple options for targeting deployments and managing bandwidth usage and deployment times.
With all these options, which an organization chooses depends on the resources, staff, and expertise its IT organization already has. For example, if IT already uses Microsoft Endpoint Manager to manage Windows updates, it can continue to use it. Similarly, if IT is using WSUS, it can continue to use that. For a consolidated look at the benefits of each tool, see Table 1.
Table 1
| Servicing tool | Can updates be deferred? | Ability to approve updates | Peer-to-peer option | Additional features |
|---|---|---|---|---|
| Windows Update | Yes (manual) | No | Delivery Optimization | None |
| Windows Update for Business | Yes | No | Delivery Optimization | Other Group Policy objects |
| WSUS | Yes | Yes | BranchCache or Delivery Optimization | Upstream/downstream server scalability |
| Configuration Manager | Yes | Yes | BranchCache, Client Peer Cache, or Delivery Optimization. For the latter, see peer-to-peer content distribution and Optimize Windows 10 Update Delivery | Distribution points, multiple deployment options |
Due to naming changes, older terms like CB and CBB might still be displayed in some of our products, such as in Group Policy. If you encounter these terms, «CB» refers to the Semi-Annual Channel (Targeted)—which is no longer used—while «CBB» refers to the Semi-Annual Channel.


