- Auto Run a program when Windows-10 starts, how to?
- To Auto Run a program when Windows-10 starts,
- 1.) . Autostart a Program from Autostart Folder in Windows 10! 2.) . Auto run Programs via Windows 10 Registry Entry! 3.) . Auto-start programs in Windows 10 Task Manager disable / enable!
- 1.) Autostart a Program from Autostart (Startup) Folder in Windows 10!
- 2.) Auto run Programs via Windows 10 Registry Entry!
- 3.) Auto-start programs in Windows 10 Task Manager disable / enable!
- How To Disable Startup Programs In Windows 7 and Vista
- “What is the MSConfig Utility?”
- How To Disable Startup Applications In Windows
- Step 1
- Step 2
- Step 3
- How to disable startup programs with CCleaner
- How to run a program automatically as admin on Windows 7 at startup?
- 9 Answers 9
- How to read and overwrite the Shell in windows using C# Windows Forms
- 1 Answer 1
- Start application at when windows Starts
- 5 Answers 5
Auto Run a program when Windows-10 starts, how to?
To Auto Run a program when Windows-10 starts,
this solution is also for Windows 8.1 and 7!
1.) . Autostart a Program from Autostart Folder in Windows 10!
2.) . Auto run Programs via Windows 10 Registry Entry!
3.) . Auto-start programs in Windows 10 Task Manager disable / enable!
The solution is simple
In this FAQ about the autostart in Windows 10, you will find information about how to register the programs for the automatic start and remove, disable and vice versa add the program to the Windows 10 autostart and where the autostart folder is located!
1.) Autostart a Program from Autostart (Startup) Folder in Windows 10!
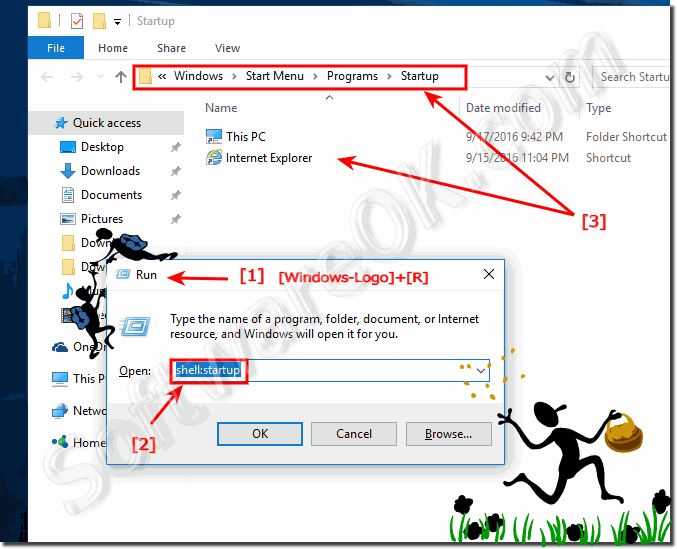
if you want to autostart a program for currently logged-on user please open the shell:startup
and if you want to start a program at Windows 10 startup please use (open) the all users startup folder shell:Common Startup
In this example auto start the MS-Explorer and Internet-Explorer at Windows 10 Start you can create Shortcuts for Other Programs. (. see Image-1 Arrow 1 to 3)
3. Drag the shortcut into the Windows-10 Startup folder.
| (Image-1) Autostart programs at Windows-10 start-up! |
 |

2.) Auto run Programs via Windows 10 Registry Entry!
Please start the Windows 10 Registry-Editor via Windows+R keyboard shortcut and the command regedit and browse to autorun entries: HKEY_CURRENT_USER\Software\Microsoft\Windows\CurrentVersion\Run
There is still a second auto run folder
HKEY_LOCAL_MACHINE\Software\Microsoft\Windows\CurrentVersion\Run
here the entry is responsible for all Windows 10 user!
In this example start the MS-Explorer at Windows-10 Startup and open the C:\ Volume. (. see Image-2 Arrow 1 to 4)
| (Image-2) Autorun a program at Windows-10 start-up! |
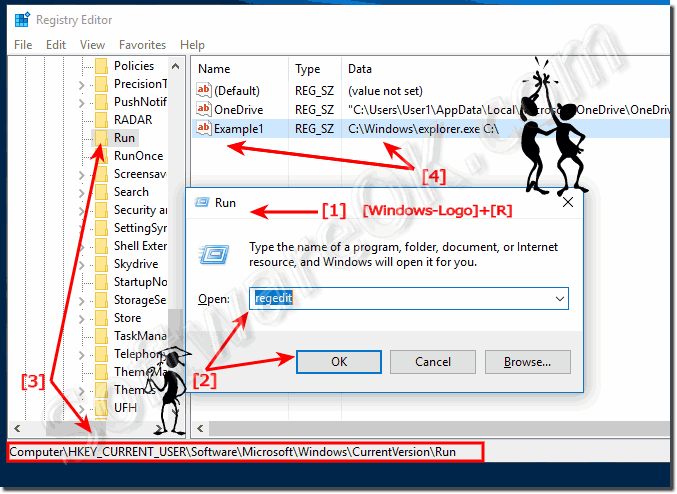 |
On the right side of the Registry Editor, a list of programs launched for the current user at login is displayed. You can delete it or add the program to the start by right-clicking on the empty area in the right part of the editor and clicking on it to specify the path to the executable program file.
3.) Auto-start programs in Windows 10 Task Manager disable / enable!
The Windows 10 Task Manager is one of the most popular tools for the startup software under Windows 10. It can easily be found by pressing the key combination [Ctrl+Shift+ Esc] or via the Start menu.
Enable and disable the launch of programs, open the path to the file of your interest or, if necessary, find information about this startup program in the Internet.
| (Image-3) Find Auto Run programs in Windows-10 Task-Manager! |
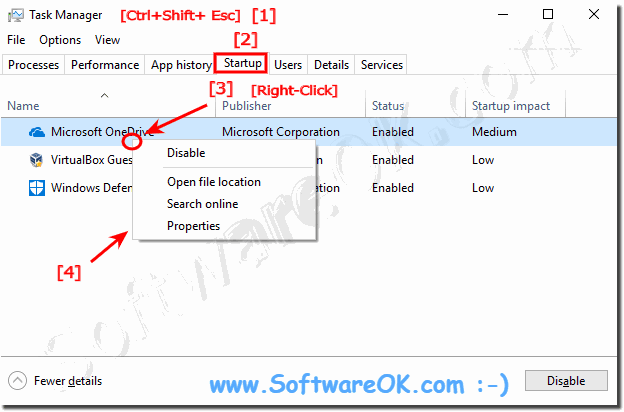 |
You will see a list of programs for the auto start of the current user in this list are from the registry and from the system auto start folder ergo directory as described here in the FAQ. If you right-click a program, you can disable or enable its launch, opening the executable file location.
In the last example here you can activate and deactivate existing applications in the list. If the program is to be executed automatically is not included in this list, it must be added there. This process is a bit more complicated, you need to edit the registry yourself or run the Windows 10 Auto Start Directory:
How To Disable Startup Programs In Windows 7 and Vista


 Over time as you install more and more software you may start to notice that it takes longer and longer for your computer to startup. More likely than not, this is probably because many applications these days hook into your Windows Startup process and automatically load up each time you start your computer. For some applications, that’s a good thing (Anti-Virus, Firewall, etc.) and I’m OK with that. However, for the majority of apps out there, it’s just a resource suck which is doing nothing more than taking up memory, CPU, and extending my startup times.
By using the Microsoft Configuration tool (msconfig.exe), we can quickly and easily audit what’s running at startup and disable the things we would prefer just to start manually after boot.
Editor’s Note: See Disabling Startup Programs for Windows 10 and Windows 8.1. Those articles contain more detailed information for the latest Microsoft operating systems.
“What is the MSConfig Utility?”
MsConfig.exe has been around for a while. It’s a Microsoft-built utility so you can trust it as well. Essentially it’s used to reconfigure your startup items within all Windows 7, Vista, or XP as well as several other things, so you need to be careful (I thought of the Spiderman reference here “With great power comes great responsibility”) as you play around with it. If you stick to the Step-by-Step How-To below, you should be okay.
How To Disable Startup Applications In Windows
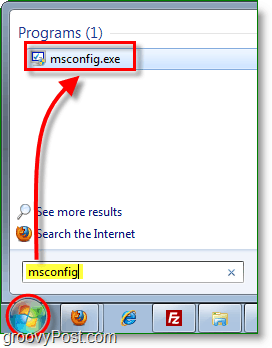
Step 1
Click the Start Menu Orb then in the search box Type MSConfig and Press Enter or Click the msconfig.exe program link.
Step 2
From within the System Configuration tool, Click Startup tab and then Uncheck the program boxes that you would like to prevent from starting when Windows starts. Click OK to save changes when finished.
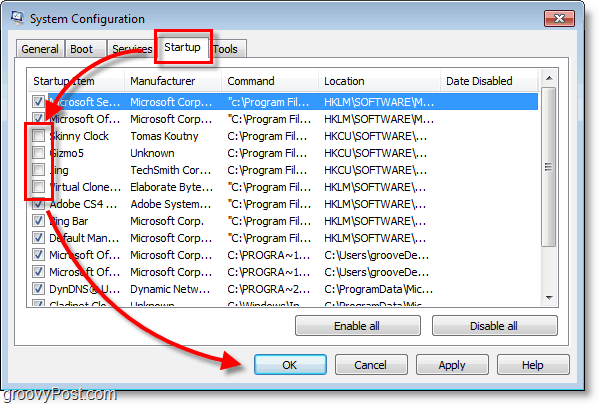
Step 3
Now that you’ve saved changes Restart Windows and the selected programs should no longer automatically start up.

How to disable startup programs with CCleaner
CCleaner is another free app for Windows or Mac you can use to disable startup programs.
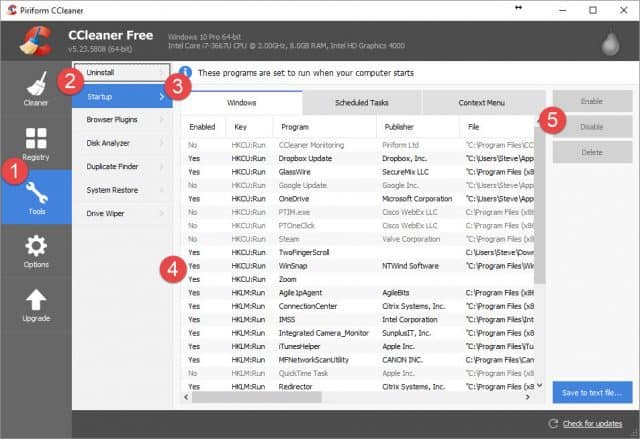
Take a look at our full tutorial which outlines how to disable apps using CCleaner.
How to run a program automatically as admin on Windows 7 at startup?
I created my own parental control app to monitor my kids activity. The app’s only GUI is a task bar icon. The program is installed as admin. I’d like this program to be started up automatically as admin user on Windows startup, so that standard users cannot kill it from task manager.
I can create a registry key at:
to make it run automatically when Windows starts up. The problem is that the program is started as the logged in (standard) user.
How can I make it run in an elevated mode? Is this possible at all in Win7?

9 Answers 9
You need to plug it into the task scheduler, such that it is launched after login of a user, using a user account that has administrative access on the system, with the highest privileges that are afforded to processes launched by that account.
This is the implementation that is used to autostart processes with administrative privileges when logging in as an ordinary user.
I’ve used it to launch the ‘OpenVPN GUI’ helper process which needs elevated privileges to work correctly, and thus would not launch properly from the registry key.
From the command line, you can create the task from an XML description of what you want to accomplish; so for example we have this, exported from my system, which would start notepad with the highest privileges when i log in:
and it’s registered by an administrator command prompt using:
this answer should really be moved over to one of the other stackexchange sites, as it’s not actually a programming question per se.
How to read and overwrite the Shell in windows using C# Windows Forms
Edit: I didn’t want to delete my post fully so edited it. I have found this code snippet:
The code snippet is from here and I cant seem to figure out how to replace the shell or even read from the string, can someone help me fix my mistake?
Errors during runtime:
What I have tried:
I have also removed MessageBox.Show(data); from the code yet it does not want to work. The same goes for overwriting the shell.
Edit 2: I have tried changing LocalMachine to CurrentUser, it still did not work. I have tested with admin and without admin privileges.
Please help Thx. Most comments are from the old question which has shifted into this.
1 Answer 1
The solution to this problem was not in changing to CurrentUser from LocalMachine, LocalMachine is correct as that is where the shell data/shell value is stored, there is no path for it under CurrentUser.
In your code, you either have made a mistake while importing the needed using Microsoft.Win32; or you just have it down wrong.
Your code to solve the problem should look like this:
Keep in mind that for administrator privileges you need the app.manifest created and or updated to from
With these changes, the code should work with no problem.
Tested on a default WindowsForms C# Application with the app.manifest changed to have administrator privileges for the app. Visual Studio 2019 latest version with the .NET Framework 4.7.2 set as the target framework.
If you need any other help please share your Visual Studio version, the framework you are using and any other information that you may have on hand.
Start application at when windows Starts
I have checked some other examples.
I am working on a winfrom. & now i am going to create its installer.
i want to start the software when windows starts & trying to use the following code.
But i am confused that where to put this code. i don’t want this code executed every time when my application starts as it will executed once when the software is installed.
shall i put check on form_Load() if the regkey is absent, & if yes then add this value to the Run.
is it correct ? i don’t want to give an option to the user & i want to start this application at the startup compulsorily.

5 Answers 5
You can create your customAction class for your installer like this: http://msdn.microsoft.com/en-us/library/d9k65z2d.aspx#Y0
Once you have this class, put your registry code in the commit section. Now, whenever your application will be installed, your application will be added to registry to run at startup.
As the others users have commented, this kind of thing should go on the installer. On the setup project you can create with Visual Studio, you can add a link to the user’s startup folder that should do the trick.
BUT
If you don’t want the user tampering with the startup folder and you absolutely want the program to start automagically with Windows, you could do as you’ve said: check for the adequate registry key everytime the program starts, and if it’s not there write it. Take into account your program will need elevated account rights for this.
BUT
Do you ABSOLUTELY need this? Are you absolutely sure you can’t offer it as an option to the final user? If I was a user to your program, didn’t want it on startup, take the effort to remove a registry key to get it out of there and then find out it’s again in the registry without my consent, I’d be pretty pissed.


