- How to Configure Security Policy Settings
- To configure a setting for your local computer
- To configure a setting for computer that is joined to a domain
- To configure a setting for a domain controller
- Настройка параметров политики безопасности Configure security policy settings
- Настройка параметра с помощью консоли «Локализованная политика безопасности» To configure a setting using the Local Security Policy console
- Настройка параметра политики безопасности с помощью консоли редактора локальных групповых политик To configure a security policy setting using the Local Group Policy Editor console
- Настройка параметра для контроллера домена To configure a setting for a domain controller
- Stay protected with Windows Security
- Important security info
- Understand and customize Windows Security features
- Status icons indicate your level of safety:
- Run a malware scan manually
- Run a quick scan in Windows Security
- Run an advanced scan in Windows Security
- Schedule your own scan
- Schedule a scan
- Turn Microsoft Defender Antivirus real-time protection on or off
- Turn real-time protection off temporarily
How to Configure Security Policy Settings
Applies To: Windows Vista, Windows Server 2008, Windows 7, Windows 8.1, Windows Server 2008 R2, Windows Server 2012 R2, Windows Server 2012, Windows 8
This procedural topic for the IT professional describes steps to configure a security policy setting on the local computer, on a domain-joined computer, and on a domain controller.
This topic pertains to the versions of Windows designated in the Applies To list above. Some of the user interface elements that are described in this topic might differ from version to version.
You must have Administrators rights on the local computer, or you must have the appropriate permissions to update a Group Policy Object (GPO) on the domain controller to perform these procedures.
When a local setting is inaccessible, it indicates that a GPO currently controls that setting.
In this topic
To configure a setting for your local computer
To open Local Security Policy, on the Start screen, type, secpol.msc.
Navigate the console tree to Local Computer Policy\Windows Settings\Security Settings
Under Security Settings of the console tree, do one of the following:
Click Account Policies to edit the Password Policy or Account Lockout Policy.
Click Local Policies to edit an Audit Policy, a User Rights Assignment, or Security Options.
When you find the policy setting in the details pane, double-click the security policy that you want to modify.
Modify the security policy setting, and then click OK.
Some security policy settings require that the computer be restarted before the setting takes effect. Any change to the user rights assignment for an account becomes effective the next time the owner of the account logs on.
To configure a setting for computer that is joined to a domain
The following procedure describes how to configure a security policy setting for a Group Policy Object when you are on a workstation or server that is joined to a domain.
You must have the appropriate permissions to install and use the Microsoft Management Console (MMC), and to update a Group Policy Object (GPO) on the domain controller to perform these procedures.
To open the MMC and add the Group Policy Object Editor, on the Start screen, typeВ mmc.msc.
On the File menu of the MMC, click Add/Remove snap-in, and then click Add.
In Add Standalone Snap-in, double-click Group Policy Object Editor.
In Select Group Policy Object, click Browse, browse to the GPO you would like to modify, and then click Finish.
Click Close, and then click OK.
This procedure added the snap-in to the MMC.
In the console tree, locate GroupPolicyObject [ComputerName] Policy, click Computer Configuration, click Windows Settings, and then click Security Settings.
Do one of the following:
Click Account Policies to edit the Password Policy or Account Lockout Policy.
Click Local Policies to edit an Audit Policy, a User Rights Assignment, or Security Options.
Click Event Log to edit event log settings.
In the details pane, double-click the security policy setting that you want to modify.
If this security policy has not yet been defined, select the Define these policy settings check box.
Modify the security policy setting and then click OK.
To configure a setting for a domain controller
The following procedure describes how to configure a security policy setting for only a domain controller (from the domain controller).
To open the domain controller security policy, in the console tree, locate GroupPolicyObject [ComputerName] Policy, click Computer Configuration, click Windows Settings, and then click Security Settings.
Do one of the following:
Double-click Account Policies to edit the Password Policy, Account Lockout Policy, or Kerberos Policy.
Click Local Policies to edit the Audit Policy, a User Rights Assignment, or Security Options.
Click Event Log to edit event log settings.
In the details pane, double-click the security policy that you want to modify.
If this security policy has not yet been defined, select the Define these policy settings check box.
Modify the security policy setting, and then click OK.
Always test a newly created policy in a test organizational unit before you apply it to your network. When you change a security setting through a GPO and click OK , that setting will take effect the next time you refresh the settings.
Настройка параметров политики безопасности Configure security policy settings
Область применения Applies to
Описание действий по настройке параметра политики безопасности на локальном устройстве, на устройстве, которое присоединилось к домену, и на контроллере домена. Describes steps to configure a security policy setting on the local device, on a domain-joined device, and on a domain controller.
Для выполнения этих процедур необходимы права администраторов на локальном устройстве или соответствующие разрешения на обновление объекта групповой политики (GPO) на контроллере домена. You must have Administrators rights on the local device, or you must have the appropriate permissions to update a Group Policy Object (GPO) on the domain controller to perform these procedures.
Если локальный параметр недоступен, это означает, что в настоящее время этот параметр контролируется GPO. When a local setting is inaccessible, it indicates that a GPO currently controls that setting.
Настройка параметра с помощью консоли «Локализованная политика безопасности» To configure a setting using the Local Security Policy console
Чтобы открыть локализованную политику безопасности, на экране «Начните» введите secpol.mscи нажмите ввод. To open Local Security Policy, on the Start screen, type secpol.msc, and then press ENTER.
В области «Параметры безопасности» дерева консоли сделайте одно из следующих параметров: Under Security Settings of the console tree, do one of the following:
- Щелкните «Политики учетных записей», чтобы изменить политику паролей или политику блокировки учетных записей. Click Account Policies to edit the Password Policy or Account Lockout Policy.
- Щелкните «Локальные политики», чтобы изменить политику аудита, назначение правпользователя или параметры безопасности. Click Local Policies to edit an Audit Policy, a User Rights Assignment, or Security Options.
При нажатии параметра политики в области сведений дважды щелкните политику безопасности, которую необходимо изменить. When you find the policy setting in the details pane, double-click the security policy that you want to modify.
Измените параметр политики безопасности и нажмите кнопку «ОК». Modify the security policy setting, and then click OK.
- Некоторые параметры политики безопасности требуют перезапуска устройства до того, как параметр вступает в силу. Some security policy settings require that the device be restarted before the setting takes effect.
- Изменения прав пользователя вступают в силу при его следующем входе в учетную запись. Any change to the user rights assignment for an account becomes effective the next time the owner of the account logs on.
Настройка параметра политики безопасности с помощью консоли редактора локальных групповых политик To configure a security policy setting using the Local Group Policy Editor console
Для выполнения этих процедур необходимы соответствующие разрешения для установки и использования консоли управления (MMC) и обновления объекта групповой политики (GPO) на контроллере домена. You must have the appropriate permissions to install and use the Microsoft Management Console (MMC), and to update a Group Policy Object (GPO) on the domain controller to perform these procedures.
Откройте редактор локальных групповых политик (gpedit.msc). Open the Local Group Policy Editor (gpedit.msc).
В дереве консоли щелкните «Конфигурация компьютера», «Параметры Windows» и выберите «Параметры безопасности». In the console tree, click Computer Configuration, click Windows Settings, and then click Security Settings.
Выполните одно из следующих действий. Do one of the following:
- Щелкните «Политики учетных записей», чтобы изменить политику паролей или политику блокировки учетных записей. Click Account Policies to edit the Password Policy or Account Lockout Policy.
- Щелкните «Локальные политики», чтобы изменить политику аудита, назначение правпользователя или параметры безопасности. Click Local Policies to edit an Audit Policy, a User Rights Assignment, or Security Options.
В области сведений дважды щелкните параметр политики безопасности, который необходимо изменить. In the details pane, double-click the security policy setting that you want to modify.
Если эта политика безопасности еще не определена, выберите этот параметр. If this security policy has not yet been defined, select the Define these policy settings check box.
Измените параметр политики безопасности и нажмите кнопку «ОК». Modify the security policy setting, and then click OK.
Если вы хотите настроить параметры безопасности для многих устройств в сети, можно использовать консоль управления групповыми политиками. If you want to configure security settings for many devices on your network, you can use the Group Policy Management Console.
Настройка параметра для контроллера домена To configure a setting for a domain controller
В следующей процедуре описывается настройка параметра политики безопасности только для контроллера домена (из контроллера домена). The following procedure describes how to configure a security policy setting for only a domain controller (from the domain controller).
Чтобы открыть политику безопасности контроллера домена, в дереве консоли найдите политику GroupPolicyObject [Имя компьютера], выберите «Конфигурация компьютера»,«Параметры Windows» и «Параметры безопасности». **** To open the domain controller security policy, in the console tree, locate GroupPolicyObject [ComputerName] Policy, click Computer Configuration, click Windows Settings, and then click Security Settings.
Выполните одно из следующих действий. Do one of the following:
- Дважды щелкните «Политики учетных записей», **** чтобы изменить политику паролей, **** политику блокировки учетных записей или политику Kerberos. Double-click Account Policies to edit the Password Policy, Account Lockout Policy, or Kerberos Policy.
- Щелкните «Локальные политики», чтобы изменить политику аудита, назначение правпользователя или параметры безопасности. Click Local Policies to edit the Audit Policy, a User Rights Assignment, or Security Options.
В области сведений дважды щелкните политику безопасности, которую необходимо изменить. In the details pane, double-click the security policy that you want to modify.
Если эта политика безопасности еще не определена, выберите этот параметр. If this security policy has not yet been defined, select the Define these policy settings check box.
Измените параметр политики безопасности и нажмите кнопку «ОК». Modify the security policy setting, and then click OK.
- Всегда проверяйте созданную политику в тестовом подразделении, прежде чем применять ее к сети. Always test a newly created policy in a test organizational unit before you apply it to your network.
- При изменении параметра безопасности с **** помощью GPO и нажатии кнопки «ОК» этот параметр вступает в силу при следующем обновлении параметров. When you change a security setting through a GPO and click OK, that setting will take effect the next time you refresh the settings.
Stay protected with Windows Security
Windows 10 includes Windows Security, which provides the latest antivirus protection. Your device will be actively protected from the moment you start Windows 10. Windows Security continually scans for malware (malicious software), viruses, and security threats. In addition to this real-time protection, updates are downloaded automatically to help keep your device safe and protect it from threats.
Windows 10 in S mode
Some features will be a little different if you’re running Windows 10 in S mode. Because this mode is streamlined for tighter security, the Virus & threat protection area has fewer options. But don’t worry—the built-in security of this mode automatically prevents viruses and other threats from running on your device, and you’ll receive security updates automatically. For more info, see Windows 10 in S mode FAQ.
Important security info
Windows Security is built-in to Windows 10 and includes an antirvirus program called Microsoft Defender Antivirus. (In previous versions of Windows 10, Windows Security is called Windows Defender Security Center).
If you have another antivirus app installed and turned on, Microsoft Defender Antivirus will turn off automatically. If you uninstall the other app, Microsoft Defender Antivirus will turn back on automatically.
If you’re having problems receiving Windows Security updates, see Fix Windows Update errors and the Windows Update FAQ.
For info on how to uninstall an app, see Repair or remove an app in Windows 10.
To change your user account to an admin account, see Create a local user or administrator account in Windows 10.
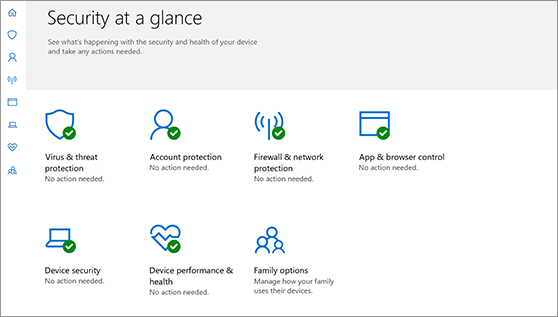
Understand and customize Windows Security features
Windows Security is your home to manage the tools that protect your device and your data:
Virus & threat protection. Monitor threats to your device, run scans, and get updates to help detect the latest threats. (Some of these options are unavailable if you’re running Windows 10 in S mode.)
Account protection. Access sign-in options and account settings, including Windows Hello and dynamic lock.
Firewall & network protection. Manage firewall settings and monitor what’s happening with your networks and internet connections.
App & browser control. Update settings for Microsoft Defender SmartScreen to help protect your device against potentially dangerous apps, files, sites, and downloads. You’ll have exploit protection and you can customize protection settings for your devices.
Device security. Review built-in security options to help protect your device from attacks by malicious software.
Device performance & health. View status info about your device’s performance health, and keep your device clean and up to date with the latest version of Windows 10.
Family options. Keep track of your kids’ online activity and the devices in your household.
You can customize how your device is protected with these Windows Security features. To access them, select Start > Settings > Update & Security > Windows Security . Then select the feature you want to explore.
Open Windows Security settings
Status icons indicate your level of safety:
Green means your device is sufficiently protected and there aren’t any recommended actions.
Yellow means there is a safety recommendation for you.
Red is a warning that something needs your immediate attention.
Run a malware scan manually
When you’re concerned about risks to a specific file or folder, you can right-click the file or folder in File Explorer, then select Scan with Microsoft Defender.
If you suspect there’s malware or a virus on your device, you should immediately run a quick scan. This is much faster than running a full scan on all your files and folders.
Run a quick scan in Windows Security
Select Start > Settings > Update & Security > Windows Security and then Virus & threat protection.
Open Windows Security settings
Under Current threats, select Quick scan (or in previous versions of Windows 10, under Threat history, select Scan now).
If the scan doesn’t find any issues, but you’re still concerned, you may want to check your device more thoroughly.
Run an advanced scan in Windows Security
Select Start > Settings > Update & Security > Windows Security and then Virus & threat protection.
Under Current threats, select Scan options (or in previous versions of Windows 10, under Threat history, select Run a new advanced scan).
Select one of the scan options:
Full scan (check files and programs currently running on your device)
Custom scan (scan specific files or folders)
Microsoft Defender Offline scan (run this scan if your device has been, or could potentially be, infected by a virus or malware). Learn more about Microsoft Defender Offline
Select Scan now.
Note: Because of streamlined security, this process isn’t available if you’re running Windows 10 in S mode.
Schedule your own scan
Even though Windows Security is regularly scanning your device to keep it safe, you can also set when and how often the scans occur.
Schedule a scan
Select the Start button, type schedule tasks in the Search box, and in the list of results, select Task Scheduler.
In the left pane, select the arrow (>) next to Task Scheduler Library to expand it, do the same with Microsoft > Windows, and then scroll down and select the Windows Defender folder.
In the top-center pane, select Windows Defender Scheduled Scan. (Point to the choices to see the full names.)
In the Actions pane on the right, scroll down and then select Properties.
In the window that opens, select the Triggers tab, and then select New.
Set your preferred time and frequency, and then select OK.
Review the schedule and select OK.
Note: Because of streamlined security, this process isn’t available if you’re running Windows 10 in S mode.
Turn Microsoft Defender Antivirus real-time protection on or off
Sometimes you may need to briefly stop running real-time protection. While real-time protection is off, files you open or download won’t be scanned for threats. However, real-time protection will soon turn on automatically again to protect your device.
Turn real-time protection off temporarily
Select Start > Settings > Update & Security > Windows Security and then Virus & threat protection > Manage settings. (In previous versions of Windows 10, select Virus & threat protection > Virus & threat protection settings.)
Open Windows Security settings
Switch the Real-time protection setting to Off and choose Yes to verify.
Note: Because of streamlined security, this process isn’t available if you’re running Windows 10 in S mode.


