- Start windows using settings from last successful boot attempt перевод
- Проблемы с ноутбуком
- Start booting from USB device что делать?
- Почему появляется дисфункция при установке ОС?
- Как исправить «Start booting from USB device»
- Заключение
- How to Boot into Last Known Good Configuration Windows 7/10 [MiniTool Tips]
- Summary :
- Quick Navigation :
- About the Last Known Good Configuration
- What Is the Last Known Good Configuration
- Problems Can Be Fixed by Last Known Good Configuration
- Problems Cannot Be Fixed by Last Known Good Configuration
- Boot Windows into the Last Known Good Configuration
- How to Boot into the Windows 7 Last Known Good Configuration
- How to Boot into the Last Known Good Configuration Windows 10
- Back up the System to Safeguard Your Computer
- Bottom Line
- Last Known Good Configuration FAQ
- ABOUT THE AUTHOR
Start windows using settings from last successful boot attempt перевод
Доброго времени суток!
У меня проблема и я не знаю как решить ее. Windows 8 загружается хорошо, без проблем. Но вот пытаюсь загрузиться с загрузочной флешки Live USB — появляется такое окно Windows Boot Manager, где написано следующее:
Windows failed to start. A recent haradware or software change might be the cause. To fix the problem:
1. Insert your Windows installation disc and restart your computer.
2. Choose your language setting, and then click next.
3. Click Repair your computer
if you do not have this disc, contact your system administarator or computer manufacturer for assisnace.
Info: The Boot Configuration Data for your PC is missing or contains errors.
Уже пробовала исправить ошибку через командную строку, вставив другую флешку с дистрибутивом ОС, выполняла команды:
X:Source>bootrec.exe /fixmbr
X:Source>bootrec.exe /fixboot
X:Source>bootrec.exe /rebuildbcd
Но результата никакого! По прежнему пытаюсь загрузиться с Live USB — вылетает также экран Windows Boot Manager с ошибкой. Сама же данная загрузочная флешка Live USB успешно запускается на другом компьютере, т.е. флешка сама рабочая. А на ноутбуке вот такое.
Отмечу, что ранее на ноуте была другая ОС и был также скрытый раздел для восстановления системы, я все это удалила и установив новую ОС. При установке — конечно удаляла все разделы, форматировала, и создавала снова.
Буду очень благодарна любому совету! Заранее спасибо.
Проблемы с ноутбуком
На ноутбуке появилось сообщение об ошибке
Windows Boot Manager
Windows failed to start. A recent hardware or software change might be the cause. To fix the problem:
1. Insert your windows installation disc and restart your computer.
2. Choose your language settings, and then click »Next.»
3. Click »Repair your computer.»
If you do not have this disc, contact your system administrator or computer manufacturer for assistance.
File: \Boot\BCD
Status: 0xc000000f
Info: An error occurred while attempting to read the boot configuration data.
Или в переводе на русский
Диспетчер загрузки Windows
ОС Windows не удалось запустить. Последние аппаратные или программные изменения могут быть причиной. Для решения этой проблемы:
1. Вставьте установочный диск Windows, и перезагрузите компьютер.
2. Выберите параметры языка, а затем нажмите кнопку» Далее. »
3. Нажмите» ремонтом вашего компьютера. »
Если у вас нет этого диска, обратитесь к системному администратору или изготовителю компьютера для получения помощи.
Файл: \ Boot \ BCD
Статус: 0xc000000f
Информация: Произошла ошибка при попытке чтения данных конфигурации загрузки.
Нашла установочный диск Windows 7. Безрезультатно.
А вот установочный диск Windows 8 помог. Хотя и установлен на ноутбуке был Windows 7.
- Перезагрузила компьютер.
- Зашла в BIOS при помощи специальной клавиши, которая для каждой материнской платы своя, у меня F2.
- Открыла раздел биоса Main. Установила F12 Boot Menu Enabled. Далее нажала F10 для сохранения изменений меню и выхода из него.
- Установила установочный диск в CD ROM, который сделала первым в загрузочной иерархии. По умолчанию загрузка производится из жесткого диска.
- Перезагрузила компьютер и нажала F12 для входа в Boot Menu.
- При появлении на экране строки «Press any kay from CD or DVD» нажала любую из клавиш, чтобы запустилась загрузка с CD ROM и началась установка Windows.
- После того, как появится меню установки нажимаем «Далее».
- Теперь необходимо в левом нижнем углу найти «Восстановление».
После нажатия на поле » Восстановить» у меня появилась строка Диск заблокирован. По этой причине пришлось все предыдущие операции проделать повторно и отправится в меню «Диагностика» и «Дополнительные параметры» там «Командная строка».
Теперь займемся открытием доступа к диску, на котором находится Windows.
Необходимо прописать простую команду «Bootrec /fixmbr». Нажимаем «Enter».
- Ключ меняем на «/rebuildbcd». Опять же подтверждаем «Enter».
- Перезагружаем компьютер.
- Теперь появляется доступ к диску.
Главное, что для процедуры необходимо использовать дистрибутив Windows. И даже может понадобиться ключ активации, с помощью которого ранее и была установлена текущая система. В противном случае команда может не сработать, а значит все останется, как есть.
У меня на удивление сработало при запуске диска с Windows 8, и система с Windows 7 восстановилась.
В моем случае думаю что все проблемы связаны с тем, что первоначально на ноут буке была установлена Windows Vista. Возможно аппаратно мой ACER не тянет Windows 7 и поэтому у меня частенько происходит перезагрузка или загорается синий экран.
Start booting from USB device что делать?
При попытке установить операционную систему с флеш-накопителя пользователь может столкнуться с появлением на экране надписи «Start booting from USB device…», после чего система зависает и далее ничего не происходит. Обычно это связано с ситуацией, когда загрузочная флешка с операционной системой не была корректно создана пользователем, потому система испытывает проблемы в установке новой версии ОС с данного устройства. В данном материале я расскажу, в чём суть проблемы, каковы её причины, и как избежать её появления на вашем ПК.

Почему появляется дисфункция при установке ОС?
В переводе данный текст звучит как «Начало загрузки с устройства USB…», обычно появляясь при загрузке установочной версии ОС Windows с ЮСБ-устройства.
Причинами «зависания» данной надписи обычно являются некорректно созданная установочная флешка, а также неверно указанные настройки в БИОСе пользовательского ПК.

Как исправить «Start booting from USB device»
Для устранения дисфункции рекомендую выполнить следующее:
- Проверьте, загрузочное ли ваше ЮСБ-устройство. Для этого рекомендую использовать программный инструмент «MobaLiveCD», который проверит загрузочный статус вашей флешки. Данная программа не требует установки, работает сразу после запуска, довольно легка и удобна в использовании.
Способ 1.Для работы с «MobaLiveCD» скачайте и запустите данную программу с правами администратора. На главном экране кликните на кнопку «Run the Live USB», укажите программе путь к вашей флешке. Если программа спросит вас «Do you want to create a hard disk image for your virtual machine?» — выберите «No». Программа произведёт эмуляцию запуска системы с вашей флешки, и вы воочию увидите результат.
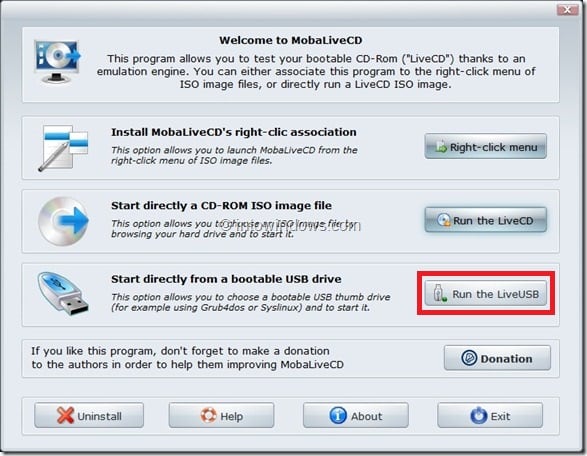
Для выхода с программы нажмите клавиши Ctrl+Alt.
- Проверьте, поддерживает ли ваш компьютер загрузку с USB. Далеко не все ПК поддерживают данную функцию (особенно это касается устаревших версий материнских плат), потому вам необходимо или просмотреть характеристики вашей материнской платы относительно поддержки ею загрузки с ЮСБ, или непосредственно перейти в БИОС и просмотреть, имеется ли в нём соответствующая опция;
- Настройте ваш ПК для загрузки с флеш-накопителя. Перейдите в БИОС и установите там соответствующие опции, в частности, в последовательности загрузочных дисков установите флеш-накопитель первым для загрузки;
 Выберите флеш-накопитель
Чтобы проверить файловую систему вашей флешки подключите её к компьютеру, в проводнике кликните на флеш-накопителе правой клавишей мыши, в появившемся меню выберите «Свойства».
- Попробуйте изменить значение некоторых параметров БИОСа. Перейдите в ваш БИОС, и поменяйте значение опции «Legacy» с «Enabled» на «Disabled» (или наоборот). Сохраните настройки, перезагрузите компьютер, и попробуйте вновь установить систему с флеш-накопителя;
Способ 2. Если предыдущий способ не помог исправить Start booting from USB device, попробуйте выполнить следующее. Перейдите в БИОС, во вкладке «Boot» установите значение параметра «Secure Boot» на «Disabled» (если появится предупреждение, смело жмите на «Ок»). Появится дополнительная опция «ОS Mode Selection», выберите здесь «UEFI and Legacy OS» (если появится предупреждение, тогда вновь нажимаем на «ОК»). Вновь жмём на F10, затем на «Yes», дожидаемся перезагрузки ноутбука.
Затем вновь переходим в БИОС, во вкладке «Boot» выбираем опцию «Boot device priority», в первом пункте выбираем нашу флешку как загрузочное устройство. Вновь жмём на F10 и «Yes». Перезагружаем наш ПК и пробуем загрузиться с нашего флеш-накопителя.
- Для создания загрузочной флешки используйте зарекомендовавший себя софт (например, Rufus).


Заключение
Рассматриваемая проблема может быть вызвана рядом причин, начиная от неправильной настройки БИОСа, и заканчивая некорректным созданием загрузочной флешки. Чтобы избавиться от сообщения Start booting from USB device» рекомендую воспользоваться приведёнными выше советами, это позволит провести нормальную инсталляцию Виндовс с помощью флеш-накопителя на вашем ПК.
How to Boot into Last Known Good Configuration Windows 7/10 [MiniTool Tips]
By Daisy | Follow | Last Updated December 01, 2020
Summary :

If the configuration of the system’s registry or driver creates a conflict that prevents the system from starting, Windows may encounter problems during startup. Booting the Windows into last known good configuration is the best way to solve the issue. Now, read this post from MiniTool to learn about the details.
Quick Navigation :
About the Last Known Good Configuration
What Is the Last Known Good Configuration
In NT and later versions of the Windows operating system, when the system successfully starts, you can obtain a copy of the system hardware configuration and driver settings from the system registry.
If the subsequent boot process fails, the copy will be stored. Then the last known good configuration’s record will be used by the operating system to perform a successful boot. If Windows detects a problem during the startup process, the «Last Known Good Configuration» option will be added to the startup menu.
Problems Can Be Fixed by Last Known Good Configuration
The problems that can be repaired by booting into last known good configuration are as follows:
1. The blue screen of death at startup caused by the driver update.
2. The unsuccessful boot caused by the newly applied Windows update or automatic updates.
3. The PC’s abnormal startup sequence caused by viruses, trojans, and rootkits.
4. The conflicts between newly installed hardware and other devices.
5. The conflicts between newly-installed software and other programs.
Problems Cannot Be Fixed by Last Known Good Configuration
However, not all of the Windows issues can be resolved by booting Windows into the last known good configuration. In particular, it will not help if you encounter these issues below:
1. Programs crashing at random.
2. Computer running slow or other bad performance. Maybe you are interested in this post — 10 Reasons for PC Runs Slow with Windows 10/8/7.
3. Driver-related issues that you’ve been experiencing for several days.
Boot Windows into the Last Known Good Configuration
Just now, you have known some basic information of the last known good configuration. Now, you may wonder how to boot into last known good configuration Windows 10/7. Keep on your reading.
How to Boot into the Windows 7 Last Known Good Configuration
If you want to use the Windows 7 last known good configuration option, follow the steps below. On the other hand, if you wonder how to use last known good configuration Windows 10, you can jump to the next section.
Step 1: Fully power your computer off. Make sure that your PC is entirely turned off and not running anymore.
Step 2: Restart your computer and then wait for the screen with the logo of the manufacturer to pass.
Step 3: Repeatedly press F8 (or another key/key combination) as soon as the logo disappears.
Step 4: If you see the Windows loading screen, go back to the first step and repeat until you enter the Advanced Boot Options window.
Step 5: Use the arrow keys on your keyboard to select Last Known Good Configuration (advanced) from the list of available options.
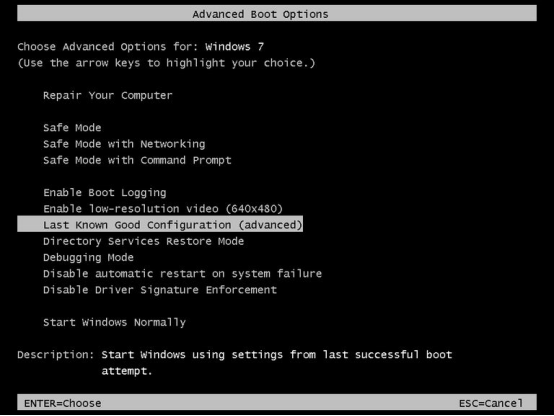
Step 6: Press Enter and wait for the process to complete. You should be able to boot into the system now.
Here are all the steps of entering into Windows 7 last known good configuration.
How to Boot into the Last Known Good Configuration Windows 10
The last known good configuration option is not provided in Windows 8 and Windows 10. Instead, there are other options like refresh, reset (reinstall), restore, etc. You can simply boot your PC to enter Safe Mode. It’s an alternative to the last known good configuration.
Safe Mode is a built-in diagnostic mode of Windows 10 (7, 8, etc.) computer operating system. If you start Windows 10 PC to Safe Mode, it will only allow starting up basic system programs and services in the booting process. Here is information on how to boot Windows 10 in Safe Mode.

Clean Boot vs. Safe Mode: what’s the difference, when and how to use? After reading this post, you can clearly know all the answers to these questions.
You should restart your PC several times to boot to WinRE (Windows Recovery Environment) to enter into Safe Mode. You can also use Windows 10 recovery bootable media like a DVD/USB bootable drive to enter WinRE. Here are the steps:
Step 1: Insert your Windows installation CD/DVD or USB bootable drive to your computer, and start the computer.
Step 2: Enter the BIOS. If you don’t know how to do that, read this post — How to Enter BIOS Windows 10/8/7 (HP/Asus/Dell/Lenovo, any PC).
Step 3: Choose the DVD or USB flash drive as the first boot device and boot the Windows 10 PC from the device.
Step 4: Click Repair your computer to enter into WinRE successfully.

Now, you can continue to enter Safe Mode.
Step 1: From the Choose an option screen, click the Troubleshoot option.
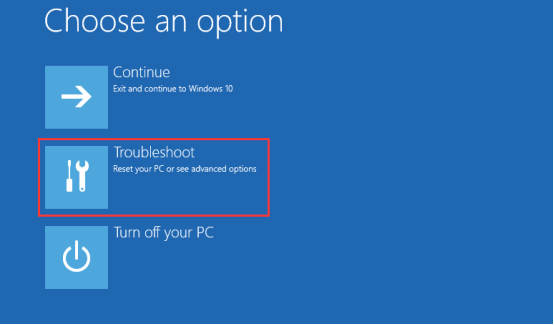
Step 2: Next, click Advanced Options. Click the Startup Settings option.

Step 3: Click the Restart button.
Step 4: Then you will see multiple options for startup. Press the F4 key to enable Safe Mode.
Now your PC will start in Safe Mode. Then you can troubleshoot your system without issues.
You can also perform a system restore via WinRE that is an alternative to the last known good configuration option. Here is how to do that:
Step 1: Enter WinRE.
Step 2: You should click Troubleshoot in Choose an option, and then choose Advanced options.
Step 3: Choose System Restore in the Advanced options window.
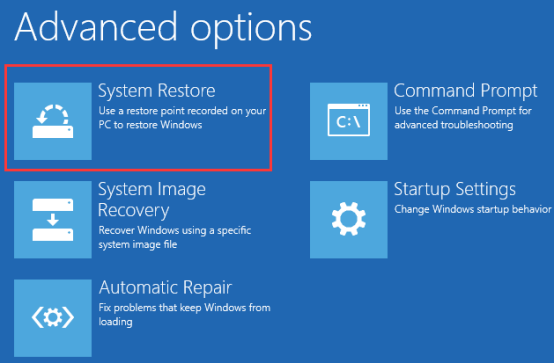
Step 4: Follow the on-screen instructions to complete the restore.

Windows 10 System Restore stuck on initializing or restoring files? This post gives helpful ways to fix System Restore stuck issue in 2 cases.
Here is how to use the Windows 10 last known good configuration alternative.
Back up the System to Safeguard Your Computer
After you fix your computer’s error, I have a suggestion for you. In case of something wrong with your system, it is recommended to back up your system in advance. Now, I will introduce a piece of free backup software for you — MiniTool ShadowMaker.
MiniTool ShadowMaker provides a one-click system backup solution. It supports backing up your system drive completely, including system partition, system reserved partition and EFI system partition. And you can image all of your data including computer settings, applications, drivers, system files and boot files.
The system backup is bootable. When the system crashes, you can restore your computer to a normal state. This post — How to Restore Computer to Earlier Date in Windows 10/8/7 (2 Ways) may be the one you need.
MiniTool ShadowMaker provides Trial Edition that gives you a 30-day free trial for all backup features. You can purchase its Pro Edition to use it permanently.
Now you can download MiniTool ShadowMaker Trial Edition to back up your system.
Now, let’s see how to back up your Windows system.
Step 1: Decide a Backup Mode
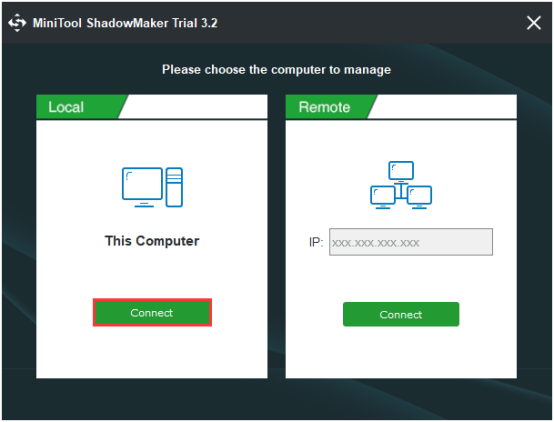
1. Launch MiniTool ShadowMaker and keep using the Trial E
2. Please choose the computer to manage and click Connectin the Local section to enter the main interface.
Step 2: Choose the Backup Source
1. Go to the Backup page.
2. This software selects the system partition and system reserved partition by default.
Step 3: Choose a Destination Path to Store Your System
1. You can back up your system to an external hard drive, USB flash drive, NAS and more.
2. Then choose a destination path to store your system and click OK. Here I take the New Volume (E)as an example.

Step 4: Start to Back up
1. Go back to the following interface.
2. You have two options: click Back up Now to start the backup process immediately or click Back up Later to delay the backup process.

When the process is finished, you have backed up your system successfully with MiniTool ShadowMaker.
Bottom Line
To sum up, this post has introduced what the last known good configuration is and shown the methods to enter Windows 7/10 into it. If your computer encounters some issues, you can try the last known good configuration to fix them.
After fixing your issues, it is recommended you back up your system. If you have any problem when using MiniTool program, please feel free to contact us via the email [email protected] and we will reply to you as soon as possible.
Last Known Good Configuration FAQ
ABOUT THE AUTHOR

Position: Columnist
She was graduated from the major in English. She has been the MiniTool editor since she was graduated from university. She specializes in writing articles about backing up data & systems, cloning disks, and syncing files, etc. She is also good at writing articles about computer knowledge and computer issues. In daily life, she likes running and going to the amusement park with friends to play some exciting items.


