- How to remove Startup Programs in Windows 10 [Full Guide]
- Windows 10 Guide to remove Startup Programs
- 1. Use the File Explorer
- 2. Use the registry
- 3. Use the Group Policy Editor
- 4. Use the Task Scheduler
- How to stop Windows 10 apps from automatically launching at startup
- How to manage apps that launch at startup using Task Manager
- Identifying problematic applications
- Disabling startup applications
- Wrapping up
- More Windows 10 resources
- Halo: MCC’s live service elements make it better, not worse
- Microsoft’s Surface Duo is not ‘failing up’
- Here’s what you can do if Windows 10 update KB5001330 is causing issues
- These are the best PC sticks when you’re on the move
- Application on windows startup
- 2 Answers 2
How to remove Startup Programs in Windows 10 [Full Guide]

- If booting your OS seems to last forever, you might want to take action.
- Start by managing your startup apps so that you only keep those you need. Here’s how to quickly remove programs from the Startup.
- Check out more handy fixes on our Windows 10 Guides.
- Don’t be shy to explore the Tutorials Hub as well for more tech tricks and tips.

- Download Restoro PC Repair Tool that comes with Patented Technologies (patent available here).
- Click Start Scan to find Windows issues that could be causing PC problems.
- Click Repair All to fix issues affecting your computer’s security and performance
- Restoro has been downloaded by 0 readers this month.
Does it take a long time to start up your operating system? Maybe the boot process is lengthy because there are many applications that load at startup.
There are different tools to manage startup apps. It can be done via the Startup Manager, Task Manager, Explorer, or Registry editor. Below, you can find a few methods that will guide you through the process of adding or removing the startup apps.
You can, also, learn how to enable or disable different apps.
Windows 10 Guide to remove Startup Programs
- Right-click the empty space on the Taskbar.
- A new window will pop up. Drag your mouse pointer on the Task Manager feature and left-click on it.
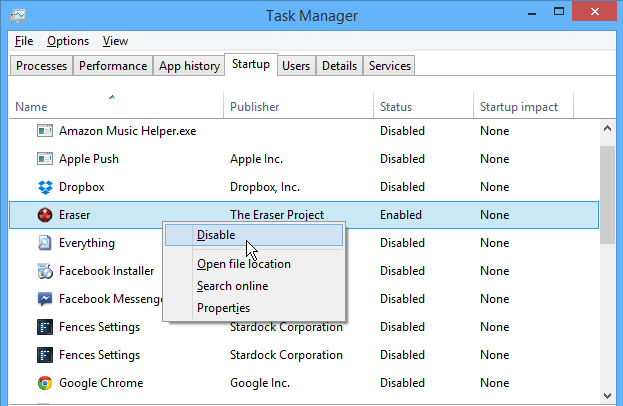
- The Task Manager window will open. Left-click on the Startup tab.
Note: You can navigate directly on the Startup tab by pressing the key combination: Win + R and enter the following command: taskmgr /0 /startup. - In the Startup tab, you can observe a list of applications that are starting with Windows;
- Disable startup application: Prevent any application in the list, from starting with your operating system. Right-click on it and select from the menu, the Disable feature.
- Enable startup application: Right-click on the application( from the startup list) and select from the menu the Enable feature. In this case, the application will start with the OS.
1. Use the File Explorer
- Press the Win + R key combination.
- Enter the following command: shell:Startup, and press the Enter key.
Note: If you want to add or remove startup apps for all users, you need to enter the following command: shell: Common Startup. - A Startup window will open. Find the application executable file that needs to load when Windows boots.
- Create a shortcut of this app. Copy it and paste it in the Startup window. This is the way for adding a startup application in Windows 10.
- To remove the application, delete the shortcut from the Startup folder.
2. Use the registry
- Press the Win + R key combination.
- Enter the following command: regedit without quotes and press the Enter key.
- Navigate to the following path or register key:
- In the name column, you can find the application that starts automatically, when Windows boots.
- Remove the application from the Startup:
- Right-click on the application name and choose Delete feature.
- Adding the application in the Startup:
- Right-click in the Registry Editor window and select New -> String value feature.
- Add value name (the name of the application).
- Add value data: enter the full path to the executable (*.exe) of the application that you wish to run at the startup.
3. Use the Group Policy Editor
If you want to add applications to startup, you can do so using Group Policy Editor. We have to mention that this tool isn’t available in Home versions of Windows, but if you’re using Pro or Enterprise version, this tool should be available for you.
To add an application to startup using Group Policy Editor, do the following:
- Press Windows Key + R and enter gpedit.msc. Press Enter or click OK.
- When Group Policy Editor opens, in the left pane navigate to User Configuration > Windows Settings > Scripts (Logon/Logoff). Now in the right pane double click on Logon.
- Logon Properties window will appear. Click on the Add button.
- When Add a script window opens, click on the Browse button.
- Select the application you want to start. After doing that, click on OK.
- Now click on Apply and OK to save changes. After saving the changes, restart your PC and check if the application starts automatically with Windows.
This is a simple method, but in order to use it, you need to have Pro or Enterprise version of Windows. If you’re a Home user, you’ll have to look for a different solution.
4. Use the Task Scheduler
Windows comes with a useful tool called Task Scheduler. Using this tool you can set certain applications to start at a specific time, but you can also use it to add applications to startup.
How to stop Windows 10 apps from automatically launching at startup
Apps you install on Windows 10 can sometimes configure themselves to run automatically on startup, and they can also configure background services that start every time you boot your computer. While they can come in handy, over time, the list of apps and services running on startup can grow, which can slow your boot time, affect battery life, and impact overall system performance.
Usually, applications include the necessary settings to block them from starting alongside Windows 10, but it’s a lot easier to use Task Manager to do so.
In this Windows 10 guide, we walk you through the steps to identify applications that are causing your device to boot slow, consuming system resources unnecessarily, and the steps to improve system performance.
How to manage apps that launch at startup using Task Manager
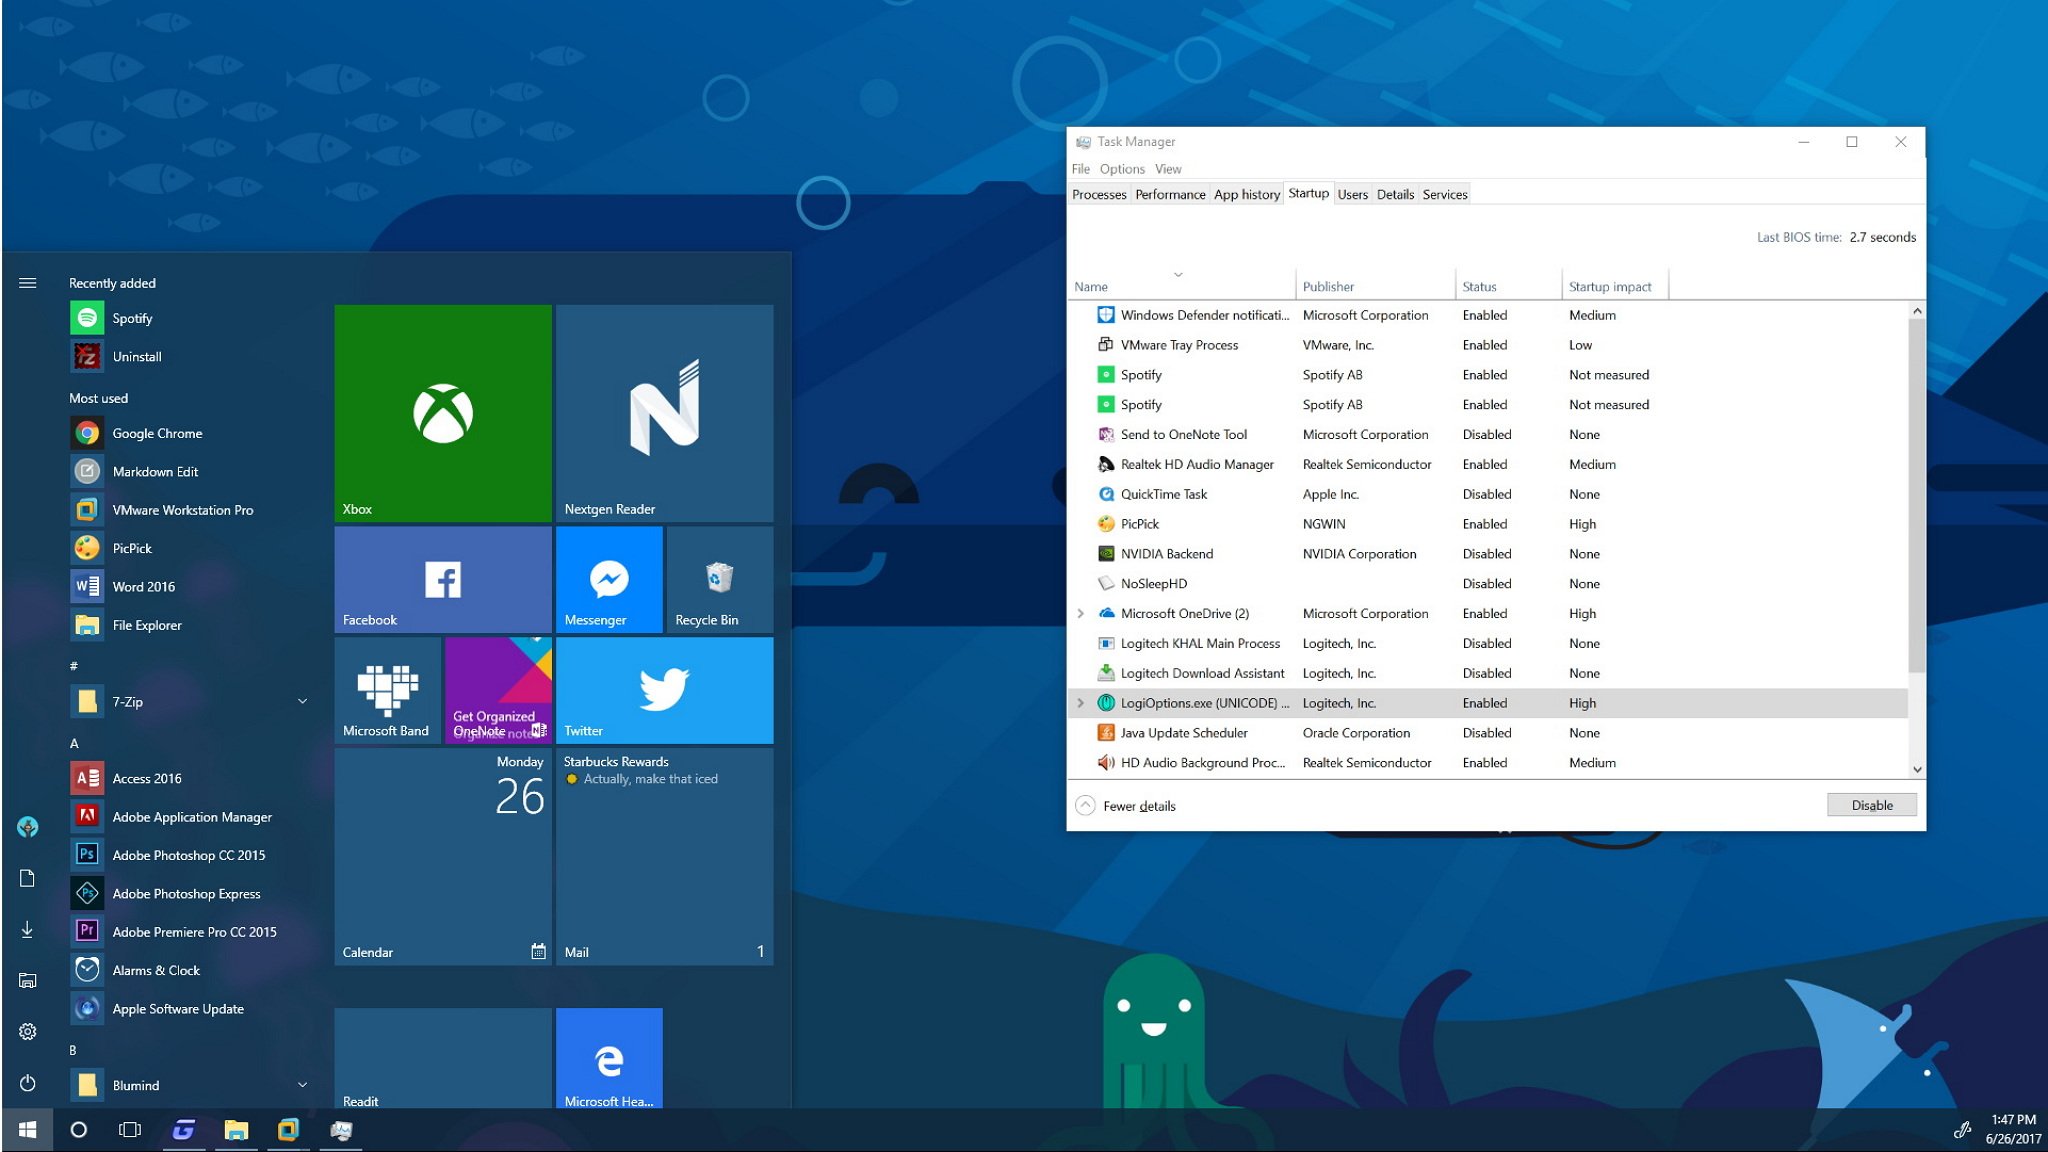
First, you should open Task Manager. If Task Manager launches in compact mode, click the More details button in the bottom-right corner to get to the advanced options, and then click the Startup tab.
Quick Tip: There are a number of ways to launch the Task Manager, but you can simply right-click the Taskbar and select Task Manager. Alternatively, you can right-click the Start button and select Task Manager, or it’s also possible to use the Ctrl + Shift + Esc keyboard shortcut. Or just start typing it in your taskbar search field.

On the Startup tab, you’ll find a list of the applications and services configured to start alongside Windows 10 with their names, publisher, status, and performance impact.
The two most important pieces of information in this tab are the Status column, which tells you which items are currently enabled, and the Startup impact column that displays the performance impact of an app or service during startup.

Identifying problematic applications
If you have a long list, it’s a good idea to click the Status column to sort the items into Enabled and Disabled to make the list more manageable.
To help you determine which apps you should disable, Task Manager displays an impact measurement for each app. Here’s exactly how Windows 10 determines each value:
- High — The app utilizes more than 1,000ms of processor time, or it uses more than 3MB of disk I/O.
- Medium — The app uses 300ms to 1,000ms of processor time, or 300KB to 3MB of disk I/O.
- Low — The app uses less than 300ms of processor time and less than 300KB of disk I/O.
- Not measured — This usually means that the app was recently installed and Windows 10 hasn’t calculated its impact. It could also happen that when an app has been uninstalled, but the entry still shows up in Task Manager.
While you can control anything listed in the Startup tab, it’s also important to understand what you’re trying to disable, because sometimes you could block an app or service that is required to run the OS or application correctly.
You can find out more information about an app by right-clicking the item and clicking Search online. This will perform an online search in your web browser with the name of the app and exact file name. For example, if I was trying to learn more about «Microsoft OneDrive,» the online search query would include «OneDrive.exe Microsoft OneDrive.»
Disabling startup applications
Once you understand the application and decide you want to stop it from launching at startup, simply right-click it, and select Disable to prevent from starting automatically.
Alternatively, you can select the item, and click the Disable button in the bottom-right corner.
Wrapping up
After completing the steps, depending on the items you disabled, you should notice an improvement in the overall performance of Windows 10. However, you must restart your computer for the changes to take effect, because these steps won’t close an application that is currently running.
It should be noted that you can only control traditional desktop (win32) apps on startup. On Windows 10, apps you download from the Windows Store (excluding converted apps) are not allowed to run automatically on startup.
While this guide focuses on Windows 10, you can use the same instructions to manage applications on Windows 8.x.
More Windows 10 resources
For more helpful articles, coverage, and answers to common questions about Windows 10, visit the following resources:
![]()
Halo: MCC’s live service elements make it better, not worse
Halo: The Master Chief Collection is more popular than ever, but some fans don’t agree with the live service approach 343 Industries has taken with it. Here’s why those elements are, at the end of the day, great for the game and for Halo overall.
![]()
Microsoft’s Surface Duo is not ‘failing up’
Microsoft announced this week that it was expanding Surface Duo availability to nine new commercial markets. While Surface Duo is undoubtedly a work in progress, this is not a sign of a disaster. It’s also doesn’t mean that Surface Duo is selling a ton either. Instead, the reason for the expansion is a lot more straightforward.
![]()
Here’s what you can do if Windows 10 update KB5001330 is causing issues
In this guide, we’ll show you the steps to get rid of the update KB5001330 to fix profile, gaming, and BSoD problems with the Windows 10 October 2020 Update and May 2020 Update.
![]()
These are the best PC sticks when you’re on the move
Instant computer — just add a screen. That’s the general idea behind the ultra-portable PC, but it can be hard to know which one you want. Relax, we have you covered!
Application on windows startup
i wish to load my C# application after windows user login and before windows desktop appears. currently i added my application startup path to registry run key. it loads my application correctly but windows windows desktop appears[2 sec] then my application runs
Note:
My application creates seperate desktop using winapi, while my application running it hides the desktop temporarily.
2 Answers 2
This really isn’t possible to do. Windows works pretty hard to get the desktop up and explorer responsive as soon after the user logs in. This is what is most important to the user.
Your goals may be noble, but they are at odds with what users want. So in general, they are at odds with how Windows works (especially Win-7).
If you have software that needs to run early that doesn’t need to interact with the user, then a service is they way to go. It is important to note that in Vista and later Windows systems, there is no way for a service to interact with the user — e.g. they cannot have their own graphical user interface. Services with UI are inherently not secure.
One way to partition your software is to put some things in a service, and have a think UI layer on top of it. COM and Local RPC are good choices for communication between your service and your UI layer.
Note that you will need to do work here to prevent your components from slowing down boot. Poorly behaving applications are one of the biggest problems in the boot path. You can study this using the Windows Performance Toolkit
It is kinda possible I think, but you are really in for a lot of extra work. What you could do is replace the Windows Shell with your own code, but at that point you become solely responsible for the UI that the user interacts with.
If your code isn’t ‘just right’, you may end up with an unusable Windows install, and I’m not sure your users are going to appreciate that much.
Also note that there may be features that you normally intuitively expect to be available on a Windows machine that are part of the shell which you will not have access to anymore. For details, try http://en.wikipedia.org/wiki/Windows_shell_replacement as a starting point.
Addendum:
I have only the vaguest knowledge myself about what is actually involved technically to make this happen, but http://dustyant.com/articles/deeshell/ seems to be a decent explanation of the basics. Again tho. here be dragons make sure you do this in a VM or something so that you don’t end up stuffing your main Windows install.
Just briefly what ‘Shell Replacement’ means: after you log in, windows starts an application called ‘explorer’ (not sure if this still holds for Vista / Win 7. I have a vague recollection it got a little more involved recently), which basically draws the desktop, the taskbar, etc. . it is possible to tell Windows to start a different application instead of the default graphical shell. At that point you are in control of the main UI of Windows. which means that you are responsible for everything that Windows normally does in the shell . gives you a lot of control and flexibility, and possibly lots of headaches.


