- Getting started with PostgreSQL on Linux
- Installation
- Getting started
- Run psql
- Exit psql
- Check version
- Users
- List users
- Create user
- Alter user
- Delete user
- Databases
- List databases
- Create database
- Connect to database
- Delete database
- Tables
- Create table
- List tables
- Delete table
- Insert rows
- Select rows
- Delete rows
- Exporting
- Importing
- TablePlus
- How to start and stop PostgreSQL server?
- Установка PostgreSQL в Ubuntu
- Установка PostgreSQL в Ubuntu 20.04
- 1. Установка из официальных репозиториев
- 2. Установка из официальных репозиториев PostgreSQL
- Настройка PostgreSQL в Ubuntu 20.04
- Создание роли postgresql
- Создание базы данных
- Создание таблиц
- Выводы
Getting started with PostgreSQL on Linux
This post contains some introductory guidance and commands to get you started and productive with PostgreSQL in a few minutes. I’ve written it as a handy reference because I always forget most of these commands and then end up trawling the web to piece them all back together again.
Note: This was written and tested against PostgreSQL 11.7 on Debian GNU/Linux but most of it should still be generally applicable to other versions and operating systems.
Right, let’s get started!
Installation
The installation instructions below are for Debian. For other operating systems see here.
Before installing PostrgreSQL we need to run a few commands to verify that we’re installing the official package, then we can run the installation.
To do all of this, open up your terminal and enter the following commands:
Confirm you’re happy with the installation size when prompted, wait a few minutes and PostgreSQL should now be installed on your machine.
Getting started
Postgres creates a postgres super user while installing. You’ll need to switch over to this user from your current Linux user account in order to access the psql client. You can switch over to the postgres user like this:
You should now see the postgres username somewhere in your command prompt, depending on your distro. To return to your previous user from here you can just type exit .
Run psql
Psql is a tool for interacting with Postgres via the command-line. Once you’ve switched to the postgres user as per above, then you can start up psql like this:
You should now see the default postgres=# prompt, this means psql is ready to accept commands or SQL queries.
Note: This prompt is included in code examples below but you do not need to enter it as part of any commands, it’s just there for context. Some SQL query examples below won’t show this prompt because it would make the formatting of longer queries unnecessarily messy for this post .
Exit psql
To exit psql, enter the command: \q
Check version
To check what version of Postgres you’re running you can use the following:
Users
This section covers the basics on listing, creating, altering and deleting users.
List users
Create user
The above SQL query creates a user called ‘username’ with the password ‘secret123’ and gives this user permissions to create databases and users. More detail on creating users can be found here.
Alter user
This user has now had their password changed to something more secure and will become invalid just before the first second of 2021 has elapsed. It’s permissions to create databases and users have also been removed. More detail on altering users can be found here.
Delete user
If the username contains special characters then you need to enclose it in double quotes.
Databases
This section covers the basics of working with databases at a high-level. Working with tables within a database is addressed lower down.
List databases
User the command \list or \l to have a look at some of the default databases:
Create database
Let’s now create our own database called ‘mystore’:
Connect to database
to connect to a database you can use the \c command followed by the database name:
Notice that your prompt now changes to reflect the name of the database you’re connected to.
Delete database
Note: you cannot delete a database that has active connections, so if you’re connected to it you’ll need to connect to another database before you can run this command.
Tables
Create table
Your new database won’t have any tables at this point, here’s an example of a query to create a table with columns of varying data types.
Below is a list of data types that you can use when creating columns.
Fixed-length character field with a limit of n. Any remaining character count in the length is padded with spaces.
Fixed-length character field with a limit of n, without padding of spaces.
Character field with no limit on characters.
BOOL or BOOLEAN
Can be true, false or NULL.
signed 2-byte integer from -32,768 to 32,767
signed 4-byte integer from -2,147,483,648 to 2,147,483,647
Same as INT except it will automatically increment the previous row’s value. This is commonly used for id fields to auto-increment the value for each new row.
floating-point number with precision of at least n up to a max of 8 bytes.
4-byte floating-point number.
NUMERIC or NUMERIC(p,s)
floating-point number with p digits before decimal point and s digits after the decimal point.
Stores date only.
Stores time of day only.
Stores date and time.
Stores date and time with timezone.
Stores periods of time.
Allows you to store an array of any valid data types. See the categories column above in the create table example that defines an array field of the TEXT data type.
Stores data as plain JSON. Slower to process than JSONB as it requires re-parsing whenever it’s processed.
Stores JSON data in binary format, slower to insert but faster to process and supports indexing.
Universally Unique Identifier has better uniqueness than SERIAL and is better for using in cases where the data is publically exposed. For example, it’s better to use UUID’s in URLs.
There is a lot more that can be done when creating tables, like creating foreign keys and so on. You can find more detail on creating tables here.
List tables
Now that you have at least one table you can list a database’s tables by being connected to it and running the \dt command.
Delete table
Insert rows
Once we’ve created a table we can then proceed to insert data into selected columns.
The indentation above is not required, however it does help to improve the readability of the query.
Select rows
Selecting all columns and rows from a table is quite straightforward.
This should produce the following output:
You can select data with conditions data more precisely like this:
which will produce an output like this:
Delete rows
Deleting rows is very similar to selecting them, you just use delete instead.
You can also use the RETURNING command to output the rows that have been deleted. In the above example, the * requests all columns for the rows to be returned but if you only wanted specific columns you could replace this with something like (username, email) .
Exporting
If you want to export a database, you can use the pg_dump tool. You’ll need to exit psql to use this. It effectively exports a file of SQL commands that when re-imported will re-create the database exactly as it was.
The below example outputs the mystore database dump into a file called ‘mystore_backup.sql’:
This is handy because you can also do things like pipe the output through your preferred compression tool into a compressed file:
Importing
To import a database dump first make sure that you’ve created a new empty database, then exit the psql client and from the command line you can use the psql command again to import the dump into your newly created database.
Okay, so that should be enough to get you started for now. Once you’re comfortable with eveything above you might want to look into creating relationships between tables using FOREIGN KEY columns and then using these to perform JOIN queries between multiple tables.
If you have any questions, comments or tips of your own, feel free to leave them below. Otherwise, I’ll update this guide in future with any more info that might be helpful here.

Creating a platform for people to discuss building things with technology.
Источник
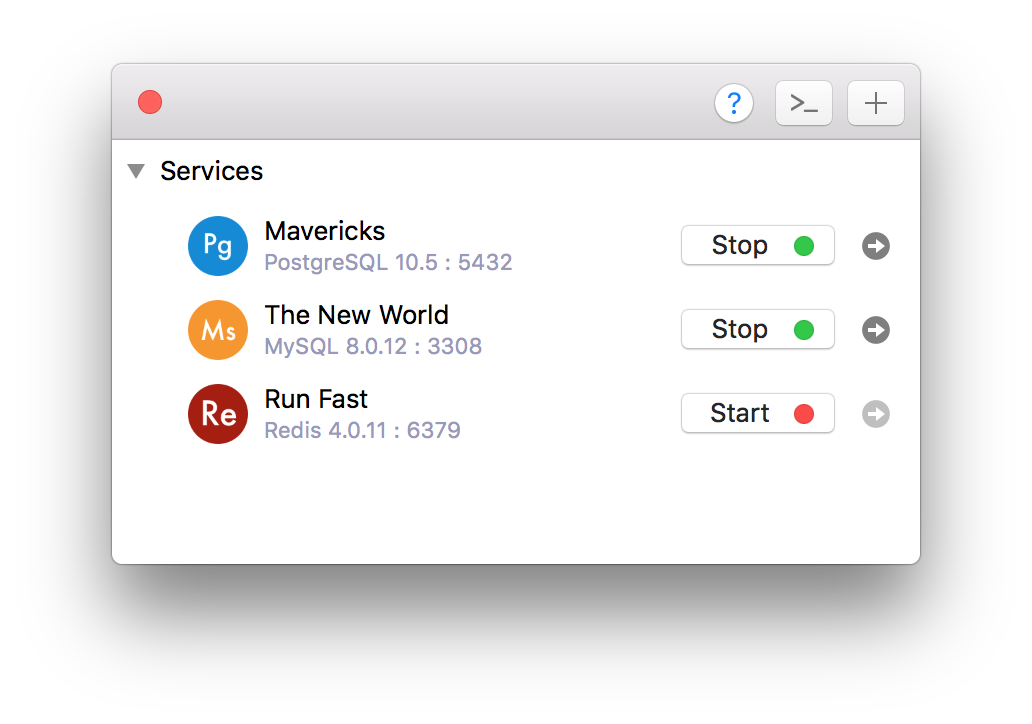
TablePlus
How to start and stop PostgreSQL server?
October 30, 2018
In this post, we are going to figure out how to start, stop, and restart a PostgreSQL server on macOS, Linux, and Windows.
1. On macOS
If you installed PostgreSQL via Homebrew:
- To start PostgreSQL server now and relaunch at login:
If you want a hassle-free way to manage the local PostgreSQL database servers, use DBngin. It’s just one click to start, another click to turn off. No dependencies, no command line required, multiple drivers, multiple versions and multiple ports. And it’s free.
2. On Windows
First, you need to find the PostgreSQL database directory, it can be something like C:\Program Files\PostgreSQL\10.4\data . Then open Command Prompt and execute this command:
- Open Run Window by Winkey + R
- Type services.msc
- Search Postgres service based on version installed.
- Click stop, start or restart the service option.
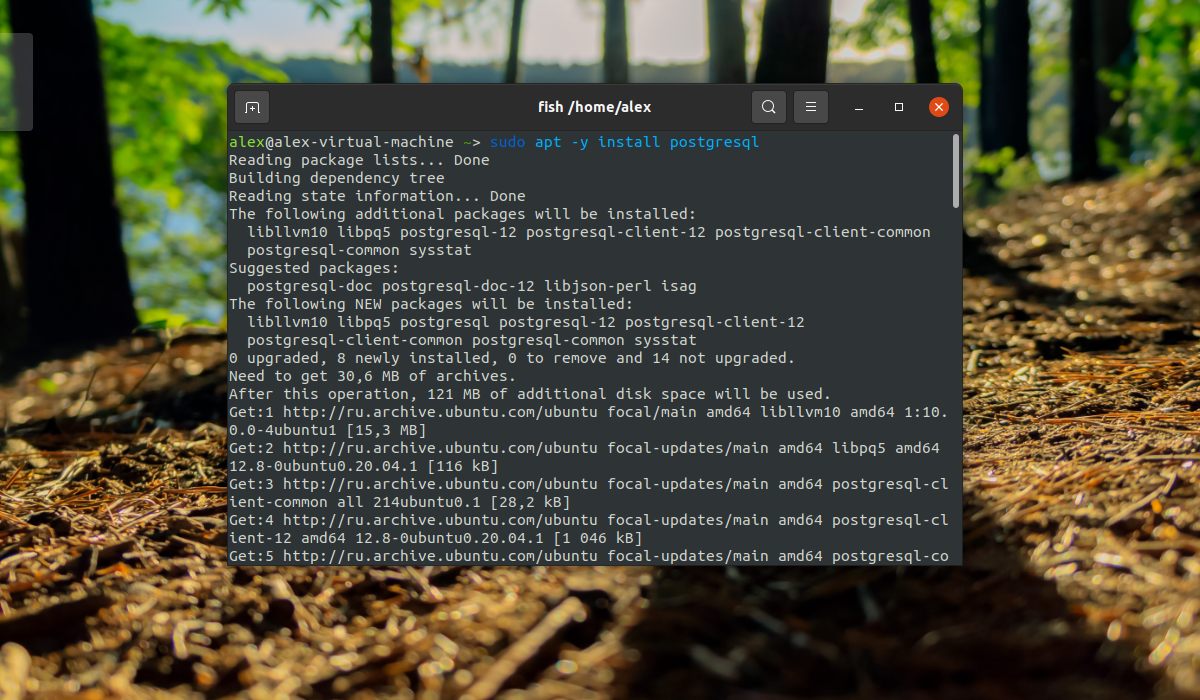
3. On Linux
Update and install PostgreSQL 10.4
By default, the postgres user has no password and can hence only connect if ran by the postgres system user. The following command will assign it:
Need a good GUI tool for PostgreSQL on MacOS and Windows? TablePlus is a modern, native tool with an elegant GUI that allows you to simultaneously manage multiple databases such as MySQL, PostgreSQL, SQLite, Microsoft SQL Server and more.
Источник
Установка PostgreSQL в Ubuntu
Реляционные системы управления базами данных (РСУБД) — это ключевой компонент многих веб-сайтов и приложений. Они обеспечивают структурированный способ хранения данных и организацию доступа к информации. PostgreSQL- это объектно-реляционная система управления базами данных, которая все больше и больше вытесняет MySQL и производственных серверов.
Её преимущество в множестве дополнительных функций и улучшений, таких как надежная передача данных и параллелизация без блокировок чтения. Вы можете использовать эту СУБД с различными языками программирования, а её синтаксис запросов PL/pgSQL очень похож на MySQL от Oracle. В этой статье мы рассмотрим, как выполняется установка PostgreSQL в Ubuntu 20.04 из официальных репозиториев и репозитория PostgreSQL (PPA) а так же, как выполнить первоначальную настройку и подготовку к работе c данной СУБД.
Установка PostgreSQL в Ubuntu 20.04
1. Установка из официальных репозиториев
Это очень популярная СУБД, потому программа присутствует в официальных репозиториях. Для установки выполните следующие команды. Сначала обновите списки пакетов:
sudo apt update
Установите СУБД PostgreSQL:
sudo apt -y install postgresql
2. Установка из официальных репозиториев PostgreSQL
Если есть необходимость в получение самой последней версии, то необходимо добавить в систему официальный PPA от разработчиков PostgreSQL. Для этого выполните следующие команды:
sudo sh -c ‘echo «deb http://apt.postgresql.org/pub/repos/apt $(lsb_release -cs)-pgdg main» > /etc/apt/sources.list.d/pgdg.list’
wget —quiet -O — https://www.postgresql.org/media/keys/ACCC4CF8.asc | sudo apt-key add —
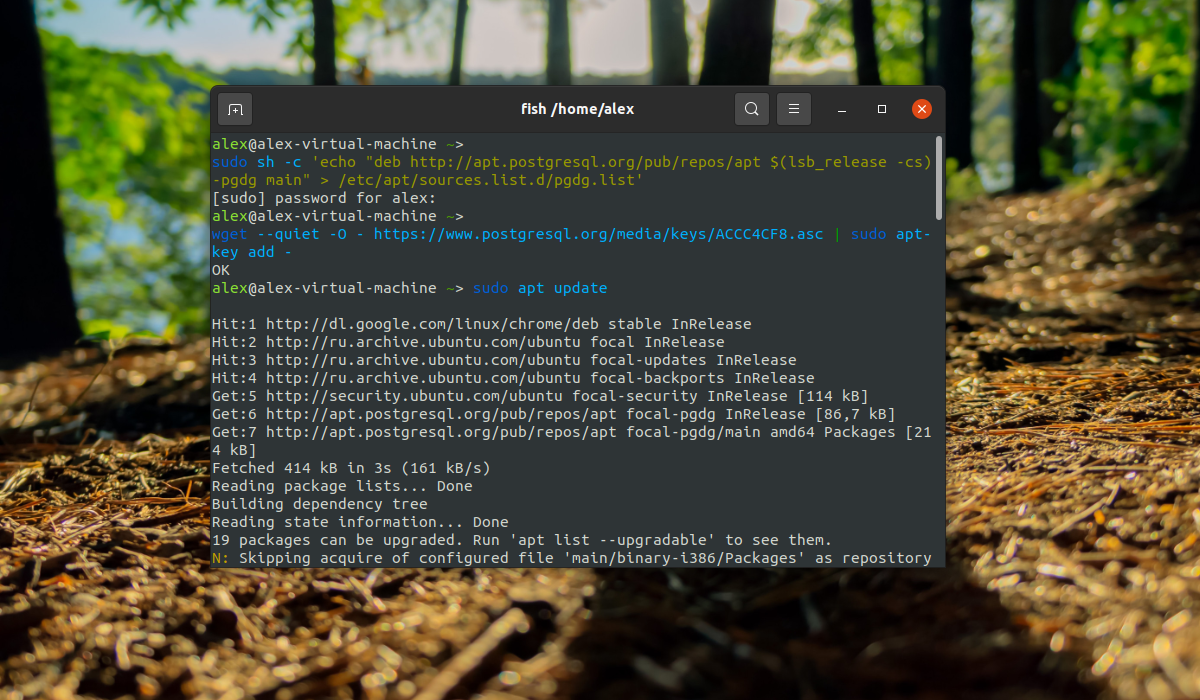
Далее обновите списки пакетов, чтобы получить самую новую доступную версию:
sudo apt update
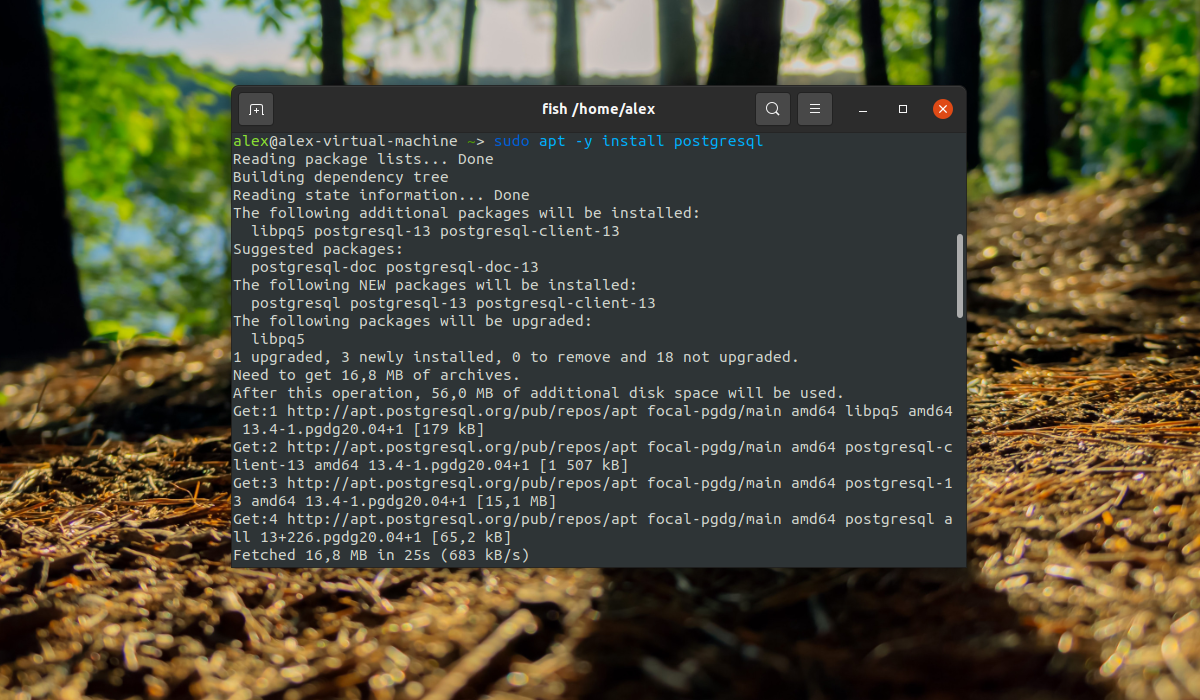
Установка PostgreSQL из PPA или официальных репозиториев выглядит одинаково:
sudo apt -y install postgresql
Настройка PostgreSQL в Ubuntu 20.04
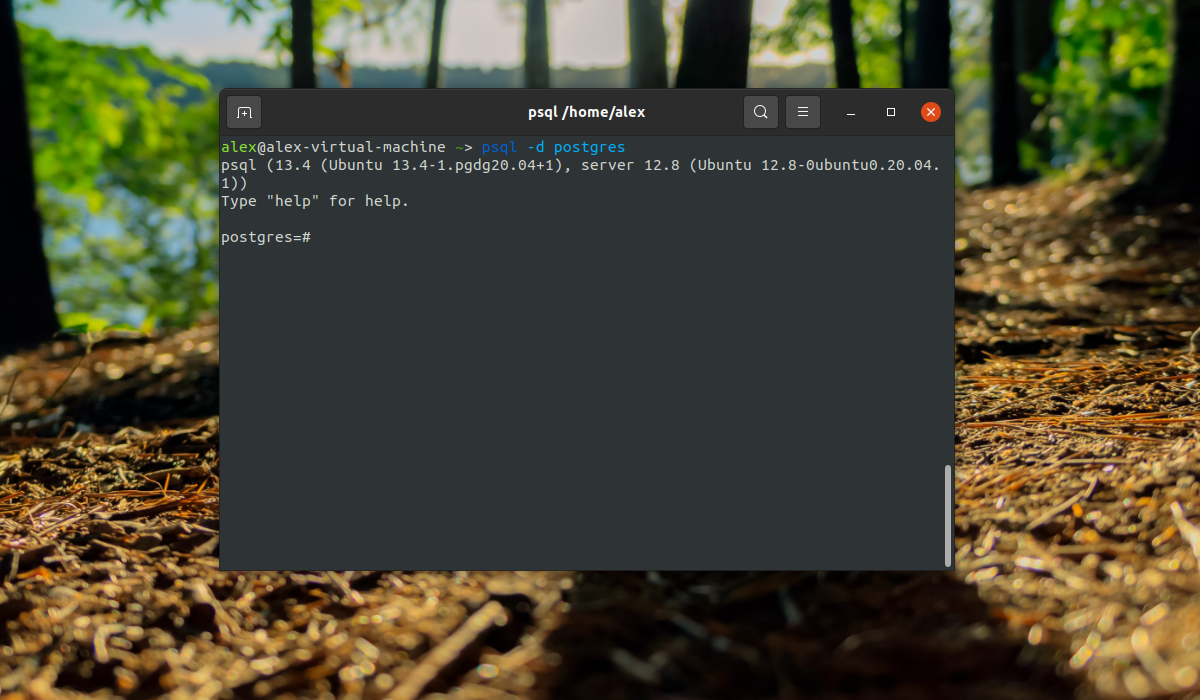
После установки СУБД откройте терминал и переключитесь на пользователя postgres с помощью команды:
sudo -i -u postgres
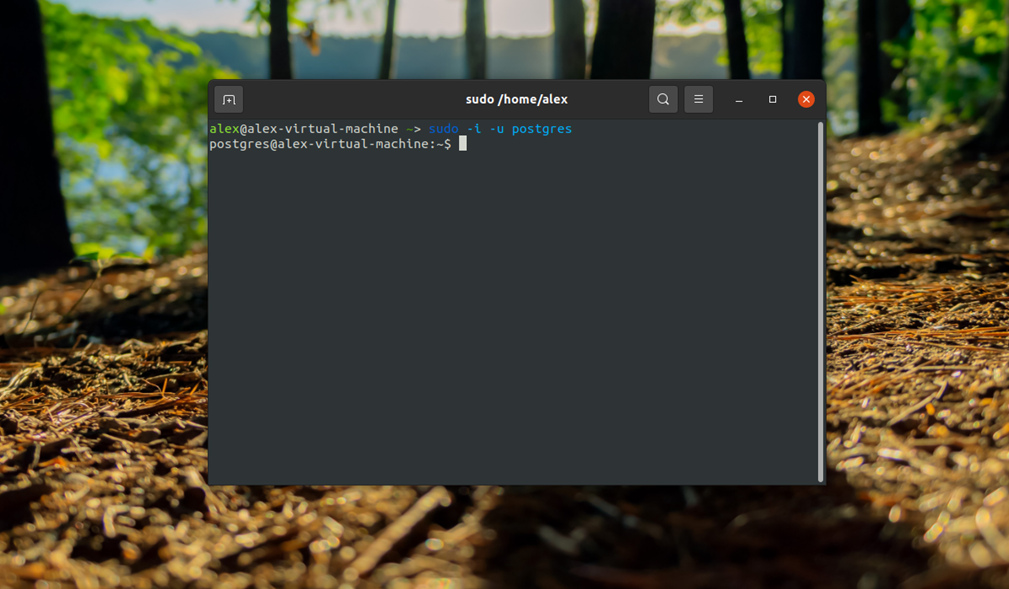
Эта учетная запись создается во время установки программы и на данный момент вы можете получить доступ к системе баз данных только с помощью нее. По умолчанию PostgreSQL использует концепцию ролей для аутентификации и авторизации.
Это очень похоже на учетные записи Unix, но программа не различает пользователей и групп, есть только роли. Сразу после установки PostgreSQL пытается связать свои роли с системными учетными записями, если для имени системной учетной записи существует роль, то пользователь может войти в консоль управления и выполнять позволенные ему действия. Таким образом, после переключения на пользователя postgres вы можете войти в консоль управления:
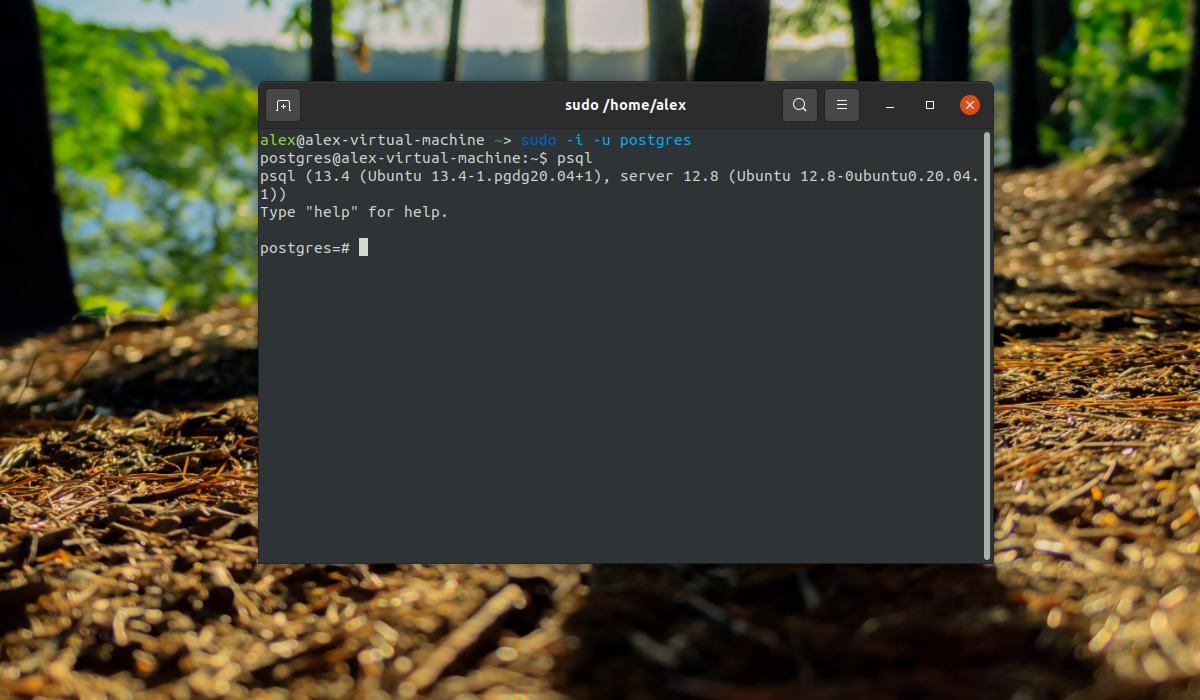
И посмотреть информацию о соединении:

Чтобы выйти наберите:
Теперь рассмотрим, как создать другие роли и базы данных.
Создание роли postgresql
Вы уже можете полноценно работать с базой данных с помощью учетной записи postgres, но давайте создадим дополнительную роль. Учетная запись postgres является администратором, поэтому имеет доступ к функциям управления. Для создания пользователя выполните команду:
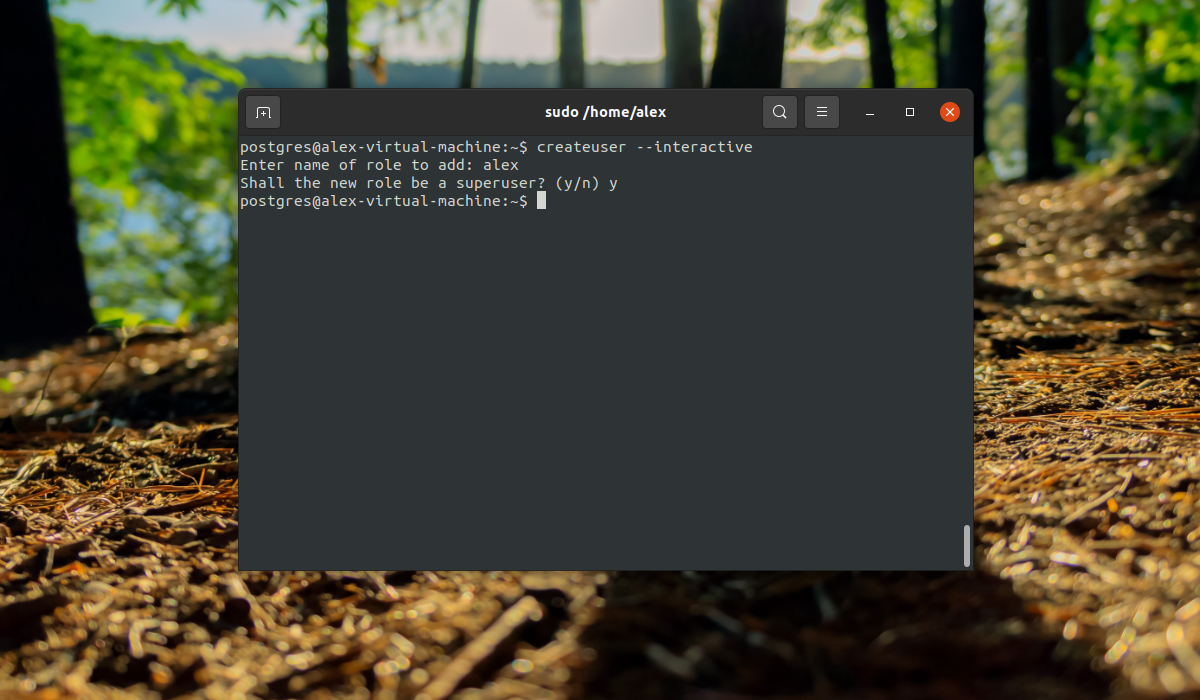
Скрипт задаст лишь два вопроса, имя новой роли и нужно ли делать ее суперпользователем.
Создание базы данных
Точно также как имена ролей сопоставляются с системными пользователями, имя базы данных будет подбираться по имени пользователя. Например, если мы создали пользователя alex, то по умолчанию система попытается получить доступ к базе данных alex. Мы можем ее очень просто создать:
Дальше, чтобы подключиться к этой базе данных нам нужно войти от имени одноименного пользователя:

Заходим в консоль и смотрим информацию о подключении:
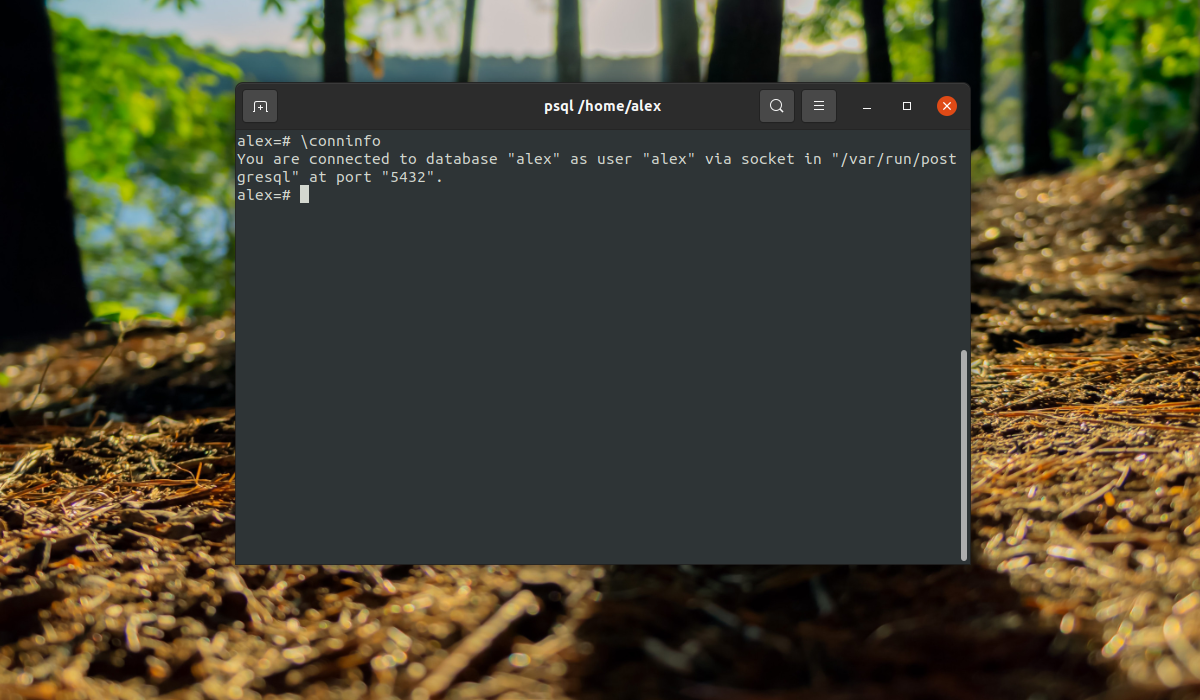
Все верно сработало. Мы подключились с помощью роли alex к базе alex. Если нужно указать другую базу данных, вы можете сделать это с помощью опции -d, например:
psql -d postgres
Все сработало верно, при условии, что все компоненты были настроены как описано выше.
Создание таблиц
Теперь, когда вы знаете, как подключится к базе данных PostgreSQL, давайте рассмотрим, как выполняются основные задачи. Сначала разберем создание таблиц для хранения некоторых данных. Для создания таблицы PostgreSQLиспользуется такой синтаксис:
CREATE TABLE имя_таблицы (имя_колонки1 тип_колонки (длина) ограничения, имя_колонки2 тип_колонки (длина), имя_колонки3 тип_колонки (длина));
Как видите, сначала мы задаем имя таблицы, затем описываем каждый столбец. Столбец должен иметь имя, тип и размер, также можно задать ограничения для данных, которые там будут содержаться. Например:
CREATE TABLE playground (equip_id serial PRIMARY KEY, type varchar (50) NOT NULL, color varchar (25) NOT NULL, location varchar(25) check (location in (‘north’, ‘south’, ‘west’, ‘east’, ‘northeast’, ‘southeast’, ‘southwest’, ‘northwest’)), install_date date );
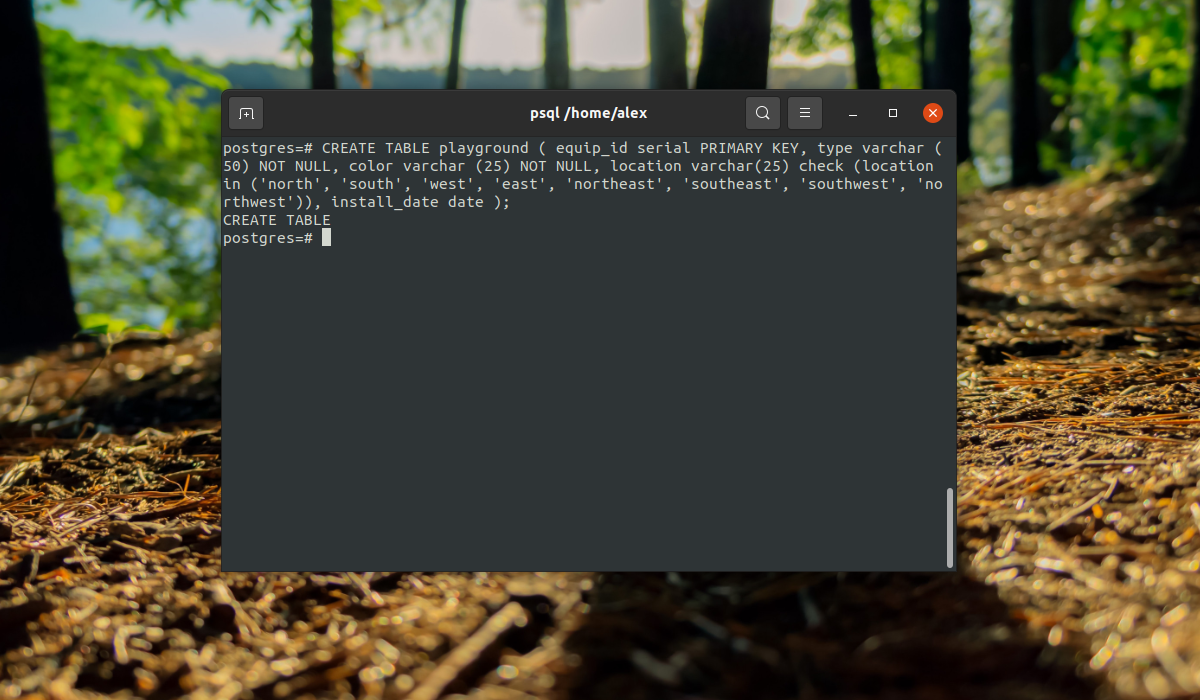
Мы создали таблицу детской площадки для описания оборудования, которое на ней есть. Сначала идет идентификатор equip_id, который имеет тип serial, это значит, что его значение будет автоматически увеличиваться, ключ primary key значит, что значения должны быть уникальны.
Следующие колонки — обычные строки, для них мы задаем длину поля, они не могут быть пустыми (NOT NULL). Следующий столбец тоже строка, но она может содержать только одно из указанных значений, последний столбец — дата создания.
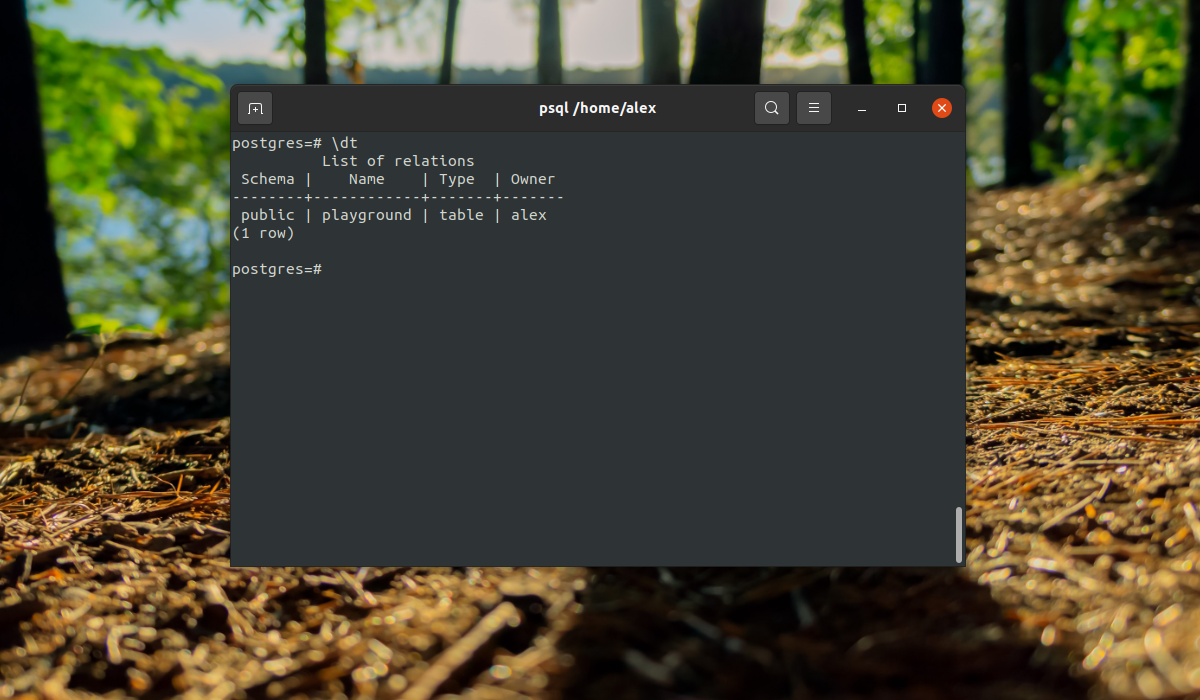
Вы можете вывести все таблицы, выполнив команду:
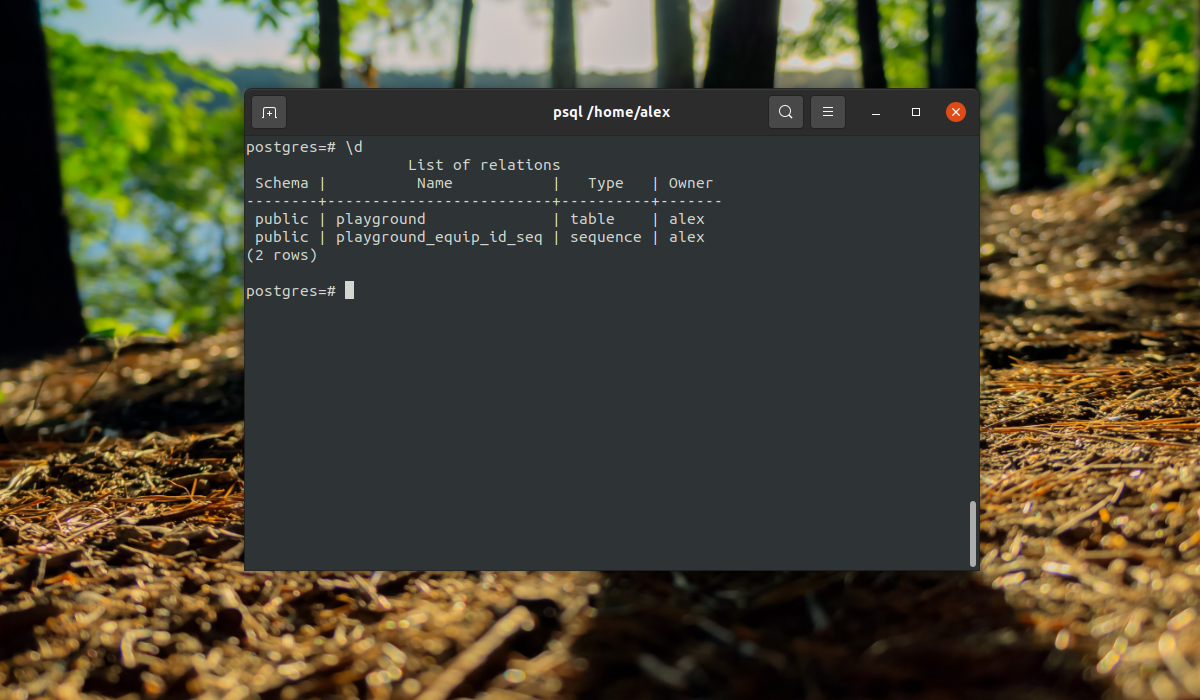
Здесь мы видим, что кроме нашей таблицы, существует еще одна переменная -playground_equip_id_seq. В ней содержится последнее значение этого поля. Если нужно вывести только таблицы, выполните:
Выводы
Теперь установка Postgresql в Ubuntu 20.04 завершена, и вы прошли краткий экскурс в синтаксис PgSQL, который очень похож на привычный нам MySQL, но имеет некоторые отличия. Если у вас остались вопросы, спрашивайте в комментариях!
Источник


