- Windows Error Recovery. Windows failed to start: Fix for Wіndоws Vista, 7, 8, 8.1
- Первый способ устранения ошибки — с помощью утилиты Easy Recovery Essentials.
- Второй вариант — загрузка последней удачной конфигурации.
- Третий способ — запуск системы восстановления с установочного диска Windows. (Откат системы)
- Четвертый способ: запуск chkdsk
- Следующий вариант — восстановление основного загрузочного сектора.
- Устранение ошибки «Startup Repair Offline» при загрузке Windows 7
- Исправляем ошибку «Startup Repair Offline»
- Способ 1: Сброс настроек BIOS
- Способ 2: Подключение шлейфов
- Способ 3: Восстановление запуска
- Способ 4: «Командная строка»
- Заключение
- If You Get Windows Error Recovery Screen in Windows 7, Fix It! [MiniTool Tips]
- Summary :
- Quick Navigation :
- Windows Error Recovery Windows 7
- How to Fix Windows Error Recovery Loop
- Method 1: Choose Start Windows Normally
- Method 2: Remove Recently Added Hardware
- Method 3: Boot into Last Known Good Configuration
- Method 4: Perform Startup Repair
- Method 5: Run System Restore to Fix Windows Error Recovery Safe Mode
- Method 6: Rebuild BCD
- Method 7: Run CHKDSK
- Method 8: Reinstall Windows 7
- Suggestion: Back up Windows Operating System
- Bottom Line
- Windows Error Recovery FAQ
- ABOUT THE AUTHOR
Windows Error Recovery. Windows failed to start: Fix for Wіndоws Vista, 7, 8, 8.1

Первый способ устранения ошибки — с помощью утилиты Easy Recovery Essentials.
- Сначала вам необходимо скачать утилиту Easy Recovery Essentials. Обратите внимание на версию вашей Wіndоws перед установкой.
- Следующим шагом будет запись автозагрузочного диска или флешки. Для этого образ скачанной утилиты записывается при помощи программы UltraISO.
- Вставьте готовый съемный носитель с записанным образом Easy Recovery Essentials в пк. Включите компьютер.
- Вслед за запуском EasyRE выбираем Automated Repair, щелкаем Continue. Начнется сканирование файлов на съемном носителе.
- После проверки, программа отобразит доступные диски. На диске Вашей ОС ищем Automated Repair. Утилита запустит анализ выбранного носителя, выявит наличие проблем для дальнейшего автоматического исправления ошибок.
- По завершению процесса, утилита сообщит о результатах. Кликните по кнопке Restart, извлеките съемный носитель из разъема.
- По мере загрузки Вашего пк ошибка должна быть исправлена.
Второй вариант — загрузка последней удачной конфигурации.
- Перезапустите компьютер.
- Нажимайте F8 до тех пор, пока не увидите на экране меню с опциями загрузки.
- Выберите «Загрузка последней удачной конфигурации».
- Нажмите Enter и ждите завершения загрузки.
Третий способ — запуск системы восстановления с установочного диска Windows. (Откат системы)
Четвертый способ: запуск chkdsk
- Вставляем съемный носитель с Windows в разъем (дисковод).
- При выводе на экран надписи «Press any key to boot from CD or DVD», нажмите произвольную клавишу.
- После прогрузки меню, набираем сочетание клавиш , увидите надписи в окне.
- В появившемся окошке напишите команду:
- Далее — Enter.
- Дождитесь окончания проверки, перезагрузите ПК.
Следующий вариант — восстановление основного загрузочного сектора.
- Вставьте диск /флешку с записанной Windows.
- Если видим надпись «Prеss аny key to bооt from СD or DVD», жмем произвольную клавишу.
- После прогрузки меню, нажмите сочетание клавиш , видим черное окно.
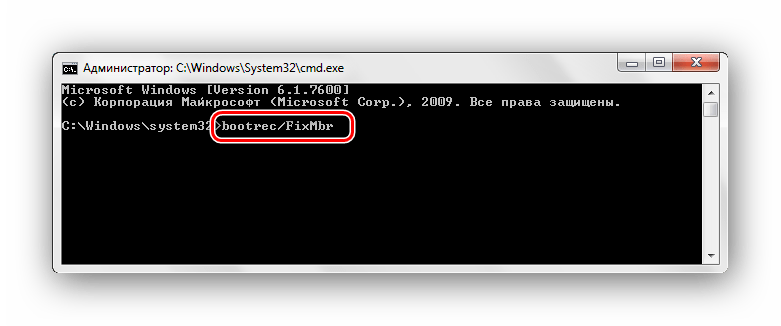
- Введите следующие команды (после каждой введенной команды жмите Enter) :
bootrec /FixMbr; bootrec /FixBoot; bootrec /ScanOs; bootrec /rebuildBcd.
Устранение ошибки «Startup Repair Offline» при загрузке Windows 7
Исправляем ошибку «Startup Repair Offline»
Буквально данная неисправность означает – «восстановление запуска не в сети». После перезапуска компьютера, система предприняла попытку по восстановлению работы (не подключаясь к сети), но попытка оказалась неудачной.
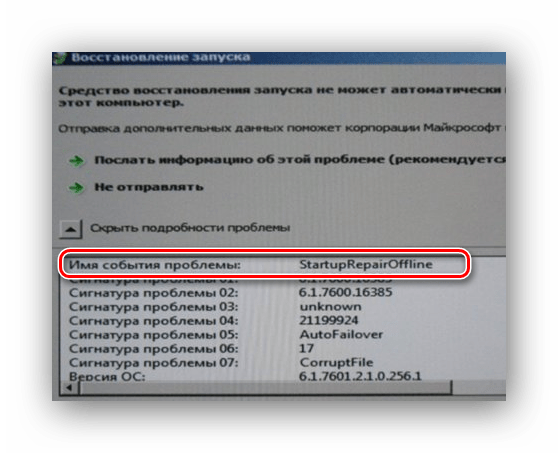
Неисправность «Startup Repair Offline» зачастую появляется из-за проблем с жестким диском, а именно из-за повреждения сектора, на котором находятся системные данные, отвечающие за правильный запуск Windows 7. Также возможны проблемы с поврежденными разделами реестра системы. Перейдем к способам исправления этой неполадки.
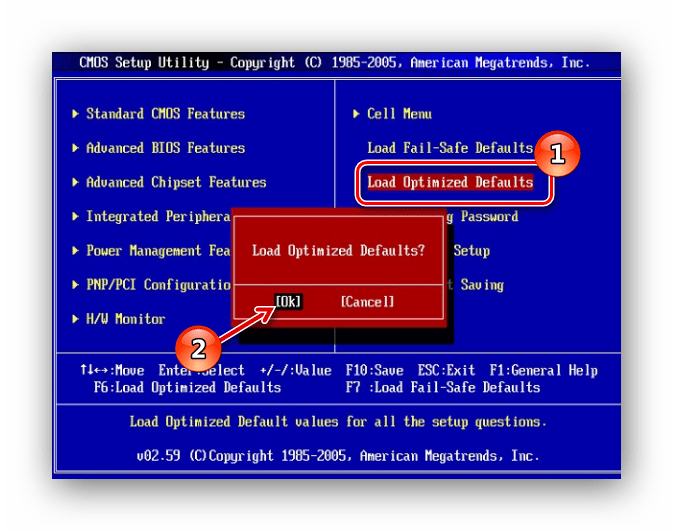
Способ 1: Сброс настроек BIOS
Переходим в БИОС (при помощи клавиш F2 или Del при загрузке компьютера). Производим загрузку настроек по умолчанию (пункт «Load optimized defaults»). Сохраняем сделанные изменения (нажав клавишу F10) и перезапускаем Виндовс.
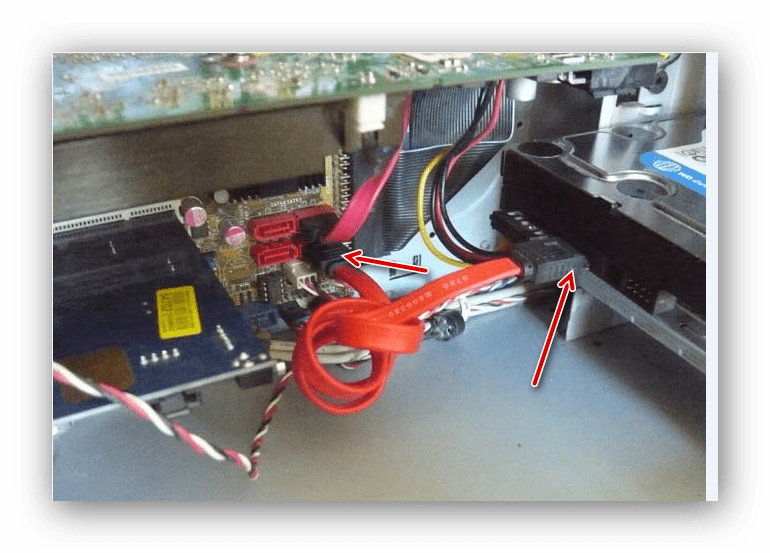
Способ 2: Подключение шлейфов
Необходимо произвести проверку целостности разъемов и плотность подключения шлейфов жесткого диска и материнской платы. Убедитесь, что все контакты подключены качественно и плотно. После проверки перезапускаем систему и проверяем на наличие неисправности.
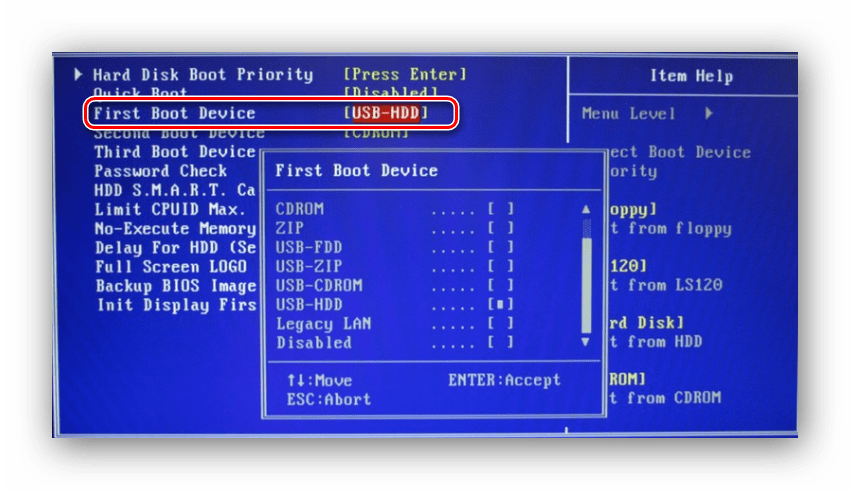
Способ 3: Восстановление запуска
Так как обычный запуск операционной системы невозможен, рекомендуем воспользоваться загрузочным диском или флешкой с системой, которая является идентичной установленной.
- Выполняем запуск с загрузочной флешки или диска. В БИОСе устанавливаем опцию запуска с диска или флеш-накопителя (устанавливаем в пункте «First Boot Device USB-HDD» параметр «USB-HDD«). Как это сделать на различных версиях BIOS, подробно описано в уроке, который представлен ниже.
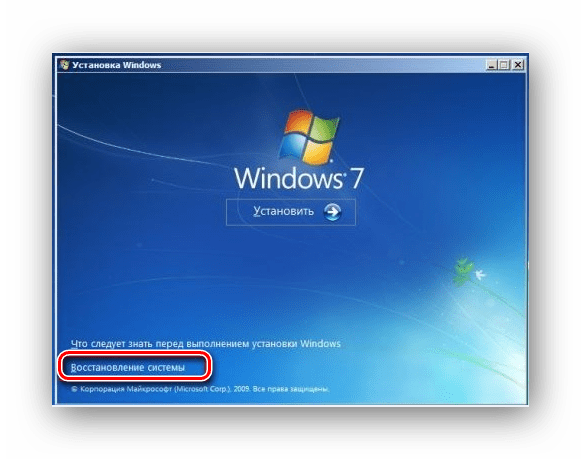
Системой будет произведён поиск неполадок в автоматическом режиме. Жмём на кнопочку «Далее» в открывшемся окне, выбрав необходимую ОС.
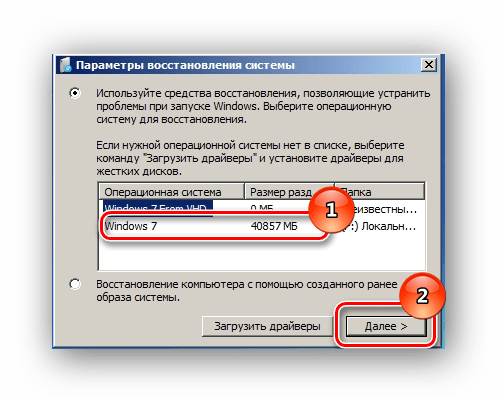
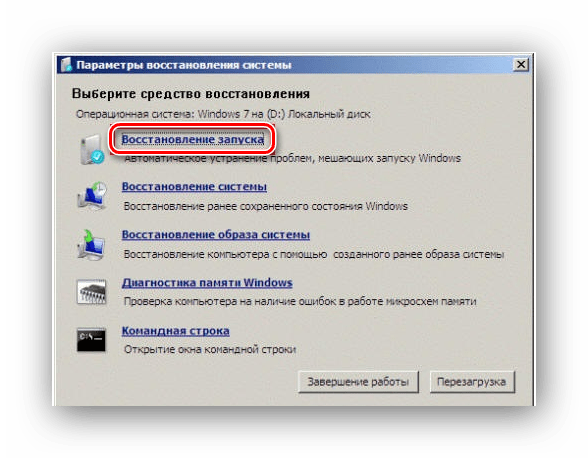
В окошке «Параметры восстановления системы» щелкаем по пункту «Восстановление запуска» и дожидаемся завершения проверочных действий и корректного запуска компьютера. После окончания проверки перезагружаем ПК.
Способ 4: «Командная строка»
Если приведенные выше способы не помогли устранить неполадку, тогда вновь запускаем систему с флешки или установочного диска.
Нажимаем клавиши Shift+F10 в самом начале установочного процесса. Попадаем в меню «Командной строки», где необходимо набрать поочередно определенные команды (после ввода каждой из них нажимаем Enter).
bcdedit /export c:\bckp_bcd
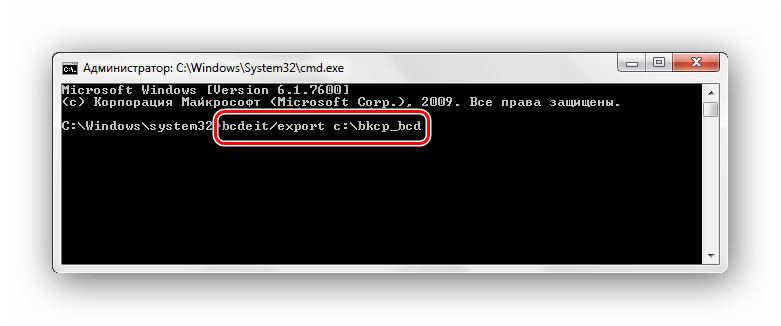
attrib c:\boot\bcd -h -r –s

ren c:\boot\bcd bcd.old


После того, как ввели все команды, перезапускаем ПК. Если Виндовс 7 не запустилась в работоспособном режиме, тогда в данных о неисправности может быть имя проблемного файла (например, библиотеки расширения .dll). Если было указано название файла, то необходимо попробовать совершить поиска данного файла в интернете и поместить его на ваш винчестер в необходимую директорию (в большинстве случаев, это папка windowds\system 32 ).
Заключение
Итак, что же делать с неполадкой «Startup Repair Offline»? Самый простой и эффективный способ – это использование восстановления запуска ОС, применяя загрузочный диск или флеш-накопитель. Если способ с восстановлением системы не исправил проблему, то воспользуйтесь командной строкой. Также проверьте целостность всех соединений компьютера и настройки BIOS. Применение этих методов позволит устранить ошибку запуска Windows 7.
If You Get Windows Error Recovery Screen in Windows 7, Fix It! [MiniTool Tips]
By Vera | Follow | Last Updated November 27, 2020
Summary :

Sometimes you start up your Windows 7 computer but you get the Windows error recovery screen saying the system failed to start and a hardware or software change might cause it. What should you do if you are bothered by this Windows error? Now, you can get solutions from this post written by MiniTool to get rid of the black screen error.
Quick Navigation :
Windows Error Recovery Windows 7
Although Microsoft has ended the support of Windows 7 since January 14, 2020, there are still many users running Windows 7 on their PCs since its ease of use and reliability.
But, Windows boot problems always occur no matter which operating system you are using (Windows 7, 8, or 10). During the startup of the Windows operating system, a blue screen or black screen appears along with an error message. Today, we will discuss a Windows 7 black screen error — Windows error recovery.
When booting up Windows 7, the Windows error recovery screen comes out of the blue and you see an error message “Windows failed to start. A recent hardware or software change might be the cause”, as shown below. Sometimes, you get another interface of Windows error recovery with different options.
The reasons behind this error are various, such as a recent hardware or software change, damaged system files, missing or corrupted Boot Configuration Data (BCD), compromised file system integrity, etc. When you come across the issue, how can you fix it?
You can get some solutions from the screen: use an installation disc to repair your computer in WinRE, or perform Startup Repair and start Windows normally by using the arrow keys.
So, you can follow the suggestions of Windows. If these simple tips couldn’t help, some other solutions are described here.
How to Fix Windows Error Recovery Loop
Method 1: Choose Start Windows Normally
When seeing the Windows 7 error recovery interface, the first thing you can do is to use the arrow keys to choose Start Windows Normally. Sometimes this can let your Windows boot to the desktop normally. Just have a try. If this won’t help, try other ways.
Method 2: Remove Recently Added Hardware
On the Windows error recovery screen, you know a recent hardware change may be the reason behind the system error. The hardware change may generate Windows instability problems, making your laptop like HP, Dell, Toshiba, etc. fail to reboot.
In this case, we strongly recommend removing recently added hardware.
The following are the instructions:
Step 1: Turn off your laptop, remove the battery and unplug the power cord.
Step 2: Disconnect all the newly added peripherals including a printer, webcam, zip drive, scanner, network cable, and other devices. Leave only the keyboard, monitor cable and mouse attached.
Step 3: Press and hold the power button for 5 seconds and release it.
Step 4: Put the battery back to the laptop and reconnect the power cord.
Step 5: Turn on the laptop and see if Windows error recovery still appears. If yes, go to the next solution to troubleshoot.
Method 3: Boot into Last Known Good Configuration
In Windows 7, there is a feature called Last Known Good Configuration, also known as LKGC. You can boot your PC to this mode if you are having trouble starting the system normally. Last Known Good Configure can load a previous configuration in Windows (including drivers, registry data, etc.) that was working properly.
Step 1: Restart your computer.
Step 2: Repeatedly press the F8 key until you see the Advanced Boot Options window.
Step 3: Select Last Known Good Configuration (advanced) and press Enter.
After the process finishes, your PC will boot to the desktop properly. However, if Windows fails to start twice in a row, you need to move to the next solution.
Method 4: Perform Startup Repair
When experiencing Windows error recovery during the startup of Windows 7, one solution given by the black screen is to perform Startup Repair (also known as Automatic Repair in older versions of Windows). It can scan your system and attempt to fix damaged or missing system files.
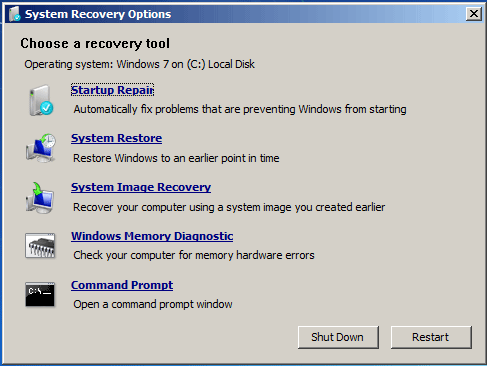
In the error recovery screen, sometimes you may have two options and one of them is Launch Startup Repair (recommended), as shown in the following figure.
Just use the arrow keys to highlight this option and press Enter on your keyboard to run Startup Repair. But if you cannot see this option (just like the first picture), how can you do this job? An installation disc is helpful.
Step 1: Go to the link from Microsoft, follow the given instructions to download an ISO file and then create an installation disc with a USB drive or DVD.
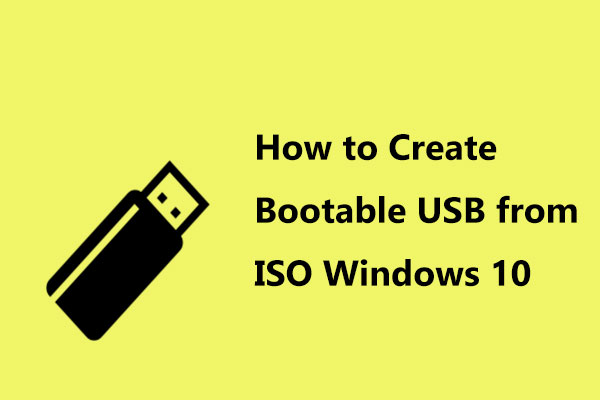
How can you create bootable USB from ISO in Windows 10 for a clean install? This post will show you the Windows 10 USB tool for ISO to USB.
Step 2: Insert this disc and restart your computer. Note that you should change the BIOS settings so that the disc is the first boot order.
Step 3: Choose your language, keyboard, and time settings, click Next.
Step 4: In the pop-up window, click Repair your computer.
Step 5: Choose your system to repair.
Step 6: You will get the following interface. Click Startup Repair to automatically fix problems that are stopping Windows from starting.
Then, the repair process starts. This may take 15 to 45 minutes to complete, so wait patiently. Also, it may require the system to restart.
If you get the error message saying “Startup Repair cannot repair this computer automatically”, you need to go to the next method to fix the Windows error recovery issue.
Method 5: Run System Restore to Fix Windows Error Recovery Safe Mode
If there is a restore point created by you on the computer, you can use it to take your PC back to the settings that previously worked.
When getting the Windows error recovery issue, you can directly choose Safe Mode, Safe Mode with Networking or Safe Mode with Command Prompt from the computer screen if you see these options. If you cannot see it, go to Safe Mode by following these steps.
Step 1: Reboot your computer.
Step 2: Press F8 to enter the Advanced Boot Options window.
Step 3: Select Safe Mode with Command Prompt by using the arrow keys.
Step 4: After the Command Prompt opens, type rstrui and press Enter to open the System Restore window.
Step 5: Choose a restore point from the list and click Next.
Step 6: Click Finish and the restore process will start. After that, the Windows error recovery issue should be fixed.
Method 6: Rebuild BCD
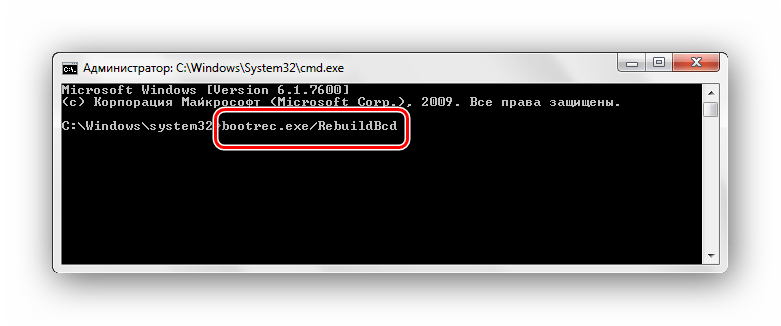
Missing or corruption of BCD files can cause Windows error recovery Windows failed to start. To get rid of the error screen, you can use bootrec.exe to rebuild BCD in Command Prompt (CMD).
You can go to Safe Mode to open Command Prompt or use an installation disc to enter the CMD window. These two ways are described in the above contents. Then, in CMD, type these commands and press Enter after each command.
bootrec.exe /fixmbr
bootrec.exe /fixboot
bootrec.exe /rebuildbcd
Method 7: Run CHKDSK
If the file system gets corrupted, the Windows 7 error recovery issue may appear. So, you should perform a disk check using CHKDSK to fix file system errors and solve your problem/
Also, open Command Prompt, type chkdsk C: /f /x /r and press Enter. After the process is finished, restart your computer and see if Windows error recovery is disappeared.
Method 8: Reinstall Windows 7
If all of these solutions above fail to fix Windows error recovery and your Windows still fails to start, what should you do? The last resort is reinstalling the operating system.
Back up Files
How can you back up files when Windows fails to boot? MiniTool ShadowMaker, a piece of professional PC backup software, is designed to back up your files via imaging and sync.
It allows you to create a bootable USB drive, boot the PC and perform the backup operation in WinPE when Windows cannot boot. Just get MiniTool ShadowMaker from the download button.
Step 1: On a normal PC, run MiniTool ShadowMaker and go to the Tools tab.
Step 2: Click Media Builder and follow the on-screen to finish the bootable drive creation.
Step 3: Insert the drive to your PC with Windows error recovery, reboot the PC from this drive and enter the MiniTool Recovery Environment.
Related articles:
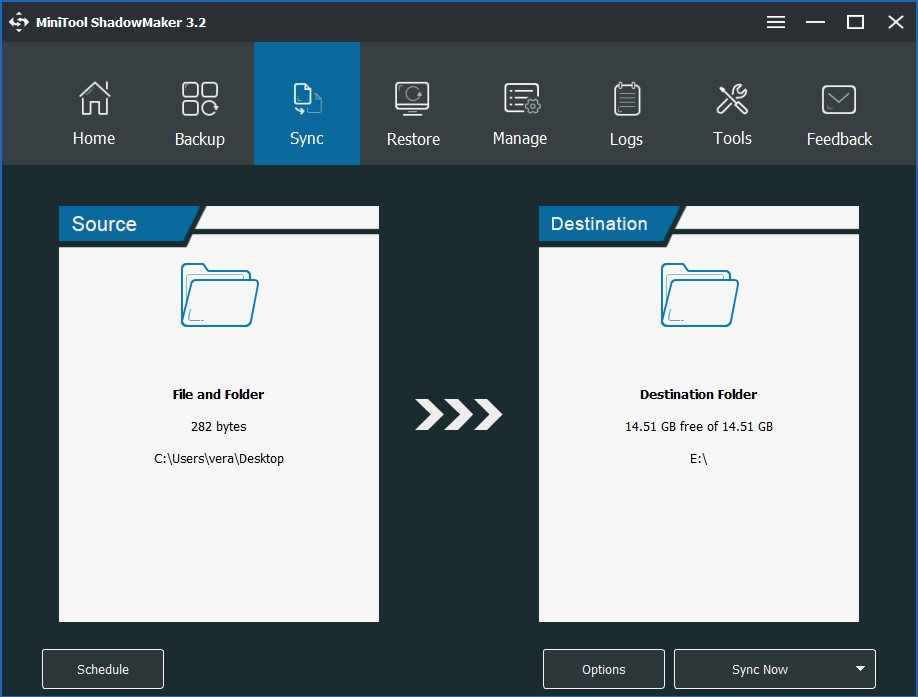
Step 4: Launch MiniTool ShadowMaker and go to the Backup or Sync tab.
Step 5: Choose files on the desktop as the backup source and select a destination.
Step 6: Click Back up Now or Sync Now to execute the backup task.
PC is not booting but you want to back up files without booting to save them? This post will show you how to back up data from a computer that won’t boot.
Clean Install
After finishing the backup, now you can follow the guide to perform a clean install of Windows 7 to repair Windows error recovery.
Step 1: Boot your computer from the installation disc that you have prepared.
Step 2: After choosing the language, time and keyboard, click Install now to start the system reinstallation.

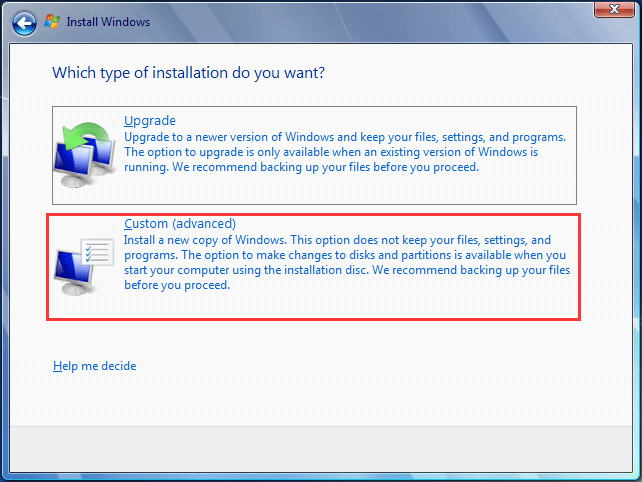
Step 3: Accept the license terms and choose Custom (advanced).
Step 4: Decide where to install Windows and then the setup tool will start installing Windows.
Suggestion: Back up Windows Operating System
Now, you should have resolved the Windows error recovery issue that happens in Windows 7 PCs. To restore your PC to a normal state instead of spending much time fixing the problem when it appears next, creating a system image is recommendable.
To do this work, MiniTool ShadowMaker can be also helpful. It can be used to back up Windows operating system, files & folders, disks and partitions in Windows 7/8/10. By default, system backup is selected.
Step 1: Launch MiniTool ShadowMaker.
Step 2: Go to the Backup page, system-related partitions are selected and you can go to Destination to choose a destination.
Step 3: Execute this backup task by clicking Back up Now.

Bottom Line
Are you bothered by Windows error recovery while you start up your Windows 7? Now, try these solutions mentioned above and you can easily get out of the trouble. Also, a suggestion is introduced.
Besides, if you have any methods to fix the Windows 7 error recovery issue, you can tell us by leaving a comment below or contacting [email protected] . Also, any questions during using MiniTool Software are also appreciated.
Windows Error Recovery FAQ
- Choose Start Windows Normally
- Remove recently added hardware
- Boot into Last Known Good Configuration
- Run Startup Repair
- Rebuild BCD
- Run CHKDSK
- Reinstall Windows
- Rebuild BCD
- Run CHKDSK
- Perform a system restore
- Delete the problematic file
- Disable Automatic Startup Repair
- Restore Windows Registry
- Check device partition and osdevice partition
- Reset this PC
ABOUT THE AUTHOR

Position: Columnist
Vera is an editor of the MiniTool Team since 2016 who has more than 5 years’ writing experiences in the field of technical articles. Her articles mainly focus on disk & partition management, PC data recovery, video conversion, as well as PC backup & restore, helping users to solve some errors and issues when using their computers. In her spare times, she likes shopping, playing games and reading some articles.


