- FIX: Windows 10 slow boot issue [Simple Guide]
- How can I fix a slow boot time in Windows 10?
- 1. Use the Windows 10 Startup Manager
- 2. Update your BIOS
- 3. Update your graphics card drivers
- DriverFix
- 4. Run the Windows Update Troubleshooter
- 5. Consider getting an SSD and tweak the BIOS settings
- 6. Install the latest updates
- 7. Delete all files from WDI directory
- 8. Install the Intel Rapid Store Technology driver
- 9. Enable/disable Fast Startup
- windows 7 taking a long time to start up !!
FIX: Windows 10 slow boot issue [Simple Guide]

- If your Windows 10 PC is booting slowly, there might be problems with your hardware or software.
- Use the Windows 10 Startup Manager to disable the apps that might cause the W indows 10 slow startup issues.
- Many users claimed that they solved the Windows 10 slow boot problem by updating their BIOS.
- You should also make sure that your GPU drivers are up to date. We recommend using a driver updater tool.
Just like Windows 8, Windows 10 was intended to improve hardware performance and speed up your computer, and most users are satisfied with their performance on Windows 10.
Sadly, not all users have similar experience, and some of them are claiming that booting routine takes up a long time on Windows 10.
A slow booting Windows 10 can be a big problem, and in this article we’re going to cover the following issues:
- Slow boot SSD, hard drive
- According to users, both SSD and hard drive owners have experienced slow boot issues. However, you should be able to fix this problem by using one of our solutions.
- Windows 10 slow boot black screen
- Users reported that they are stuck on a black screen during the boot. This is an annoying problem and it’s usually caused by your graphics card drivers.
- Windows 10 slow boot after Creators Update
- Many users reported this problem after the Creators Update. This is a big problem, and it’s most likely caused by an incompatible driver or software.
- Slow boot Windows 10 AMD, Nvidia
- Your graphics card can be the cause for slow boot, and both AMD and Nvidia owners reported this issue. To fix the problem, you just have to reinstall or update your drivers.
- Slow boot even in Safe Mode
- If you’re having issues with slow boot in Safe Mode, the problem might be your hardware or BIOS configuration.
- Slow startup time windows 10
- This is a variation of this problem, and if you have problems with slow startup time, you might be able to fix it using one of our solutions.
Long boot times on Windows operating systems are usually caused by third-party apps that you install, and since most of them start automatically with Windows 10, they tend to make your booting routine slow.
How can I fix a slow boot time in Windows 10?
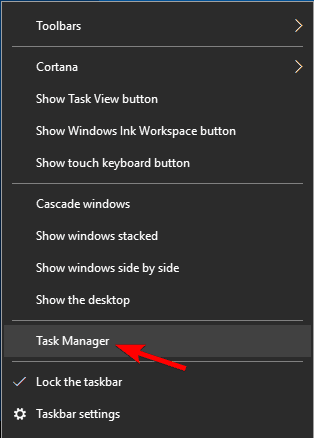
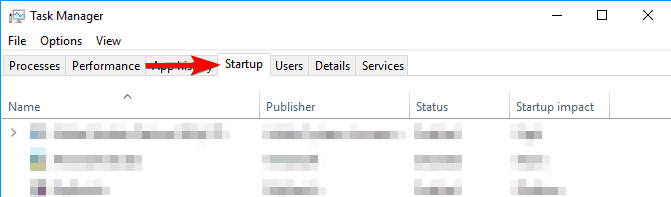
1. Use the Windows 10 Startup Manager
- Open Task Manager by right-clicking the Taskbar and selecting Task Manager from the menu.
- In addition, you can use Ctrl + Shift + Escape to open the Task Manager directly or Ctrl + Alt + Delete and select Task Manager from the list.

- Click the More details button and then go to the Startup tab.
- In the Startup tab, you’ll see the startup impact of each program that starts with Windows 10.
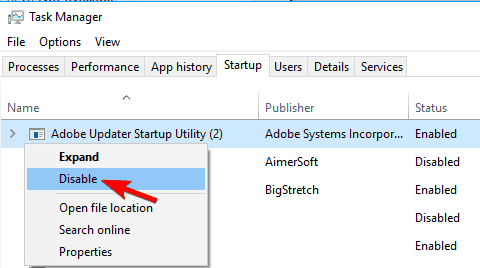

The key is to choose the right apps to disable, for example, you want to keep your Antivirus running, but you might want to disable Skype or driver update software from starting with your Windows 10.
Of course, you can manually start these services at any time if you need them.
If you’re interested in additional info on how to add or remove startup apps on Windows 10, check out this simple guide.
2. Update your BIOS

Several users reported that they fixed the slow boot problems in Windows 10 by updating their BIOS. BIOS update is an advanced and potentially dangerous procedure, so use it at your own risk.
After updating your BIOS, check if the issue is resolved. If you already have the latest version of BIOS, you might want to reflash it and install the same version again.
Few users reported that installing the same version of BIOS fixed the problem for them, so you might want to try that.
If you need more information about updating your BIOS, check out this useful guide dedicated to the matter.
3. Update your graphics card drivers
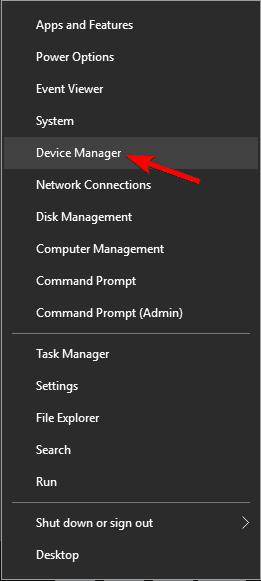
- Press Windows Key + X to open Win + X menu and choose Device Manager from the list.
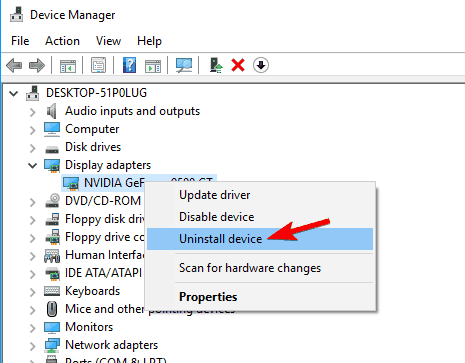
- When Device Manager opens, locate your graphics card driver, right-click it and choose Uninstall device.
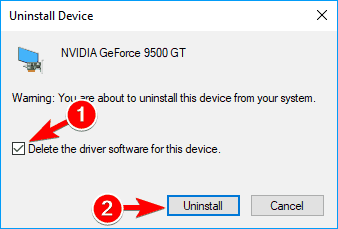
- Check Delete this driver software for this device and click on Uninstall.
If you’re having slow boot problems in Windows 10 followed by a black screen, the issue might be related to your drivers. According to users, they fixed this problem simply by updating their Nvidia drivers.
Updating your graphics card drivers is relatively simple, but if you don’t know how to do it, we wrote a short guide on how to update your graphics card drivers.
In some cases, you might have to uninstall your drivers and reinstall them again. You can easily do that right from Device Manager by following the aforementioned steps.
After the driver is uninstalled, simply download the latest driver and check if the issue is resolved. If you want to completely remove your driver along with all of its associated files, be sure to check our guide on how to use Display Driver Uninstaller.
Update your drivers automatically
Updating your drivers manually isn’t that easy, especially for those who have no background knowledge. Having to find out your hardware’s model number and searching for the latest driver can be tedious.
Thankfully, there are programs that will make your life easier by automatically scanning your hardware for new driver versions, and updating them accordingly.
DriverFix
4. Run the Windows Update Troubleshooter
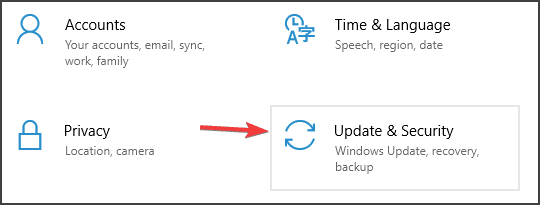
- Press the Windows Key + S and search for Settings.
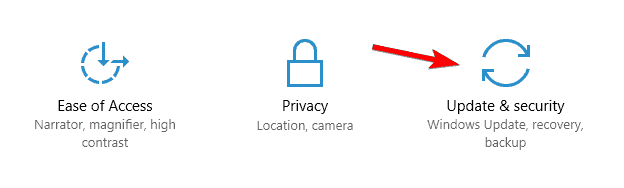
- In the Settings menu, choose Update & Security.
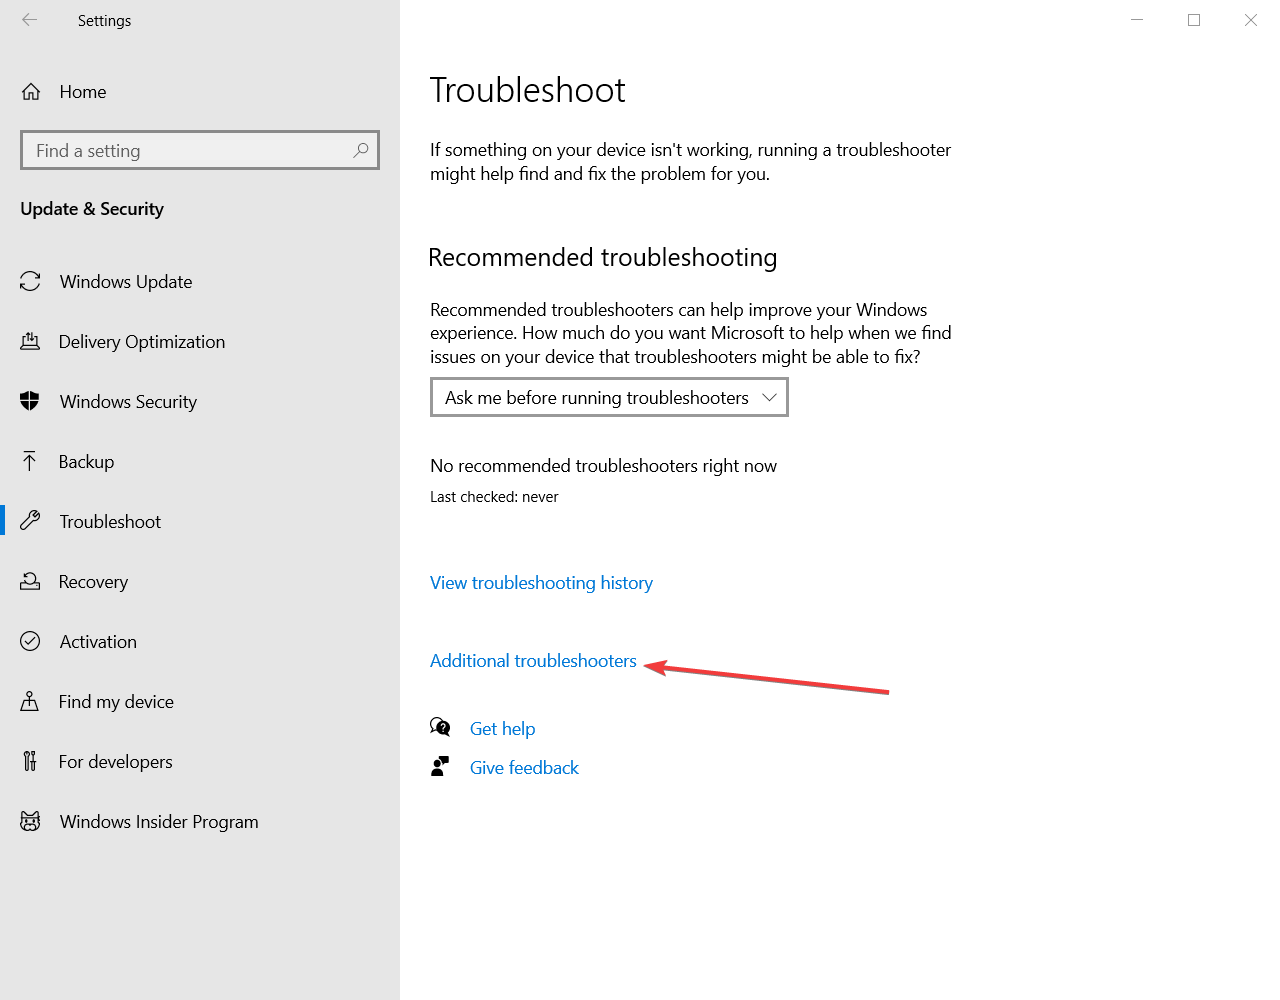
- Then, select Troubleshoot, and Additional troubleshooters.
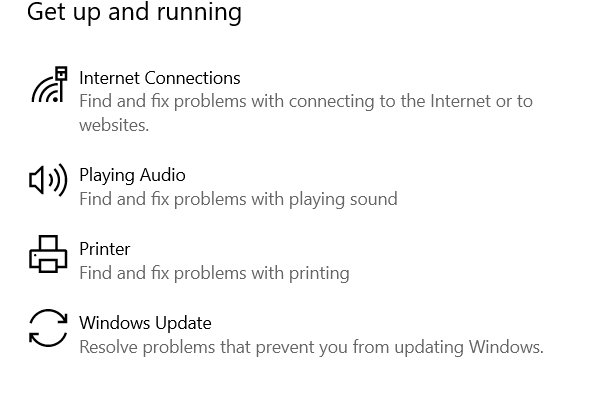
- Inside the new window, under Get up and running, select Windows Update.
- Next, click on Run the troubleshooter.
Many users reported slow boot problems in Windows 10, and according to users, this issue is caused by a corrupted Windows Update file. To fix this problem, you just need to use the Windows troubleshooter.
Once you start the tool, it should automatically fix any issues and corrupted files. After the troubleshooter is finished, check if the problem is resolved.
If your Windows Troubleshooter stops before completing the process, you can easily fix it with our great guide.
5. Consider getting an SSD and tweak the BIOS settings

Solid State Drives are great for your PC in terms of speed, and if you can afford one, maybe you should consider getting one in the future.
If you can’t afford it, you might want to tweak some BIOS settings to improve your booting routine. For example, you can disable BIOS checking your DVD drive or network locations each time you boot and reduce boot time.
Few users reported that this problem occurs due to the USB Storage Function in BIOS. This feature is used to boot your PC from a flash drive, and if you don’t want to do that, you can just disable it.
To see how to find and disable this feature in BIOS, we advise you to check your motherboard manual.
If you’re in the market for a fast SSD, don’t waste another minute and check this article to get the biggest ones available right now.
6. Install the latest updates
- Press Windows Key + I to open the Settings app.
- When Settings app opens, go to Update & security section.
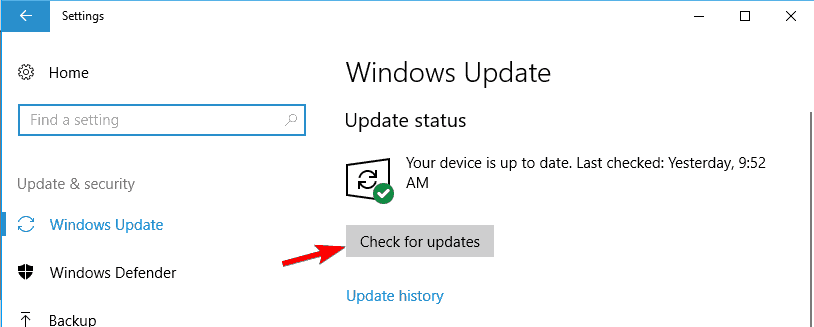
- Go to the Windows Update section, and click on Check for updates.
Sometimes you can fix the slow boot problems simply by installing the latest updates. Windows 10 usually downloads the necessary updates in the background.
Take a closer look at this quick article about Windows updates if you’re not sure when your OS is installing new updates.
If any updates are available, they will be downloaded automatically and installed once you restart your PC. However, if your PC is already up to date, you might want to try a different solution.
Is the Windows Settings app giving you trouble? Follow the steps from this detailed article to solve the issue. Additionally, here’s another detailed guide dedicated to solving Windows problems.
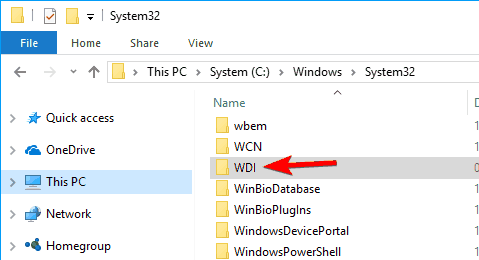
7. Delete all files from WDI directory
- Open File Explorer and navigate to the following directory: C:/Windows/System32/
- Now go to the WDI directory.
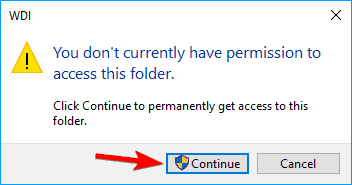
- If you get a security prompt, click on Continue to proceed.
- Select all files from the WDI directory, right-click them and choose Delete.
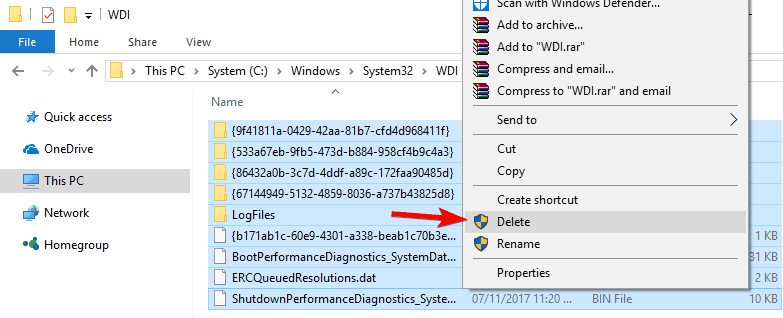
If you’re having slow boot issues, you might be able to fix the problem by deleting the contents of the WDI directory as instructed in the steps above.
After removing the contents of the WDI directory, the Windows 10 slow startup issue will be fixed.
Here’s a comprehensive guide dedicated to fixing File Explorer issues that will make sure it won’t give you any problems in the future.
8. Install the Intel Rapid Store Technology driver
To fix the problems with slow boot, you just need to install Intel Rapid Store Technology driver on your PC. Many users reported that this driver isn’t the latest, and that’s causing the issue to appear.
To fix the problem, just download and install the latest version of the Intel Rapid Store Technology driver from their official website and check if the problem is resolved.
If you’re unable to install drivers on your Windows 10 PC, you’ll find all the causes and solutions for your issues in this great guide.
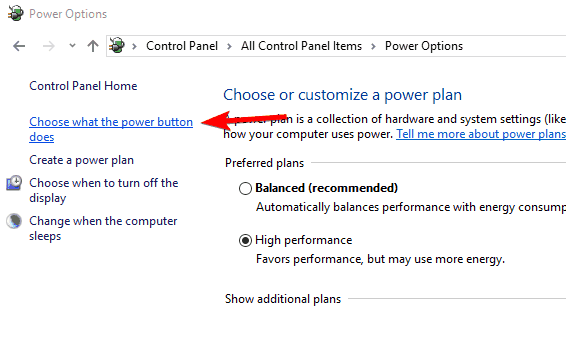
9. Enable/disable Fast Startup
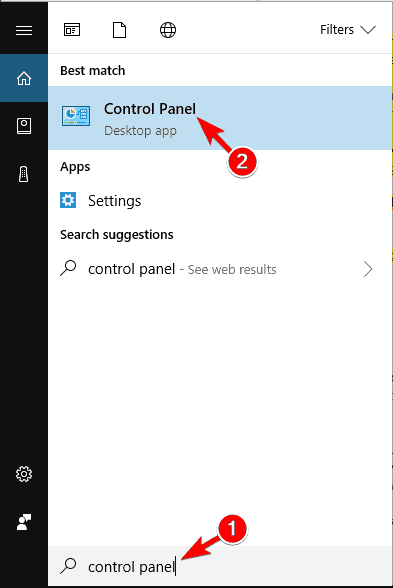
- Press Windows Key + S and enter Control Panel.
- Select Control Panel from the list.
- When Control Panel opens, select Power Options from the menu.
- The Power Options window will now appear.
- Click on Choose what the power button does from the menu on the left.
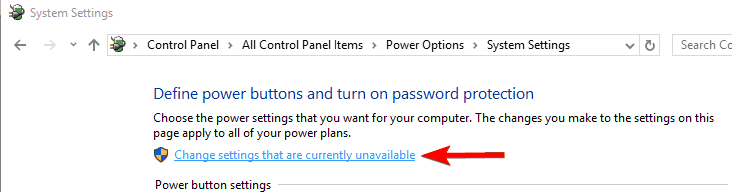
- Click on Change settings that are currently unavailable.
- If Turn on fast startup is checked, disable it.
- If this feature is not enabled, check it.
- Now click on the Save changes button.

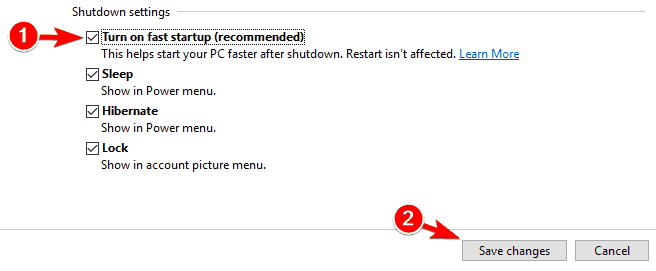
Sometimes the fast startup feature can cause this problem, but you can disable/enable it by following our method above. After disabling or enabling fast startup, the issue should be resolved.
If you can’t open Control Panel on Windows 10, take a look at this step-by-step guide to find a solution.
Moreover, you can also give a read to this useful guide dedicated to Fast Startup issues if you want to learn how to solve them quickly.
That’s it. If none of these solutions helped you to solve the problem with the Windows 10 slow startup problem, check out the solutions from our article about slowed down computers in Windows 10.
If you have any comments or suggestions, tell us in the comment section below. Also, if you have any other Windows 10-related issues you can check for the solution in our dedicated Windows 10 section.
windows 7 taking a long time to start up !!
i have a couple of questions here and i hope that some one could help me with them. my laptop at the first days needed only about 30 seconds to start windows, but now i need more than 90 seconds to start windows. i have SONY (VAIO) machine, model number is CPCCW2S1E. i need to know what is taking a long time for the machine to start. and i would like to know if the registry is incharge somehow about that. i work with video and photo editing stuff, i always install and deinstall programs, so i thought that might be effecting my pc speed. and if the regestry is incharge about that, is there any way or any software to clean the registry or do something about it? if there is any recommended program, just let me know please.
Is your system error free?
To access the System log select Start, Control Panel, Administrative Tools, Event Viewer, from the list in the left side of the window select Windows Logs and System. Place the cursor on System, right click and select Filter Current Log. Check the box before Error and click on OK and you see only Error reports. Click on the Date and Time Header to sort. You may need to click a second time to see the latest Report at the top.
A tip for posting copies of Error Reports! Run Event Viewer and double click on the error you want to copy. In the window you will see a button resembling two pages. Click the button and close Event Viewer. Now start your message and paste into the body of the message. Make sure this is the first paste after exiting from Event Viewer.
I suggest you download Process Explorer.
For further information about Process Explorer see here:
http://www.microsoft.com/technet/sysinternals/SystemInformation/ProcessExplorer.mspx
This freeware utility performs a similar function to the Windows Task Manager but it goes much further.
In Process Explorer please add a Column. Select View, Select, Columns, Process, Performance and check the box before Start Time. Next select «Show Processes from all Users» and click on the column header «Start Time». This will sort so that you can see start with the earliest first. You may need to click twice or three times.


