- Mac startup key combinations
- On a Mac with Apple silicon
- On an Intel-based Mac
- Смена загрузочного диска Mac
- Смена загрузочного диска на один раз
- Смена загрузочного диска при каждом запуске
- How to pick a startup disk for your Mac at boot time
- What’s a startup disk?
- What is Startup Manager?
- How to choose a startup disk at boot time
- How to change your default startup disk
- Startup Manager vs. System Preferences > Startup Disk
- Startup Manager won’t let you select a startup disk?
- Five common use cases for Startup Manager
- 1. Install an operating system from external media
- 2. Temporarily override default startup disk
- 3. Boot into other OS natively
- 4. Software development and testing
- 5. Troubleshoot startup issues
- Other ways to start up your Mac
- See also:
- Start up your Mac in Windows or macOS with Boot Camp
- Set the default operating system
- Restart in macOS
Mac startup key combinations
Learn about the Mac features and tools that you can access by holding down one or more keys during startup.
On a Mac with Apple silicon
Turn on your Mac with Apple silicon and continue to press and hold the power button until you see the startup options window. From there you can start up from a different disk, start up in safe mode, use macOS Recovery, and more. Learn more about these options, including macOS Recovery.
On an Intel-based Mac
To use any of these key combinations, press and hold the keys immediately after pressing the power button to turn on your Mac, or after your Mac begins to restart. Keep holding until the described behavior occurs.
- Command (⌘)-R: Start up from the built-in macOS Recovery system. Or use Option-Command-R or Shift-Option-Command-R to start up from macOS Recovery over the internet. macOS Recovery installs different versions of macOS, depending on the key combination you use. If your Mac is using a firmware password, you’re prompted to enter the password.
- Option (⌥) or Alt: Start up to Startup Manager, which allows you to choose other available startup disks or volumes. If your Mac is using a firmware password, you’re prompted to enter the password.
- Option-Command-P-R:Reset NVRAM or PRAM. If your Mac is using a firmware password, it ignores this key combination or starts up from macOS Recovery.
- Shift (⇧): Start up in safe mode. Disabled when using a firmware password.
- D: Start up to the Apple Diagnostics utility. Or use Option-D to start up to this utility over the internet. Disabled when using a firmware password.
- N: Start up from a NetBoot server, if your Mac supports network startup volumes. To use the default boot image on the server, press and hold Option-N instead. Disabled when using a firmware password.
- Command-S: Start up in single-user mode. Disabled in macOS Mojave or later, or when using a firmware password.
- T: Start up in target disk mode. Disabled when using a firmware password.
- Command-V: Start up in verbose mode. Disabled when using a firmware password.
- Eject (⏏) or F12 or mouse button or trackpad button: Eject removable media, such as an optical disc. Disabled when using a firmware password.
If a key combination doesn’t work at startup, one of these solutions might help:
- Press and hold all keys in the combination together, not one at a time.
- Shut down your Mac. Then press the power button to turn on your Mac. Then press and hold the keys as your Mac starts up. You might need to wait a few seconds before pressing the keys, to give your Mac more time to recognize the keyboard as it starts up. Some keyboards have a light that flashes briefly at startup, indicating that the keyboard is recognized and ready for use.
- If you’re using a wireless keyboard, plug it into your Mac, if possible. Or use your built-in keyboard or a wired keyboard. If you’re using a keyboard made for a PC, such as a keyboard with a Windows logo, try a keyboard made for Mac.
- If you’re using Boot Camp to start up from Microsoft Windows, set Startup Disk preferences to start up from macOS instead. Then shut down or restart and try again.
Источник
Смена загрузочного диска Mac
Компьютер Mac можно настроить на загрузку с CD или DVD, с сетевого тома, другого диска или из другой операционной системы. Для этого Вам нужно сменить загрузочный диск.
Важно! Чтобы изменить загрузочный том на Mac с процессором Apple T2, может потребоваться настроить дополнительные параметры безопасности. См. раздел Что такое Утилита безопасной загрузки?.
Смена загрузочного диска на один раз
Когда Ваш компьютер Mac или компьютер Mac с процессором Apple выключен, выполните следующие действия.
На Вашем Mac. Во время загрузки Mac нажмите и удерживайте клавишу Option.
На Mac с процессором Apple. Нажмите и удерживайте кнопку питания, пока не появится надпись «Загрузка параметров запуска».
На Mac mini дождитесь, пока системный индикатор состояния не загорится оранжевым цветом.
Увидев доступные загрузочные диски, выберите один из них, затем нажмите стрелку вверх (на Mac) или кнопку «Продолжить» (на Mac с процессором Apple).
При следующей перезагрузке компьютера он загрузится с диска, выбранного в качестве загрузочного диска в Системных настройках.
Смена загрузочного диска при каждом запуске
На Mac выберите пункт меню «Apple»

> «Системные настройки», затем нажмите «Загрузочный том».
Если слева внизу отображается запертый замок  , нажмите его, чтобы разблокировать панель настроек.
Нажмите значок тома, который Вы хотите использовать, и нажмите «Перезагрузить».
ПРЕДУПРЕЖДЕНИЕ. При выборе сетевого загрузочного тома убедитесь, что Вы выбираете сетевой загрузочный том, а не сетевой установочный образ. При выборе сетевого загрузочного образа системное программное обеспечение будет установлено заново, что может привести к потере данных на диске. Обычный значок сетевого диска имеет вид шара с папкой. Значок сетевой установки имеет вид шара с зеленой стрелкой, указывающей вниз.
Источник
How to pick a startup disk for your Mac at boot time
Most people are content with booting their Mac straight into macOS, but certain multi-boot situations warrant choosing a different startup disk. But why would anyone in their right mind have multiple operating systems on their computer, you ask?
Well, if you like trying out new things out before they’re available to everyone, chances are you keep the latest beta of macOS installed on a separate partition.
Besides, some people like yours truly prefer to keep a bootable USB thumb drive in a safe place for times when something terribly wrong goes with their Mac.
There are two ways to choosing a startup disk.
One involves choosing a boot disk via a System Preferences pane called Startup Disk, which my colleague Jeff recently covered. This tutorial deals with the other method which involves picking a boot disk as your Mac is starting up.
This tutorial will educate you on choosing a boot disk during the startup process using a feature of macOS called Startup Manager and explain why and when to use Startup Manager over selecting a startup disk in System Preferences.
Let’s get started.
What’s a startup disk?
A startup disk is a partition of a drive or a volume that contains a usable operating system. Your startup disk doesn’t have to contain macOS.
For example, your Mac can boot directly into Windows if you’re using Boot Camp. It can also boot into Ubuntu or any other operating system supported by your Mac’s hardware.
As mentioned before, you can, one, set your computer to automatically use a startup disk using System Preferences, and two, temporarily override this choice at boot time using Startup Manager.
What is Startup Manager?
Startup Manager is a built-in application that you can invoke during the startup process to pick a volume to boot your Mac from.
How to choose a startup disk at boot time
To pick a disk to start your Mac from while it’s booting, follow these simple steps for using macOS’ built-in feature called Startup Manager, which can be invoked via a simple keystroke.
Step 1: Turn on your Mac by pressing the power button, or restart it if it’s already on by choosing Restart in the Apple menu.
Step 2: Press and hold the Option (⌥) key immediately upon hearing the startup chime and release the key after Startup Manager appears. Startup Manager will scan connected drives and will present drive icons of any volumes it finds, as shown below.
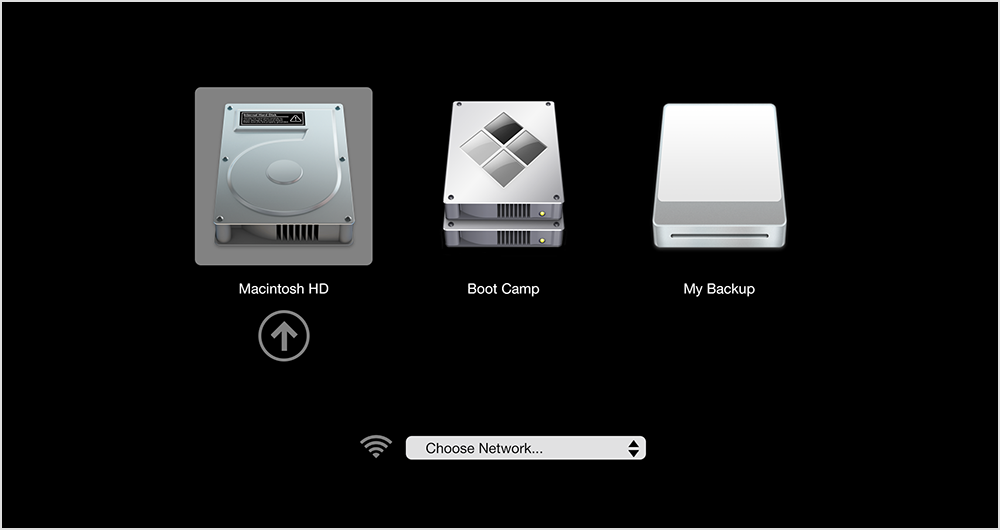
Step 3: Highlight the volume you want to use by using your mouse or trackpad, or left and right arrow keys.
Step 4: Double-click or press the Return key to boot your Mac from the volume you just selected. Keep in mind that your Mac can only start up from a disk containing an operating system.
Tip: You can also attach external hard drives with an operating system: Startup Manager will automatically add bootable volumes as you connect them.
How to change your default startup disk
To tell your Mac to automatically use a specific startup volume each time your restart or turn it on, open the System Preferences application in the Dock and click the Startup Disk pane. You will be presented with various disk icons, as shown in Jeff’s video walkthrough embedded below.
Now select the system you would like to use to startup your computer and click the Restart button. From this point on, your Mac will always boot into the selected startup disk until you change your choice in System Preferences or temporarily override it through Startup Manager.
Startup Manager vs. System Preferences > Startup Disk
As explained before, choices you make via the Startup Disk pane will stick until you choose another one in System Preferences or temporarily override these defaults at boot time in Startup Manager.

So when should you use Startup Manager over System Preferences?
Basically, if you want your Mac to boot automatically into Windows 10 every time it’s restarted or turned on, use System Preferences > Startup Disk. Want to boot into Windows, Ubuntu or whatever but just this one time, without changing your default startup disk?
Use Startup Manager instead.
Startup Manager won’t let you select a startup disk?
If you cannot choose your startup disk in Startup Manager, make sure that it contains a bootable copy of an operating system such as macOS, Windows or Linux.
Simply formatting a drive or partitioning a disk won’t cut it because Startup Manager looks for partitions and connected drive that contain a usable operating system.
If you’re interested in creating a dual-boot environment on your Mac, check out these easy to follow tutorial that cover deploying Yosemite and El Capitan on a separate partition and USB flash drive:
For additional insights, browse our archive of how-to posts, tips and tutorials.
Five common use cases for Startup Manager
There are many situations that warrant using Startup Manager. Here are some of the more obvious scenarios that average users might encounter:
1. Install an operating system from external media
If you’re old-school and your Mac has an optical drive connected to it, you can insert a disc containing an installer for macOS, Linux, Windows or other supported operating system and boot directly into the installer via Startup Manager. A usable operating system can also reside on a FireWire, Thunderbolt or USB external drive. As long as the disk is bootable, it should show up in Startup Manager.
2. Temporarily override default startup disk
As mentioned before, you should use Startup Manager to choose a startup disk for a single session as it won’t permanently change your default startup disk selected in System Preferences. Let’s say Yosemite is your default startup disk and you have El Capitan on another partition. You can use Startup Manager at boot time to temporarily override Yosemite and start up your computer straight into El Capitan.
3. Boot into other OS natively
Sometimes you may be wondering what’s life like on the “other side.”
In addition to running another operating system alongside macOS using virtualization software such as Parallels Desktop, it’s also possible to boot your Mac directly into a “foreign” operating system via Startup Manager. Typically, I would boot my Mac into Microsoft’s Windows 7 whenever I feel like playing that first-person Windows shooter that everyone’s talking about.
4. Software development and testing
People who develop software for a living typically have multiple instances of macOS to test their apps in multiple environments in order to ensure they run without a hiccup. In addition, many bloggers, journalists and power typically keep macOS betas separate from stable macOS releases. Startup Manager makes it ridiculously easy to choose between them at boot time.
5. Troubleshoot startup issues
Has your Mac been acting up lately?
An improper shutdown, forced restart or power interruption can lead to file system errors that may prevent your computer from starting up. Choosing a different boot device is typically the first step in resolving common startup issues. And to be 100 percent on the safe side, I have another copy of macOS installed on a USB drive should something go terribly wrong with my Mac and I’m in the middle of doing my work.
Other ways to start up your Mac
Your Mac can start up in a number of different ways, including the following methods that our tutorials provide step-by-step instructions for:
- Safe Mode—Safe Mode disables certain features of macOS and loads only essential components to make troubleshooting software issues simpler. In addition, Safe Mode includes an automatic disk check and repair which might resolve boot problems and allow you to start up your computer successfully.
- Verbose Mode—Verbose Mode is a text-only environment which displays status messages as the startup process progresses. Use Verbose Mode to resolve issues with kernel extensions and custom hardware. If that doesn’t sound too sexy, you can enter Verbose Mode to see what’s going on behind the scenes and watch as macOS is loading its components.
We will be covering more ways to start up your Mac in future tutorials.
See also:
If you like this tutorial, please consider bookmarking and passing it along to your friends and other Mac support folks.
Источник
Start up your Mac in Windows or macOS with Boot Camp
After you use Boot Camp Assistant to install Windows on your Intel-based Mac, you can set the default operating system to either macOS or Windows. The default operating system is the one you want to use when you turn on or restart your Mac.
Set the default operating system
In Windows on your Mac, click  in the right side of the taskbar, click the Boot Camp icon
  , then choose Boot Camp Control Panel.
If a User Account Control dialog appears, click Yes.
Select the startup disk that has the default operating system you want to use.
If you want to start up using the default operating system now, click Restart. Otherwise, click OK.
You can’t change your startup volume to an external drive while you’re using Windows.
To learn how to change the default operating system using macOS, see Get started with Boot Camp.
Restart in macOS
In Windows on your Mac, do one of the following:
Restart using Startup Manager: Restart your Mac, then immediately press and hold the Option key. When the Startup Manager window appears, release the Option key, select your macOS startup disk, then press Return.
If you’re using a Mac notebook computer with an external keyboard, make sure you press and hold the Option key on the built-in keyboard.
Restart using Boot Camp Control Panel: Click in the right side of the taskbar, click the Boot Camp icon , then choose Restart in macOS.
This also sets the default operating system to macOS.
For more information about restarting in macOS, see the Apple Support article Restart your Mac in macOS or Windows.
Источник


