- Как зайти в Boot Menu на ноутбуках и компьютерах
- Общая информация по входу в меню загрузки БИОС
- Особенности входа в Boot Menu в Windows 10 и Windows 8.1 (8)
- Вход в Boot Menu на Asus (для ноутбуков и материнских плат)
- Как зайти в Boot Menu на ноутбуках Lenovo
- Остальные модели ноутбуков и материнских плат
- Видео о том, как войти меню устройств загрузки
- Recovery options in Windows 10
Как зайти в Boot Menu на ноутбуках и компьютерах
 Boot Menu (меню загрузки) можно вызывать при включении на большинстве ноутбуков и компьютеров, данное меню является опцией BIOS или UEFI и позволяет быстро выбрать, с какого накопителя загрузить компьютер в этот раз. В этой инструкции покажу, как зайти в Boot Menu на популярных моделях ноутбуков и материнских плат ПК.
Описываемая возможность может быть полезной, если вам потребовалось загрузиться с Live CD или загрузочной флешки для установки Windows и не только — не обязательно менять порядок загрузки в БИОС, как правило, достаточно однократного выбора нужного устройства загрузки в Boot Menu. На некоторых ноутбуках это же меню дает доступ и к разделу восстановления ноутбука.
Сначала напишу общие сведения по входу в Boot Menu, нюансы для ноутбуков с предустановленной Windows 10 и 8.1. А потом — конкретно по каждой марке: для ноутбуков Asus, Lenovo, Samsung и других, материнских плат Gigabyte, MSI, Intel и т.п. Внизу есть так же видео, где показывается и поясняется вход в такое меню.
Общая информация по входу в меню загрузки БИОС
Так же, как для входа в БИОС (или настройки ПО UEFI) при включении компьютера необходимо нажать определенную клавишу, как правило Del или F2, так же и для вызова Boot Menu существует аналогичная клавиша. В большинстве случаев это F12, F11, Esc, но есть и другие варианты, о которых напишу ниже (иногда информация о том, что нужно нажать для вызова Boot Menu появляется сразу на экране при включении компьютера, но не всегда).
Причем, если все что вам требуется — это поменять порядок загрузки и сделать это нужно для какого-то однократного действия (установка Windows, проверка на вирусы), то лучше использовать именно Boot Menu, а не ставить, например, загрузку с флешки в настройках БИОС.

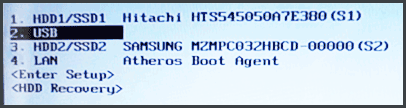
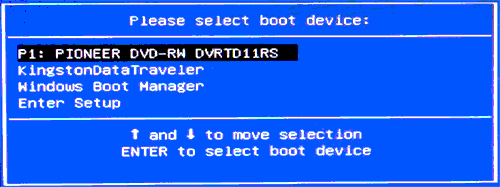
В Boot Menu вы увидите список всех подключенных к компьютеру устройств, с которых в данный момент потенциально возможно загрузка (жесткие диски, флешки, диски DVD и CD), а также, возможно, вариант сетевой загрузки компьютера и запуск восстановления ноутбука или компьютера с резервного раздела.
Особенности входа в Boot Menu в Windows 10 и Windows 8.1 (8)
Для ноутбуков и компьютеров, которые изначально поставлялись с Windows 8 или 8.1, а в скором времени и с Windows 10, вход в Boot Menu с помощью указанных клавиш может не получаться. Связано это с тем, что выключение для этих операционных систем не является в полном смысле этого слова выключением. Это скорее гибернация, а потому меню загрузки может и не открываться при нажатии F12, Esc, F11 и других клавиш.
В этом случае вы можете поступить одним из следующих способов:
- При выборе «Выключение» в Windows 8 и 8.1 удерживать клавишу Shift, в этом случае компьютер должен выключиться полноценно и при включении клавиши для входа в Boot Menu должны сработать.
- Перезагрузите компьютер вместо выключения и включения, при перезагрузке нажмите нужную клавишу.
- Отключите быстрый запуск (см. Как отключить быстрый запуск Windows 10). В Windows 8.1 для этого зайдите в Панель управления (вид панели управления — значки, а не категории), выберите пункт «Электропитание», в списке слева нажмите «Действия кнопок питания» (даже, если это не ноутбук), отключите пункт «Включить быстрый запуск» (для этого может потребоваться нажать «Изменение параметров, которые сейчас недоступны» вверху окна).


Один из указанных способов обязательно должен помочь со входом в меню загрузки, при условии, что все остальное делается правильно.
Вход в Boot Menu на Asus (для ноутбуков и материнских плат)
Практически для всех настольных компьютеров с материнскими платами Asus, вход в меню загрузки осуществляется нажатием клавиши F8 после включения компьютера (тогда же, когда мы нажимаем Del или F9, чтобы зайти в БИОС или UEFI).
А вот с ноутбуками есть некоторая неразбериха. Чтобы зайти в Boot Menu на ноутбуках ASUS, в зависимости от модели, нужно при включении нажать:
- Esc — для большинства (но не для всех) современных и не очень моделей.
- F8 — для тех моделей ноутбуков Asus, название которых начинается с x или k, например x502c или k601 (но не всегда, есть модели на x, где вход в Boot Menu осуществляется клавишей Esc).
В любом случае, вариантов не так много, так что при необходимости можно попробовать каждый из них.
Как зайти в Boot Menu на ноутбуках Lenovo
Практически для всех ноутбуков и моноблоков марки Lenovo для входа в Boot Menu можно использовать клавишу F12 при включении.

Также дополнительные варианты загрузки для ноутбуков Lenovo можно выбрать, нажав маленькую кнопку со стрелкой рядом с кнопкой питания.
Следующая по популярности модель ноутбуков и моноблоков у нас — это Acer. Вход в Boot Menu на них для разных версий BIOS осуществляется путем нажатия клавиши F12 при включении.
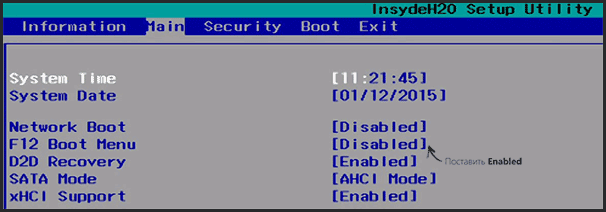
Однако, на ноутбуках Acer есть одна особенность — часто, вход в Boot Menu по F12 на них не работает по умолчанию и для того, чтобы клавиша заработала, необходимо сначала зайти в БИОС, нажав клавишу F2, а потом переключить параметр «F12 Boot Menu» в состояние Enabled, после чего сохранить настройки и выйти из БИОС.
Остальные модели ноутбуков и материнских плат
Для остальных моделей ноутбуков, а также ПК с разными материнскими платами особенностей поменьше, а потому просто приведу клавиши входа в Boot Menu для них в виде списка:
- Моноблоки и ноутбуки HP — клавиша F9 или Esc, а затем — F9
- Ноутбуки Dell — F12
- Ноутбуки Samsung — Esc
- Ноутбуки Toshiba — F12
- Материнские платы Gigabyte — F12
- Материнские платы Intel — Esc
- Материнские платы Asus — F8
- Материнские платы MSI — F11
- AsRock — F11
Кажется, учел все наиболее распространенные варианты, а также описал возможные нюансы. Если вдруг у вас все так же не получается зайти в Boot Menu на каком-либо устройстве, оставляйте комментарий с указанием его модели, я постараюсь найти решение (и не забывайте о моментах, связанных с быстрой загрузкой в последних версиях Windows, о чем я писал выше).
Видео о том, как войти меню устройств загрузки
Ну и, в дополнение ко всему написанному выше, видео инструкция о входе в Boot Menu, возможно, кому-то окажется полезной.
А вдруг и это будет интересно:
Почему бы не подписаться?
Рассылка новых, иногда интересных и полезных, материалов сайта remontka.pro. Никакой рекламы и бесплатная компьютерная помощь подписчикам от автора. Другие способы подписки (ВК, Одноклассники, Телеграм, Facebook, Twitter, Youtube, Яндекс.Дзен)
27.11.2018 в 09:18
Пробовал все, что описано, не могу попасть в бут меню, а очень надо . Может какие сочетания ещё есть? Комп заводской сборки, интел.
27.11.2018 в 09:36
Здравствуйте. Если на нем предустановлена Windows 10 или 8.1, то отключите быстрый запуск (см. https://remontka.pro/fast-startup-windows-10/ ) и попробуйте после этого
30.11.2018 в 19:01
Спасибо за ответ. У меня 7. В течение получаса методом тыка выяснил, что за вызов бут меню отвечает клавиша F10. (Вот такой большой секрет интел , нигде никакой информации) .
22.04.2020 в 23:04
Всё написанное МОЖЕТ и было актуально лет 5 назад, но почему то не актуально на данный момент. При выборе в биос настройки UEFI для диска GPT и установленной Windows 10 У меня видно только Windows boot. Нет ни сд-рома ни диска самого ВООБЩЕ ничего. Хотя UEFI — BIOS настроил правильно. Правильно КАК абсолютно все рекомендуют и на ютубе и на форумах и на похожих сайтах.
У меня материнка G970A — D3
Ничего не сумел найти в этой ОГРОМНЕЙШЕЙ помойке — ИНТЕРНЕТ.
Спасибо что прочитали. Хотя ответа видимо не будет. Я не профи, так «закипевший» чайник.
23.04.2020 в 14:22
Оно и сейчас актуально. А то, что в качестве устройства загрузки показывается Windows Boot Manager, а флешки и диски без поддержки UEFI загрузки не показываются, если в БИОС выставлена загрузка только в режиме UEFI — это нормально.
10.05.2020 в 17:32
Добрый день, подскажите, как зайти в boot menu на компе sony vaio? Быстрый запуск отключён, F 11 и F12 не помогают. Спасибо.
11.05.2020 в 10:15
Не помню уже (у меня тоже Vaio был). То ли F2 то ли F10. Иногда нужно нажимать Fn+F-клавиша, чтобы сработало.
15.01.2021 в 13:26
21.05.2020 в 09:55
А можно ли в UEFI заставить автоматически выводить выбор дисков при включении? Комп с тремя дисками, тремя ОС со своими загрузчиками.
21.05.2020 в 15:47
Нет, таких методов не знаю и не встречал на попадавшихся компьютерах/ноутбуках.
Так что из вариантов в голову приходит лишь сделать основной загрузку, к примеру системы с GRUB, а уже туда добавить в загрузку остальные системы.
10.10.2020 в 14:47
Boot Menu на ноутбуке Lenovo IdeaPad L340 клавиша F2
Recovery options in Windows 10
If you’re having problems with your PC, the following table can help you decide which recovery option to use.
See this section
Your PC isn’t working well and you recently installed an update.
Your PC isn’t working well and it’s been a while since you installed an app, driver, or update.
Your PC won’t start, you haven’t created a recovery drive, and resetting your PC didn’t work.
Your PC won’t start and you haven’t created a recovery drive.
Your PC won’t start and you’ve created a recovery drive.
You want to reinstall your previous operating system.
Your PC isn’t working well and you recently installed an app.
Click one of the recovery options below and follow the steps to try to get things working again.
If you’ve recently installed a Windows update, uninstall the update to try to resolve the issue.
Select the Start button, then select Settings > Update & Security > Windows Update > View your update history > Uninstall updates.
View update history settings
Right-click the update you want to remove, and then select Uninstall.
Important: If you’ve encrypted your device, you’ll need your BitLocker key to reset your PC If you don’t know your BitLocker key, see Find my BitLocker recovery key.
Resetting reinstalls Windows 10, but lets you choose whether to keep your files or remove them, and then reinstalls Windows. You can reset your PC from Settings, the sign-in screen, or by using a recovery drive or installation media.
Reset your PC from Settings
Select the Start button, then select Settings > Update & Security > Recovery .
Open Recovery settings
Under Reset this PC, select Get started and then choose from the options and/or settings in the table below.
Keep my files > Change settings > Preinstalled apps On
Reinstalls Windows 10 and keeps your personal files.
Removes apps and drivers you installed.
Removes changes you made to settings.
Restores any apps your PC manufacturer installed if your PC came with Windows 10.
Keep my files > Change settings > Preinstalled apps Off
Reinstalls Windows 10 and keeps your personal files.
Removes apps and drivers you installed.
Removes changes you made to settings.
Removes any apps your PC manufacturer installed.
Reinstalls Windows 10 and removes your personal files.
Removes apps and drivers you installed.
Removes changes you made to settings.
Removes any apps your PC manufacturer installed. (If your PC came with Windows 10, apps from your PC manufacturer will be reinstalled.)
Note: Remove everything > Change settings gives you two options.
Data erasure On removes files and cleans the drive. If you’re planning to donate, recycle, or sell your PC, use this option. This might take an hour or two, but it makes it harder for other people to recover files you’ve removed.
Data erasure Off just removes files. It takes less time, but is less secure.
Reset your PC from the sign-in screen
If you can’t open Settings, you can reset your PC from the sign-in screen. Here’s how:
Press Windows logo key + L to get to the sign-in screen, and then restart your PC by pressing the Shift key while you select the Power button > Restart in the lower-right corner of the screen.
Your PC will restart in the Windows Recovery Environment (WinRE) environment.
On the Choose an option screen, select Troubleshoot > Reset this PC, and then choose one of the options in the previous table.

Connect the installation media you created to your PC and reinstall Windows 10.
Open File Explorer and select the drive with the installation media.
From the root directory of the drive, double-click setup.exe, and then select Yes when asked if you’d like to allow the app to make changes to your device.
Select Change what to keep.
Select one of the following options, and then select Next:
Keep personal files and apps – This will preserve your personal data, apps, and settings.
Keep personal files only – This will preserve your personal data and settings, but all your apps will be removed.
Keep nothing – This will remove all personal data, settings, and apps.
Warning: You cannot undo a reinstallation of Windows 10. Be sure to back up your files first if you choose the Keep nothing option.
To finish, select Install to start reinstalling Windows 10 on your PC.
Your PC will restart several times during the resinstallation.
Important: If you’ve encrypted your device, you’ll need your BitLocker key to use a recovery drive to restore or reset your PC If you don’t know your BitLocker key, see Find my BitLocker recovery key.
If your PC won’t start and you haven’t created a recovery drive, download installation media and use it to restore from a system restore point or reset your PC.
Download the Windows 10 media creation tool and then run it.
Select Create installation media for another PC.
Choose a language, edition, and architecture (64-bit or 32-bit).
Follow the steps to create installation media, and then select Finish.
Connect the installation media you created to your nonfunctional PC, and then turn it on.
On the initial setup screen, enter your language and other preferences, and then select Next. If you don’t see the setup screen, your PC might not be set up to boot from a drive. Check your PC manufacturer’s website for info on how to change your PC’s boot order, and then try again.
Select Repair your computer.
On the Choose an option screen, select Troubleshoot. From there, you can:
Restore from a system restore point by selecting Advanced options > System Restore. This will remove recently installed apps, drivers, and updates that might be causing your PC problems. Restoring from a restore point won’t affect your personal files.
Important: If you’ve encrypted your device, you’ll need your BitLocker key to use a recovery drive to restore or reset your PC If you don’t know your BitLocker key, see Find my BitLocker recovery key.
If your PC won’t start, you can use a recovery drive to restore from a system restore point or recover your PC. For info on how to create a recovery drive on a working PC, see Create a recovery drive.
Note: If you are using a Surface, see Creating and using a USB recovery drive for Surface to download and create a USB recovery image specifically for your Surface device.
To restore or recover using the recovery drive:
Connect the recovery drive and turn on your PC.
Press Windows logo key + L to get to the sign-in screen, and then restart your PC by pressing the Shift key while you select the Power button> Restart in the lower-right corner of the screen.
Your PC will restart in the Windows Recovery Environment (WinRE) environment.
On the Choose an option screen, select Troubleshoot, and then select one of the following two options. (If you don’t see the Choose your option screen, your PC might not be set up to boot from a drive. Check your PC manufacturer’s website for info on how to change your PC’s boot order.)
To restore from a system restore point, select Advanced Options > System Restore. This won’t affect your personal files, but it will remove recently installed apps, drivers, and updates that might be causing your PC problems.
To reinstall Windows 10, select Advanced Options > Recover from a drive. This will remove your personal files, apps and drivers you installed, and changes you made to settings.
For a limited time after upgrading to Windows 10, you’ll be able to go back to your previous version of Windows by selecting the Start button, then select Settings > Update & Security > Recovery and then selecting Get started under Go back to the previous version of Windows 10. This will keep your personal files, but it’ll remove apps and drivers installed after the upgrade, as well as any changes you made to settings. In most cases, you’ll have 10 days to go back.
Open Recovery settings
To go back, you’ll need to:
Keep everything in the windows.old and $windows.
bt folders after the upgrade.
Remove any user accounts you added after the upgrade.
Know the password you used to sign in to Windows 7 or Windows 8.1 (if you used one).
Have the USB drive you used to upgrade to Windows 10 (if you used one).
Note: If you go back to Windows 8.1, some apps that came with Windows, like Mail and People, might not work anymore. To fix the apps, reinstall them from the Microsoft Store.
Note: The option in Settings to go back to your previous version of Windows is only available for a limited time after upgrading.
Info for Windows Insiders
If you’re an Insider and the current preview build isn’t working for you, select the Start button, then select Settings > Update & Security > Recovery . Under Go back to the previous version of Windows 10, select Get Started. This won’t remove your personal files, but it’ll remove recently installed apps and drivers, and change settings back to their defaults.
Going back to an earlier build won’t remove you from the Insider Program. When the next preview build is ready, it’ll be installed on your PC.
This option takes your PC back to an earlier point in time, called a system restore point. Restore points are generated when you install a new app or driver, and when you create a restore point manually. Restoring won’t affect your personal files, but it will remove apps, drivers, and updates installed after the restore point was made.
In the search box on the taskbar, type control panel,andthen choose it from the list of results
In the Control Panel search box, type recovery.
Select Recovery > Open System Restore.
In the Restore system files and setting box, select Next.
Select the restore point that you want to use in the list of results, and then select Scan for affected programs.
If you don’t see the restore point that you want to use, select the Show more restore points check box to see more restore points.
If you’re not seeing any restore points, it might be because system protection isn’t turned on. Here’s how to check:
In the search box on the taskbar, type control panel,andthen choose it from the list of results.
In the Control Panel search box, type recovery.
Select Recovery > Configure System Restore > Configure and see if the Turn on system protection option is selected.
If the Turn on system protection option is not selected, system protection isn’t turned on and there aren’t any restore points. In this scenario, you won’t be able to recovery your PC using a system restore point and will need to use one of the other recovery options listed on this page.
If the Turn on system protection option is selected, continue with step 6.
You’ll see a list of items that will be deleted if you remove this restore point. If you’re OK with the deletions, select Close> Next > Finish.


