- How to Create a Stationeers Server Guide
- Option #1: Renting a Stationeers server (see example control panel below!)
- Option #2: Creating a Stationeers Server From Your Home Computer or Dedicated Server
- Server Requirements
- Step 1: Fetching Game Server files from SteamCMD
- Step 1 (alternate method): Locating Game Server Files on Hard Drive
- Step 2: Setting up a Stationeers Dedicated Server
- Step 3: Port Forwarding
- How to Join Your Server (SurvivalServers.com Customers)
- Configuring your Stationeers Game Server!
- Stationeers Dedicated Server Configuration Variables
- Stationeers Admin Commands
- Stationeers dedicated server linux
- Dedicated server
- Contents
- Dedicated Server Commands [ ]
- Examples [ ]
- Remote Administrator [ ]
- Command Lists [ ]
- Linux Server with LinuxGSM [ править ]
- Installation on a Ubuntu 18.04 LTS Server [ править ]
- Start and Stop the Server [ править ]
- Edit configuration [ править ]
- Example: Change map to Mars [ править ]
How to Create a Stationeers Server Guide
Creating a Stationeers game server is an easy process that can be done from either a dedicated server or your home computer.
Option #1: Renting a Stationeers server (see example control panel below!)

Option #2: Creating a Stationeers Server From Your Home Computer or Dedicated Server
Server Requirements
Windows 7, 8, 8.1, Server 2008, Server 2012 & 64-Bit
Quad Core processor (requires up to 2 full cores)
Up to 3GB memory (currently uses around 6GB memory minimum and up to 15GB of memory for a full server)
2GB disk space (install folder)
Step 1: Fetching Game Server files from SteamCMD
The best method to get game server dedicated hosting files is via SteamCMD.
- Create a folder where you wish to store your Stationeers game server hosting files
- Inside of the folder, place the newly downloading SteamCMD.exe file
- Create a batch file named SteamCMD.bat
- Place the following code in this batch file:
@echo off start «» steamcmd.exe +login anonymous +force_install_dir «C:\Some\Path\Where\You\Want\Game\Server\Files\To\Go» +app_update 600760 validate +quit
- Right-click SteamCMD.bat and Run as Administrator
- Your game server files should be completely downloaded by now
Step 1 (alternate method): Locating Game Server Files on Hard Drive
You can host Stationeers directly from the game itself. If you want to change any settings, locate your common folder:
- Right-click Stationeers from Steam, select Properties
- Click Local Files tab
- Click ‘Browse Local Files button
Step 2: Setting up a Stationeers Dedicated Server
- Create a batch file named StationeersServer.bat in your newly created SteamCMD folder (Step 1) or your Steam common folder (Step 1: (alternate method)).
- Place the following code in this batch file:
start «C:\stationeersserver\Stationeers\rocketstation_DedicatedServer.exe» -batchmode -nographics -autostart
- Set up a C:\stationeersserver\Stationeers\default.ini file with
[SERVER] SERVERNAME=Stationeers GAMEPORT=27500 UPDATERPORT=27015 PASSWORD= MAPNAME=Mars DESCRIPTION=Stationeers MAXPLAYER=30 [RCON] RCONPASSWORD=stationeers RCONIP=127.0.0.1
Step 3: Port Forwarding
Add an incoming rule to your Windows Firewall to allow UDP port 27500 as well as 27015 (or whichever ports you are using).
You may additionally need to add a forwarding rule to your network router. You can use PortForward.com to read how to do this.
How to Join Your Server (SurvivalServers.com Customers)
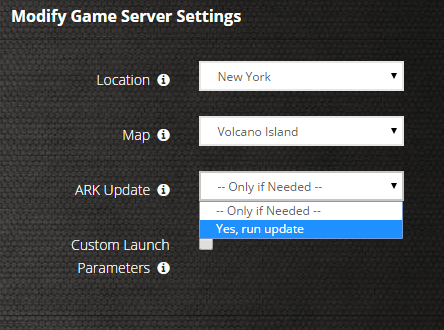
STEP 1: Update your server to the newest Stationeers version, then click the green update button at the bottom of the panel. * If you are not a Survival Servers customer ask your game server host about this.
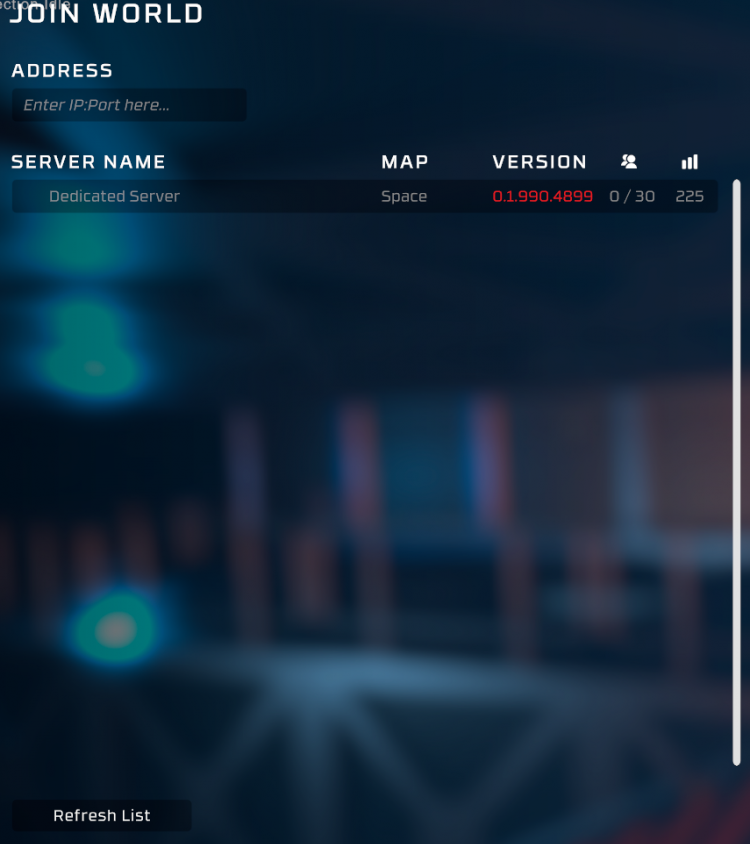
METHOD 2, STEP 1: Find your server from the in-game server list!
METHOD 2, STEP 2: Right click Steam in the task bar icons of your PC and select servers as pictured below.
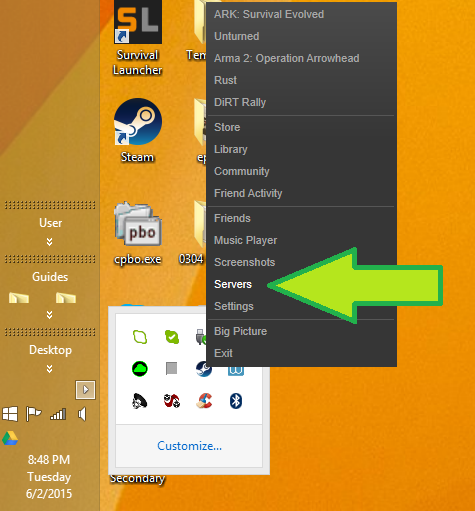
METHOD 2, STEP 3: Select Stationeers as your game at the bottom. Join your server!
Configuring your Stationeers Game Server!
Now comes the fun part, setting up your Stationeers game server to your liking.
You can find a list of
To modify game server settings you can open the \Stationeers\Default.ini
You can modify settings in here (in addition to the launch line) — these settings overwrite your launch line settings:
Stationeers Dedicated Server Configuration Variables
-batchmode Dedicated server runs without UI and start to listen port.
-nograpics When running in batch mode, do not initialize graphics device at all. This makes it possible to run your automated workflows on machines that don’t even have a GPU.
-autostart Dedicated server start to listen port without player input. It’s always enabled on Linux dedicated server.
-autosaveinterval integer Save world in every interval.
-creator int64 Set creator’s steam id as gamedata and key-value. This is for future integration of server instancing.
-worldname string Load and save game data automatically from existing file.
-worldtype string Worldtype(Space, Mars, Terrain)
-loadworld string Load world from saved file. If loadworld is enabled, worldname command is ignored.
-gameport integer UDP port for game. Avoid to set 27015-27020. It’s steam’s local server query ports.
-updateport integer UDP port for steam query
-servername string Server title.
-basedirectory string Absolute base directory for custom profile Ex) -basedirectory C:\Profile\Player1 Config Path : C:\Profile\Player1\default.ini Save Path : C:\Profile\Player1\saves\[worldname]
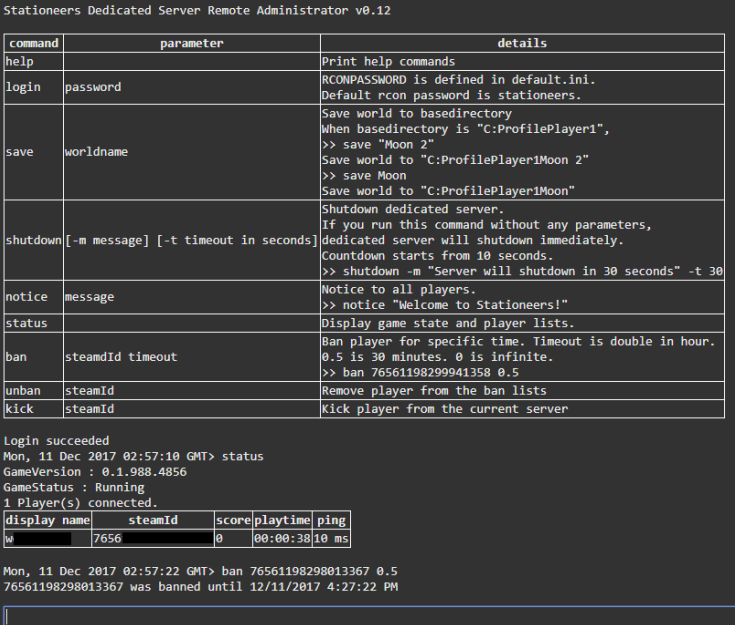
Stationeers Admin Commands
You can send commands on web browser. Link : http://[dedicated server address]:[GamePort]
help Print help commands
RCONPASSWORD is defined in default.ini. Default rcon password is stationeers.
save Save world to basedirectory
shutdown [-m message] [-t timeout in seconds] Shutdown dedicated server. if you run this command without any parameters, dedicated server will shutdown immediately. Countdown starts from 10 seconds example — shutdown -m «Server will shutdown in 30 seconds» -t 30
notice Notice to all players. Example: notice «Welcome to Stationeers!»
status Display game stat and player lists
ban Ban player for specific amount of time. Timeout is double in hour. 0.5 is 30 minutes. 0 is infinite. Example: ban 76561198299941358 0.5
Источник
Stationeers dedicated server linux


| 2,992 | уникальных посетителей |
| 30 | добавили в избранное |

The first step is to retrieve the files for the game, this is done via SteamCMD.
Follow the guide here on how to use STEAMCMD.
Once you have STEAMCMD, run the following command:
steamcmd +login anonymous +force_install_dir C:\SteamCMD\myserver +app_update 600760 validate +exit
Note: You can adjust the +force_install_dir paramter to the directory you want to download the server to.
This will then download the entire game, Once completed, it’s time to setup the server configuration.
For windows, you will require the following to be installed:
Inside the content you just downloaded, there will be several files, proceed to edit the following file: default.ini
Go ahead and edit this file in a text editor such as notepad.
It should look similar to this:
[SERVER]
SERVERNAME=My Stationeers Server
GAMEPORT=27500
UPDATERPORT=27015
PASSWORD=
MAPNAME=Moon
DESCRIPTION=Stationeers
MAXPLAYER=10
[RCON]
RCONPASSWORD=stationeers
In this file you will be able to edit the settings such as the server name.
e.g. The following line:
Will set your server to be called «My Stationeers Server»
The best method for a self-hosted solution is to create a simple .batch file,
Inside your folder where rocketstation_DedicatedServer.exe is located, create a batch file with the following content:
start rocketstation_DedicatedServer.exe -autostart -nographics -batchmode
This will then start the server up with the following map: Moon (That is the default map and the map defined in the configuration example above and 10 maxplayers as dicated in the default configuration file above..
Please note some port-forwarding may be required, by default the server will use game port 27500 and query port 27015, you should unblock these ports in your firewall\router.
Источник
Dedicated server
Contents
Dedicated Server Commands [ ]
String parameters can take space with double quotes.
| parameter | value | etc |
|---|---|---|
| -batchmode | Dedicated server runs without UI and start to listen port. | |
| -nograpics | When running in batch mode, do not initialize graphics device at all. | |
| -autostart | Dedicated server start to listen port without player input. It’s always enabled on Linux dedicated server | |
| -autosaveinterval | integer | Save world in every interval. |
| -creator | int64 | Set creator’s steam id as gamedata and key-value. This is for future integration of server instancing. |
| -worldname | string | Load and save game data automatically from existing file. |
| -worldtype | string | Worldtype(Space, Mars, Terrain) |
| -loadworld | string | Load world from saved file. If loadworld is enabled, worldname command is ignored. |
| -gameport | integer | UDP port for game. Avoid to set 27015-27020. It’s steam’s local server query ports. |
| -updateport | integer | UDP port for steam query |
| -servername | string | Server title. |
| -basedirectory | string | Absolute base directory for custom profile Ex) -basedirectory C:\Profile\Player1 Config Path : default.ini C:\Profile\Player1\ Save Path : C:\Profile\Player1\saves\[worldname] |
batchmode and nograpics are Unity3D commands.
Examples [ ]
Dedicated server starts new Mars world. Autosave every 5 mins to Mars1. [ ]
Load Mothership file. Autosave every 5 mins. [ ]
Load . Autosave every 5 mins. C:\Profile\Player1\saves\Mothership C:\Profile\Player1\saves\map1 [ ]
Configuration from default.ini [ ]
default.ini will be created once you start game. Command parameters override defaut.ini
Remote Administrator [ ]
You can send commands on web browser.
Command Lists [ ]
| Command | Parameter | Details |
|---|---|---|
| login | password | RCONPASSWORD is defined in default.ini. Default rcon password is stationeers. |
| save | worldname | Save world to basedirectory |
When basedirectory is «C:\Profile\Player1»,
Save world to «C:\Profile\Player1\Moon 2»
Save world to «C:\Profile\Player1\Moon»
Game client displays messages in the system message window at this moment.
Источник
Linux Server with LinuxGSM [ править ]
You could run a Linux Dedicated Server on these Distros:
- Ubuntu 16.04/18.04 LTS
- Debian 8
- CentOS 7
Installation on a Ubuntu 18.04 LTS Server [ править ]
It’s possible to download the iso-file for installation from here:
https://ubuntu.com/download/server
This should not be a tutorial on how to set up a VM and install Ubuntu. There are many of them already out there.
First it’s necessary to install all the dependencies for LinuxGSM:
To not having the server running with root privileges, it is recommended to set up a new user for the game server.
To create a new user in linux use:
For security best practice, ensure you set a strong password!
After installing the dependencies and creating a user, switch to that user and do the following steps:
Download linuxgsm.sh with wget.
Make the script executable.
Setup the Stationeers Server instance.
Run the installer following the on-screen instructions.
The script now downloads the server binaries and default configuration.
Start and Stop the Server [ править ]
To start the server use this command.
In Default the server will start a Moon map. To join the server use the local IP with the Port 27500.
To join the server from a different location, it’s necessary to forward the port 27500/tcp and 27015/udp to the local server.
If it’s not possible to connect make sure the Ubuntu Firewall is off or configured to let these ports open. To check this run this as root user.
To disable it use:
To see the details use:
To stop the server use:
This command shows all attributes
To show the live console of the server use:
To exit the console pres CTRL+b and then «d»
Edit configuration [ править ]
The Configuration is stored under the folder lgsm/config-lgsm/stserver. There are three files:
- _default.cfg (contains the whole configuration with the default values Do not edit this file)
- common.cfg (the settings for this server)
- stserver.cfg (the settings for this instance)
If there is only one instance/server running and there will not be any other server it doesn’t matter if you change the settings in common.cfg or stserver.cfg. If you planing to run more than one server or instance on the same VM you have to consider if the setting should apply server wide (all instances), or just for a specific Stationeers instance.
Example: Change map to Mars [ править ]
Use your favorite text editor (ex. vi or nano) and open the _default.cfg (remember not to do any changes here) search for the setting you want to change and copy the text. In our example it is this:
Now open the file you want to configure. If you want any instance to run a Mars map use common.cfg or if only one instance should run this map use stserver.cfg (or stserver-2.cfg for the next instance). Paste the text at the end of the file and change «Moon» to «Mars»
Now restart your server with ./stserver restart
Make sure you also change the worldname (this is the folder where the savegame is). If the savegame-file is for a different world than the config is set to, the server will not start.
Источник


