Тема metro для steam

Доброго времени суток! Хочу презентовать вам саму популярную (не только, на мой взгляд, а, по мнению всего сообщества) тему metro for steam. Скачать ее вы сможете абсолютно бесплатно и воспользоваться для небольшого украшения клиента.
Зачем она нужна и для чего metro использовать?
Ни для кого не секрет, что дизайн стим уже давненько не обновляется. Valve обещает новое обновление, тем не менее, когда оно выйдет в общий свет никто не знает. Для всех кто хочет уже слегка преобразить дизайнерские решения, то вы всегда сможете воспользоваться работами сообщества steam. В этой теме вы найдете одну из самых лучших тем – metro. Скин metro это не только изменение цветов, а большая проработка и изменения некоторого функционала, что будет очень удобным для многих пользователей.
Как установить metro в Steam?
- Скачиваем архив с нашего сайта
- Разархивируем папку metro (ВАЖНО. В папке metro не должно быть другой, повторной папки metro, а только папки с названиями friends, graphics и т.д.)
- Переходим в корневую папку стим (там где он установлен)
- Переходим в Steam/skins/ и копируем туда папку metro
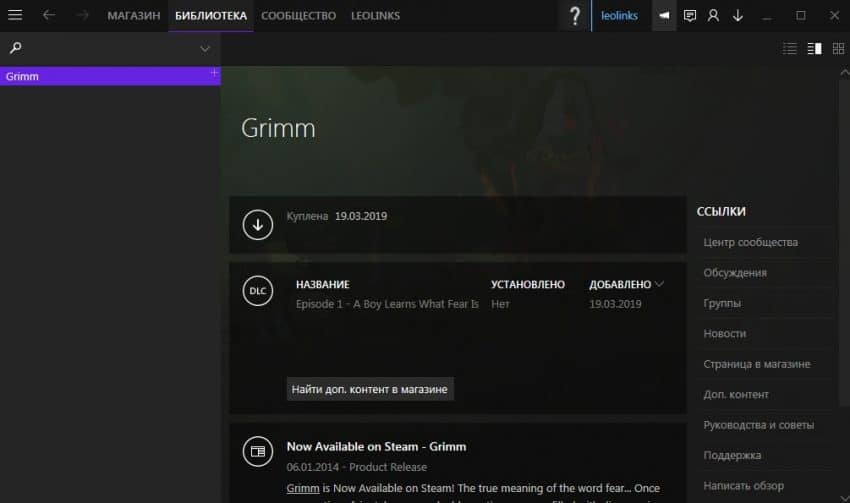
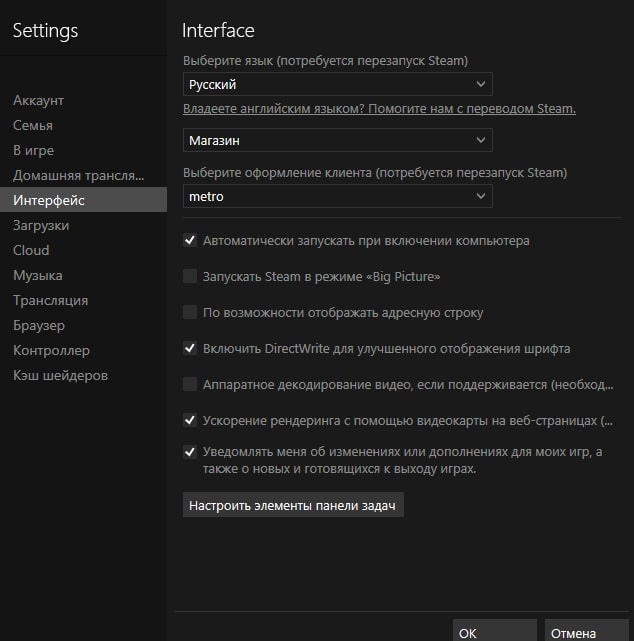
- Переходим в «Steam» — «Настройки» — «Интерфейс» и активируем нашу тему.
- При необходимости перезагружаем steam
- Готово.
Если у вас возникли проблемы или дополнительные вопросы по установке, вы можете просмотреть полную статью про установку темы metro
Итак, надеюсь, вам понравилась данная работа, и вы остались довольными новым обновлением клиента.
Steam для Windows 10 бесплатно — Официальная версия
 | Для скачивания игр |
| Windows 10 | |
| 32 bit, 64 bit, x32, x64 | |
| Компьютер | |
| на Русском | |
| Последняя | |
| Valve |
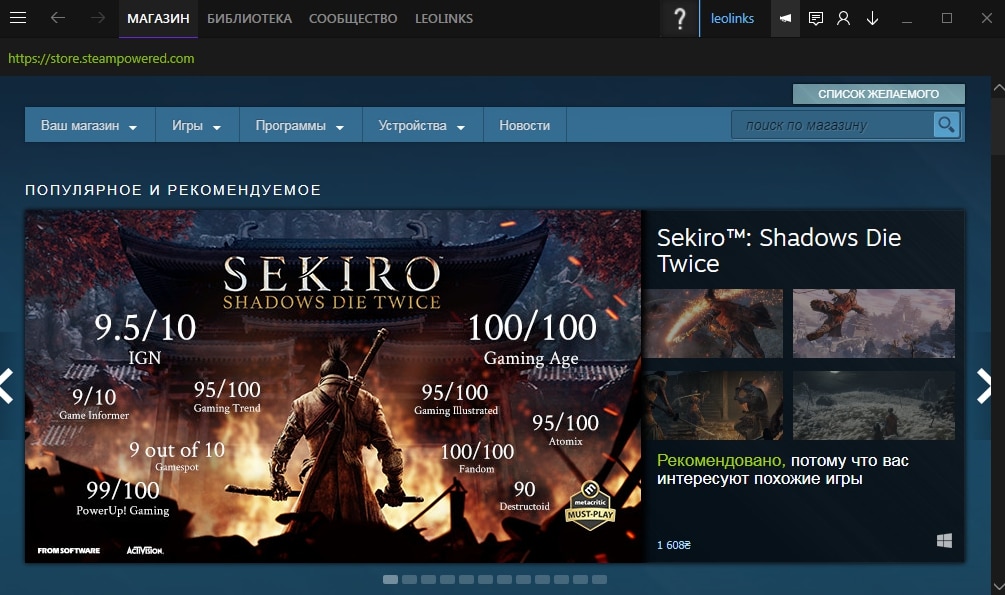
Довольно таки просто скачать Стим на Windows 10 так как он является игровой платформой для скачивания и установки только качественного игрового контента. Каждый пользователь любит проводить время за монитором компьютера. Существует множество мест для скачивания игр, однако, существует опасность подцепить вирус или установить пиратскую версию программы, которая никогда не будет работать корректно, чтобы избежать неприятностей установки игр с непроверенных источников скачайте Steam.
Steam для Windows 10 на компьютер
Он представляет собой не только сервис для скачивания игр, но и своего рода социальной сетью, где каждый пользователь имеет персональную страничку, может обмениваться информацией с другими участниками путем использования текстового и голосового чата, дарить подарки и транслировать игровые моменты. Все игры распределены по категориям. Разработчиком утилиты является корпорация Valve, однако помимо своих игр Стим предлагает к скачиванию продукцию других разработчиков, а помимо платных также бесплатные игры, в которые можно играть вместе с другими пользователями.
Для установки платформы на компьютер, необходимо пройти процедуру регистрации и идентификации на сайте. Там же создается страница пользователя и создается игровой аккаунт. После этого можно скачать и установить программу на компьютер, для этого спуститесь ниже к блоку загрузок и нажмите кнопку «Скачать». Желательно выбрать путь установки программы на тот диск который больше по объёму. Для запуска приложения необходимо нажать на его иконку на рабочем столе. В открывшемся окне вводим данные аккаунта, созданного при регистрации. После завершения процедуры входа на рабочем столе отобразиться интерфейс Steam, отобразится вкладка библиотеки со всеми доступными приложениями для вас, на вкладке магазин можно купить любые доступные там игры.
Steam для windows 10 metro


A set of fixes and extras brought to you by RedSigma and the former member K12T6
This non-official addon for Metro for Steam 4.x [www.metroforsteam.com] fixes bugs with the current version and adds optional content for you to choose from.
- Check out the Discord server. [discord.gg]
- Supports the Steam Beta Update as of 20/12/2020.
- Added Support for linux
- Tested with Linux Mint Sarah 18 | Ubuntu 16.04
- Added frame focus on chat windows
- Added News item in the hamburger menu
- Minor design fixes to match the official version
- Minor fixes for text selection especially in the News panel
- Moved the steamVR button next to the bigpicture button when using that extra
- Fixed some missing images on some themes
- Fixed the find bar
- Improved Backup Wizard Visual Design
- Updated Segoe UI FONT FIX with 2 more fonts. for consistency 😀
- Thanks LazR
- New Extra: Removed In-Game tag
For a full list of changes of all previous updates, open Change Log.rtf in the downloaded archive.
The extras that are formatted as A + B are for extras that modifiy the same files. For example if you want to use the extra «Big Picture Button» as well as «Green Notification Box» you would use the files within «Big Picture Button + Green Notification Box»
- Client Windows
- Accent Scrollbars
- Blue Scrollbars
- Hide Account Details
- Red Highlight on Close Caption Button
- Friends and Chat
- Removed Message Preview
- Removed In-Game Tag
- High DPI
- Increased fonts
- Navigation Bar
- Big Picture Button
- Big Picture Button + Green Notification Box
- Big Picture Button + Green Notification Icon
- Green Notification Box
- Green Notification Icon
- No Dropmenu Profile Text
- Other
- Win10 Notification Animation
- Overlay
- Alternate Overlay Style
- Default Overlay Style
- Friend Avatars
- Remastered Extra
- Themes
- Metro Blue
- Metro Midnight
- Metro White
- Metro Dark
How to Install[metroforsteam.com]
- Extract it into your SteamDir/skins/ folder
- Extract the files within the Main Files Folder into skins/Metro Skin/ and replace everything
- If it doesn’t ask you to overwrite the files then you did something wrong
- Extract the files found inside the Install folder of each extra, to the SteamDir/skins/Metro Skin/ and overwrite everything.
- To remove all the extras, re-apply the files within the main files folder.
- If it doesn’t ask you to overwrite then you did something wrong.
WARNING: Applying the Main Files will reset the webkit.css file so backup it before if you were using a custom one.
All extras and main files have the folders premade. You only need to drag an drop the files within the main files folder, and for extras, the files within the Install folder
Steam для windows 10 metro


| 2,323 | уникальных посетителей |
| 123 | добавили в избранное |

This skin enhances the default skin by giving the interface a clean yet modern look and feel based on Microsoft’s ‘Metro’ Design Language (now superseded by Fluent). To be honest, Steam’s default skin is quite ugly and out-of-date.
First of all, check out the Metro for Steam website [metroforsteam.com] and their steam group! They also have a discord: here [discord.gg] . If there are any mistakes, errors, typos or something missing hit me up on Steam or Discord (BallOpener#8102).
It’s a very comprehensive guide on this skin, so buckle up, make yourself a cheese toastie and a hot drink!
Before you continue you’ll need to download some files:
Always download the latest version! You may need a .rar/.zip extractor of your choice. I use 7zip [www.7-zip.org] as it is free and open-source.
This complete guide works for all Steam platforms and operating systems (Windows, macOS and Linux). Some applications may require additional dependencies or only works on some operating systems. Check the repos linked for additional instructions or resources.
* This version is currently in beta/pre-release. There may be bugs, instability and unthemed content present. Please report any bugs on the Discord.
There are a bunch of different styles and looks to choose from. Click the example screenshot link to see a preview of the skin.
You should download a CSS file named: ‘friends.custom.css’ by right-clicking the code and selecting the ‘Save As’ option. Save it to ‘Downloads’ or C:/Program Files (x86)/steam/cilentui/ (or wherever Steam is installed). For RedSigma’s skin, just extract the .zip file (you only need the CSS file).
The Hopeless Gamer also has a Circle version [raw.githubusercontent.com] .
There’s also an installer by LaserFlash: here [github.com] and check their instructions on the repo [github.com] . This is just for people that are too lazy to drag-and-drop the files. They also created an online friend’s list and chat skin customiser, here [t.ly] .
Alternatively, you can use the Automatic Installer for Metro for Steam [github.com] to install the base UI and the unofficial patch at the same time. See the ‘Automatic Installer’ section. Make sure that you download the most recent version of the installer.
If manually installing, check the ‘Manual Installation’ section and this forum post on the Steam Group.
For the lazy, there’s an all-in-one package that contains a mix of everything here [github.com] by Hyoretsu/Bucetossauro.
For those that do not know any website creation whatsoever here is a short explanation of what certain abbreviation means.
CSS (Cascading Style Sheets) [www.w3schools.com] : Cascading Style Sheets as the name implies describes the style and look of a webpage in HTML.
HTML (HyperText Markup Language) [www.w3schools.com] : HypeText Markup Language is the layout and the skeleton of a webpage. It is not a programming language but rather a markup language.
Javascript (often shortened to JS): [www.w3schools.com] Not to be confused with Java, a completely different programming language is a popular programming language for the web.
Clicking on the link will send you to w3schools [www.w3schools.com] , a reliable and free website that teaches you any of the above languages.
To enter into this mode, create a Steam shortcut and add ‘-dev’ (without quotes) to the ‘target’ field next to the location target address. Kill the current Steam process by either right-clicking the icon in the System Tray and selecting ‘Exit’, or going into the Hamburger Menu and selecting ‘Exit’. Click on the newly-created shortcut. Steam should launch and you should see ‘Console’ in the top row and when you press F6, the VGUI editor would popup. This is used to edit the base skin and view its properties.
When you enter the Store, Library, Chat or Friends List, press F12 to view the ‘DevTools’. This allows you to edit and view the code for the Store, Library, Friends List and Chat. In Library or Friends List press F5 to refresh the ‘page’ after an edit.
To exit out of ‘Dev Mode’ kill the current Steam process and launch a new instance of Steam from another shortcut.
See the relevant section.
The unofficial patch also has some extras to install, check the ‘Manual Installation’ section and this forum post on the Steam Group for a list of extras.
The dark mod that changes the ‘in-app web browser’ has two different options: hard edges (top image) and rounded edges (bottom image).
This would make your steam look like this! (Sort of, there are other modifications not listed here.)
You would need the base skin and the unofficial patch. There are some extras that are only available using the manual installation method. This is a recommended method on macOS and Linux.
On Windows:
Extract the base skin file. Move the base Metro skin folder to the skin folder where Steam is installed on your computer. The default installation on Windows is C:\Program Files (x86)\Steam\skins.
On macOS:
Place the skin folder in
/Library/ApplicationSupport/Steam/Steam.AppBundle/Steam/Contents/MacOS/skins or by right-clicking the app bundle ‘Steam.app’, then ‘Show Package Contents’ where Steam is installed (usually in the Applications folder) and browse to /Contents/MacOS/skins.
On Linux:
Place the skin folder in
Then, extract the unofficial patch. Move the MAIN FILES first and overwrite/replace files in the base Metro skin folder.
Optional: Then, choose and select any extras. (To see a preview of the extra, enter into the folder of an extra of your choice and find an image file.) Drag the files contained in the extra to the root directory of the Metro skin folder. Accept the overwrite of files. To remove/uninstall the extra, replace the files from the Main Files folder in the patch that you had replaced or reinstall the skin.
To change the skin, click on the hamburger menu in the default skin and select settings -> Interface and select ‘metro-for-steam 4.4’ in the dropdown box.
To update the entire skin, repeat the instructions.
If the update is small like a minor bug patch or a minor feature upgrade, download and replace the required file(s) stated on the ‘Announcements’ channel on the Unofficial Metro for Steam Discord. Head to the master folder on GitHub and find the stated file. Click on the file. Click on ‘Raw’ on the right-hand side of the page next to ‘Blame’ and ‘History’. Then right-click to save the file to the location where the skin is installed in the same location as where you had downloaded the file on the master folder (ie: \MetroSkin\resource\filename.res). Make sure to overwrite that file. Repeat if there is more than one file that needs updating.
This would reduce the need to replace or reinstall the entire skin. Not only this decreases file duplicates but also declutter your Downloads folder by only requiring you to replace the required file(s) needed for the update.
Run the application.
Click on the ‘Next’ under the Patched version.
Wait until the extras are loaded and select your extras to install. Make sure to check the checkbox to save the selected extras. Click ‘Install Now’.
Wait for the installation to complete.
Now it’s finished. Exit the application.
In the default Steam skin, go to the hamburger menu and click on settings, then Interface and in the dropdown box change from ‘default skin’ to ‘MetroSkin’. Steam will require you to restart.
The Automatic Installer would have a popup box indicating to you that there is an update to download. I recommend that you update the installer.
To update the skin, wait for an update to the installer and run the installer as normal. Check the patch notes on the releases page of the repo for details. Alternately, follow the instructions in the ‘Updating the Skin’ part of the ‘Manual Installation’ section of the guide if you want to quickly update the skin.
To personalise Metro for Steam’s base skin like accent colours and custom fonts, head to here [sundergaming.com] or here [metroforsteam.com] .
It looks like this!
Beware that the styles/decals for the library do not work anymore. Decals break the generated file, so it’s best not to select any decals. If you are going to use a custom font, make sure that the custom font is installed on your computer first, or it would default to the base font for Metro for Steam (a sans-serif font likely Segoe UI in Windows, Helvetica or Arial in macOS and Linux).
Click on ‘Save’ to download the file. Head to the location where your skin is installed (usually C:/Programs Files (x86)/Steam/Skins/MetroSkin for example). Override the file named ‘custom.syles’ and restart Steam.
Use a colour picker to pick an accent colour from
here [www.materialui.co] or here [colorlib.com] . Make sure to use the same accent colour throughout the skin.
Copy the hex code (e.g. for teal it’s 00aba9) or the RGB (Red Green Blue) code (e.g. for teal it’s 0,171,169) on the colour picker and paste them in their respective location(s) in the CSS file either next to
for teal and the hash (#) before the hex code.
Download the Dark mode files and extract the folder called ‘steam-dark-mode-master’ to the Desktop. There are two versions: hard and round edges.
There are two methods of installing this:
The easiest method is to just move the file called ‘webkit.css’ in the folder to C:/Programs Files (x86)/Steam/Skins/MetroSkin/resource (or wherever Steam is installed) and overwrite the file. Restart Steam to see the changes.
Another is to use the ‘SteamDarkModeTool.bat’ file. See the included gifs for detailed instructions.
If there is an update to the mod, replace the file ‘webkit.css’ or run ‘SteamDarkModeTool.bat’ and select the third option.
Replace or copy ‘webkit.css’ to:
Remember to add back the Library and Friends List/Chat modifications back to the ‘webkit.css’ when you update the Dark Mode mod.
Linux and macOS users: skip this part.
You will need the Steam Friend Patcher and the Metro for Steam modifications (‘libraryroot.custom.css’, ‘config.css’ [basically the Library modifications] and ‘friends.custom.css’ [the Friend’s List/Chat modifications]). Extract the files if needed.
When you first start the patcher, you will see a log with words scrolling, three buttons on the left called ‘Stop Scanning’, ‘Force Check’ and ‘Clear Cache’. On the right-hand side, the info button and the settings. The info button has some information about recommended options to set. The program will automatically extract the ‘root’ files and apply the modifications to the Library and the Friend’s List/Chat.
‘Force Check’ is run automatically when you first launch the program. This manually pushes the modifications to be patched. Every time Valve releases an update for the Friend’s List/Chat or the Library you will need to click this option.
‘Stop Scanning’ and ‘Start Scanning’ options enable you to automatically patch the Friend’s List/Chat and the Library on the fly even if an update is released.
If there are any issues use the ‘Clear Cache’ option to empty the cache of Steam and restart Steam.
Head into the ‘Settings’ menu in the bottom right. Make sure that ‘Start with Windows’, ‘Check for Updates’, ‘Patch Beta’ and ‘Patch Library’ is selected. Leave all the options at the default settings. ‘Start with Windows’ ensures that the application patches Steam so that the mod works when you start-up into Windows. When updating the patcher you would need to set these settings again and override the old version of the patcher.
Update: regardless if you are using the Steam Beta version or not you need to check ‘Patch Beta’ or the modification will not work.
Extract and drag the CSS files named ‘libraryroot.custom.css’ and ‘config.css’ in the downloaded zip ‘steam-library-master’ to C:\Program Files (x86)\Steam\steamui (or wherever Steam is installed). Accept the override of the files.
Move the CSS file named ‘friends.custom.css’ to C:\Program Files (x86)\Steam\clientui (or wherever Steam is installed). Accept the override of the files.
After finishing, click on ‘Force Check’ option in the patcher and reload the Library and Friend’s List/Chat menus. You’re done!
Ensure that the modifications are downloaded. You do not need the patcher as it is a Windows-only application.
First, create a backup of the original ‘webkit.css’ or the ‘webkit.css’ with the Dark Mode mod installed in case something goes wrong by renaming the file from ‘webkit.css’ to ‘webkit.css.bak’ or creating a copy elsewhere. You can rename it back to ‘webkit.css’ to revert any changes.
Replace or copy the contents of ‘libraryroot.custom.css’ and ‘config.css’ to ‘webkit.css’ located below. Make sure to leave a gap under the main ‘webkit.css’ code.
To install the friends’ skin of your choice, copy or replace the contents named ‘friends.custom.css’ in the same location as above. Make sure to leave a gap under the Library Makeover code.
Optional:
Leave some gaps in the CSS file. Add some comments like
for example, underneath or above the code to easily distinguish and identify between the mods for updating or editing.
You may need to add additional CSS code or files to override or replace the original code if you intend to customise or personalise the skin, which may require CSS knowledge. Not a recommended method to install the mods due to the lack of customisation. Only recommended for people that want an easy way to update the mods.
Repeat these instructions in the relevant sections above if you are updating the mod(s). Check the Discord for regular updates and patch notes or in the repo of the mod.
You can edit the CSS file(s) to your preferences at your own risk. Knowledge of CSS may be required. ‘Config.css’ is the CSS file to edit for the Steam Library. Make sure you know what you’re doing and read the headings or comments in green. Keep backups just in case.
When choosing colours, I recommend that you use the accent colour that you chose in the ‘Personalisation’ section of the guide. To modify the Steam Library, insert the code in ‘Libraryroot.custom.css’ make sure to add
(this line modifies the top header ‘ in the navigation bar in the Steam Library).
If editing the CSS files, I would recommend a code/text-editing program like Notepad++ [notepad-plus-plus.org] or Visual Studio Code [code.visualstudio.com] . For CSS references, tutorials and help check out w3schools [www.w3schools.com] or the Discord.
There a GUI editor [github.com] created by Aeryle for the Shiina’s Library if you want something that’s easier to edit from.
You can enable ‘Small Mode’ of the Library by clicking the Steam logo and selecting it in the dropdown menu (if you are using the latest version of the unofficial patch) and you can go back to the large mode by selecting ‘Large Mode’.
After making the changes, make sure to save and reload the Library by leaving the library to the Store or Community Hub and then re-entering back into the library.
- Click ‘Force Check’ then reload the skin by closing the skin/window and re-entering back into the window.
- Restart Steam.
- Check if the patcher is actually running.
- Restart your computer and open Steam up first, then the patcher.
- Click on ‘Stop Running’ in the patcher to turn it off then on again.
- Click on ‘Clear Steam Cache’ in the patcher and restart Steam.
- Check the syntax and closing brackets in the code of your CSS files.
- Delete ‘steamui’ or ‘clientui’ folder to reset the Friend’s List/Chat or Library to factory defaults.
- Finally, if the above steps do not work; seek help on the Discord.
I recommend deleting all unused downloaded files from this guide and cleaning up your Downloads folder after the installation has completed.
These are optional extras for your Steam Library!
These white logo covers and artwork look like this!
Check out https://www.steamgriddb.com/ to download more covers and share them with others. Download the manager [www.steamgriddb.com] to change the covers of your installed games.
Here is an application that finds game covers: Steam Grid Cover Finder [github.com] created by AriJKh. Make sure to install GraphicsMagicK [www.graphicsmagick.org] if you want the app to automatically create a game cover when the app can’t find one.
Here’s Jonius7’s version here where it does a similar thing: Steam Missing Covers Downloader build [github.com] .
Here’s another cover ‘grabber’: Steam Grid [github.com]
Also, check out r/steamgrid as well for extra resources, links or just to share!
To change the covers: right-click the game cover and select ‘Manage’ then ‘Set custom artwork’. Choose the artwork.


