Как узнать частоту кадров в играх средствами Windows 10
Частота кадров в играх, она же FPS — самый важный показатель плавности. Конечно, в широких пределах ее можно узнать на глазок, но чтобы точно получить «играбельный» результат используются различные счетчики. Пожалуй, один из самых известных это Fraps, но есть и множество других, начиная от встроенных в Steam или Uplay и заканчивая MSI Afterburner и FPS Monitor. Но у всех этих программ есть минус: их нужно устанавливать, и некоторые из них платные. Поэтому Microsoft пошла своим путем, интегрировав счетчик FPS в Xbox Game Bar. Он работает в подавляющем большинстве игр и неплохо кастомизируется, так что как базовое средство мониторинга плавности отлично подойдет.
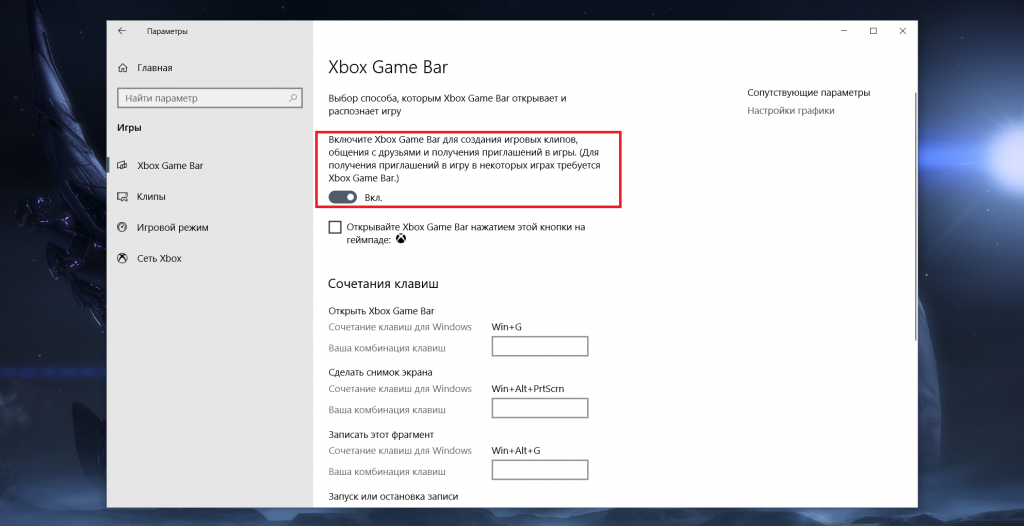
Итак, чтобы воспользоваться таким измерителем частоты кадров в секунду, вам нужно обновить Windows 10 до версии 2004 (May 2020 Update). После этого нужно убедиться, что у вас в системе установлен Xbox Game Bar (если вы его удалили — он бесплатно ставится из Microsoft Store). Также нужно убедиться, что он включен — для этого нужно перейти в Параметры > Игры > Xbox Game Bar и активировать самый первый переключатель на странице:
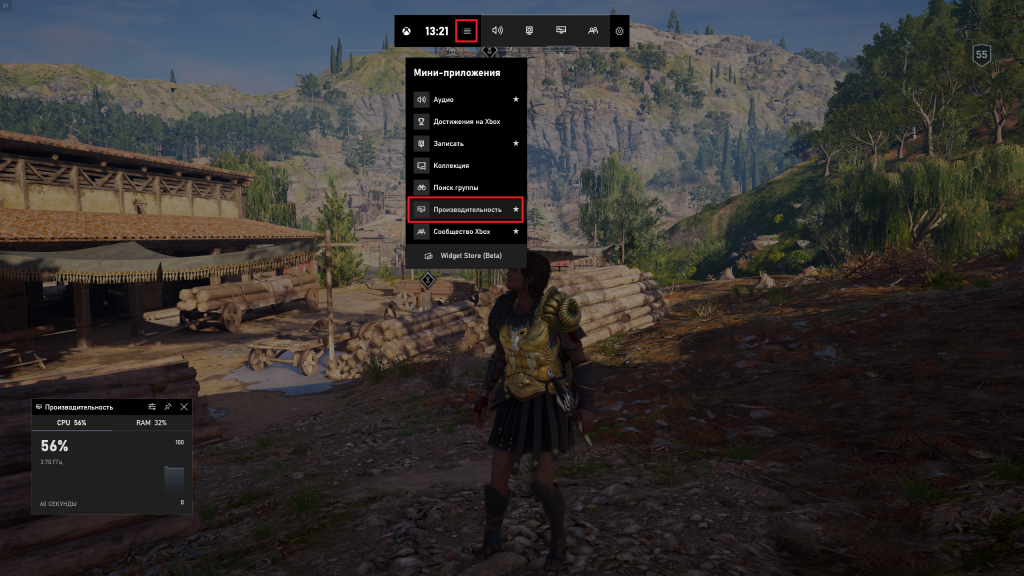
Все, после этого запустите нужную игру и нажмите в ней сочетание клавиш Win+G. После этого нажмите на значок мини-приложений и выберите там опцию «Производительность» (возможно, она сразу будет на оверлее и включать ее не придется):
Теперь нужно настроить само окошко мониторинга. Нажмите в нем на значок настроек, после чего выберите, что должно отображаться, каким цветом и с каким коэффициентом прозрачности:
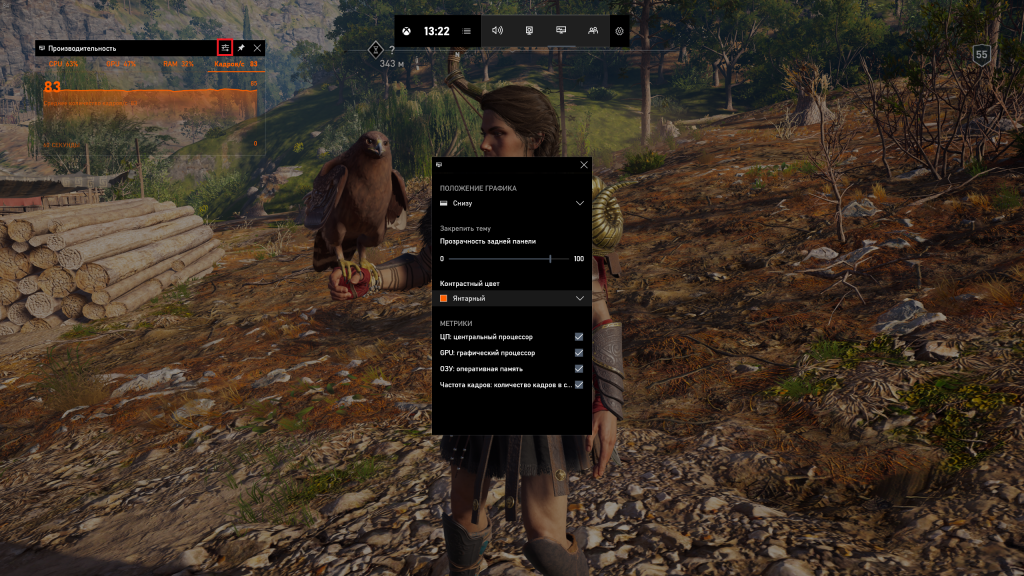
При этом само окошко, разумеется, можно передвинуть в любую удобную область экрана. Также нужно понимать, что мониторинг пока реализован достаточно криво: так, показывается лишь общая нагрузка на CPU и его базовая, а не реальная частота. Мониторинг GPU вообще показывает загрузку видеопамяти. Поэтому если вы хотите кроме FPS видеть нагрузку на остальные компоненты ПК, то стоит перейти к диспетчеру задач и его превратить в оверлей.
После всех настроек окна мониторинга нужно нажать на нем на вкладку в FPS, чтобы видеть график и среднее количество кадров в секунду. Далее остается скрыть Xbox Game Bar нажатием на Win+G и вуаля, у вас остается игра и небольшое окошко с FPS:
Работе Nvidia G-Sync или AMD FreeSync оно не мешает, а влияние на производительность ПК оказывает минимальное, так что его вполне можно использовать во всех играх.
Steam fps windows 10
I just disabeled Steam Beta
I have also done this. When i get the lag in steam i just close it and start it up again. Seems to dort it. Huge pain in the arse,


====================================================================
Step One: In the bottom left hand side of you screen they is the search bar, open that up and search «View local services» and open it
====================================================================
Step two: Scroll down until you find the service called «Steam Client Service», Then right click it and select «properties»
====================================================================
Step three: Change Startup Type to «automatic» and then go down to Service status and click «stop», then after that click start, apply and the problem should be fixed.
====================================================================


====================================================================
Step One: In the bottom left hand side of you screen they is the search bar, open that up and search «View local services» and open it
====================================================================
Step two: Scroll down until you find the service called «Steam Client Service», Then right click it and select «properties»
====================================================================
Step three: Change Startup Type to «automatic» and then go down to Service status and click «stop», then after that click start, apply and the problem should be fixed.
====================================================================
I had this problem but here is how i fixed it
go to device manager
open the area of your graphics cards
update the drivers of each
Neither of these seem to fix my problem. Nothing has changed. Thoughts?
Neither of these seem to fix my problem. Nothing has changed. Thoughts?
What graphics card do you use? and is the problem with steam only or does the lag inclued games/
Steam fps windows 10
You can achieve perfect smoothness when moving the mouse, friezes disappear and boost FPS.
Everything needs to be done section by section. And even better — on a clean system. But at the end of the setup — you will not regret it.
The guide is also suitable for laptops.
Play a big role cfg
Nvidia Graphics Card Owners — Read the introduction to Section 5.2 carefully
The manual is based on my experience over the years.
If this guide helps someone, please rate it and leave a comment — it helped you or not.
Sorry for my English. I used google translator)
- Tradeoffer
- donatepay [donatepay.ru]


| 51,865 | уникальных посетителей |
| 1,052 | добавили в избранное |

Please write in the comments on how much fps you got.
First of all, if you have a discrete graphics card (the one that is inserted into the motherboard — Example: Nvidia GTX 1050, Radeon RX 580, or others), make sure that the cable from the monitor is inserted into the video card. There are people who buy expensive graphics cards, but plug the cable into the motherboard — thereby sitting on the integrated graphics of the processor.
Also back up your system
This is necessary to roll back the system if your drivers fly off or something goes wrong.
My computer — system properties — system protection
Select drive C and click configure — give 1-2% of the drive for recovery
Next, click on create — the restore point will be created
Start — settings — update and security — windows update — check for updates
If the update center does not see the latest version, you can force the upgrade to the latest version.
Windows 10 [www.microsoft.com]
select «Update Now»
Download the tool from the official microsoft website and run the tool — it will update your computer to the latest version.
We go into the properties of the computer.
We increase the page file.
Who has 16Gb of RAM — you can not put a page file.
For comparison, try swapping, and then remove and compare performance.
Who has AMD video cards — expose 30,000 MB to drive C or D — where there is free space.
Some games will crash until you put the page file. This applies only to AMD cards.
NetFraemwork is a software platform released by Microsoft. The platform is based on the Common Language Runtime (CLR), which is suitable for different programming languages.
DirectPlay — a network programming interface (API) that provides services at the transport and session level.
Control Panel — Programs and Features — Turn Windows Features on and off — and turn on NetFraemwork 3.5 and Legacy Components — DirectPlay (in older builds, instead of Legacy Components — Legacy Components)
DirectX [www.microsoft.com] — This standalone set is a package from the official site. In standard windows, there are no many components from versions 9-11 that are necessary for games and some applications. “Install” them only through a standalone package (the web installer will not help here). It is necessary to reinstall after each change of assembly number.
DirectX, which is installed with the game, does not have a complete package.
mem reduct [www.henrypp.org]
is a small application for freeing system memory pages. It makes it possible to free the system cache, modified and idle memory pages. Vobshchem — excess reinstallation will not do much harm.
1) We go into the BIOS of the motherboard and look for the HEPT (High Precision Event Timer) line and check that the function is turned on.
2) We start the computer. Run the command line (CMD) as administrator and enter the following commands in order. After each command, press Enter.
Commands to disable:
- bcdedit / set disabledynamictick false
- bcdedit / set useplatformclock false
- bcdedit / deletevalue useplatformclock
After entering all the commands, restart the computer.
If you suddenly notice that it has become worse — commands to return to their previous state.
Commands to enable:
- bcdedit / set disabledynamictick Yes
- bcdedit / set useplatformclock true
I have maximum fps when:
- HPET hardware enabled — in BIOS
- disabled software HPET — in the system via the command line.
Intelligent standby list cleaner [www.wagnardsoft.com]
You can also set an event timer — set 0.5
If your programs or games freeze or slow down from time to time, this program can help you.
A lot of reasons can cause slow operation in applications and games, one of such reasons is the lack of sufficient RAM. The program does not require installation.
The principle of operation is that as soon as applications in standby mode use too much memory (by default more than 1 gigabyte), and the system does not have enough free space (by default less than 1 gigabyte), the tool terminates this application and clears the memory. Thus creating additional resources for games or other applications. You can set thresholds yourself using the appropriate fields.
By clicking the Standby List button, you can also manually end programs.
TCP Optimizer [www.speedguide.net] — is a program that will allow you to achieve the fastest possible network connection with the lowest latency.
Run as administrator.
We set your internet speed.
Choosing — Optimal
Check for BIOS updates on her. If there is a newer BIOS — update.
They are free. We update everything except the drivers for the video card. Installing drivers on the video adapter in section No. 5
Driver Booster 7 in STEAM
If you want smoothness in the game, you need an SSD for the operating system and STEAM.
If you have a weak computer — there is no guarantee that your game will run smoothly.
But what will become better you will notice.
Now you can buy a new 120GB SSD for $ 25-30
If you have Steam and CS installed, reinstalling is only necessary if you have an SSD, but Steam and CS are on the HDD.
Setting STEAM
For comfortable work with the application, I offer the following settings
Settings for friends:
Click on the gear under the cross.
After installing CS, go to the steam library — right-click on CS — properties — set launch options.
Enter the values: Make some settings for yourself.
-freq 144 -novid -console -high -threads 6 -noaafonts -processheap +fps_max_menu 999 +fps_max 999 -tickrate 128 +cl_cmdrate 128 +cl_updaterate 128 +cl_interp_ratio 1 +cl_interp 0 +mat_queue_mode 2 +cl_forcepreload 1 +cl_lagcompensation 1
-noubershader — new option (added 2020.04.04 — Users on very old Intel hardware can set this launch option to improve their framerate. This option is not recommended otherwise as it is likely to cause stuttering on the overwhelming majority of GPUs) on older intel processors.
-freq «number» — screen refresh rate, for example 120,144,240 (-freq 144) If you have a regular monitor — you can leave this parameter
-novid — disable the start movie
-console — turns on the console at startup
-high — launch a game with a high priority (we recommend it)
-threads «number» — the number of processor cores involved
-noaafonts — disables screen font smoothing
+ fps_max_menu 999 — fps in the main menu
+ fps_max 999 — fps in the game
-tickrate 128 — refresh rate — from server (per second) — used only for server
+ cl_cmdrate 128 — maximum number (per second) of packets sent to the server
+ cl_updaterate 128 — maximum number (per second) of requested updates; packets from the server
+ cl_interp_ratio 1 — the number of gaps between the «interpolation» of the world
+ cl_interp 0 — time interval through which interpolation occurs
+ mat_queue_mode 2 — force multi-core
+ cl_forcepreload 1 — 3 loads information about textures and models at the beginning of the map
+ cl_lagcompensation 1
-noforcemspd — use mouse speed from windows;
-noforcemaccel — disable mouse acceleration;
-noforcemparms — use mouse button settings from windows;
-language english — switches the game to English;
-windowed — to start the game in windowed mode;
Download CFG — NEW [drive.google.com]
Copy cfg to the game folder along the path STEAM \ steamapps \ common \ Counter-Strike Global Offensive \ csgo \ cfg
It is because of this config that the movement of the mouse will move smoothly.
I did not understand how it differs from the default. As a basis, I took the s1mpla config.
Who is afraid to download from google drive copy all of the two parts into a text document and change the extensions from txt to cfg
unbindall
bind «0» «cl_crosshairdot 1;cl_crosshairgap -2;cl_crosshairsize 3»
bind «1» «slot1»
bind «2» «slot2»
bind «3» «slot3»
bind «4» «slot4»
bind «5» «slot5»
bind «a» «+moveleft»
bind «c» «slot8»
bind «d» «+moveright»
bind «e» «buymenu»
bind «f» «+lookatweapon»
bind «g» «radio»
bind «h» «slot12»
bind «i» «show_loadout_toggle»
bind «m» «teammenu»
bind «o» «toggle cl_righthand 0 1»
bind «p» «toggle cl_crosshairstyle 4 5»
bind «q» «lastinv»
bind «r» «+reload»
bind «s» «+back»
bind «t» «+spray_menu»
bind «u» «messagemode2»
bind «v» «slot10»
bind «w» «+forward»
bind «x» «slot6»
bind «y» «messagemode»
bind «z» «slot7»
bind «[» «toggle cl_crosshair_drawoutline 0 1»
bind «]» «cl_crosshair_drawoutline 0»
bind «`» «toggleconsole»
bind «,» «volume 0.01»
bind «.» «volume 0.1»
bind «/» «volume 1»
bind «-» «cl_crosshairdot 0;cl_crosshairgap -2;cl_crosshairsize 3»
bind «SPACE» «+jump»
bind «TAB» «+showscores»
bind «ESCAPE» «cancelselect»
bind «DEL» «mute»
bind «PAUSE» «pause»
bind «SHIFT» «+speed»
bind «CTRL» «+duck»
bind «F3» «askconnect_accept»
bind «F4» «bug»
bind «F7» «load quick»
bind «F9» «autobuy»
bind «F11» «quit prompt»
bind «MOUSE1» «+attack;r_cleardecals»
bind «MOUSE2» «+attack2»
bind «MOUSE3» «+voicerecord»
bind «MOUSE4» «+use»
bind «MOUSE5» «drop»
bind «MWHEELUP» «+jump»
bind «MWHEELDOWN» «invprev»
@panorama_debug_overlay_opacity «0.8»
adsp_debug «0»
ai_report_task_timings_on_limit «0»
ai_think_limit_label «0»
budget_averages_window «30»
budget_background_alpha «128»
budget_bargraph_background_alpha «128»
budget_bargraph_range_ms «16.6666666667»
budget_history_numsamplesvisible «100»
budget_history_range_ms «66.666666667»
budget_panel_bottom_of_history_fraction «.25»
budget_panel_height «384»
budget_panel_width «512»
budget_panel_x «0»
budget_panel_y «50»
budget_peaks_window «30»
budget_show_averages «0»
budget_show_history «1»
budget_show_peaks «1»
bugreporter_uploadasync «0»
bugreporter_username «»
c_maxdistance «200»
c_maxpitch «90»
c_maxyaw «135»
c_mindistance «30»
c_minpitch «0»
c_minyaw «-135»
c_orthoheight «100»
c_orthowidth «100»
c_thirdpersonshoulder «false»
c_thirdpersonshoulderaimdist «120.0»
c_thirdpersonshoulderdist «40.0»
c_thirdpersonshoulderheight «5.0»
c_thirdpersonshoulderoffset «20.0»
cachedvalue_count_partybrowser «1534609171»
cachedvalue_count_teammates «1535046425»
cam_collision «1»
cam_idealdelta «4.0»
cam_idealdist «150»
cam_idealdistright «0»
cam_idealdistup «0»
cam_ideallag «4.0»
cam_idealpitch «0»
cam_idealyaw «0»
cam_snapto «0»
cc_lang «»
cc_linger_time «1.0»
cc_predisplay_time «0.25»
cc_subtitles «0»
chet_debug_idle «0»
cl_allowdownload «1»
cl_allowupload «1»
cl_autohelp «1»
cl_autowepswitch «0»
cl_bob_lower_amt «21»
cl_bobamt_lat «0.400000»
cl_bobamt_vert «0.250000»
cl_bobcycle «0.98»
cl_chatfilter_version «1»
cl_chatfilters «63»
cl_clanid «0»
cl_cmdrate «128»
cl_color «1»
cl_compass_enabled «1»\par»
cl_crosshair_drawoutline «0»
cl_crosshair_dynamic_maxdist_splitratio «0.35»
cl_crosshair_dynamic_splitalpha_innermod «1»
cl_crosshair_dynamic_splitalpha_outermod «0.5»
cl_crosshair_dynamic_splitdist «7»
cl_crosshair_outlinethickness «1»
cl_crosshair_sniper_show_normal_inaccuracy «0»
cl_crosshair_sniper_width «1»
cl_crosshair_t «0»
cl_crosshairalpha «355»
cl_crosshaircolor «1»
cl_crosshaircolor_b «250»
cl_crosshaircolor_g «250»
cl_crosshaircolor_r «250»
cl_crosshairdot «1»
cl_crosshairgap «-2»
cl_crosshairgap_useweaponvalue «0»
cl_crosshairscale «0»
cl_crosshairsize «2»
cl_crosshairstyle «3»
cl_crosshairthickness «0»
cl_crosshairusealpha «1»
cl_debugrumble «0»
cl_detail_avoid_force «0.4»
cl_detail_avoid_radius «64»
cl_detail_avoid_recover_speed «0.25»
cl_detail_max_sway «5»
cl_disablefreezecam «0»
cl_disablehtmlmotd «0»
cl_dm_buyrandomweapons «0»
cl_downloadfilter «all»
cl_dz_playagain_auto_spectate «0»\par»
cl_embedded_stream_audio_volume «0»
cl_embedded_stream_audio_volume_xmaster «0»
cl_fixedcrosshairgap «3»
cl_forcepreload «0»
cl_freezecampanel_position_dynamic «1»
cl_grass_mip_bias «-0.5″\par»
cl_hide_avatar_images «»
cl_hud_background_alpha «0.000000»
cl_hud_bomb_under_radar «1»
cl_hud_color «8»
cl_hud_healthammo_style «0»
cl_hud_playercount_pos «0»
cl_hud_playercount_showcount «1»
cl_hud_radar_scale «1.300000»
cl_idealpitchscale «0.8»
cl_inventory_saved_filter2 «all,not_defaultequipped»
cl_inventory_saved_sort2 «inv_sort_rarity»
cl_join_advertise «1»
cl_minimal_rtt_shadows «1»
cl_mouselook «1»
cl_mute_all_but_friends_and_party «0»
cl_mute_enemy_team «0»
cl_obs_interp_enable «1»
cl_observercrosshair «1»
cl_playerspray_auto_apply «1»
cl_quickinventory_deadzone_size «0.05»\par»
cl_quickinventory_lastinv «0»\par»
cl_radar_always_centered «1»
cl_radar_icon_scale_min «0.6»
cl_radar_rotate «1»
cl_radar_scale «0.400000»
cl_radar_square_with_scoreboard «1»
cl_righthand «1»
cl_rumblescale «1.0»
cl_sanitize_player_names «0»
cl_scalecrosshair «1»
cl_scoreboard_mouse_enable_binding «+attack2»
cl_scoreboard_survivors_always_on «0»\par»
cl_show_clan_in_death_notice «1»
cl_showhelp «1»
cl_showloadout «1»
cl_showpluginmessages2 «0»
cl_spec_follow_grenade_key «0»
cl_spec_mode «5»
cl_tablet_mapmode «1»\par»
cl_teamid_overhead_always «1»
cl_teammate_colors_show «1»
cl_thirdperson «0»
cl_timeout «30»
cl_updaterate «128»
cl_use_opens_buy_menu «0»
cl_viewmodel_shift_left_amt «1.5»
cl_viewmodel_shift_right_amt «0.75»
closecaption «0»
closeonbuy «0»
commentary_firstrun «0»
con_enable «1»
crosshair «1»
dsp_enhance_stereo «0»
engine_no_focus_sleep «50»
force_audio_english «0»
func_break_max_pieces «15»
g15_update_msec «250»
gameinstructor_enable «0»
hud_scaling «0.799326»
hud_showtargetid «1»
hud_takesshots «0»
joy_accelmax «1.0»
joy_accelscale «3.5»
joy_accelscalepoly «0.4»
joy_advanced «0»
joy_advaxisr «0»
joy_advaxisu «0»
joy_advaxisv «0»
joy_advaxisx «0»
joy_advaxisy «0»
joy_advaxisz «0»
joy_autoaimdampen «0»
joy_autoAimDampenMethod «0»
joy_autoaimdampenrange «0»
joy_axisbutton_threshold «0.3»
joy_cfg_preset «1»
joy_circle_correct «1»
joy_curvepoint_1 «0.001»
joy_curvepoint_2 «0.4»
joy_curvepoint_3 «0.75»
joy_curvepoint_4 «1»
joy_curvepoint_end «2»
joy_diagonalpov «0»
joy_display_input «0»
joy_forwardsensitivity «-1»
joy_forwardthreshold «0.15»
joy_gamma «0.2»
joy_inverty «0»
joy_lowend «1»
joy_lowend_linear «0.55»
joy_lowmap «1»
joy_movement_stick «0»
joy_name «joystick»
joy_no_accel_jump «0»
joy_pitchsensitivity «-1»
joy_pitchthreshold «0.15»
joy_response_look «0»
joy_response_look_pitch «1»
joy_response_move «1»
joy_sensitive_step0 «0.1»
joy_sensitive_step1 «0.4»
joy_sensitive_step2 «0.90»
joy_sidesensitivity «1»
joy_sidethreshold «0.15»
joy_wingmanwarrior_centerhack «0»
joy_wingmanwarrior_turnhack «0»
joy_yawsensitivity «-1»
joy_yawthreshold «0.15»
joystick «0»
joystick_force_disabled «1»
joystick_force_disabled_set_from_options «1»
key_bind_version «4»\par»
lobby_default_privacy_bits1 «1»
lockMoveControllerRet «0»
lookspring «0»
lookstrafe «0»
m_customaccel «0»
m_customaccel_exponent «1.05»
m_customaccel_max «0»
m_customaccel_scale «0.04»
m_forward «1»
m_mouseaccel1 «0»
m_mouseaccel2 «0»
m_mousespeed «1»
m_pitch «0.022»
m_rawinput «1»
m_side «0.8»
m_yaw «0.022»
Run CS
in the console we write — exec New
customize these settings:
sensitivity «2.2»
zoom_sensitivity_ratio_mouse «1»
fps_max 300 or fps_max 999
I install 999
Next, I have CS in the window — this is for screenshots — you set it to «full screen»
Set the resolution of the game 1280×960
You can bet less — to whom it is convenient — but the lower the resolution — the more FPS
(at high resolution, the game may not be necessary, but if you have a powerful computer, you can try the resolution and put it higher)
Set the following video settings
On slower computers can turn «Texture Streaming»
Sound options
You need to set the volume of the ten-second countdown — thanks to it you will know whether you have time to clear the bomb or not. Turn off the rest of the sound.
Game Options
we put «Unrestricted»
Hud
Team
Comunication
Spectators
Item
Radar
Crosshair
I advise you to put grenades on these buttons — there is no need to press button 4 — you will always get the right grenade
Thanks to the DDU program, all files associated with the drivers of your video card are deleted, which guarantees no conflicts during installation.
It can also be used to remove the audio driver.
In the future, if you need to update the driver — we update only by this algorithm. And also, we are setting everything up again.
To do this, in the windows search, write msconfig or the system configuration — select the Download tab — Safe Mode — minimum — reboot.
Do not forget — if you require a password when entering the system — this is the password from the MICROSOFT account.
In safe mode, you need to run DDU as administrator. Chose you videcard.
Click Clean and restart
After rebooting, the computer will start in normal mode.
If you turn on in safe — run msconfig and set the normal boot.
There are two options for configuring a video card.
This method, which is written below, is intended for all video cards.
However, powerful video cards such as the GTX980, GTX 1050 and later may not behave as they should.
You can configure according to this instruction — but if after this setup you start friezes, lags and download VAR then you will need to change the following items:
5) 3D parameters — adjustment of image settings — We put user settings focusing on quality
8) 3D settings management — Software settings — add — add CS — here you need to restore the settings .
We include only:
Preferred Update Frequency — Highest Available
Low Latency Mode — Ultra
This is due to the fact that when we set everything up for performance on powerful graphics cards, they stop working as they should. Therefore, it is necessary to load them a little — which is what we are doing.
Download the latest drivers from the official site Nvidia [www.geforce.com]
Choosing a graphics driver
Select custom installation
GeForce Experience DO NOT INSTALL. Graphics driver only
It contains unnecessary services that load the system.
In the latest drivers, the «NVIDIA Control Panel» is missing.
It must be downloaded from the Windows Store — it’s called Nvidia Control panel [www.microsoft.com]
Configure Nvidia
1) Adjustment by color and video parameter:
2) Display — Change resolution — Set the maximum monitor frequency that you have. 60Hz, 75Hz, 120Hz, 144Hz, 240 Hz
3) Display — Adjustment of the desktop color settings — For a comfortable game, you can set the digital intensity to 100% — The colors in the game will be saturated.
4) Display — Size adjustment and position — Scaling tab — select Full screen (When playing with the 4: 3 extension, the picture will be stretched to full screen) Perform scaling — GP. And put a daw on the Substitution of the zoom mode set for games and programs
5) 3D parameters — adjustment of image settings — We put user settings with an emphasis on performance — click apply.
6) 3D parameter management — global parameters
- Image Sharpening — Off
- Ambeint Occlusion — Off
- Anisotropic filtering — Off
- Antialiasing — Gamma correction — Off
- Antialiasing — Mode — applications controled
- Cuda — GPUs — All
- DSR — Factors
- Low latency mode — Ultra
7) Run CS and close immediately. It is necessary for Nvidia to display the csgo application when we click on the add button.
8) 3D settings management — Software settings — add — add CS and make settings. For all other games, we also adhere to the same settings.
- Image Sharpening — Off
- Ambeint Occlusion — Off
- Anisotropic filtering — Off
- Antialiasing — Gamma correction — Off
- Antialiasing — Mode — applications controled
- Cuda — GPUs — All
- Low latency mode — Ultra


