- Steam games from windows to mac
- Steam games from windows to mac
- Steam games from windows to mac
- Switched Windows to Mac, do I have to buy Steam games again to play on Mac?
- 4 Answers 4
- Play games on your Mac installed on another computer with Steam In-Home Streaming
- Requirements
- Setting up on Mac
- Host Mac Settings
- Client Mac Settings
- Starting the stream
- A Word on Windows
- Comments (6)
- maestro64
- Mike Wuerthele
- MacPro
- MalcolmOwen
- beowulfschmidt
- Related Articles
- How to stream movies on your network with Plex Media Server on a Mac
- How to search website content from within Safari
- How to factory reset an Apple Watch
Steam games from windows to mac
DirectX isn’t better than OpenGL from a technical standpoint (it’s actually the opposite, now, and there was a semi-high-profile news piece about that involving Valve and L4D2 [www.itproportal.com] a few years ago). The problem is that many PC developers write their rendering engines specifically using DirectX APIs and don’t always concern themselves with implimenting OpenGL. Console developers, however, need to align their games with OpenGL APIs if they want to support PS3/4 or Wii U, and that’s why most games available for Mac are also on other non-Microsoft platforms.
Apple has also been unhelpful when it comes to attracting more game development to OS X, mostly caused by their very unnecessary reluctance in updating the version of OpenGL implimented in OS X. OpenGL 3.2 wasn’t implimented until Lion, which came out six months after the OpenGL 4 specifications were defined, and before then OS X was stuck with OpenGL 2.1 despite 3.x being available for much of that time. Apple has been sligthly more proactive lately, with Mavericks eventually receiving support for 4.1. That version has been carried over into Yosemite, even though the newest version of the spec is 4.3. The main excuse for this slow adoption is that Apple writes the display drivers for the GPUs, not the manufacturer. I still think it’s lazy not to keep up, though.
Really, though, it all comes down to what Sam said. Until is becomes more financially viable to spend the time porting games to OS X, we’re stuck with fewer titles to play. There are only two companies that I know of that port games to OS X — Aspyr Media and Feral Interactive, who have also started doing Linux ports, too. Both of those companies are incredibly small and have fewer than 100 employees (Feral has under 50 if I remember correctly). We’re lucky that both of them seem to be getting more work lately, especially Aspyr. I’m particularly grateful that Aspyr and 2K have forged a relationship together that has resulted in an incredibly fast turnaround for the Mac ports of Civ V, Civ:BE, BioShock Infinite, and Borderlands (aside from the first one, which was done by Feral).
Valve is one of the few developers that handle porting in-house, which has also been ramped up thanks to their working on SteamOS and their full embracing of non-Windows platforms. I’m not sure how long you’ve been playing games on Mac, but just by simply releasing Steam on OS X, Valve has made the selection we have blow up exponentially. Aspyr and Feral have been getting more work, and a huge percentage of the indie games being pumped out lately have supported Mac. Aside from all of the edutainment games in the 90s, OS X has never seen a better time for gaming than it is now. All we have to do is steal converts from the PC master race — the more Mac gamers there are the more options we’ll have!

The «Use bootcamp» answer isn’t helping our cause either — Mac users account for 10-13% of the market, but somehow only 1/2 that on Steam. I have a feeling that is because too many people are just rebooting to Wintendo to play instead of leveraging their native OS.
Demand Mac versions with your wallet. Only purchase native games, and when something looks promising on Greenlight or early access leave a message saying you’d love to buy it if it’s Mac friendly.
It’s not like we’re in a drought though. I’ve got 156 native games in my Mac Steam library, more than enough that if I buckled down and started at the top, it’d take me years to work through all of it, and more of the new games coming, especially from indie devs, are coming out Mac friendly at release.
Steam games from windows to mac


| 4,938 | уникальных посетителей |
| 43 | добавили в избранное |

The simple editing of a non-steam game steam library shortcut with launch options and app id is all that is needed. This linustechtips How To [linustechtips.com] is very good at describing in detail everything step by step. The comment found on reddit here gives additional info which lets your profile status show which game you are playing; as it should.
Credit to the authors.
- Find the windows app id. For this example i chose Forza 6: Apex. To do this we:
- Navigate to
The windows app of your choice can now be launched from the steam client.
- Create new text file and paste;
This is hit and miss with different games but with a bit of tweaking and trial and error you should be able to get things going. So you got your windows app store game launching from steam and now would like to use steam controller to play that game. First thing to check is what bindings your game supports and try mapping controller in games controller settings. For example sakes Forza would not let me configure controller so had to go kb + m only config (by right clicking library shortcut and select Controller Configuration) for steam controller to get it be usable in in game input settings. If the steam controllers buttons don’t work there they will not in game. Once they are working make a custom keyboard layout in the games iinput settings. and then accept once set. It might be worth noting here some of the numpad keys being used here were named slightly different by steam controller configuration/big picture ui. i.e. numpad0 is named insert and numpad7 is named Home.
Whenever the game showed a cursor this would then cause either «lizard mode» or «desktop» configuration to be activated and would not be usable with Forza. So had to then copy/duplicate the game shortcut config made earlier (according to the in game settings we mapped) as a desktop configuration through big picture ui and made sure; and made sure from the game shortcut right click options, that desktop configuration does not get used if cursor is visible.
Steam games from windows to mac
You might have already seen this guide to playing Windows Steam games on Mac, by NHRoccodog. This is not that guide. This method will allow you to play Windows-only Steam games on your iMac as if they were Mac games, with no difference in performance at all . Here’s how it works:
First, download this file [shareplace.com] (no malware, I promise) , and this file [wineskin.urgesoftware.com] (no malware there either, I promise) . Note that the steam.exe installer may not work, as it did not work for me, but the .msi installer that I uploaded worked for me.
Next, unzip the downloaded .zip file, and open up Wineskin Winery. The window that opens should have a list of engines for download. Download and install the latest one (no admin password required). Once you have done this, click «Create New Blank Wrapper». Name the file «Steam» (Wineskin will include the .app extension for you). Give it some time to build the app. You should find a «Wineskin» folder in the folder that you put Wineskin Winery in.
Inside the Wineskin folder, you’ll find «Steam.app». Right click it and select «Show Contents». A finder window will pop up with a «Contents» folder. Double click that, then double click the item labeled «Wineskin.app».
Inside will be a window with a button that says «Install Software». Click that button, then select «Choose Setup Executable». In the Finder window that pops up, select «SteamInstall.msi», the file that you downloaded from me. The Steam installation wizard will pop up, and lead you through the install process. This may take a while, so sit tight. Even when it looks like it’s not doing anything (for example, 0% progress after a full minute), it’s doing something.
Once the Steam installation completes, a dialog box may come up that says «No executable was found.», and a dropdown list of executables in the wrapper. Select «Steam.exe». Now you can exit Wineskin.
Once it’s done, you can now download and install Windows Steam games and play them all you want! I’d recommend using the Mac Steam client to buy games, and the Wineskin Steam client to download and play the Windows games.
In case your game acts weird, reopen Wineskin.app under the Steam app contents and try changing these settings:
— Go to Advanced Settings, then Tools, then Config Utility. At the bottom of the window that opens up, you’ll see a list of Windows operating systems you can emulate. Change these around until you find one that suits you.
— Go to Advanced Settings, then Options. Change any one of these. They all change certain things, which can be undone easily.
— Go to Advanced Settings, then Screen Options. If your mouse is acting weird while playing a game, like Call of Duty: World at War did for me, try changing the setting to «Override», and select «Rootless» or «Fullscreen». You’ll have to use the keyboard shortcut Command-Q to exit the fullscreen virtual desktop, though.
And that’s it! Have fun, and reply to this post if you have comments or concerns.
Switched Windows to Mac, do I have to buy Steam games again to play on Mac?
I recently switched from Windows to Mac. Steam says I have fewer Mac specific games than total games and it should be an equal amount unless you can only download, install, and play once from your account. I thought I bought it so that it would work across all operating systems. If this is true, is there a work around or a discount for re-purchasing for the other OSes?

4 Answers 4
Once you buy a steam game, you can use it on any computer, provided that the computer can run it. There should be no need to re-buy the mac versions of the same games, though you will need to download the mac versions of the game to your new computer.
However, not all games for Windows work on Mac or Linux. That is why your mac specific games are less than your total number of games.
There are some workarounds involving getting windows to run on your mac (in virtual machines or something like wine). If you do that, you can install a windows version of steam and play your windows games there, but they are not mac native and may not work as well as you would expect.

When you open Steam on the Mac, your game library is by default shown with a filter for games released under the «SteamPlay» label. Buying games with this label always gives you the Mac version or the Mac and Linux versions for free in addition to the Windows version of the software.
You’ll see either of these logos on games with SteamPlay:
 (Windows and Mac support)
 (Windows, Mac and Linux support)
Sometimes a game publisher might release a SteamPlay version of a game separately from the original, Windows only version. In that case, you will need to buy the new version that includes Mac support.
As for Windows-only games, in addition to trying out the open source Windows compatibility layer, WINE, you could also install Windows on the Mac with Apple’s Boot Camp. This has worked well for me with running games with complex graphics that might not be as optimized when running under Mac OS X.

Some games only run on Windows. These games, obviously, will not run on your Mac and do not appear by default in your library. Unfortunately, this is a technical limitation which generally cannot be worked around by giving Valve more money. WINE, as mentioned in another answer, may give you some success, but in my experience, it is very case-by-case in how well it works.
Steam does not make you re-buy games. (I want to say «ever,» but I’m not 100% sure there isn’t some really weird situation where you could end up buying a game twice). Once you own it, it is attached to your account for good.
You do need to download your games again, though. You might be able to copy the steamapps folder from Windows to Mac, but I don’t have experience doing that cross-OS. It does work reasonably well from Windows to Windows, though. At the very least, it might let you just «validate integrity of game cache» instead of re-downloading from scratch.
Play games on your Mac installed on another computer with Steam In-Home Streaming

If you want to play games on a Mac that has lower specifications than ideally needed to play properly, it is possible to take advantage of the hardware of a more powerful Mac or PC elsewhere on the home network to have a more enjoyable gaming experience. AppleInsider explains how to set up Steam’s In-Home Streaming function to remotely play your game collection.
As newer games are released, the specifications needed to play them smoothly continue to rise, and can end up being unplayable on some desktops. In the event that there happens to be a second computer that’s more powerful and more suitable for gaming, the obvious answer is to use that one, but there are situations where it is unfeasible.
For example, the more powerful computer could be in a completely different place in the house to where you would prefer to play the game. Maybe there’s a Mac mini connected to a large living room TV that isn’t great at displaying games, but a Mac Pro in the home office which can easily do the job, but you don’t want to move.
Valve Software’s answer to this is built into the app for the Steam online game marketplace: Steam In-Home Streaming.
Using two computers over the same network, the powerful host computer can play the game and send a video stream to a client desktop, which displays the image. Inputs taken from peripherals, like keyboards and game controllers, are fed back from the client computer to the host, which then performs the commands in-game.
The feature also offers the benefit of not having to install the game on the client desktop at all, only the host, minimizing the amount of storage used up by game files. It also expands the Mac’s game collection, as the stream works across Windows and Mac desktops, meaning Windows games are playable on a Mac in this way.
Requirements
Two computers are needed for In-Home Streaming: the host and the client. Originally the host was limited to Windows PCs, but it has since been updated to work with Mac desktops, and Linux.
In terms of hardware, Valve recommends a minimum of a quad-core processor for the host. Client desktops can be lower-powered but must be capable of H.264 decoding, preferably using hardware acceleration.
For Mac specifically, the host needs to run OS X 10.8 at a bare minimum.
Both systems need to be on the same network for In-Home Streaming to function. It is recommended to use a wired network due to the high amount of bandwidth required, but there are also claims it will work on wireless N and AC networks and some powerline networking equipment.
As it is a feature of Steam, the software itself has to be installed on both the host and client, which can be downloaded from the store’s website. It is also expected that the user has an account set up with Steam, has games they want to play on the account, and has already installed them on the host.
Setting up on Mac
Launch Steam on both the client and the host systems, and log in to the same account on each desktop. For Mac users, the Steam client can be accessed within the Applications folder in the Finder.
On both computers, select Steam in the Menu then Preferences. In the Preferences Window, select In-Home Streaming in the left-hand column, then click the tickbox next to Enable streaming if one is not present.
This window will show other Mac and PC desktops on the network that are logged into the same account, as well as whether they are enabled for In-Home Streaming or not.
Host Mac Settings
To fine tune the host’s settings, click the Advanced Host Options button midway down the window.
This new window will offer up a number of ways to change how the stream is generated on the host desktop, with the default options usually fine for most users. If you are familiar with the specifications of the client Mac, you could select or disable the hardware-encoding and capture options to suit your hardware, but it isn’t essential.
The top option, «Change desktop resolution to match streaming client,» will aim to match the resolution of the client system for a better experience, but this could potentially cause performance issues if the host is not capable of rendering the game at that level. Keeping this switched off will instead send the same resolution as the game is already set to run at on the host.
The «Dynamically adjust capture resolution to improve performance» setting is self explanatory, and is generally a good idea to keep enabled. The stream will try to reduce in resolution if issues occur, like network lag, instead of stopping completely or stuttering at a higher resolution.
If software encoding is employed but it is choking the gameplay, you can limit the number of threads used in the Number of software encoding threads dropdown box instead of allowing Steam to automatically manage it for you.
Lastly, it is highly advised to enable «Prioritize network traffic,» as for newer routers with network traffic prioritization features, this will limit the impact of other network users on the stream’s connection.
Close this window by clicking OK.
Client Mac Settings
The main Preferences window includes three basic options for how users want the stream to appear from the host on the client. Balanced is the default, while Fast will prioritize speed rather than picture quality when decoding the stream, and Beautiful opts for higher quality images but potentially lower frame rates.
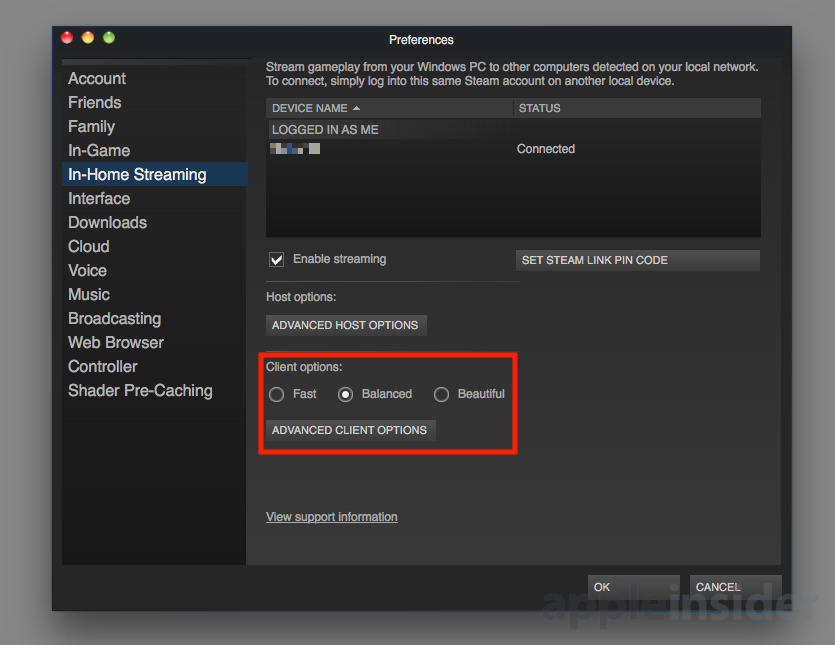
More settings are available by clicking Advanced Client Options.
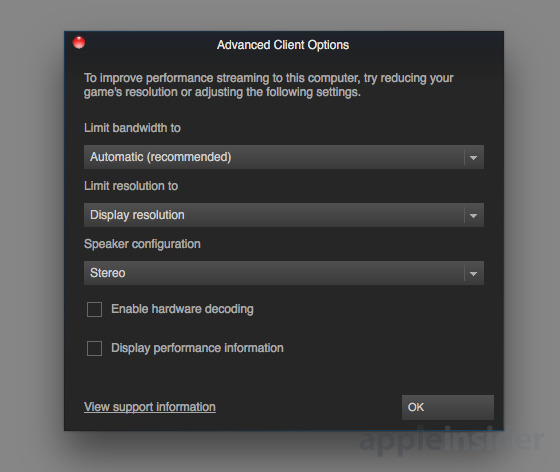
In cases where the network is being used for other tasks or bandwidth needs to be preserved for various reasons, the Limit bandwidth dropdown box can restrict the stream’s bandwidth usage. Generally, the more bandwidth is used, the better the stream will appear on the client.
The «Limit Resolution» dropdown gives the client the ability to limit the stream’s resolution, which can reduce the overall bandwidth used or sacrifice the resolution in favor of higher frame rates. The stream can go as low as 480p, with the upper limit being the display resolution of the client system.
There is support for multiple speaker configurations in the menu, allowing clients to request stereo, quadrophonic, and 5.1 surround sound from the host, if available from the game and usable on the client. It is usually advised to stick to Stereo to preserve bandwidth usage for the visual element of the stream.
A tickbox is also available to enable hardware decoding on the client, if it has supporting hardware. If it does not, this is instead performed in software, and may be more taxing to the client Mac overall.
Lastly, the «Display performance information» tickbox will show data relating to the stream on the client’s screen, making it useful for diagnosing a poor quality video feed from the host.
Click OK to close the window.
Starting the stream
Ensure Steam is running on both the client and the host desktops.
On the client, select Library in the main Steam window, and select the game you wish to play from the left-hand column. Available to play games will be brighter on this menu, regardless of whether it is installed locally or streamable.
In the selected game’s screen, click the arrow next to Play to bring up a dropdown box, and select the host system from the list. Click the now-renamed Stream button to launch the game.
On the first occasion the Host will be used, the client will show a notification that actions need to be carried out on the Host. This refers to drivers that need to be installed by Steam in order to stream.
On the Host, click Install on the Gamepad Driver Update window, and pass through the installation process for Steam Input. Typically this requires clicking Continue, Install, entering your macOS account’s password, authorizing it in the Security & Privacy settings menu following the «Allow» notification, Ok on the notification, then Close once the installation completes.
Attempt to run the game stream again on the client. A second host actions notice will be displayed, this time for audio drivers.
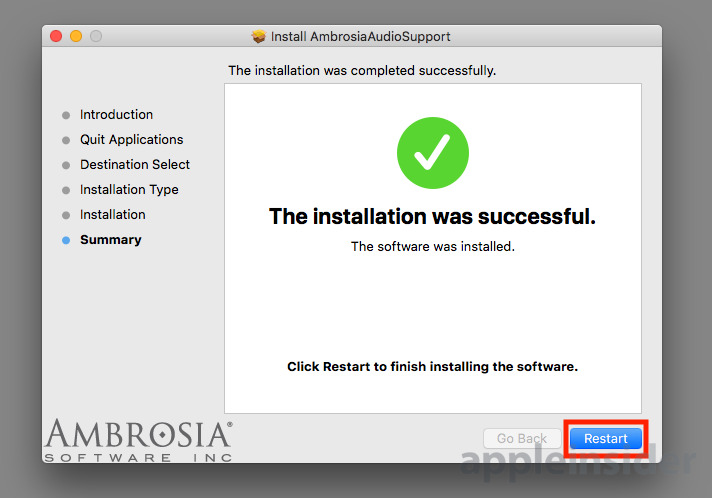
On the Host, click Install on the Audio Driver Update window, and go through its installation process. This time the path for the default installation of Ambrosia AudioSupport will be Continue on the package installation determination notice, Continue on the welcome screen, Install, enter the Mac account’s password, Continue Installation at the restart notice, and authorizing the Security and Privacy settings to allow it to continue.
At the successful installation screen, click Restart to reboot the Mac.
Once it has booted and been logged in, load Steam again on the Host, and reattempt to load the stream from the client. On this third attempt, the host should start up the game and commence the stream, which will then be displayed and playable on the client, if everything is installed correctly.
Note that this process is shorter for future play sessions, as the drivers only need to be installed once.
A Word on Windows
As games can be streamed from a Windows host to a Mac client and vice versa, it is worth covering how to perform this in Windows. Handily, the basic instructions are the same for both platforms.
Once installed on Windows, launch Steam, click the Steam menu item in the top-left corner, then Settings. In the new window, select In-Home Streaming in the left-hand column, then follow the rest of the Mac guide above.
The main difference is in the driver installation for the host, as while the initial notice window will be the same for both GamePad and Audio drivers, the process of installing the drivers themselves will differ. Unless there is something specific to the host’s particular Windows installation that needs attention, the default options will work fine.
Starting the game stream using Windows as a client is identical to Mac, once signed into Steam.
AppleInsider has affiliate partnerships and may earn commission on products purchased through affiliate links. These partnerships do not influence our editorial content.
Comments (6)
maestro64
doesn’t the network become the limiting factor on this, you would have to run hardwire Gbit enet for this to work well?
Mike Wuerthele
It can, but non-congested 802.11ac or 100-base-T is generally fine. The video is being streamed as H.264 of the appropriate resolution, so the bandwidth requirements are pretty low.
MacPro
Does the hosting machine need powerful graphics or would a headless Xeon PC server work well? I ask as I am looking at getting one anyway to host opensim and that only being a database doesn’t require much in the way of a GPU the graphics being handled by the client viewer.
MalcolmOwen
Ideally, the hosting machine would need to be powerful enough to play the game and to encode the stream simultaneously.
While it would be feasible to do this on a headless server with a beefy processor and minimal graphical power, you’re almost certainly going to get better results if a decent enough GPU is used on the host.
Remember, the client can be a low-performance device, so long as it can sufficiently play the stream, as it doesn’t handle rendering the game’s graphics.
beowulfschmidt
It sounds like as much of the work, including graphical work, as possible should be done on the host. If the resolution of the host display is set in-game to the same as the client, that’s that much less work the client has to do.
Steam is the best thing to happen to non-console, non-mobile gaming in a couple of decades.
Related Articles

How to stream movies on your network with Plex Media Server on a Mac
One way to make use of a spare Mac is to turn it into a server for home entertainment purposes. Here’s how to set up Plex Media Server in macOS.

How to search website content from within Safari
You use Safari to get you to a website, but once you’re there, Apple’s browser has some more tricks for zeroing in on what you’re looking for. Here’s how to turn Safari from a passive display of information, to a helpful research tool.

How to factory reset an Apple Watch
Whether you’re getting ready to sell or trade-in your Apple Watch, or if you’re simply troubleshooting some persistent problems, our helpful guide will show you how to return your Apple Watch to factory settings.


