- Не запускается Стим на Windows 10 – что делать?
- Не запускается Стим на Windows 10 — возможные причины
- Способы решения проблемы
- Остановка лишних процессов
- Проверяем файлы на повреждения
- Проверка файла hosts
- Проверка даты и времени
- Удаление и переустановка Steam
- Steam games won’t launch in Windows 10 [Full Fix]
- What can I do if I can’t launch Steam games?
- 1. Update your Drivers and DirectX
- DriverFix
- 2. Verify Integrity of Game Files
- 3. Update Windows
- Run a System Scan to discover potential errors
- 4. Rollback Windows
- 5. Update GPU drivers
- 6. Run the game as Administrator
- 7. Run games in the compatibility mode
- 9. Relocate the Steam client
- Change the default installation path
Не запускается Стим на Windows 10 – что делать?
Не запускается Стим на Windows 10, а простая перезагрузка компьютера не помогает? Это означает, что причина проблемы может крыться в неправильной установке программы, повреждении файлов и даже действии антивируса. Но избавиться от столь неприятной ошибки всё же получится, воспользовавшись способами, которые представлены далее. Заметим, что желательно тестировать варианты последовательно – так есть вероятность устранить неполадку быстрее!
Не запускается Стим на Windows 10 — возможные причины
Интересно, а почему Стим не запускается на Виндовс 10? Это может происходить по разным причинам, и вот самые основные из них:
- нет подключения к интернету;
- слишком много фоновых процессов;
- неправильная установка даты и времени;
- поврежденные файлы;
- проблемы с антивирусом.
Теперь вам примерно известно, почему Steam не запускается на Windows 10.
Способы решения проблемы
А что делать, если не запускается Стим на Виндовс 10? И первым делом мы рекомендуем проверить качество подключения к интернету. Возможно, что скорость передачи данных настолько низкая, что магазин попросту не может корректно отображать информацию.
Также предлагаем перезагрузить компьютер, даже в том случае, если вы делали это ранее.

И еще, можно отключить лишние устройства (речь идет о микрофоне, наушниках и прочих гаджетах). Если проблему так и не удалось решить, то переходим к более сложным способам!
Остановка лишних процессов
Иногда не запускается Steam на Windows 10 из-за обычного зависания запущенного процесса. Проще говоря, вы пытаетесь заново открыть программу, однако наличие уже работающего приложения не позволяет это сделать. И в этом случае решение только одно – принудительно снять задачу. Вот инструкция, рассказывающая об этом:
- Одновременно зажимаем клавиши Ctrl+Alt+Del .
- В появившемся меню отмечаем «Диспетчер задач» , после чего заходим во вкладку «Процессы» .
- В списке находим нужное приложение (оно будет начинаться со слова Steam). Кликаем по процессу ПКМ, а затем нажимаем «Снять задачу» .

- Подтверждаем действие и принудительно завершаем работу Steam.
Проверьте, может ошибка уже исчезла. По-прежнему не запускается Стим на Виндовс 10? Тогда переходим к следующему способу и пытаемся всеми силами решить проблему!
Проверяем файлы на повреждения
Также нередко программа отказывается работать из-за наличия поврежденных файлов. И здесь уже ничего не поможет, кроме переустановки или некоторых манипуляций с папками. Думаем, что лучше остановиться на втором варианте, выполнив действия из пошагового руководства:
- Открываем «Мой компьютер» и переходим к диску C .

- Нажимаем по папке Program Files.

- Выбираем Steam , после чего – Steam.dll .

- Удаляем этот проблемный документ и пытаемся открыть Steam еще раз.

Всё равно не запускается Стим на Windows 10, ничего не происходит? В этом случае предлагаем воспользоваться альтернативным вариантом, который также имеет место:
- Заходим в директорию, где расположена сама программа Steam .
- Пытаемся отыскать там такие файлы: ier0_s64.dll , tier0_s.dll .
- Удаляем эти документы, затем перезагружаем компьютер.

Скорее всего, вам наконец-то получится перейти в Steam и установить свою любимую игру. А если нет, то предлагаем перейти в предыдущую папку, а после этого удалить оттуда имеющиеся документы, за исключением файлов с расширением EXE. Не волнуйтесь, ни к чему плохому это не приведёт, так как нужные данные автоматически загрузятся после запуска приложения.
Проверка файла hosts
Не запускается Стим на Windows 10, выдает ошибку? Иногда к этому приводит случайное изменение важного файла hosts. К примеру, на добавление неправильных данных могли повлиять вирусы или установка нелицензионной версии игры. Но решить проблему получится, сделав следующее:
- Открываем диск C , затем выбираем Windows .

- Переходим в папку System32 , после чего Drivers и ETC .


- Находим текстовый документ с названием «hosts» и открываем его через стандартный блокнот.


- Внимательно изучаем информацию. Суть в том, что должна быть только строка 127.0.0.1 localhost. А если что-то находится после нее, то обязательно удалите лишний материал.

- Сохраняем изменения и закрываем проводник.
И вот вы знаете, что делать, если не запускается Стим на Виндовс 10, выдает ошибку.
Самое важное, чтобы после строки 127.0.0.1 localhost не располагалась никакая лишняя информация.
Проверка даты и времени
Почему не запускается Стим на Виндовс 10: нажимаешь, ничего не происходит? Если вы по-прежнему продолжаете задаваться таким вопросом, то предлагаем проверить настройки даты и времени. Как ни странно, но такая банальная вещь играет очень важную роль.
- Вам нужно открыть «Параметры» ;


- А затем возле пункта «Установить время автоматически» перевести ползунок вправо.

После этого всё должно работать корректно.
Удаление и переустановка Steam
Если Steam не запускается Windows 10 даже в результате тестирования всех предыдущих методов, то остается только одно решение – удаление и повторная переустановка клиента. Для наглядности мы составили пошаговую инструкцию, так что советуем с ней ознакомиться:
- Открываем проводник и переходим в папку Steam. Как правило, при стандартной установке она находится на диске C.
- Теперь удаляем всё содержимое, но только оставив папки: steamapps – все игры, userdata – информация о профиле, steam.exe – файл запуска приложения.


- Когда все готово, запускаем steam.exe и выполняем повторную установку клиента. В этом случае понадобится подключение к интернету, так как начнется новая загрузка необходимых файлов.
И в конце перезагружаем компьютер и пытаемся открыть программу. И в результате должно отобразиться главное окно Steam, а не сообщение об ошибке. Если это так, то поздравляем – вы успешно решили проблему собственными силами. А вообще, зачастую хватает банальной перезагрузки ПК и остановки запущенного процесса!
Steam games won’t launch in Windows 10 [Full Fix]

- Steam games run without a problem for the most part but sometimes they won’t start when you try to launch them.
- This can be due to a number of reasons but mostly it’s because of the drivers.
- Bookmark our Steam page and check it often as we upload guides and fixes all the time.
- Explore our Gaming Hub if you want to stay tuned to the gaming world.
- Download Restoro PC Repair Tool that comes with Patented Technologies (patent available here).
- Click Start Scan to find Windows issues that could be causing PC problems.
- Click Repair All to fix issues affecting your computer’s security and performance
- Restoro has been downloaded by 0 readers this month.
But PC gamers use Steam even more than they use the Xbox One app, and a few of them reported that they’re unable to play steam games at all.
What can I do if I can’t launch Steam games?
1. Update your Drivers and DirectX
 It won’t do any harm if you head to Device Manager, right-click on the graphics card under Display Adapter, and see if there are any Driver updates.
The same goes for DirectX, check if the latest version is installed, and if not, go to Microsoft’s website and download it.
Updating drivers manually can be a long process, especially if you do it manually, download DriverFix (100% safe and tested by us) to do it automatically.
After several tests, our team concluded that this is the best-automatized solution in order to prevent permanent damage to your system by downloading and installing the wrong driver versions.
By the way, DriverFix has a library of over 18 million drivers so finding the latest is a piece of cake for this simple solution.
After you install it, the tool will start scanning your system automatically for driver issues or updates and will provide a list of the recommended files.

The only action you are required to do is to click on the Update All button to install them in a single shot or to check the corresponding boxes for each one and hit their Update button from the right.

DriverFix
2. Verify Integrity of Game Files
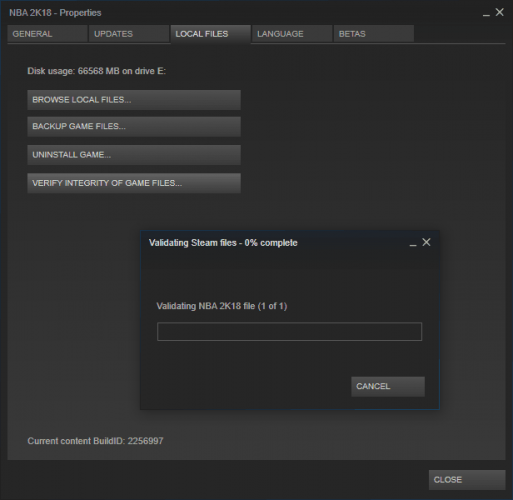
- Launch Steam.
- Go to Library and click on Properties from the menu.
- Select the Local files tab and click the Verify integrity of game files button.
- Wait for the process to finish and re-launch Steam.
3. Update Windows

Microsoft pays a lot of attention to gaming and considers gamers a valuable part of the whole Windows community.
Therefore, the company includes some threats for gamers in every major update for Windows 10.
Run a System Scan to discover potential errors


And besides the new features, major Windows 10 updates also solve certain issues related to gaming. In this case, our Steam issue.
So, make sure you have the latest version of Windows 10 installed on your computer, and maybe you won’t have to do anything else.
You can find the updates by starting the Settings and then clicking on Update & Security.
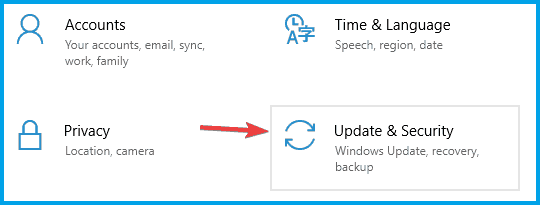
4. Rollback Windows
- Go to the Settings app.
- Click on Update & security.
- Navigate to the Recovery tab from the left pane and click the Get started button in Go back to the previous version of Windows 10section.

- Select the reason for going back to the previous build and click Next.
- You’ll be offered to download the latest updates. Click on the No, thanks button.
- Click Next to continue.
- Click on Next once again and select Go back to the earlier build.
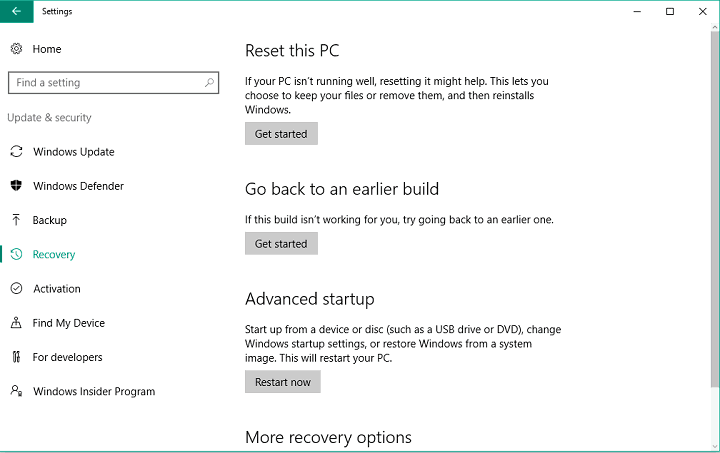
Note: You’ll only be able to do this if you use a Windows 10 version older than the Fall Creators Update because this option has been removed from this version of Windows.
If you’re using Windows 10 Fall Creators Update, the only thing you can really do is to clean install some previous version of the system.
5. Update GPU drivers
- Right-click on the Start button and, from the Power-user menu, select Device Manager.
- Navigate to Display adapters and expand this section.
- Right-click your graphics device and open Properties.
- Select the Details tab.
- From the drop-down menu, open HardwareIds.
- Copy the first row and paste it into your browser’s address bar.
- The search results should show you the exact drivers you’ll need to install.
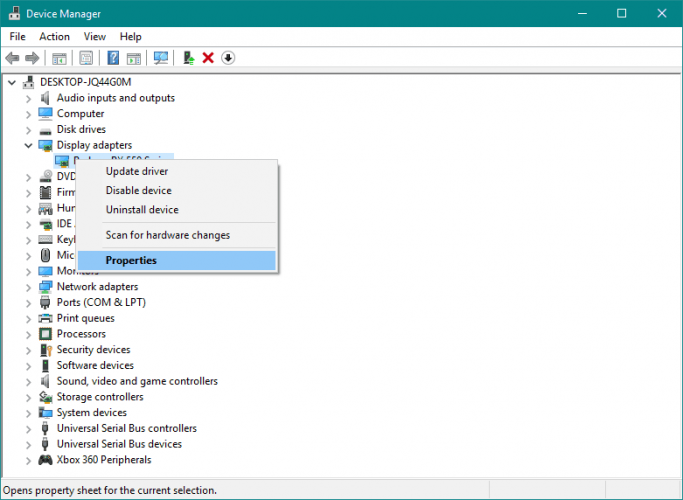
Note: This is where you’ll need to act with caution. Drivers are often distributed by some suspicious sources and you need to avoid those like plague.
Here are the official sites where you should find your drivers:
6. Run the game as Administrator
- Go to the Steam Library
- Locate the game you want to run
- Right-click the game title, and go to Properties
- Head over to the Local Files tab
- Click Browse Local Files
- Find the game executable, right-click it, and go to Properties
- Head over to the Compatibility tab, and check Run this program as Administrator
- Save the changes and try to run the game
Note: If nothing happens when you click on the Run as administrator, take a look at this excellent guide to solve the issue quickly.
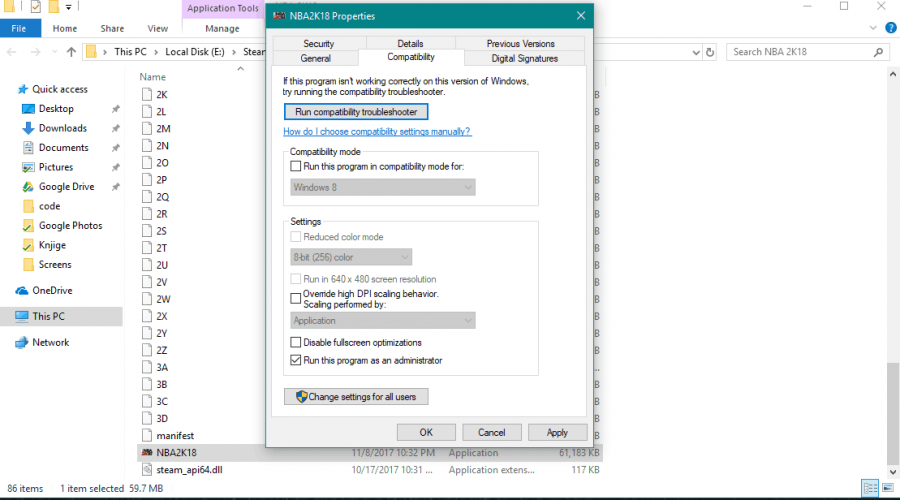
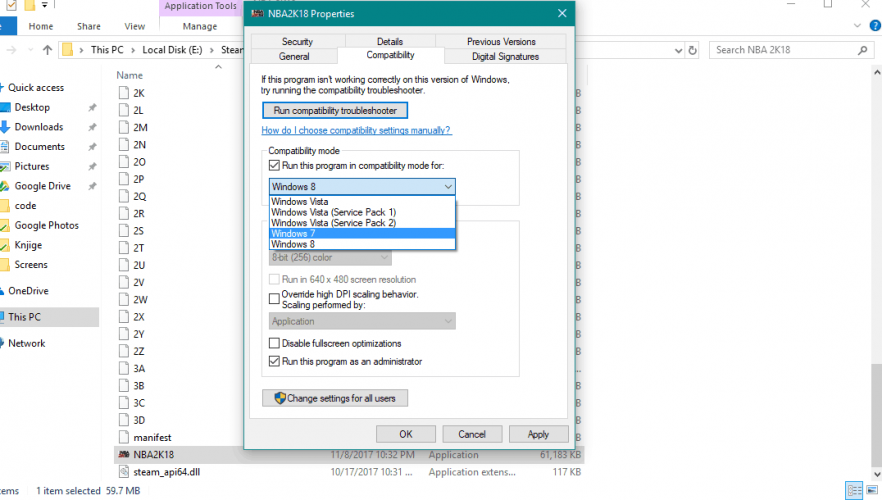
7. Run games in the compatibility mode
- Go to Steam Library
- Locate the game you want to run
- Right-click the game title, and select Properties
- Head over to the Local Files tab
- Click Browse Local Files
- Find the game executable, right-click it, and go to Properties
- Head over to the Compatibility tab
- Check Run this program in compatibility mode for:
- Choose the operating system
- Save the changes
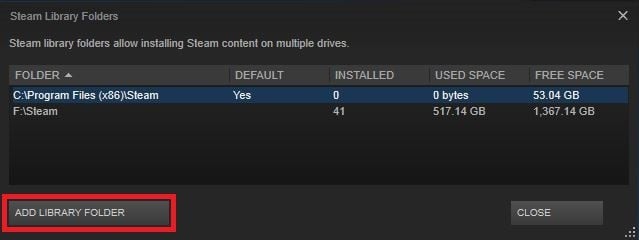
9. Relocate the Steam client

- Exit the Steam client.
- Go to the Steam installation folder and locate the folder you would like to move (D:Steam, for example).
- Delete all of the files and folders except the SteamApps & User data folders and Steam.exe
- Cut and paste the whole Steam folder to the default location. Usually, it’s the following path: C:Program FilesSteam
- Launch Steam and log into your account.
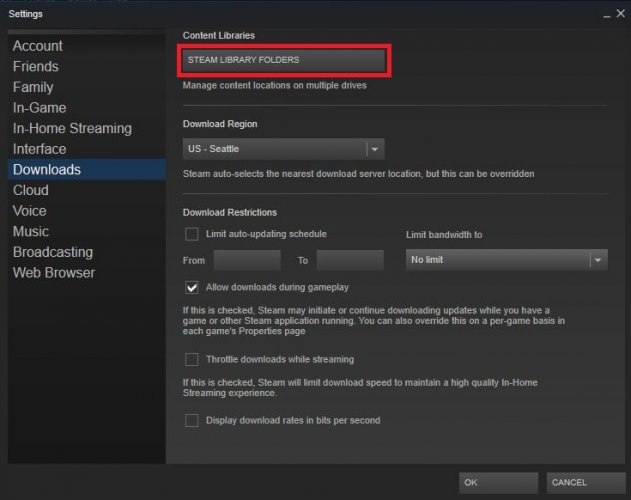
Change the default installation path
- Open Steam
- Navigate to your Steam client Settings menu.
- Select Steam Library Folders from the Downloads tab.
- Select Add Library Folder and create a new path
- Right-click the newly created path, to make sure it’s set to default.
If you encountered any other Steam errors, we recommend you to take a look at this in-depth guide that will help you fix common Steam errors on Windows 10.
What is your gaming experience in Windows 10? Do you have any problems or everything runs smoothly? Share that with us in the comments, below.


