- Windows Update — additional resources
- WSUS Troubleshooting
- How do I reset Windows Update components?
- Reset Windows Update components manually
- Fix: Windows 10 setup stuck at checking for updates
- Solution 1: Restarting Update Service after deleting downloaded content
- Step 1: Disabling Update Service
- Using Services
- Using Command Prompt
- Step 2: Deleting Downloaded Files
- Step 3:Turning Update Service back on
- Using Services
- Using Command prompt
- Solution 2: Disabling your Antivirus
- Solution 3: Switching to a LAN connection
- Solution 4: Waiting for the Download to Complete and Checking your Disk Space
- Solution 5: Resetting Windows Components
- Update the Windows Update Agent to the latest version
- Summary
- Automatically download Windows Update Agent
- Manually download Windows Update Agent from Microsoft Download Center
- Stand-alone packages for Windows 8 and Windows Server 2012
- Stand-alone packages for Windows 7 SP1 and Windows Server 2008 R2 SP1
- More information
- Improvements in version 7.6.7600.256 of Windows Update Agent
- Improvements in version 7.4.7600.226 of Windows Update Agent
- Issues that are fixed in version 7.2.6001.788 of Windows Update Agent
- Improvements in version 7.2.6001.784 of Windows Update Agent
- Issues that are fixed by version 7.0.6000.381 of Windows Update Agent
Windows Update — additional resources
Applies to:
- Windows 10
- Windows Server 2016
- Windows Server 2019
Windows Server 2016 supports policies available in Windows 10, version 1607. Windows Server 2019 supports policies available in Windows 10, version 1809.
The following resources provide additional information about using Windows Update.
WSUS Troubleshooting
How do I reset Windows Update components?
- Try using the Windows Update Troubleshooter, which will analyze the situation and reset any components that need it.
- Try the steps in Troubleshoot problems updating Windows 10.
- Try the steps in Fix Windows Update errors.
If all else fails, try resetting the Windows Update Agent by running these commands from an elevated command prompt:
Reset Windows Update components manually
Open a Windows command prompt. To open a command prompt, click Start > Run. Copy and paste (or type) the following command and then press ENTER:
Stop the BITS service, the Windows Update service and the Cryptographic service. To do this, type the following commands at a command prompt. Press ENTER after you type each command.
Delete the qmgr*.dat files. To do this, type the following command at a command prompt, and then press ENTER:
If this is your first attempt at resolving your Windows Update issues by using the steps in this article, go to step 5 without carrying out the steps in step 4. The steps in step 4 should only be performed at this point in the troubleshooting if you cannot resolve your Windows Update issues after following all steps but step 4. The steps in step 4 are also performed by the «Aggressive» mode of the Fix it Solution above.
- Rename the following folders to *.BAK:
To do this, type the following commands at a command prompt. Press ENTER after you type each command.
- Reset the BITS service and the Windows Update service to the default security descriptor. To do this, type the following commands at a command prompt. Press ENTER after you type each command.
Type the following command at a command prompt, and then press ENTER:
Reregister the BITS files and the Windows Update files. To do this, type the following commands at a command prompt. Press ENTER after you type each command.
Reset Winsock. To do this, type the following command at a command prompt, and then press ENTER:
If you are running Windows XP or Windows Server 2003, you have to set the proxy settings. To do this, type the following command at a command prompt, and then press ENTER:
Restart the BITS service, the Windows Update service and the Cryptographic service. To do this, type the following commands at a command prompt. Press ENTER after you type each command.
If you are running Windows Vista or Windows Server 2008, clear the BITS queue. To do this, type the following command at a command prompt, and then press ENTER:
Fix: Windows 10 setup stuck at checking for updates
Windows 10 was a great leap forward towards redefining operating systems along with setting new boundaries for ease of access. It reached milestones in providing users a faster, better, and an efficient OS without compromising on quality. Users running previous Windows versions were given the option to upgrade to the new one through the Windows Update manager. The process is very simple. All you have to do is start the update process and sit back while Windows does all the work.
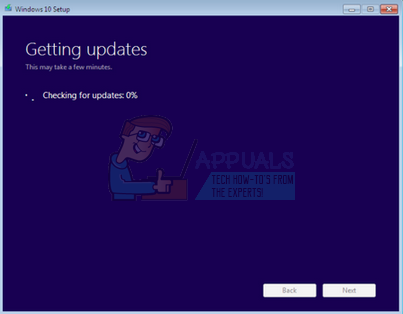
Despite the method working for almost everyone, many users reported that their Windows 7 update manager got stuck at “Checking for updates”. This situation is very bizarre as the notification for Windows 10 is already present for you to start the download. We did a little digging and after getting feedback from the users and experimenting ourselves, we concluded that this problem could occur due to very few reasons.
You can also read our article regarding how Windows 7 gets stuck while checking for updates.
Solution 1: Restarting Update Service after deleting downloaded content
We will disable the Windows update service momentarily so we can delete the content already downloaded by the Update Manager. After we restart the service, Windows will check which files are already downloaded. If it finds none, it will start the download from scratch. Most of the time, this solves the problem and the computer no longer gets stuck in Checking for Updates.
Step 1: Disabling Update Service
There are two methods to disable the Windows Update Service. You can follow any one of them for your ease of access.
Using Services
- Press Windows + R to bring up the Run application. In the dialogue box, type “services.msc”. This will bring up all the services running on your computer.

- Browse through the list until you find a service named “Windows Update Service”. Right-click on the service and select Properties.

- Click on Stop present under the sub-heading of Service Status. Now your Windows Update service is stopped and we can proceed.
Using Command Prompt
- Press Windows + R to bring up the Run In the dialogue box, type “cmd” to launch the command prompt.
- In the command prompt, type the following command. Don’t close the command prompt yet, we may need it later on.
Step 2: Deleting Downloaded Files
Now we will navigate to the Windows Update directory and delete all the updated files already present. Open your file explorer or My Computer and follow the steps.
- Navigate to the address written below. You can also launch the Run application and copy-paste the address to reach directly.
- Delete everything inside the Software Distribution folder (you can also cut paste them to another location in case you want to place them back again).

Step 3:Turning Update Service back on
Now we have to turn the Windows Update service back on and launch it again. Initially, the Update Manager might take a few minutes to compute details and prepare a manifest for the download.
Now if you used method one to turn off Windows Update, also follow method one here. If you followed method two, follow method two.
Using Services
- Open the Services tab as we did earlier in the guide. Navigate to Windows Update and open its Properties.
- Now Start the service again and launch your update manager.

Using Command prompt
- Launch your command prompt (or if it is already running just type).
- Type the following command. This will start the Windows Update service again. Now you launch your Update manager again and start the Windows 10 process.
Note: Always run the command prompt and the services tab as an administrator. You might experience an error if you forget to use full authority.
Solution 2: Disabling your Antivirus
Many antivirus software conflicts your Windows downloaded updates and quarantines them. Antivirus is designed to stop the download of files that are meant to change your existing system files. Although they update their protocols with any new developments (like the new files which are meant to be downloaded from the Windows update), it is possible that they didn’t update their definitions yet.
Disabling your antivirus is a risky move and might expose you to a number of threats. Hence we should only disable them momentarily and run the Update Manager. If our problem gets solved, we can keep it disabled until the download the complete. If not, you can switch it back On anytime.
Solution 3: Switching to a LAN connection
Many users reported that the Windows 10 update wouldn’t download over their wireless connection. It may be a problem with your wireless driver or the current operating system may not be willing to accept the download over a wireless connection.
 Plugging in Ethernet Wire
You can switch to a wired connection and start the Update Manager again and test the issue. Just plug an Ethernet cable into your router and one to your PC. You can also plug the Ethernet cable connected to your router directly into your PC. The speed will be faster and there will be no interruptions too.
Solution 4: Waiting for the Download to Complete and Checking your Disk Space
There can be many cases when your Windows 7 isn’t updated to the latest version available. In that case, the process can take as long as 12 hours according to some experiments. Windows will first update your system or download the updates of your Windows 7 and then start the process of Windows 10.
The Windows 10 update has a feature to clean install the OS or upgrade your existing OS. For the upgrade your existing OS option, Windows has a milestone set. It can only upgrade your system IF your system is the latest operating system. Therefore it first upgrades your system and then starts the download process of Windows 10.
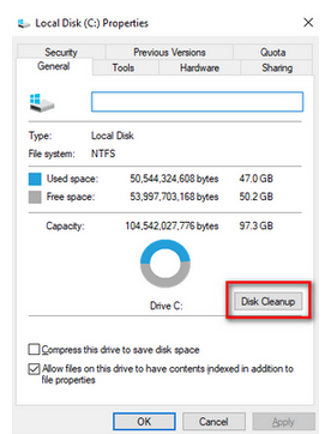
Another reason why the Update Manager might be stuck is that you don’t have enough disk space available. Check your local disk C and see if there is any space you can clear. Empty the recycle bin and delete unnecessary items on your desktop. You can also clean your disk using this method.
- Open up your explorer or navigate to My Computer. Here all the connected devices and disk drives will be listed.

- Right-click on the disk and select the option of Properties from the drop-down menu.
- Once in the properties, navigate to the General tab present at the top. Here you will see how much free space is available along with the used memory. Click the button which says Disk Cleanup.
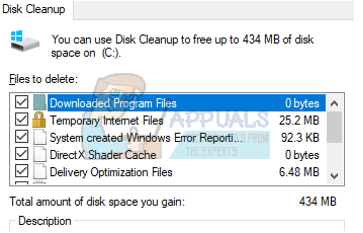
- Now check all the boxes present and include all the temporary files as well. Press Ok for the disk cleanup to begin.
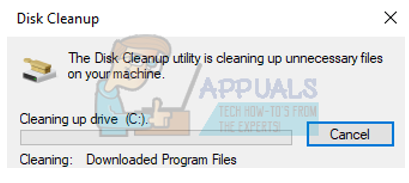
- After you press Ok, Windows will start cleaning your drive. It may take a few minutes if you haven’t performed Disk Cleanup for a long time. Be patient and don’t cancel the process at any stage.
Solution 5: Resetting Windows Components
If none of the above methods work, we can try resetting all of the Windows Update components. This will remove all the temporary configurations for all Windows Update modules. This is a fix that is officially documented by Microsoft itself.
Windows Update components are known to get in error states every once in a while. This usually occurs when a corrupt manifest is downloaded or some of the modules have bad update files stored locally. There are two ways mentioned by Microsoft: either you can download and run a script or you can manually perform each command. Don’t forget to restart your computer before you attempt at starting the update again.
Update the Windows Update Agent to the latest version
This article describes how to update the Windows Update Agent to the latest version.
Original product version: В Windows 10 — all editions, Windows Server 2012
Original KB number: В 949104
Summary
If you have automatic updating turned on, the latest version of the Windows Update Agent is downloaded and installed automatically on your computer. Or, you can manually download and install the Windows Update Agent.
Automatically download Windows Update Agent
To download the Windows Update Agent automatically, follow these steps:
Turn on automatic updating. Follow these steps, for the version of Windows that you are running.
Windows 8.1 or Windows 8
- Open Windows Update by swiping in from the right edge of the screen (or, if you’re using a mouse, pointing to the lower-right corner of the screen and moving up the mouse pointer), tapping or clicking Settings, tapping or clicking Control Panel, and then tapping or clicking Windows Update.
- Tap or click Change settings.
- Under Important updates, choose Install updates automatically.
- Under Recommended updates, select the Give me recommended updates the same way I receive important updates check box, and then select OK.
Windows 7, Windows Vista, or Windows XP
To turn on automatic updating automatically, select the Fix it button or link, and then select Run in the View Download dialog box. Then, follow the steps in the Fix it wizard.
Restart the Windows Update service. To do this, follow these steps:
- Press the Windows logo Key+R to open the Run box.
- Type services.msc in the Run box, and then press Enter.
- Right-click Windows Update in the Services management console, and then select Stop. If you are running Windows XP, right-click Automatic Updates, and then select Stop.
- After Windows Update stops, right-click Windows Update, and then select Start. If you are running Windows XP, right-click Automatic Updates, and then select Start.
Wait for Windows Update to start, and then verify that the Windows Update Agent is updated.
Manually download Windows Update Agent from Microsoft Download Center
Click the download link for your version of Windows to obtain the latest Windows Update Agent.
Stand-alone packages for Windows 8 and Windows Server 2012
The following files are available for download from the Microsoft Download Center.
| Operating system | Update |
|---|---|
| All supported x86-based versions of Windows 8 (KB2937636) | Download the package now. |
| All supported x64-based versions of Windows 8 (KB2937636) | Download the package now. |
| All supported x64-based versions of Windows Server 2012 (KB2937636) | Download the package now. |
Stand-alone packages for Windows 7 SP1 and Windows Server 2008 R2 SP1
The following files are available for download from Windows Update.
| Operating system | Update |
|---|---|
| All supported x86-based versions of Windows 7 SP1 | Download the package now. |
| All supported x64-based versions of Windows 7 SP1 | Download the package now. |
| All supported x86-based versions of Windows Server 2008 R2 SP1 | Download the package now. |
| All supported x64-based versions of Windows Server 2008 R2 SP1 | Download the package now. |
| All supported Itanium-based versions of Windows Server 2008 R2 SP1 | Download the package now. |
Windows 8.1, Windows RT 8.1, and Windows Server 2012 R2 with update 2919355 already include the latest version of the Windows Update Agent.
More information
If you receive a Windows Update error, try Solutions for common Windows Update errors.
For more information about how to check which version of the Windows Update Agent is installed, follow these steps:
- Open the %systemroot%\system32 folder. %systemroot% is the folder in which Windows is installed. For example, the %systemroot% folder is C:\Windows .
- Right-click Wuaueng.dll, and then select Properties.
- Select the Details tab, and then locate the file version number.
The latest version of the Windows Update Agent for Windows 8.1 is 7.9.9600.16422. The latest version of the Windows Update Agent for Windows 8 is 7.8.9200.16693. The latest version of the Windows Update Agent for Windows 7, Windows Vista, and Windows XP is 7.6.7600.256.
Improvements in version 7.6.7600.256 of Windows Update Agent
A hardened infrastructure so that the Windows Update client will trust only those files that are signed by a new certificate. The certificate is used solely to protect updates to the Windows Update client.
A more secure communication channel for the Windows Update client
Improvements in version 7.4.7600.226 of Windows Update Agent
- Improved scan times for Windows updates.
- Improved Windows Update UI for computers that are running Windows Vista or Windows Server 2008.
- More visible and detailed descriptions of updates.
- Improvements in how users are notified about service packs.
Issues that are fixed in version 7.2.6001.788 of Windows Update Agent
Version 7.2.6001.788 of the Windows Update Agent fixes the following issue. This issue was not previously documented in a Microsoft Knowledge Base article:
- When you try to install 80 or more updates at the same time from Windows Update or Microsoft Update, you receive a «0x80070057» error code.
Improvements in version 7.2.6001.784 of Windows Update Agent
- Improved scan times for Windows Update
- Improved speed at which signature updates are delivered
- Support for Windows Installer reinstallation
- Improved error messaging
Issues that are fixed by version 7.0.6000.381 of Windows Update Agent
Version 7.0.6000.381 of the Windows Update Agent fixes the following issues. These issues were not previously documented in a Microsoft Knowledge Base article:
- The Background Intelligent Transfer Service (BITS) crashes on a Windows Vista-based computer. For more information, see An update is available to fix a Background Intelligent Transfer Service (BITS) crash on a Windows Vista-based computer.
- A fix is included that reduces the number of restarts that are required for the stand-alone installer when Multilingual User Interface Pack (MUI) files are being used.
- User interface elements in the Korean, Simplified Chinese, and Traditional Chinese languages are fixed.
- The Windows Vista installation experience is improved.
Windows Update helps keep your computer up-to-date and secure by downloading and installing the latest security and other updates from Microsoft. Windows Update determines which updates apply to your computer.
Microsoft periodically makes software updates available to users of Windows and other Microsoft software. These include updates that improve reliability and performance, updates that provide new protections against malware and other potentially unwanted software, and upgrades to Windows features. To improve the performance or the reliability of hardware components on the computer, Microsoft may also provide updates to device drivers that are supplied by the computer manufacturer.
If you turn on Windows Update, software components that are directly related to Windows Update will have to be updated occasionally on your computer. These updates must be performed before Windows Update can check for required updates or before it can install other updates. These required updates fix errors, provide ongoing improvements, and maintain compatibility with the Microsoft servers that support Windows Update. If you disable Windows Update, you will not receive these updates.
Windows Update is configured to install updates automatically when you select the recommended option during Windows Out Of Box Experience (OOBE) Setup. You can also turn on Windows Update by selecting one of following settings in the Automatic Updates item in Control Panel:
- Automatic (recommended).
- Download updates for me, but let me choose when to install them.
- Notify me, but don’t automatically download or install them.
After you turn on Windows Update, the required updates to components of Windows Update will be downloaded and installed automatically without notifying you. This behavior occurs regardless of which setting you use to turn on Windows Update. If you do not want to receive required updates, you can disable automatic updates in Control Panel.
The updates to Windows Update itself typically do the following: Address feedback from customers, improve compatibility, service performance and reliability, and enable new service capabilities. When the Windows Update server is updated, a corresponding client update is typically required. During an agent self-update operation, Windows Update Agent files may be added, modified, or replaced. For example, Windows Update Agent files that help display the user experience or that determine whether updates apply to a particular system may be added. This behavior occurs when a system is set to automatically check for available updates. This does not occur when automatic updates are turned off. For example, this behavior does not occur if you select Never check for updates in Windows Vista and Windows 7 or if you select Turn off Automatic Updates in Windows XP.
Administrators will receive the latest version of the Windows Update Agent for deployment through Windows Server Update Services (WSUS).


