- Upgrade Domain Controllers to Windows Server 2016
- Pre-requisites
- Installation steps and required administrative levels
- Supported in-place upgrade paths
- Adprep and Domainprep
- Functional level features and requirements
- Rolling back functional levels
- AD DS interoperability with other server roles and Windows operating systems
- Administration of Windows Server 2016 servers
- Step-by-Step for Upgrading to Windows Server 2016
- Just a Random Microsoft Azure and Computing Tech info
- Introduction
- How NLB works
- Configuring and Managing the NLB Cluster
- Validate port rules
- Manage host availability in the NLB cluster
- That’s all for now. 🙂
Upgrade Domain Controllers to Windows Server 2016
Applies To: Windows Server
This topic provides background information about Active Directory Domain Services in Windows Server 2016 and explains the process for upgrading domain controllers from Windows Server 2012 or Windows Server 2012 R2.
Pre-requisites
The recommended way to upgrade a domain is to promote domain controllers that run newer versions of Windows Server and demote the older domain controllers as needed. That method is preferable to upgrading the operating system of an existing domain controller. This list covers general steps to follow before you promote a domain controller that runs a newer version of Windows Server:
- Verify the target server meets system requirements.
- Verify Application compatibility.
- Review Recommendations for moving to Windows Server 2016
- Verify security settings. For more information, see Deprecated features and behavior changes related to AD DS in Windows Server 2016.
- Check connectivity to the target server from the computer where you plan to run the installation.
- Check for availability of necessary operation master roles:
- To install the first DC that runs Windows Server 2016 in an existing domain and forest, the machine where you run the installation needs connectivity to the schema master in order to run adprep /forestprep and the infrastructure master in order to run adprep /domainprep.
- To install the first DC in a domain where the forest schema is already extended, you only need connectivity to the infrastructure master.
- To install or remove a domain in an existing forest, you need connectivity to the domain naming master.
- Any domain controller installation also requires connectivity to the RID master.
- If you are installing the first read-only domain controller in an existing forest, you need connectivity to the infrastructure master for each application directory partition, also known as a non-domain naming context or NDNC.
Installation steps and required administrative levels
The following table provides a summary of the upgrade steps and the permission requirements to accomplish these steps
| Installation action | Credential requirements |
|---|---|
| Install a new forest | Local Administrator on the target server |
| Install a new domain in an existing forest | Enterprise Admins |
| Install an additional DC in an existing domain | Domain Admins |
| Run adprep /forestprep | Schema Admins, Enterprise Admins, and Domain Admins |
| Run adprep /domainprep | Domain Admins |
| Run adprep /domainprep /gpprep | Domain Admins |
| Run adprep /rodcprep | Enterprise Admins |
For additional information on new features in Windows Server 2016, see What’s new in Windows Server 2016.
Supported in-place upgrade paths
Domain controllers that run 64-bit versions of Windows Server 2012 or Windows Server 2012 R2 can be upgraded to Windows Server 2016. Only 64-bit version upgrades are supported because Windows Server 2016 only comes in a 64-bit version.
| If you are running this edition: | You can upgrade to these editions: |
|---|---|
| Windows Server 2012 Standard | Windows Server 2016 Standard or Datacenter |
| Windows Server 2012 Datacenter | Windows Server 2016 Datacenter |
| Windows Server 2012 R2 Standard | Windows Server 2016 Standard or Datacenter |
| Windows Server 2012 R2 Datacenter | Windows Server 2016 Datacenter |
| Windows Server 2012 R2 Essentials | Windows Server 2016 Essentials |
| Windows Storage Server 2012 Standard | Windows Storage Server 2016 Standard |
| Windows Storage Server 2012 Workgroup | Windows Storage Server 2016 Workgroup |
| Windows Storage Server 2012 R2 Standard | Windows Storage Server 2016 Standard |
| Windows Storage Server 2012 R2 Workgroup | Windows Storage Server 2016 Workgroup |
For more information about supported upgrade paths, see Supported Upgrade Paths
Adprep and Domainprep
If you are doing an in-place upgrade of an existing domain controller to the Windows Server 2016 operating system, you will need to run adprep /forestprep and adprep /domainprep manually. Adprep /forestprep needs to be run only once in the forest. Adprep /domainprep needs to be run once in each domain in which you have domain controllers that you are upgrading to Windows Server 2016.
If you are promoting a new Windows Server 2016 server you do not need to run these manually. These are integrated into the PowerShell and Server Manager experiences.
For more information on running adprep see Running Adprep
Functional level features and requirements
Windows Server 2016 requires a Windows Server 2003 forest functional level. That is, before you can add a domain controller that runs Windows Server 2016 to an existing Active Directory forest, the forest functional level must be Windows Server 2003 or higher. If the forest contains domain controllers running Windows Server 2003 or later but the forest functional level is still Windows 2000, the installation is also blocked.
Windows 2000 domain controllers must be removed prior to adding Windows Server 2016 domain controllers to your forest. In this case, consider the following workflow:
- Install domain controllers that run Windows Server 2003 or later. These domain controllers can be deployed on an evaluation version of Windows Server. This step also requires running adprep.exe for that operating system release as a prerequisite.
- Remove the Windows 2000 domain controllers. Specifically, gracefully demote or forcibly remove Windows Server 2000 domain controllers from the domain and used Active Directory Users and Computers to remove the domain controller accounts for all removed domain controllers.
- Raise the forest functional level to Windows Server 2003 or higher.
- Install domain controllers that run Windows Server 2016.
- Remove domain controllers that run earlier versions of Windows Server.
Rolling back functional levels
After you set the forest functional level (FFL) to a certain value, you cannot roll back or lower the forest functional level, with the following exceptions:
- If you are upgrading from Windows Server 2012 R2 FFL, you can lower it back to Windows Server 2012 R2.
- If you are upgrading from Windows Server 2008 R2 FFL, you can lower it back to Windows Server 2008 R2.
After you set the domain functional level to a certain value, you cannot roll back or lower the domain functional level, with the following exceptions:
- When you raise the domain functional level to Windows Server 2016 and if the forest functional level is Windows Server 2012 or lower, you have the option of rolling the domain functional level back to Windows Server 2012 or Windows Server 2012 R2.
For more information about features that are available at lower functional levels, see Understanding Active Directory Domain Services (AD DS) Functional Levels.
AD DS interoperability with other server roles and Windows operating systems
AD DS is not supported on the following Windows operating systems:
- Windows MultiPoint Server
- Windows Server 2016 Essentials
AD DS cannot be installed on a server that also runs the following server roles or role services:
- Microsoft Hyper-V Server 2016
- Remote Desktop Connection Broker
Administration of Windows Server 2016 servers
Use the Remote Server Administration Tools for Windows 10 to manage domain controllers and other servers that run Windows Server 2016. You can run the Windows Server 2016 Remote Server Administration Tools on a computer that runs Windows 10.
Step-by-Step for Upgrading to Windows Server 2016
The following is a simple example of upgrading the Contoso forest from Windows Server 2012 R2 to Windows Server 2016.

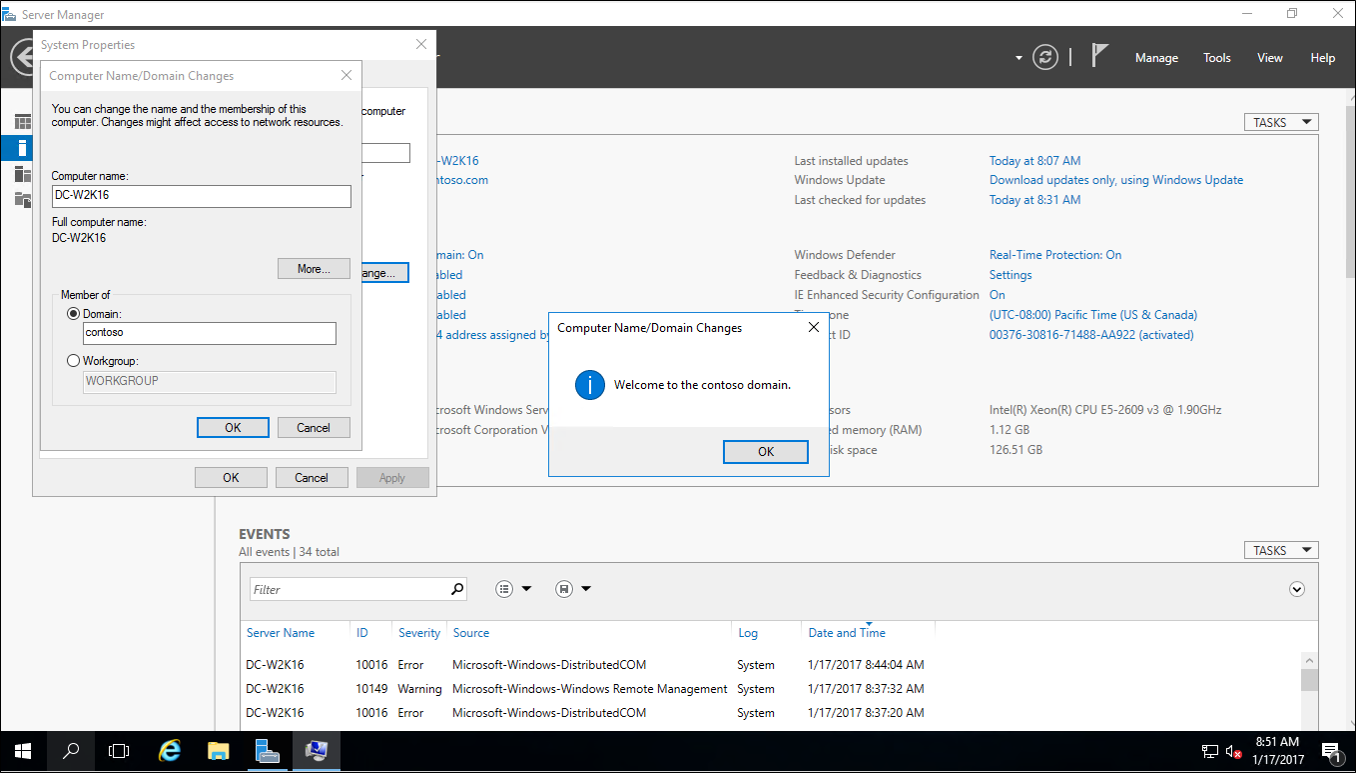
Join the new Windows Server 2016 to your forest. Restart when prompted.
Sign in to the new Windows Server 2016 with a domain admin account.
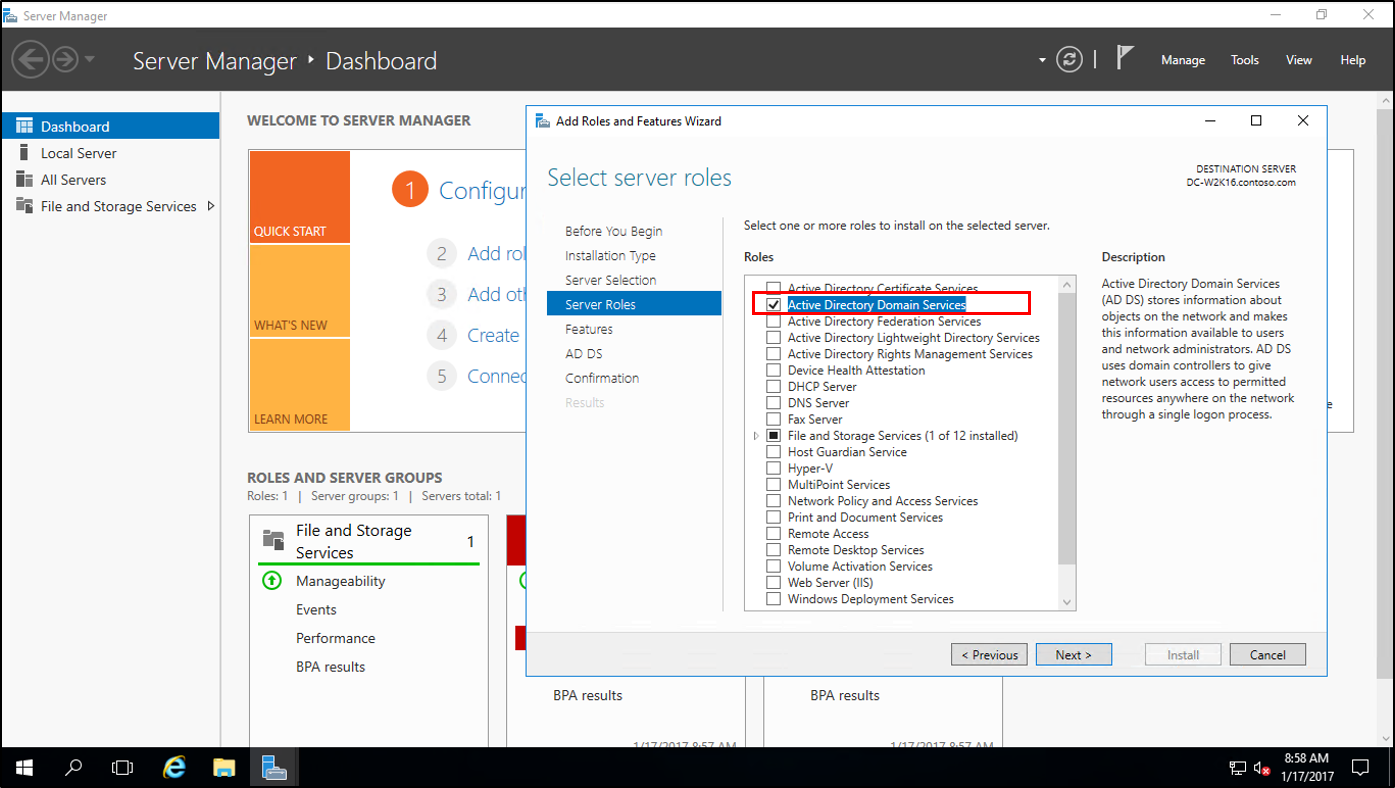
In Server Manager, under Add Roles and Features, install Active Directory Domain Services on the new Windows Server 2016. This will automatically run adprep on the 2012 R2 forest and domain.
In Server Manager, click the yellow triangle, and from the drop-down click Promote the server to a domain controller.

On the Deployment Configuration screen, select Add a domain controller to an existing forest and click next.

On the Domain Controller options screen, enter the Directory Services Restore Mode (DSRM) password and click next.
For the remainder of the screens click Next.
On the Prerequisite Check screen, click install. Once the restart has completed you can sign back in.
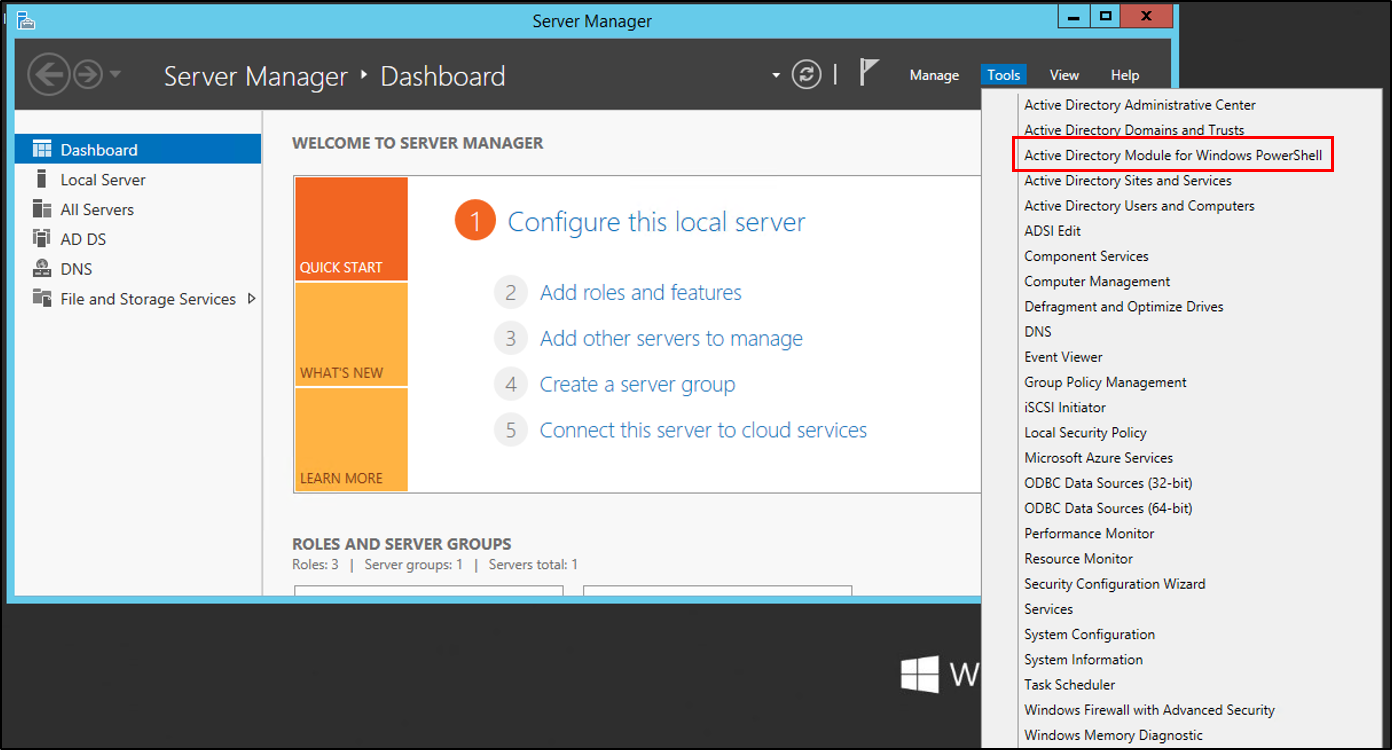
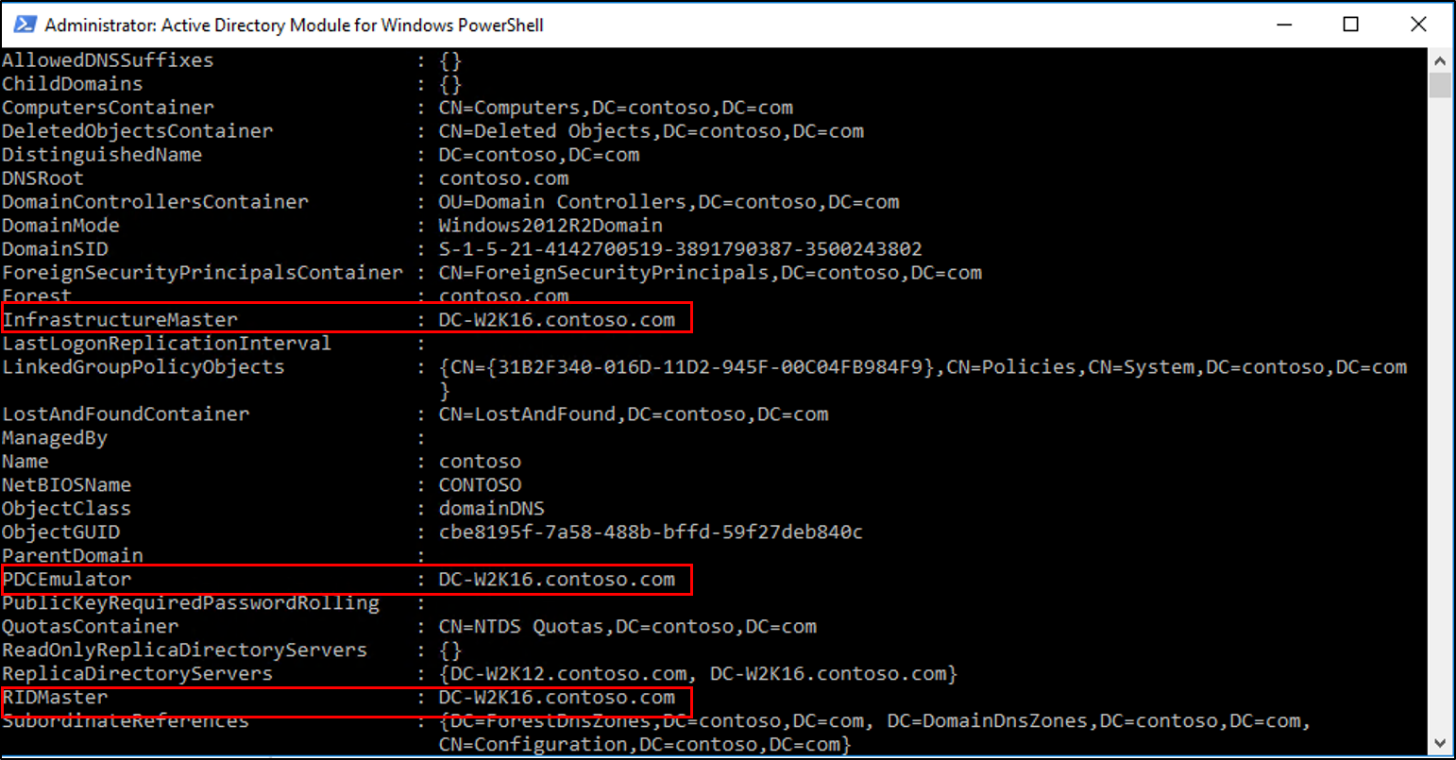
On the Windows Server 2012 R2 server, in Server Manager, under tools, select Active Directory Module for Windows PowerShell.
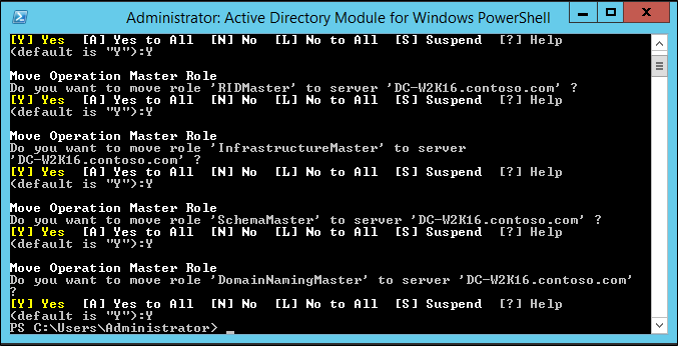
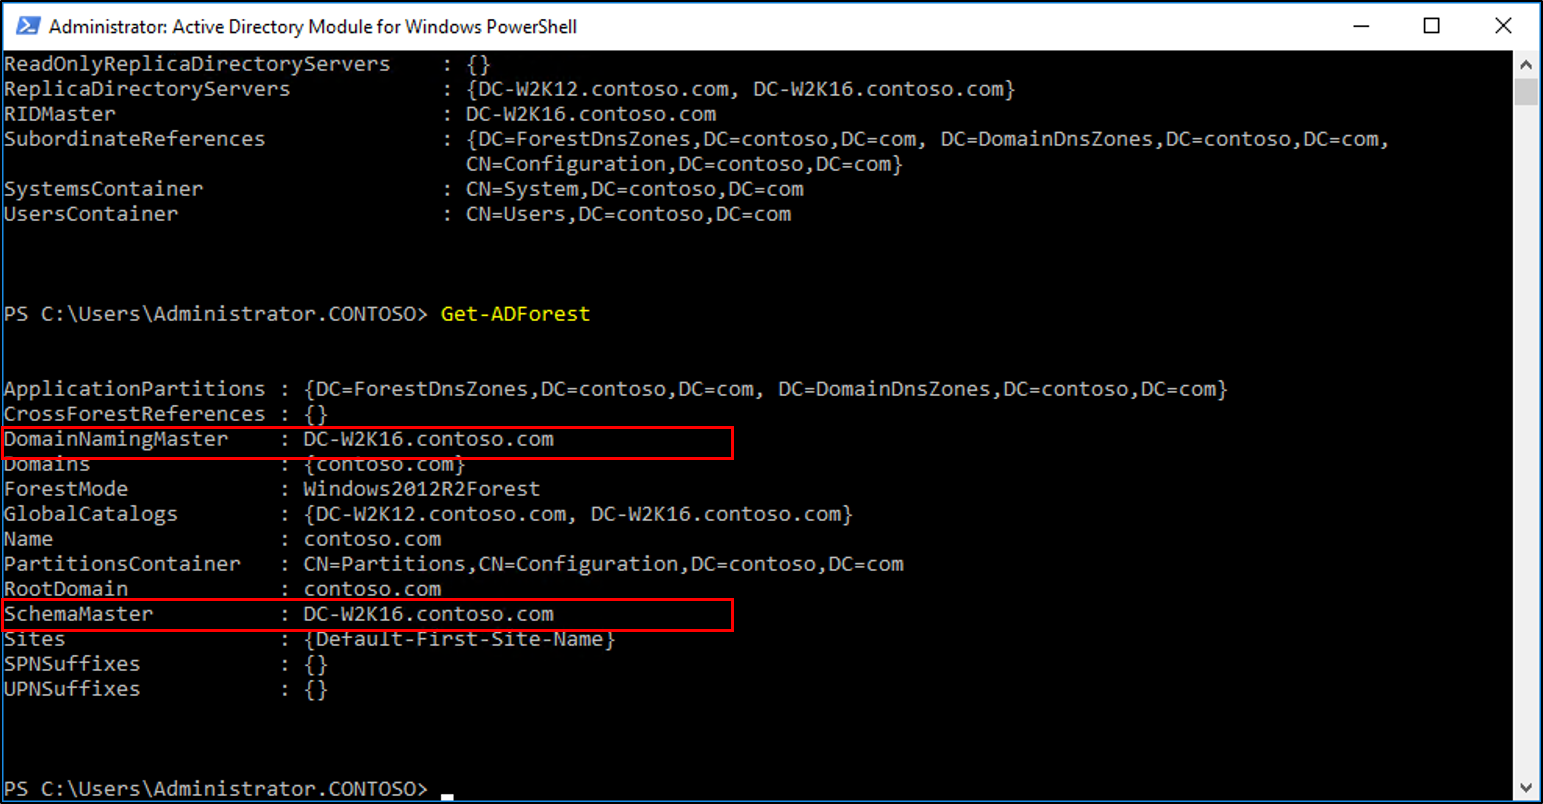
In the PowerShell windows use the Move-ADDirectoryServerOperationMasterRole to move the FSMO roles. You can type the name of each -OperationMasterRole or use numbers to specify the roles. For more information see Move-ADDirectoryServerOperationMasterRole
Verify the roles have been moved by going to the Windows Server 2016 server, in Server Manager, under tools, select Active Directory Module for Windows PowerShell. Use the Get-ADDomain and Get-ADForest cmdlets to view the FSMO role holders.
Demote and remove the Windows Server 2012 R2 domain controller. For information on demoting a dc, see Demoting Domain Controllers and Domains
Once the server is demoted and removed you can raise the forest functional and domain functional levels to Windows Server 2016.
Just a Random Microsoft Azure and Computing Tech info
Introduction
NLB is a scalable, high-availability feature that you can install on all editions of Windows Server 2016. NLB distributes network traffic across a set of servers, balancing the workload each server must handle. It is scalable because it enables you to add additional servers (also called nodes or hosts). A node (or host) in an NLB cluster in Windows Server 2016 is a computer, either physical or virtual, that is running the Windows Server 2016 operating system. Each node or host runs a copy of the server applications that are also running on the other hosts in the cluster.
Windows Server 2016 NLB clusters can have between 2 and 32 nodes. When you create an NLB cluster, it creates a virtual network address and virtual network adapter. The virtual network adapter has an IP address and a media access control (MAC) address. Network traffic to this address is distributed evenly across the nodes in the cluster. In a basic NLB configuration, each node in an NLB cluster services requests at a rate that is approximately equal to that of all other nodes in the cluster. When an NLB cluster receives a request, it forwards that request to the node that currently is the least used. You also can configure NLB to direct traffic to a specific host, called a default host.
New in Windows Server 2016 is it includes a new Azure-inspired Software Load Balancer (SLB) as a component of the Software Defined Networking (SDN) infrastructure. Use SLB instead of NLB if you are using SDN, are using non-Windows workloads, need outbound network address translation (NAT), or need Layer 3 (L3) or non-TCP based load balancing. You can continue to use NLB with Windows Server 2016 for non-SDN deployments.
How NLB works 

When you configure an application to use NLB, clients address the application using the NLB cluster address rather than the address of nodes that participate in the NLB cluster. The NLB cluster address is a virtual address that is shared between the hosts in the NLB cluster.
For this NLB demo this time, I will be using 03 Server, which is 01 Domain Server and 02 Member Server.
1 – Now switch to the SUB-01 server and open Windows PowerShell ISE

2 – In the Windows PowerShell ISE type
Invoke-Command -Computername SUB-01,SUB-02 -command


3 – Once the process complete, open Server Manager, click Tools and verify that Network Load Balancing Manager is installed

4 – Now switch to SUB-02, open Server Manager, click Tools and verify also that Network Load Balancing Manager is installed

5 – On the SUB-01 server, in the Windows PowerShell ISE, type
New-NlbCluster -InterfaceName “Ethernet” -OperationMode Multicast -ClusterPrimaryIP 172.16.1.100 -ClusterName NewHelpTech-NLB

6 – Once the command complete, still in the Windows PowerShell ISE, type
Invoke-Command -Computername DC-SERVER -command

7 – Now to add a second host to the cluster, still in Windows PowerShell ISE, type
Add-NlbClusterNode -InterfaceName “Ethernet” -NewNodeName “SUB-02” –NewNodeInterface “Ethernet”

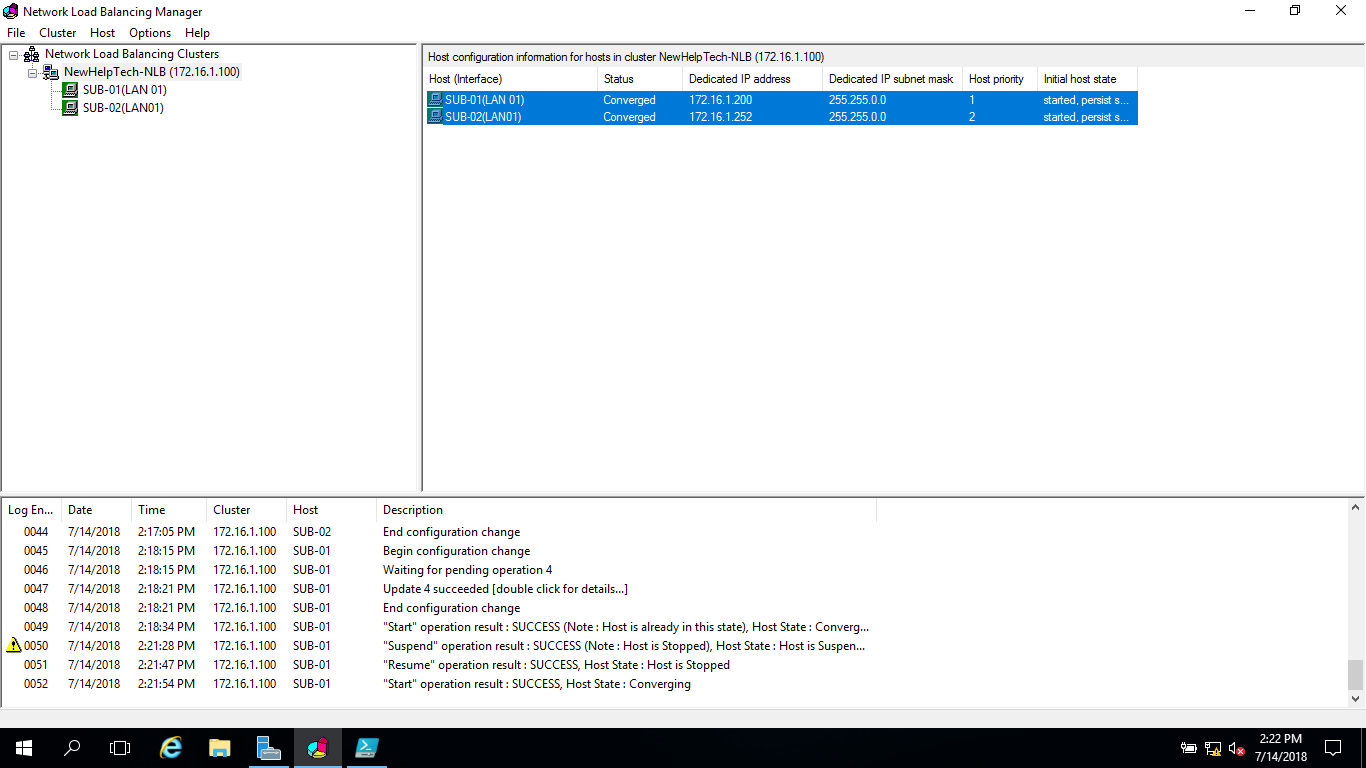
8 – On the SUB-01 Server, open Server Manager, click the Tools and then click Network Load Balancing Manager
9 – In the Network Load Balancing Manager console, verify that nodes SUB-01 and SUB-02 display with the status of Converged for the New HelpTeh-NLB cluster

10 – Next, right-click the NewHelpTech-NLB cluster, and then click Cluster properties

11 – In the NewHelpTech-NLB(172.16.1.100), on the Cluster Parameters tab, verify that the cluster is set to use the Multicast operations mode

12 – On the Port Rules tab, verify that there is a single port rule named All that starts at port 0 and ends at port 65535 for both TCP and UDP protocols and that it uses Single affinity

Configuring and Managing the NLB Cluster
1 – Before we start to configure and manage the NLB Cluster, log on to the SUB-02 server, and create 01 folder named NewHelpTech in C:\
2 – then copy all C:\inetpub\wwwroot to C:\NewHelpTech folder
3 – Open PowerShell and type
New-Website –Name NewHelpTech –PhysicalPath “C:\NewHelpTech” –Port 5678

4 – Open PowerShell and type
New-NetFirewallRule –DisplayName NewHelpTech –Protocol TCP –LocalPort 5678

5 – Now switch to Domain Server and in the IE type http://SUB-02:5678
Verify that the static basic website 
6 – Now switch back to the SUB-01 server and open Network Load Balancing Manager, in the Network Load Balancing Manager console, right-click NewHelpTech-NLB, and then click Cluster Properties
#_# In the NewHelpTech-NLB(172.16.1.100), on the Port Rules tab, select the All port rule, and then click Remove


7 – On the Port Rules tab, click Add

8 – In the Add/Edit Port Rule box, enter the following information, and then click OK
• Port range: 80 to 80
• Protocols: Both
• Filtering mode: Multiple Host
• Affinity: None
9 – On the Port Rules tab, click Add again
In the Add/Edit Port Rule box, enter the following information, and then click OK
• Port range: 5678 to 5678
• Protocols: Both
• Filtering mode: Single Host

10 – Click OK to close the NewHelpTech-NLB(172.16.1.100)

11 – In the Network Load Balancing Manager console, right-click SUB-01, and then click Host Properties

12 – On the Port Rules tab, click the port rule that has 5678 as the Start and End value, and then click Edit

13 – Click the Handling priority value, and change it to 10 and click OK twice to close


Validate port rules
1 – To validate port rules, switch to DC Server, in IE type http://NewHelpTech-NLB:5678, and then Refresh the site few times and verify that you see static basic website

Manage host availability in the NLB cluster
1 – Switch to the SUB-01 server, in the Network Load Balancing Manager console, right-click SUB-01 click Control Host, and then click Suspend

2 – Click the NewHelpTech-NLB node
#_# Verify that node SUB-01 displays as Suspended, and that node SUB-01 displays as Converged

3 – Right-click SUB-01, click Control Host, and then click Resume

4 – Right-click SUB-01, click Control Host and then click Start

5 – Click the NewHelpTech-NLB node
#_# Verify that both nodes SUB-01 and SUB-02 now display as Converged. You might have to refresh the view
Good luck! Just give it try – I’m sure you’ll love it as well. If you have any comments or questions on feel free to contact me.


