- Работа с микроконтроллерами: прошивка программатором и чистый «Си»
- Нам понадобится
- Подключаем питание
- Распиновка
- Схема
- Программатор
- Подключение к контроллеру
- Прошивка
- Mac OS X
- Прошивка
- Windows
- Заключение
- AVR STK500 on OS X
- Christos Sotiriou
- Xcode Integration Part 3: Compiling, and fusing the program into the AVR.
- 7 Pieces Of Advice I Wish I Knew In My Early career.
- Mechanical keyboards: an expensive but addictive hobby
Работа с микроконтроллерами: прошивка программатором и чистый «Си»
В этой статье я расскажу о том, как программировать микроконтроллеры без использования Arduino. Мы будем использовать программатор AvrISP STK500 для программирования контроллера ATtiny84.
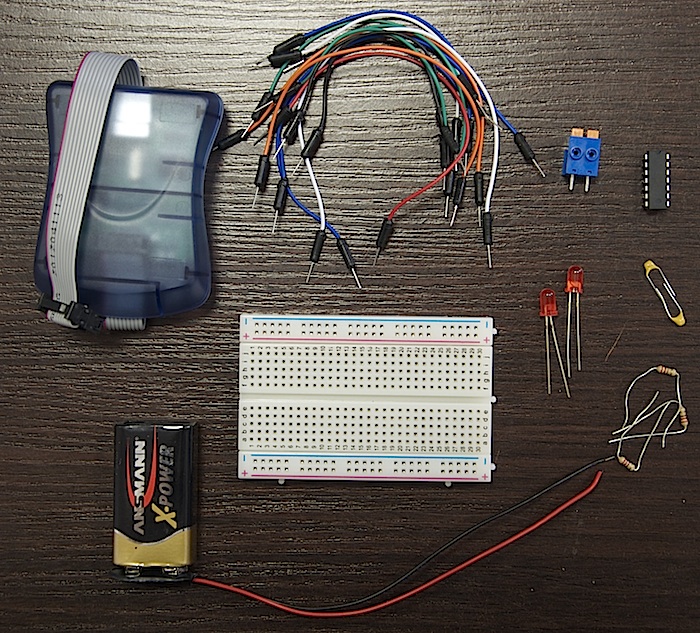
Нам понадобится
Подключаем питание
Arduino мы не используем, поэтому обо всем нам придется думать самостоятельно. И первое, с чем необходимо разобраться — питание. Мы будем использовать преобразователь L7805, обладающей следующими характеристиками:
Теперь нам надо узнать схему подключения этого преобразователя. Ее мы найдем на странице 3 даташита. 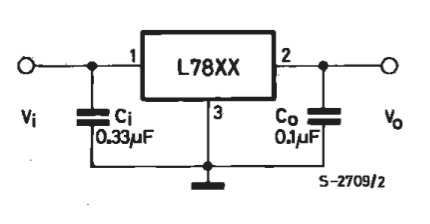
Помимо самого преобразователя, мы видим еще 2 конденсатора — входной Сi и выходной Сo. Входной конденсатор необходим для того, чтобы сгладить пульсации на входе в случае удаленности L7805 от источника. В нашем случае длина соединительных проводов не будет превышать 15 см, поэтому входного конденсатора у нас не будет. Зато будет выходной, поскольку мы хотим «кормить» наш контроллер стабильным питанием.
Распиновка
Необходимо знать назначение ножек преобразователя. Это описано на 2-й странице даташита. 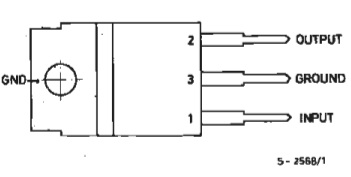
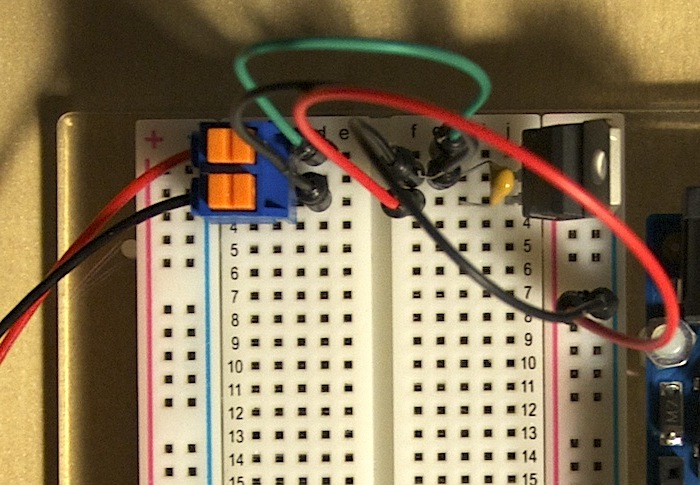
Схема
С учетом всего вышеописанного, получается схема для организации питания.
Программатор
В качестве программатора мы использовали AvrISP STK500 от Seeed Studio. Для его работы под Windows и Mac OS необходимы драйверы. Их можно скачать с официального сайта. Пользователям Linux устанавливать ничего не нужно — программатор будет сразу готов к работе.
Подключение к контроллеру
Распиновка разъема программатора такова: 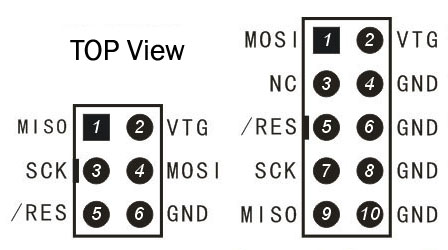
Важно! Это распиновка разъема программатора, если смотреть на него сверху (отверстиями от себя). Не перепутайте!
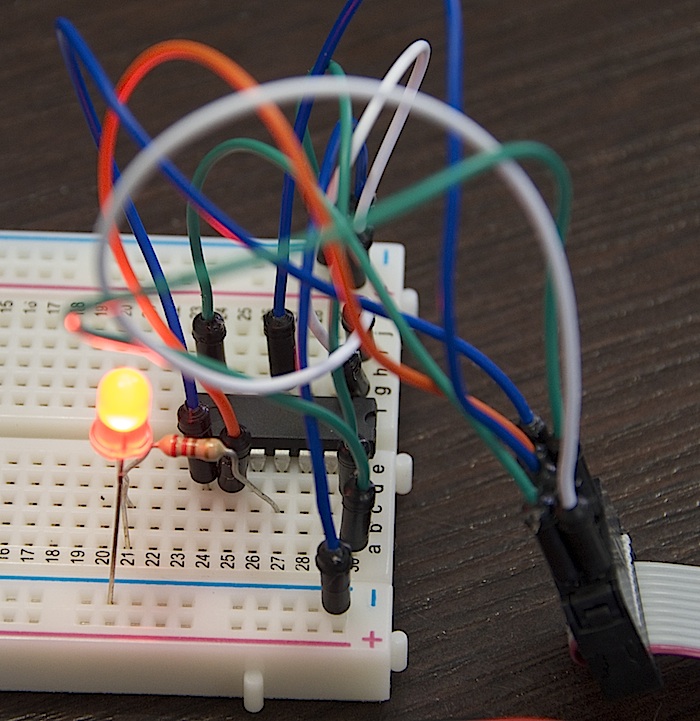
Разъем программатора необходимо подключить к микроконтроллеру. Можно использовать как 10-пиновый разъём, так и 6-пиновый. Без разницы. Соединим проводами соответствующие пины, т.е:
| 10-пиновый ICSP | ATtiny84 | |
|---|---|---|
| Reset | 5 | 4 |
| MOSI | 1 | 7 |
| MISO | 9 | 8 |
| SCK | 7 | 9 |
Прошивка
Напишем код прошивки на чистом «C», которая заставит светодиод мигать. Использование ШИМ-сигналов и считывание аналоговых сигналов на чистом «C» не так тривиальна, и может являться темой отдельной статьи, поэтому остановимся пока на простейшем примере.
После скетчей Arduino, код малопонятен, правда? Ничего, сейчас я объясню, что да как. В первых двух строчках мы подключаем необходимые библиотеки, чтобы воспользоваться такими штуками, как DDRA , PORTA , _delay_ms .
Что же такое DDRA ? Это регистр микроконтроллера, управляющий направлением работы порта А. Он содержит в себе 8 бит. Если установить какой-то бит в 1, то пин с соответствующим номером станет выходом.
PORTA — тоже регистр, но он содержит в себе данные порта А. Если мы хотим на вывод номер 2 записать логическую единицу, то мы должны поместить 1 в соответсвующий бит регистра.
А _delay_ms — функция задержки. Исходя из этого можно составить таблицу соответствия:
| Arduino | C | |
|---|---|---|
| Направление | pinMode(led, OUTPUT); | DDRA = 1 |
| Значение | digitalWrite(led, HIGH); | PORTA = 1 |
| Задержка | delay(1000); | _delay_ms(50); |
Однако, самым важным различием кода является то, что в программе на С нет разделений функций setup и loop . За все это отвечает функция int main(void) . И она выполняется всего 1 раз! А мы хотим, чтобы наш светодиод моргал не один раз, а постоянно. Как раз для этого и используется бесконечный цикл while (1==1) .
Поэтому легко сделать вывод, что этот цикл и есть аналог функции loop() в Arduino. А то, что до него — аналог функции setup() .
Далее начинается самое интересное. Нам нужно скомпилировать и загрузить прошивку. Однако, в зависимости от вашей операционной системы, методика будет различаться.
Mac OS X
Первым делом необходимо скачать и установить CrossPack for AVR Development. Это даст нам все необходимые инструменты. CrossPack состоит из двух частей.
Первая нам нужна для написания кода и создания файла прошивки, а вторая — для заливки прошивки в контроллер.
Проект создается в три шага.
В результате будет создано следующее дерево файлов.
На данном этапе нас интересует содержимое файла Makefile . В нем содержится информация о том, что вообще мы используем: какой контроллер, программатор. Это все описывается в строках с 20 по 24:
Пройдемся по строкам:
Это автосгенерированный make-файл, поэтому нам необходимо вручную его подправить. Править будем строку DEVICE у нас же микроконтроллер attiny84 и строку FUSES . А вот с ней все сложнее. Fuse-биты, или просто «фьюзы» — два (иногда три) особых байта, в которых содержится фундаментальая конфигурация работы контроллера. Очень важно правильно их задать.
Внимание! Задание неверных fuse-битов может привезти к тому, что микроконтроллер перестанет работать и вернуть его к нормальной жизни может быть либо очень сложно либо невозможно! Воспользеумся сайтом AVR Fuse Calcuator.
Сначала из выпадающего списка выберем нужный нам контроллер (ATtiny84).

И затем укажем необходимые опции, которые нам нужны. Сейчас для нас важны 2 вещи: сохранение возможности прошивать контроллер через SPI и сохранение его работоспособности без внешнего резонатора, поэтому выбираем соответствующие пункты, а остальные оставляем по умолчанию.
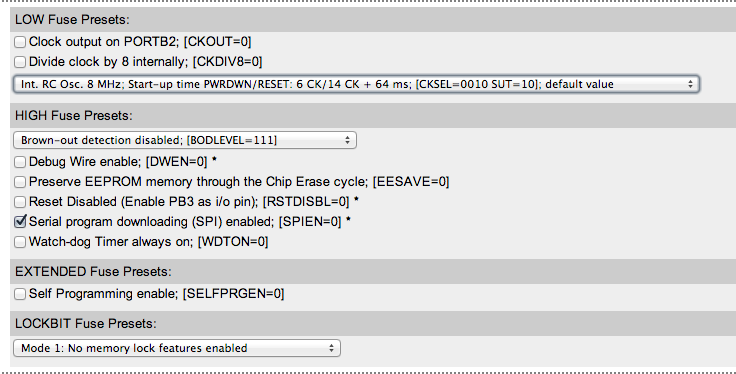
Видим, как поменялись сгенерированные значения.

Внесем изменения в Makefile.
Прошивка
Она происходит в 2 этапа.
Сначала необходимо перейти в папку firmware и выполнить команду make . Если ошибок нет, то результат выполнения команды будет таким:
Эта команда сделает из нашего исходника main.c файл, пригодный для заливки в контроллер — main.hex .
Второй этап — как раз заливка прошивки. Делается это с помощью команды make flash . Ее нормальный вывод выглядит следующим образом:
Все, прошивка контроллера завершена.
Windows
Здесь все проще.
Первым делом необходимо скачать и уствновить среду разработки для AVR — Atmel AVR Studio 4. А вторым — Atmel AVR Toolchain.
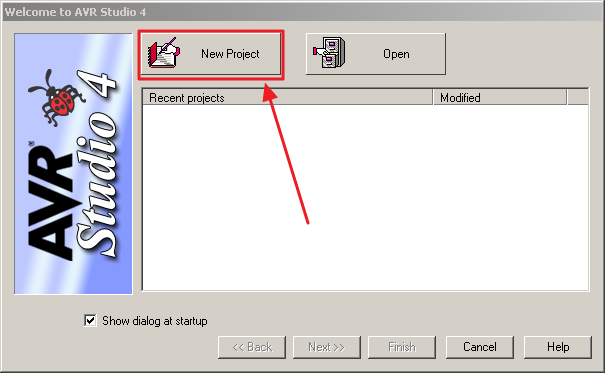
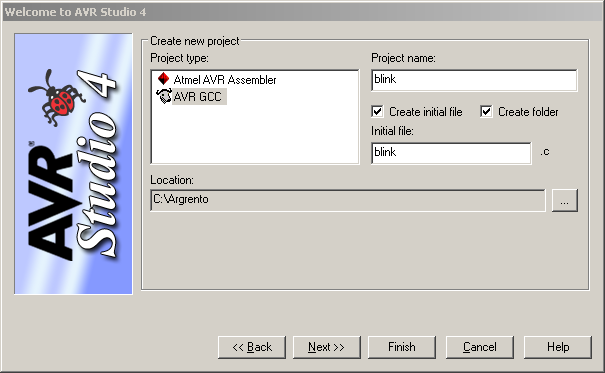
После запуска среды, необходимо создать новый проект.
Затем указать имя, расположение и то, что мы хотим использовать С ( GCC ).
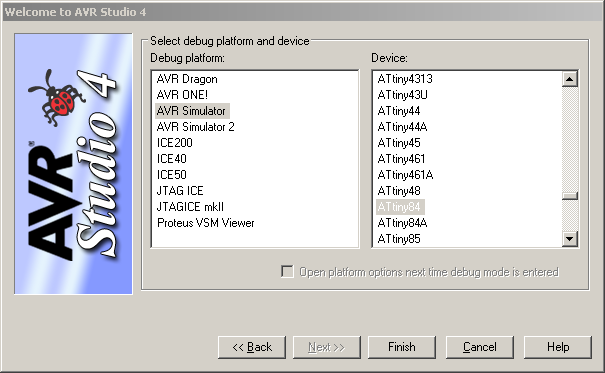
Третий шаг — настройка отладчика.
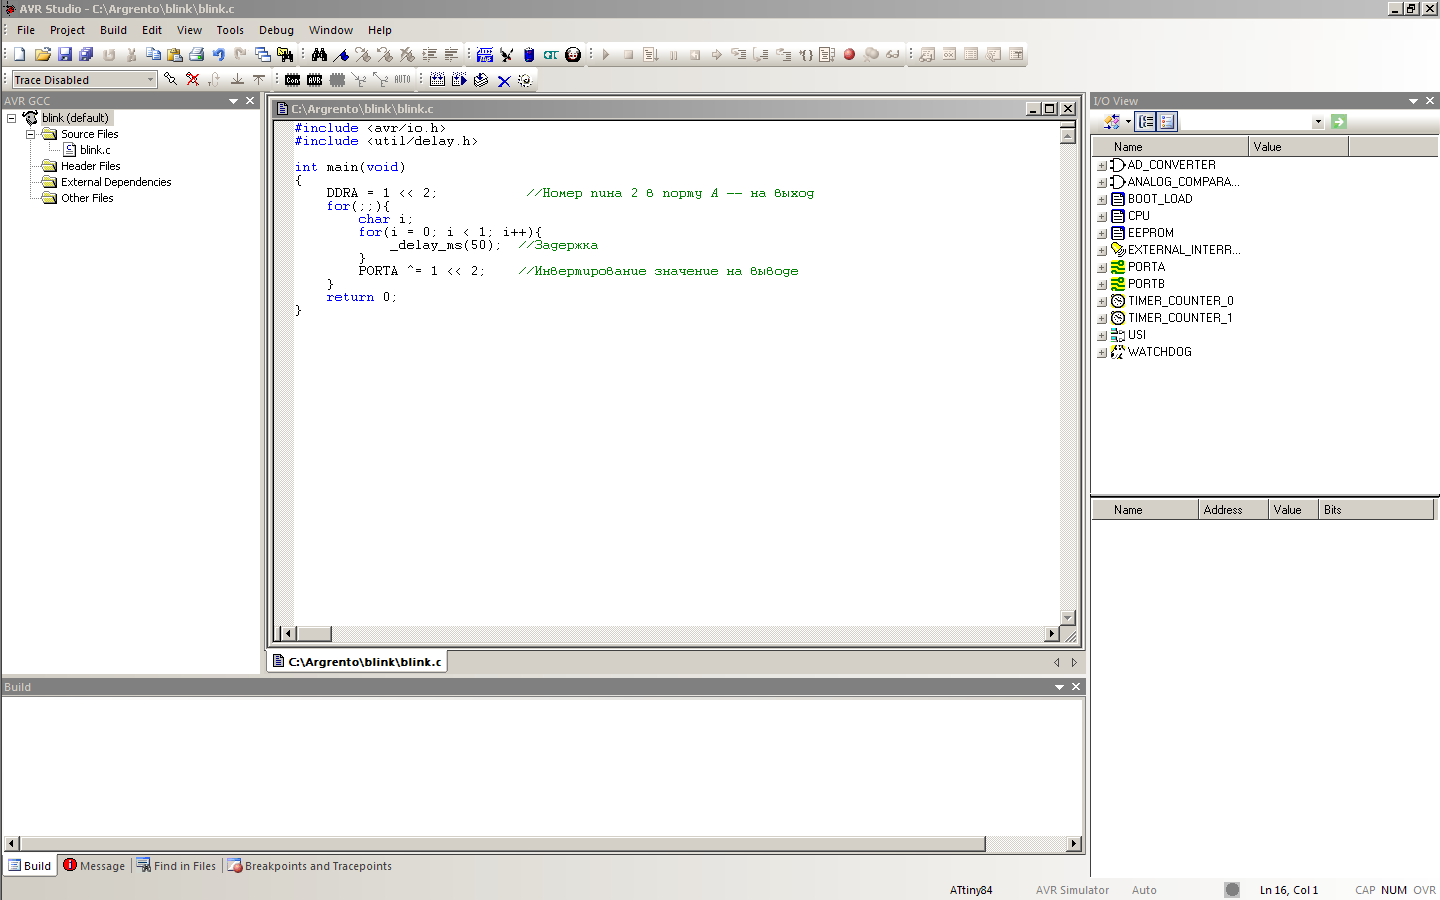
На этом все, проект готов к использованию. Теперь необходимо написать и сохранить исходник, который мы уже обсудили.
В результате общий вид среды разработки выглядит вот так:
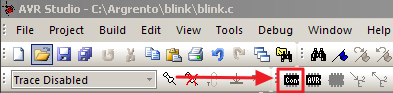
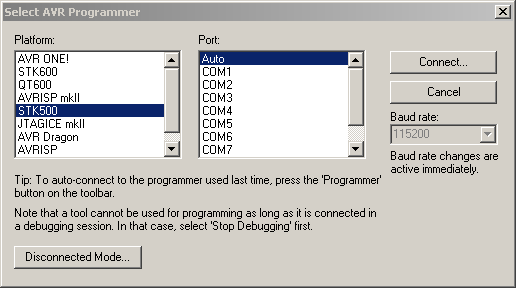
Теперь необходимо подключиться к программатору. Делается это с помощью нажатия на кнопку con .
В качестве Platform выбираем STK500 , а в Port — Auto . Затем нажимаем Connect.
Если все правильно, то в открывшемся окне выбираем вкладку Main и нажимаем в ней на кнопку Read Signature .
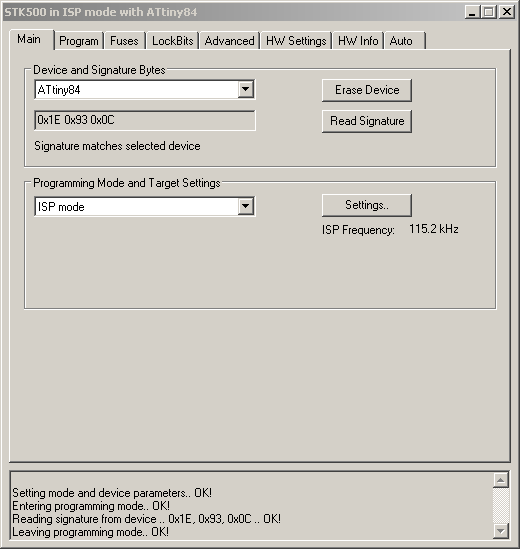
Строка Reading signature from device .. 0x1E, 0x93, 0x0C .. OK! говорит о том, что все хорошо и сигнатура успешно прочиталась. Сигнатура — это своего рода позывной микроконтроллера, которым он сообщает собственную модель.
Это окно нельзя закрывать, иначе соединение с программатором будет потеряно. Просто сверните его.
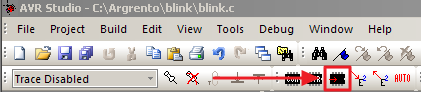
Теперь нажмем Build → Build . Это заставит программу скомпилироваться. Прошьем контроллер с помощью кнопки Write Flash Memory Using Current Settings — это заставит скомпилированную программу загрузиться в память микроконтроллера.
Заключение
Мы собрали простейшее устройство мигалку, но сделали это на низком уровне. С использованием программатора и «продвинутой» среды разработки, а не Arduino.

Разобравшись в премудростях программирования микроконтроллеров на чистом «Си», вы сможете выжимать из них максимум возможности, затрачивая при этом минимум места и денег.
Источник
AVR STK500 on OS X
Christos Sotiriou
So I bought my own copy STK500, and I installed my version of Fusion, with Windows 7 in order to run AVR Studio for programming my ATMega8515 microcontroller with the STK. After 2 weeks, I finally managed not only to properly operate the STK on a Mac booted on Windows 7, but to use it with Fusion, Parallels, and OS X as well. So, in order to save you some time, here is a quick walkthrough on how to develop software for Atmel’s AVR using the STK and a Mac. In this article you will also find information about AVR setup on OS X in general.
Obtaining a USB-Serial cable
Macs, as well as new PCs do not come with a serial port that is needed for developing software for any AVR. So, to make sure that everything will work as expected, you need to buy a USB-to-Serial cable (or a RS-232 adapter that is essentially the same thing with another name). I chose to buy the cable from SerialIO, because specific Intel OS X drivers are provided. For the windows part, windows drivers are also provided, but things are more complicated there.
OS X drivers are based on the standard drivers that come with Prolific. Prolific manufactures the chip that comes with every usb-serial adapter, and each company uses that chip into their products. Because of the open source basis of those drivers, and because the Mac always complies with the universal standards, any drivers, either from prolific themselves, or from serialIO will work on the mac.
On windows, this is not always the case. I have seen cables to work with the mac, but not with Windows on the same machine, as well as other cables that work with both platforms on the same machine with the same drivers. USB-Serial cables are not always trustworthy. In order to test whether your cable is recognized by the Mac, visit System Profiler, and check the USB section and see if the USB-Serial device is recognized under the company “Prolific” (of course, your cable must be connected to a USB port on your Mac).
For the windows counterpart, if you realize that windows cannot recognize the cable, perhaps you should try these drivers. I found them by searching a lot in the internet. Many people have said that these drivers solved them many problems with their adaptors. I have tested them on Windows XP Home SP3 and Windows 7 and they work flawlessly, where other drivers from prolific failed (especially with Windows 7). In order to use the cable with a virtual machine, make sure that you have installed the appropriate drivers on BOTH the virtual machine and the Mac. With the drivers I gave you, I managed to use the cable with Fusion and Windows 7.
The software
Well, for Windows you don’t have many choices, but the already available ones will do just fine. Just go to Atmel, and download AVR Studio 4, with its service packs, and you are done. If you have done everything correctly, the application will have no problem flashing any program onto the ATMEL STK500. If you want to program in embedded C, you must download and install WinAVR. Then, without any other effort, after restarting AVR Studio it will offer you the option of creating a GCC project, which is essentially an AVR project where you can program in C.
If you want to program using XCode, then that’s a whole different story. You will certainly need to download Crosspack, a package that includes the AVR-GCC package, avrdude, objcpy and many other command line applications, headers and sources that are needed to write programs and flash them onto the STK. No restart is required.
in the crosspack website there is a small tutorial on programming the AVR using the terminal. It’s on their main page. However, I should point you out into other manual pages, mostly because you need to change a bit the arguments for AVRDUDE in order to specify which type of microcontroller you have, and which programming platform you use. I use the one located here.
Xcode Integration Part 1: Explanation
As I found out the hard way, AVR-Studio is not the best tool for writing code. No code folding, no correct syntax coloring, no code completion. During my efforts to integrate Xcode with Avr-GCC, I stumbled upon a template, in which I made some improvements, and will continue to make as I proceed with development on AVR microcontrollers. The template I give you is the original one.
Inside that template there is a makefile, that is responsible for generating the executables, and placing them onto the AVR. The project does not have a physical target, it’s just the makefile that does the hard work. All targets in the Xcode project are actually command line arguments for the makefile, while the project is built. That’s why the “Build and Run” button is disabled.
Xcode Integration Part 2: Setting up the MakeFile
All the hard work that you need to do is to provide the correct device specifications for the AVRDUDE program, such as the fuses, the programmer id (in this case we have the STK 500) and the AVR model you will be programming on. You can find those information in the official AVRDUDE reference guide.
You will need the following information:
- The programmer id. In our case, for the STK500, it is ‘stk500v2’
- The AVR model ID for the AVR-GCC compiler. The compiler needs to know for what microdevice the code will be compiled. For me, it is ‘atmega8515’ .
- The AVR model ID for AVRDUDE. AVRDUDE needs to know this in order to search for the microdevice in the stk500.
- (OPTIONAL) A project name.
- The fuses for the AVR. Fuses are 2 bytes (or more in some cases) that alter the behavior of the microcontroller in several ways. You can read about those switches and what they do in your AVR’s datasheet. I found out what values are needed by using AVR Studio, which explains the fuses and what they do in the case of ATMEGA8515.
- Last but not least, the programmatic location of your USB-to-Serial adaptor. How do you find this? Well, a little terminal is necessary here. Open the terminal and type these 2 commands while the adaptor is connected to the Mac:cd /dev
ls A large list of available items is displayed. The one you are interested in is probably the one that contains “usb”, or”serial” inside it. In my case, the path to the item is “/dev/cu.usbserial”.
For example, I have the STK500 with the ATMEGA8515 on it. So, in the makefile script, I set the following (the variables already exist, but they are set to different values than the ones desired):
Here is the altered variables and their corresponding values for my case. Note that depending on your microcontroller, some (if not all) values will be different.
Xcode Integration Part 3: Compiling, and fusing the program into the AVR.
The procedure is normally this:
- Select the “build” target and build. Normally this would work. But in my case, it didn’t.
The procedure that must be followed if the previews didn’t work is to compile the targets in the following order:
- clean
- debug_init
- fuse
- flashThat should do it.Personal Note: Improving the scriptIn the script, I made a new addition at the end of it:
Perhaps it needs some improvements, but at the time it cleans over the target MCU, builds a new .hex file, and uploads it to the stk. After that, you can make a new target in the Xcode that runs the makefile script with the argument “mine” or you can go to the terminal, and after you change directory to the “firmware” folder inside your project, you can type “make mine”, and the script will take care of everything.
Outro
That’s all. Maybe the article was long, but the actual things you need to remember are quite few. This article will be improved from time to time with new information, and perhaps some source samples.
Edit 2012-07-01: Changed the links for the drivers and the template. Now they should work.
Interesting Links:

7 Pieces Of Advice I Wish I Knew In My Early career.
The following is an (undoubtedly non-exhaustive, and in no particular order) list of professional advice that I wish someone had given me before I began my professional journey.

Mechanical keyboards: an expensive but addictive hobby
My new obsession is eating up my wallet fast — but I like it.
Источник


