How To Stop Windows 10 From ‘Spying’ On Everything You Do
Today we will leason up that how to guide your Windows 10 PC privacy setting to block Microsoft from spying over the security concern. So Lets check it out the Six genuine and the only perfect way to secure yourself. we will explain all the details of that Six types of privacy which you have currently activated in your Windows 10 System.
[dropcap]T[/dropcap]here are right now Six settings through which you will be fully secure from being spy over the Microsoft server to spy on you that, you will be shocked that Microsoft is acquiring the keystrokes which you enter in the keyboard which they say that those were just users experience over using the Windows 10, likewise you will found such more interesting dangerous over the privacy matter.
How To Stop Windows 10 Being Spying On You
The first recommendation is to make your Local account in Windows 10 in place of using your email address applied ID account, it will disable your PC about 10% of your privacy to share with Microsoft.
Step 1. Type Privacy Setting in your Start Option box, Now See the Privacy Window and from there you can see that other category From General “turn Off” all the options under privacy setting. That’s the most important Turn Off all the options from general Tab. From Location “Turn Off” and others too, such as Calendar, Messaging, Radios. Likewise, Disable all the options as “Off“, If any Question regarding this asks anything, you can comment below in the comment box.
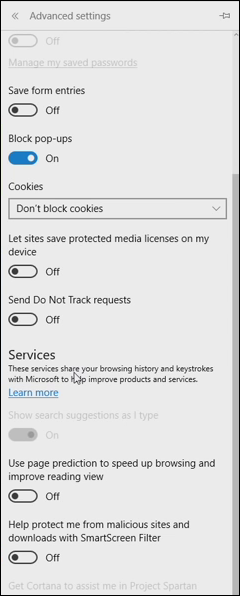
Step 2. Now Type On start box “Project Spartan” After opening go to the “More Actions“, then “Settings“, and then “View Advanced Settings” on that setting just disable all the options mainly “Services” Below “Cookies Options”.
 How To Stop Windows 10 Being Spying On You
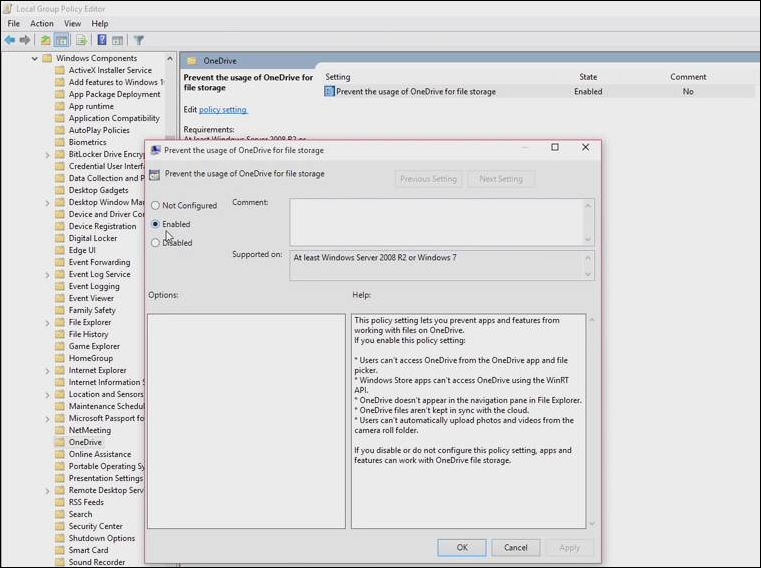
Step 3. Now next press “Win+R” as windows Key and type “gpedit” and Hit ENTER it will take you to the directory of OS, which is a system configuration.
 How To Stop Windows 10 Being Spying On You
Now in this you have to click on “Administrative Templates” under “Computer Configuration” not “User Configuration” then under Administrative Templates after expanding click on “Windows Components” and expand that now just go to below “OneDrive” you will see a windows at your right-hand side it will open now “Right Click” and edit on “Prevent the usage of OneDrive for the Storage” which will may be “Disabled” from default but now you have to “Enable” it Done.
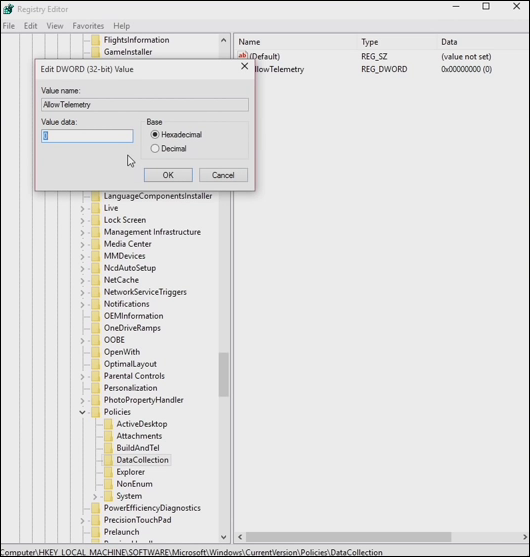
Step 4. In this you have to open up gpedit registry and again go to “Computer Configuration” -> “Administrative Templates” and then “Settings”, it will take you to the right-hand side you will see “Allow Telemetry” just click on that and “Disable”.
 How To Stop Windows 10 Being Spying On You
Now the same you have to do in “regedit” go to your desktop and from keyboard press “Win+R” on that type “regedit” it is also a system registry where the registry settings occur, Now Go to “HIKEY_LOCAL_MACHINE” -> “SOFTWARE” -> “MICROSOFT” -> “WINDOWS” -> “CurrentVersion” -> “Policies” under policies you will see right-hand side “Allow Telemetry” Right-click on that and select “Modify” and in the value box type “0” and save and final exit.
 How To Stop Windows 10 Being Spying On You
Step 5. Now again go to your Desktop, Before proceeding next step, I recommend you to clear all your background programs and proceed, Now from Desktop, click on Start button and start typing “Command Prompt” and right click on that to open it as “Run as Administrator”. Now just type as I have typed! except (HIT ENTER) it is just to tell you that what to do next. (not necessary to type in CAPITALS)
cd .. (HIT ENTER)
cd .. (HIT ENTER)
SC DELETE DIAGTRACK (HIT ENTER)
SC DELETE DMWAPPUSHSERVICE (HIT ENTER)
ECHO “” > C:PROFRAMDATAMICROSOFTDIAGNOSISETLLOGSAUTOLOGGERAUTOLOGGER-DIAGTRACK-LISTENER,ETL (HIT ENTER)
exit (HIT ENTER)
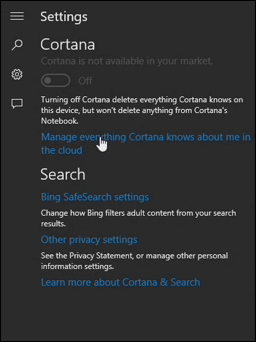
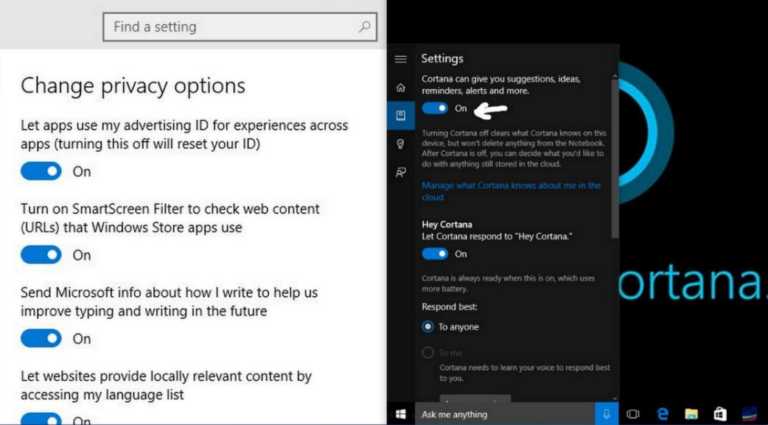
Step 6. Now go to the settings, and just disable Cortana. you can see the sentence written in Cortana Setting “Manage everything Cortana Knows about me in the cloud” just click on that you will be taken to Web Browser for that setting and manage those setting if you have logged in with Bing Search toolbar.
 How To Stop Windows 10 Being Spying On You
Now you have successfully stopped Windows 10 from Spying On You. Later we will discuss and explain all about the WiFi wireless network Internet Connections which will also help to connect the Routers which also help you not to share some more stuff. Hope you like the post! Share it with your friends too. If you are facing any trouble at any mentioned steps, feel free to ask us in the comments below.
How to Stop Windows 10 From Spying on You

Short Bytes : Windows 10 is released for all with lots of good features. On the other hand, its privacy policies are being criticized. But, there are some simple ways and tweaks in settings that will stop this Windows 10 spying, making your Windows 10 experience more comfortable.
Apart from all the good features of Windows 10 and painless upgrade process, the privacy policies of Microsoft and Windows 10 spying needs to be frowned upon. According the constant digging being done by the security experts, Windows 10 is quick at tracking your behaviour and uses your personal information for improving its targeted ads. Some of you won’t mind sharing your email, contacts, and messages with Microsoft, but many of you won’t like this privacy breach.
In our previous articles, we have told you about turning off your WiFi Sense and avoiding the usage of your data for providing updates to others . Today, I’ll tell you how to tweak your Windows settings to hide yourself from the prying eyes of Microsoft and Windows 10 spying.
First Step: Go to Settings and Privacy options

In Windows 10 privacy settings, you get 13 different screens that you need to scan. Take a look at them and disable as much concerning settings as you can. Most of the settings could be found under the General category. Take a look, tweak some settings and you’ll start feeling more comfortable using Windows 10.
Second Step: Cortana

Cortana is one of the best features of Windows 10, but it doesn’t handle your data cautiously and assists in Windows 10 spying. Also, with Cortana, some tiny percentage of your CPU power is always dedicated to listen your “Hey Cortana” command. You can just search “Cortana Settings” in the desktop search and disable Cortana to opt out of its suggestions. This will make your desktop search confined to a PC search that gives you results from your Windows 10 PC and settings.
Third Step: Use a local account

Some of you would find it too much as it will restrict you from using online services like OneDrive and Windows Store. But, given the Windows 10 spying concerns and data Microsoft extracts to serve you its services, this step is justifiable. Just type “Manage my accounts” in desktop search, or follow Settings – Accounts, to find the options.
Final Step : Opt out of ads

With Windows 10 spying, Microsoft is becoming the new Google of data theft and using the same for serving you advertisements. For hitting the final nail in coffin, you need to click on this link and visit Microsoft’s website. This gives you options to opt-out of the personalized ad that Microsoft intends to serve you.
I hope you found this how to stop Windows 10 spying article helpful, and now you feel more comfortable using your Windows 10 PC.
Visit our Windows 10 Guide page for more.
For more updates and interesting stories, subscribe to fossBytes newsletter.
DoNotSpy: Stop Windows 10 From Spying On You
Last Updated on April 12, 2020 by admin 2 Comments
Windows 10 is a successor to Windows 8 and Windows 7 in all departments, except user privacy. Not all users are concerned about their privacy, but many users want to protect their privacy and want to stop Windows 10 from collecting and sharing data with Microsoft.
Windows 10 offers a lot of settings and options for users who want to opt-out of the data collection. If you want more control or want to limit the data collection, you need to use a third-party tool to stop Windows 10 from spying on you.
Is Windows 10 spying on you?
Unlike Windows 7 or 8.1, a number of features and settings in Windows 10 can expose your privacy. In plain words, some of the features and options in the operating system might expose information that you might not want to share with Microsoft. For instance, location tracking is turned on by default and is required for using some features like Cortana.
It’s true that Windows 10 offers you change default privacy settings while installing Windows 10 or upgrading from a previous version of Windows to Windows 10 but not all users care to read and change privacy settings during the product installation.

One can also configure these privacy settings even after installing or upgrading to Windows 10 by navigating to the Settings app and then clicking the Privacy category. Under the Privacy section of the Settings app, you can change tens of Privacy settings from location to camera to microphone to contacts.

That said, there are some privacy settings that are not easy to understand or configure for novice users. To better protect your privacy while using Windows 10, you can now use a free third-party software called DoNotSpy.
DoNotSpy10 program for Windows 10

DoNotSpy10, as the name suggests, is a free software designed to help you configure various privacy settings in Windows 10 to avoid Windows 10 from spying on you! The current version (v5.1.0.0) offers over 100 options to better protect your privacy while using Windows 10.
Here are some of the options:
# Disable advertising in Windows 10 File Explorer
# Disable and reset the advertising ID
# Disable app suggestions in Windows Ink Workspace
# Disable Bluetooth advertising
# Disable Start menu app suggestions
# Disable third-party suggestions
# Defer Windows Updates
# Disable Access to Language List
# Disable and Reset Advertising ID
# Disable App Access to Account Info
# Disable App Access to Calendar
# Disable App Access to Camera
# Disable App Access to Location info
# Disable App Access to Messages
# Disable App Access to Microphone
# Disable App Access to Radios
# Disable App Notifications
# Disable Application Telemetry
# Disable Automatic Driver Update
# Disable Automatic Windows Updates
# Disable enabling Lock screen camera
# Disable Getting to know me
# Disable handwriting data sharing
# Disable inventory collector
# Disable password reveal button
# Disable sending writing info
# Disable SmartScreen filter for URLs
# Disable Steps Recorder
# Disable Sync with devices
# Disable web search
# Disable WiFi Sense feature
# Disable Windows Defender
# Disable Windows feedback requests
# Disable Windows media DRM internet access
# Disable Windows Update for other products
# Disable Windows Update sharing
As you probably have observed, some of these privacy settings can be configured from the Settings app as well.
Finally, you don’t need to turn off all the above-mentioned settings in Windows 10. Some features like OneDrive and Steps Recorder are really handy to have.

Lastly, most of the free apps out there for computers as well as smartphones spy on you in one or another way. So there is no point in blaming just Microsoft!
Important: The setup file of DoNotSpy itself offers you install some crapware. When you see the following screen, please select I don’t accept if you want to install DoNotSpy without that junkware.

Related Articles
Comments
peter jones says
how do you unlock windows 10 your disk and operating system is locked?
I tried DoNotSpy and when you select “yes” to create a restore point it doesn’t actually create it. So before you do anything, create one yourself. You can do this by one of several ways…the way I do it is Open up Windows Powershell as Administrator and I type this: checkpoint-computer -description “what you want to call it” (quotes included and then hit enter)
or you can use the old fashion way…
Control Panel > System and Security > System > Advanced system settings > System Protection
Choose which drive you want and click Create…
just type “create restore” (without quotes) in the search box and click “Create a restore point”


