- Включается проверка диска при запуске Windows
- 1. Запустить полную проверку диска.
- 2. Отключить проверку диска.
- CHKNTFS — включение-отключение проверки жесткого диска при перезагрузке
- Как отключить проверку диска на ошибки при загрузке Windows?
- How to STOP chkdsk
- Replies (5)
- Win10 FAQ
- How to stop disk check on startup windows 10
- Why does it happen?
- Method I: Fix the error using CMD
- Method II: Check for drive errors
- Method III: Stop auto disk check using Registry Editor
- Other solutions found online:
- Submit a Comment Cancel reply
Включается проверка диска при запуске Windows
В данной статье рассмотрим, несколько способов отключения проверки жесткого диска (HDD), которая запускается каждый раз при включении или перезагрузке компьютера.
Причиной чаще всего является то, что система помечает жесткий диск как «грязный». Это происходит из-за неправильного выключения компьютера, нарушениях в файловой системе или повреждениях самого жесткого диска.
Для того чтобы устранить эту проблему, нужно проделать следующие действия:
1. Запустить полную проверку диска.
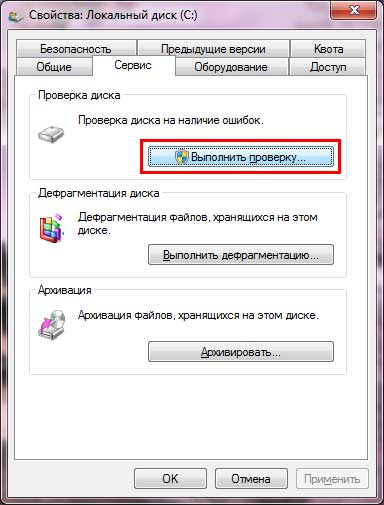
Откройте «Мой компьютер» => кликните правой кнопкой по диску, который постоянно проверяется => из контекстного меню выберите «свойства» => затем на вкладке «сервис» нажмите кнопку «Выполнить проверку»
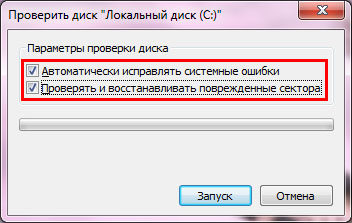
в открывшемся окне поставте все галочки и нажмите «Запуск».
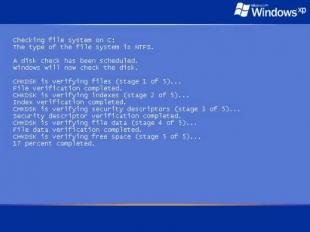
Если был выбран системный диск, то появится предложение выполнить проверку при следующей загрузке системы — соглашаемся и перезагружаем компьютер. Ждем окончания процесса проверки.
Если проблема осталась, переходим к следующему пункту;
2. Отключить проверку диска.
Нажимаем комбинацию клавиш Win-R или Пуск => Все программы => Стандартные => Выполнить => вводим команду cmd -> нажимаем OK. В открывшемся окне вводим команду chkntfs /X C: (где C: — имя диска, который постоянно проверяется).
Теперь проверка отключена. Если захотите ее снова включить, необходимо набрать команду chkntfs /D.
CHKNTFS — включение-отключение проверки жесткого диска при перезагрузке
Выводит или изменяет параметры проверки диска во время загрузки.
- CHKNTFS том: [. ]
- CHKNTFS /D
- CHKNTFS /T[:время]
- CHKNTFS /X том: [. ]
- CHKNTFS /C том: [. ]
Если никакие параметры не указаны, CHKNTFS отображает или состояние бита обнаружения ошибок для диска или его проверку при следующей перезагрузке.
Как отключить проверку диска на ошибки при загрузке Windows?
Периодически сталкиваюсь с ситуацией, когда перед загрузкой Windows запускается проверка диска на ошибки. Это вполне нормальное явление, если проверка успешно завершается, вносятся необходимые исправления и дальше система работает стабильно. Но, что делать, если проверка происходит каждый раз при загрузке? Здесь два варианта решения проблемы:
1) Найти причину, по которой запускается проверка диска перед загрузкой системы.
Windows запускает chkdsk перед загрузкой по причине того, что на диск установлено состояние «грязного бита».
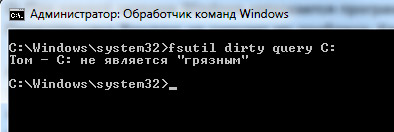
Проверить можно с помощью утилиты командной строки fsutil следующей командой:
fsutil dirty query X: — где X это буква диска.
В данном случае Диск C не является грязным.
Если установлено состояние «грязный бит», Windows будет запускать проверку на ошибки при включении. Решается эта проблема по-разному, причина может быть, как из-за физического состояния жесткого диска, так и из-за проблем с программным обеспечением.
Можно попробовать следующее:
Установить все системные обновления, обновить драйвер чипсета материнской платы, проверить целостность всех защищенных системных файлов с помощью утилиты командной строки sfc(Пример: sfc /scannow), выполнить дефрагментацию, сделать проверку диска chkdsk (пример, проверка диска C: chkdsk C: /f). Проверить жесткий диск программой MHDD или Victoria.
Если проблема не решается, то можно воспользоваться вторым способом.
2) Простой способ. Отключить проверку для диска, который постоянно проверяется.
Это можно сделать двумя способами через реестр или через командную строку, кому как удобней.
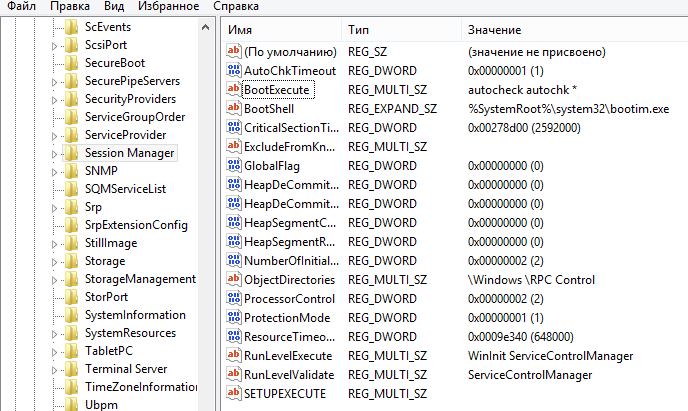
Открываем реестр. В Windows Vista, 7, 8 запускать от имени Администратора.
Переходим в раздел реестра
HKEY_LOCAL_MACHINE\SYSTEM\CurrentControl\SetControl\Session Manager
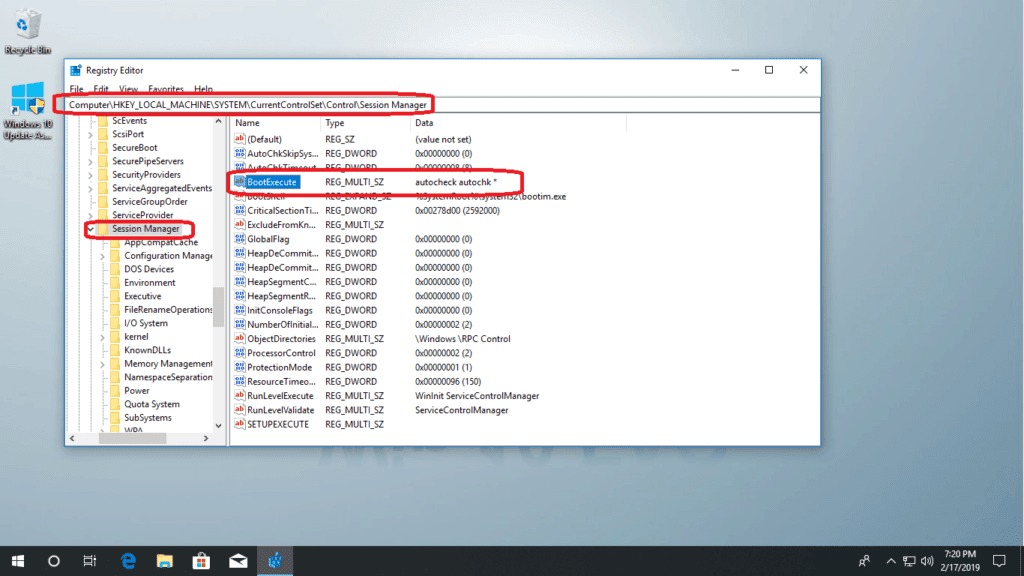
Находим параметр BootExecute – значение по умолчанию autocheck autochk * , т.е. проверяются все диски. Меняем значение на autocheck autochk /k:C * , если нужно отключить проверку диска C.
Значение autocheck autochk /k:D /k:E * отключает проверку диска D и E.
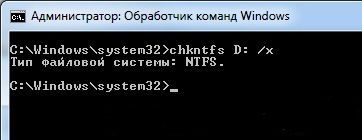
Для отключения проверки диска с помощью командной строки, открываем командную строку. В Windows Vista, 7, 8 запускать от имени Администратора.
В командной строке пишем: chkntfs D: /x – в данном случае отключаем проверку диска D.
Для того чтобы вернуть значение по умолчанию, вводим в командной строке chkntfs /d .
How to STOP chkdsk
I am trying to STOP ehckdisk from running
I have deleted the command in «BootExecute line in regedit» and replaced the command with «autocheck autochk /k:c» five times and still get checkdisk about every 4th or 5th reboot. When I do the dirty query, it says that it is NOT dirty. I have changed the registry numerous times and after reboot the registry goes back to some gobly gook. What can I do now.
Replies (5)
If you are not having success with the registry method, try via command prompt:
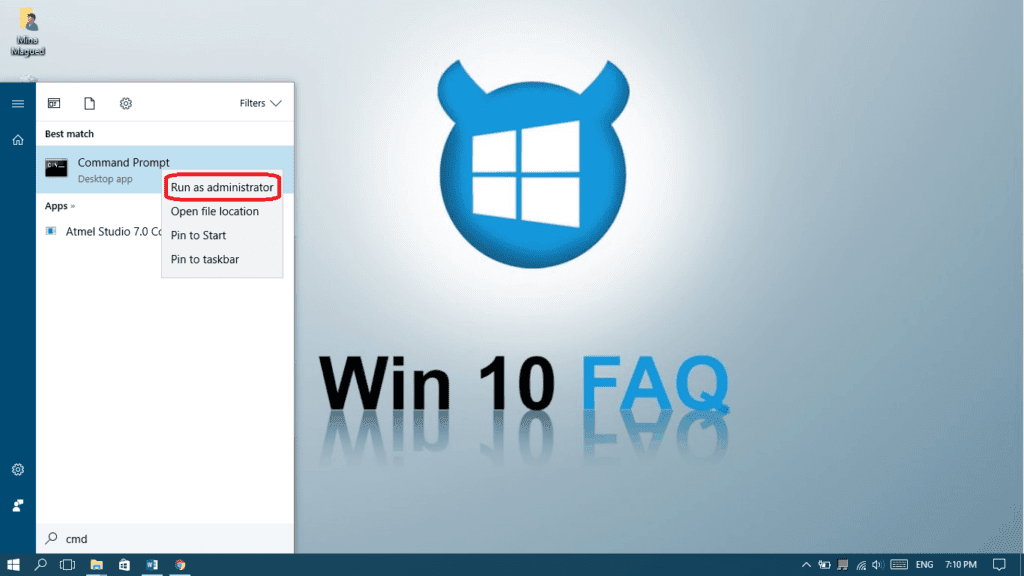
start > search > command prompt (right click run as admin for Elevated Command Prompt).
Once in Elevated Command Prompt, type the following:
chkntfs /x DRIVELETTER:
so if your drive letter is c:
Was this reply helpful?
Sorry this didn’t help.
Great! Thanks for your feedback.
How satisfied are you with this reply?
Thanks for your feedback, it helps us improve the site.
How satisfied are you with this reply?
Thanks for your feedback.
If CHKDSK wants to run at every boot up, it is because Windows is trying to cope with a failing hard drive and wants to try to fix it..
What other symptoms do you have.. ?
Was this reply helpful?
Sorry this didn’t help.
Great! Thanks for your feedback.
How satisfied are you with this reply?
Thanks for your feedback, it helps us improve the site.
How satisfied are you with this reply?
Thanks for your feedback.
Was this reply helpful?
Sorry this didn’t help.
Great! Thanks for your feedback.
How satisfied are you with this reply?
Thanks for your feedback, it helps us improve the site.
How satisfied are you with this reply?
Thanks for your feedback.
This issue normally occurs when the hard drive is corrupted. Let’s analyze and identify the cause of the issue.
Method 1: You may run chkdsk from WINRE.
In order to troubleshoot this issue will run chkdsk from WinRE(Windows Recovery Environment )mode and check for the issue.
Chkdsk (Chkdsk.exe) is a command-line tool that checks volumes for problems. It runs automatically only if you have any problems. The tool then tries to repair any that it finds. For example, Chkdsk can repair problems related to bad sectors, lost clusters, cross-linked files, and directory errors.
To run check disk, you have to have Windows Vista DVD, boot the computer to Win RE from the elevated command prompt, and try to do a CHKDSK. You can follow these steps to run CHKDSK :
a. Use the Windows 7 DVD to start the computer in Windows Recovery (WinRE).
b. In WinRE, open a command prompt. To do this, follow these steps:
c. On the Install Windows screen, select the appropriate Language to install, Time and currency format, and Keyboard or input method options, and then click Next.
d. Click Repair your computer.
e. Click the Windows 7 installation that you want to repair, and then click Next.
f. Click Command Prompt.
At the command prompt, type the following command, and then press ENTER:
Important: While performing chkdsk on the hard drive if any bad sectors are found on the hard drive when chkdsk tries to repair that sector if any data available on that might be lost.
Method 2: SFC scan
You may perform a SFC(System File Checker) scan and see if the issue is resolved or not.
How to use the System File Checker tool to troubleshoot missing or corrupted system files on Windows Vista or on Windows 7
Hope this information helps. Reply with the status so that we could help you further.
Win10 FAQ
Windows 10 Guides and Help
How to stop disk check on startup windows 10
We are a participant in the Amazon Services LLC Associates Program, an affiliate advertising program designed to provide a means for us to earn fees by linking to Amazon.com and affiliated sites.
Hello everyone! Sometimes a Windows computer runs a disk check on startup. It happens every now and then on every computer, but for some people it happens every time they start their computer up.
When it shows up, you have 8 seconds to skip it by pressing any keyboard key, and if you have to do this every time the computer starts up it definitely gets a bit Annoying.
Why does it happen?
Disk checks are triggered by Windows automatically when the computer didn’t shut down cleanly, when it sensed a problem with the file system or the hard drive, and for other reasons. If it happens every now and then it’s normal but if it runs every time you start your computer up then there may be a problem that needs to be fixed.
Since frequent disk checks can signify that your hard drive is faulty, I strongly recommend that you backup your hard drive on an external storage drive as soon as possible because you risk losing your files at any moment. After you have your important files backed up, continue to the methods below to fix the problem.
Method I and Method II will try to actually solve the disk issue, but if you’re not really interested in that and you just want to disable the disk check, you can go directly to Method III.
Method I: Fix the error using CMD
I would like to begin with this couple of commands in order to check for system and disk errors and try to fix them. If you’ve read any of my previous guides, you’ll know how much I love those magical commands, they save tons of time and energy… Here we go:
- Type “cmd” in your start menu, right-click on Command Prompt and choose Run as administrator.
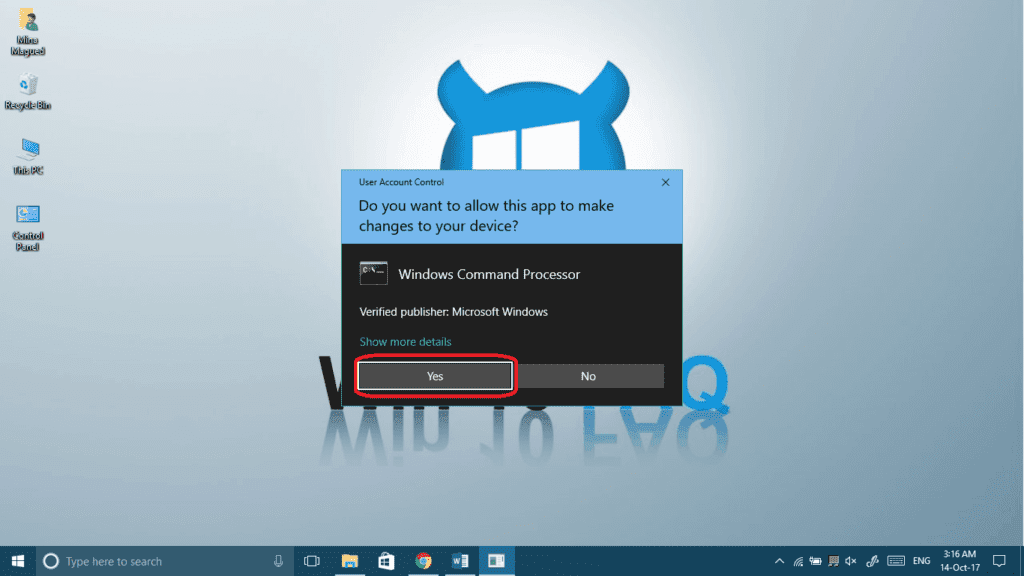
- Click Yes to give it permission.
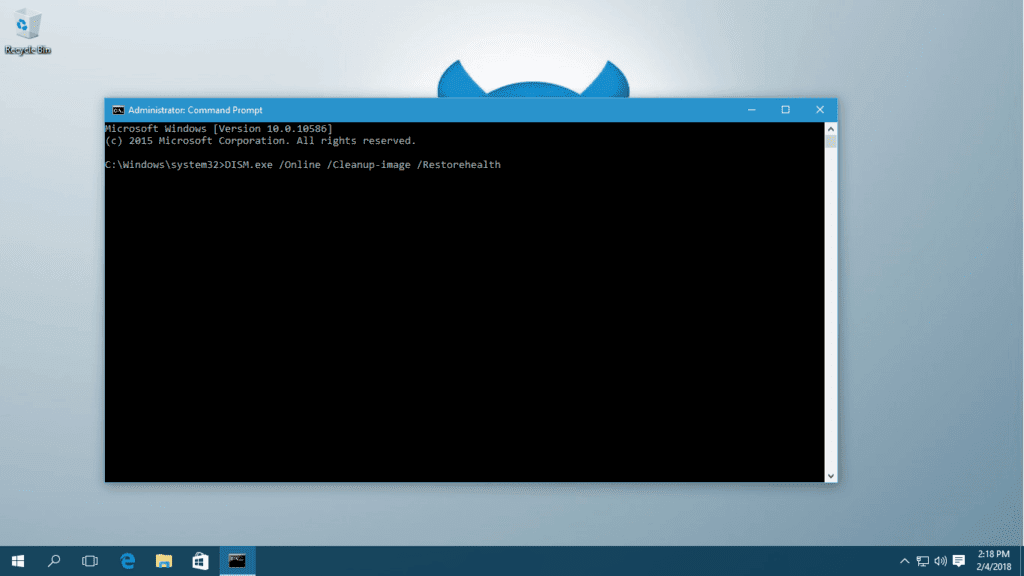
- Type the following command and then press Enter:
DISM.exe /Online /Cleanup-image /Restorehealth
(note the spaces before each “/”).
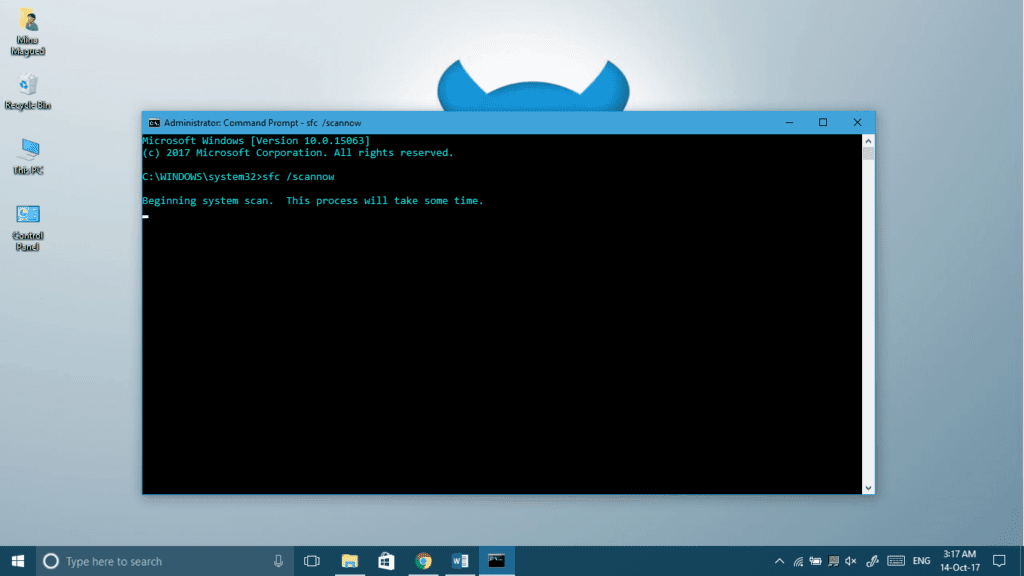
- Type the following command then press Enter:
(make sure you put a space between “sfc” and “/scannow”)
Now you should perform a couple of restarts and see if it worked and the auto CHKDSK is gone. If it still happens when you start up, then try the next methods.
Method II: Check for drive errors
In general, the C drive is the most important one because it’s carrying all the Windows installation files. Therefore, we will check for errors in this drive. Of course, you can do this for all of your remaining drives, it’s going to be the exact same procedure. Let’s do it:
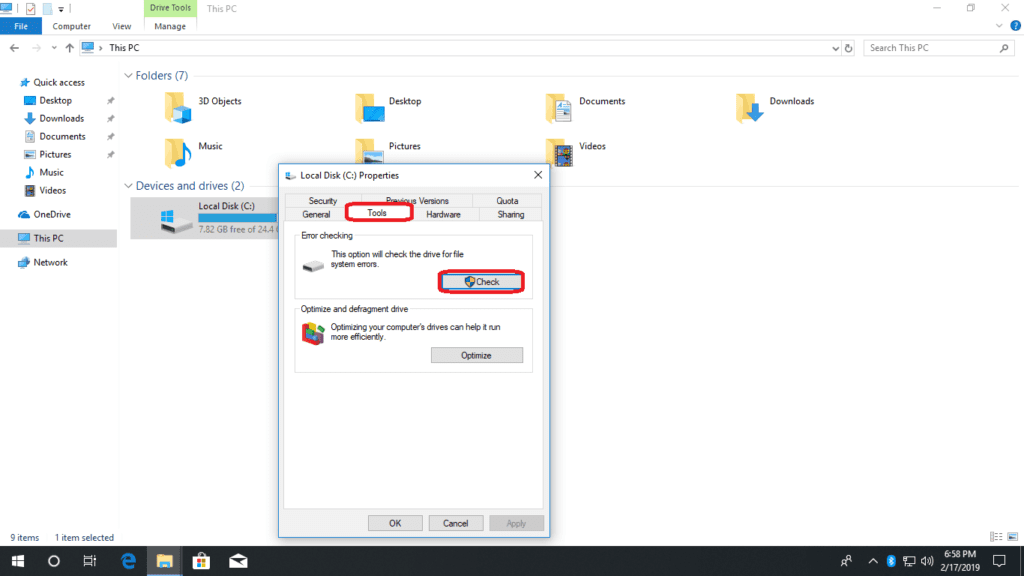
- Right-click on your C drive and choose Properties.
- Go to the Tools tab and click the Check button.
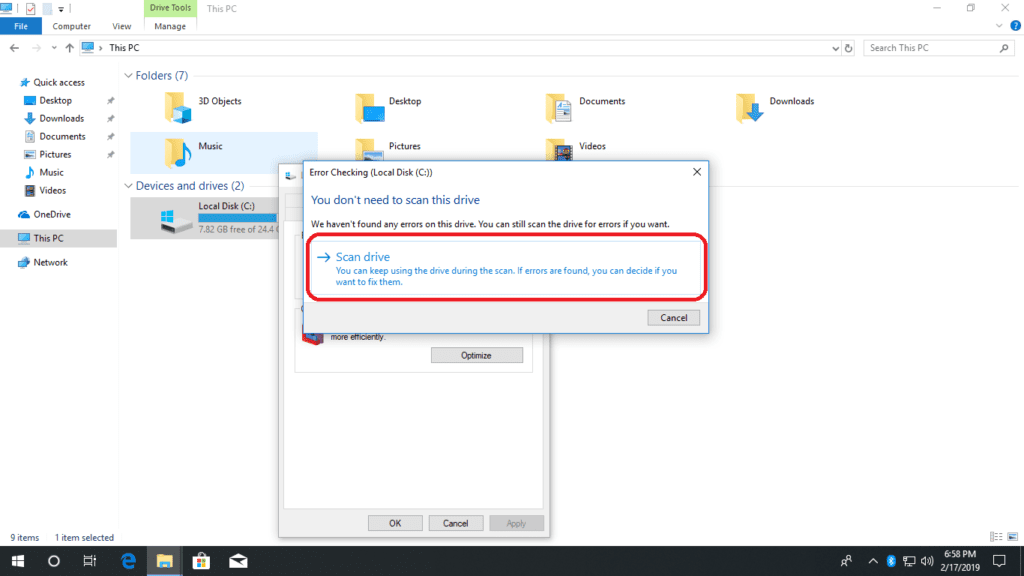
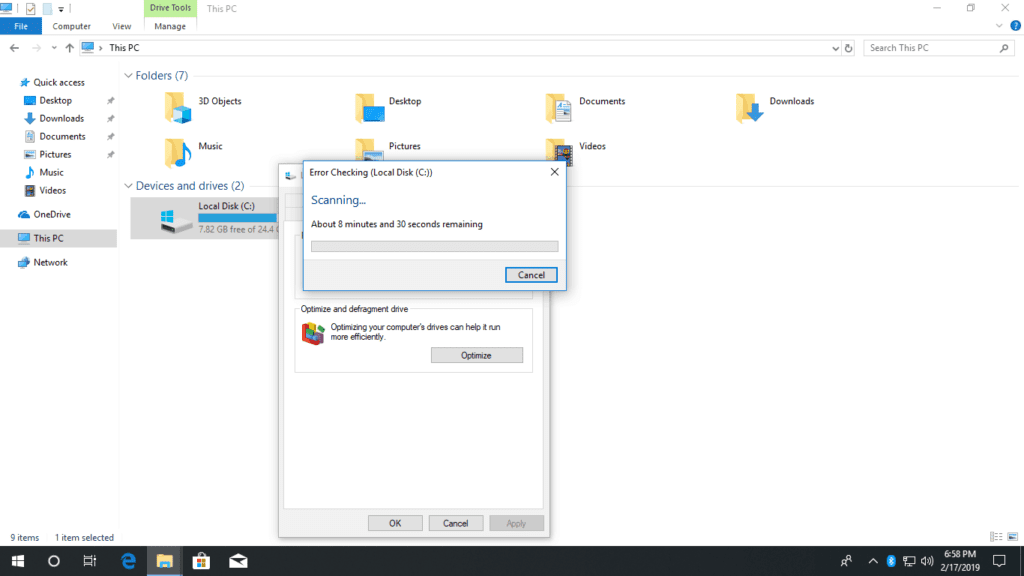
- Click Scan drive in order to start scanning and fixing any drive errors.
- Now, you should just relax and wait, this is going to take a while but it might fix the whole issue.
Once this is done, give your computer a couple of restarts and see if the problem still occurs. Method II was the last software methods of fixing your hard drive, so if it the disk check at startup still happens, I recommend to just have backups done regularly (in case there is a real problem with the hard drive), and go to method III to stop this disk check nonsense with brute force 🙂
Method III: Stop auto disk check using Registry Editor
First of all, the Registry Editor is an advanced control panel which controls every little part of your system, so if you’re not familiar with it, we would advise that you back up your registry just in case. Yeah, back up your registry separately from the regular hard drive backup. Visit our Backup your Registry article which is going to help you. At any case, follow the instructions carefully and no harm should come to your computer:
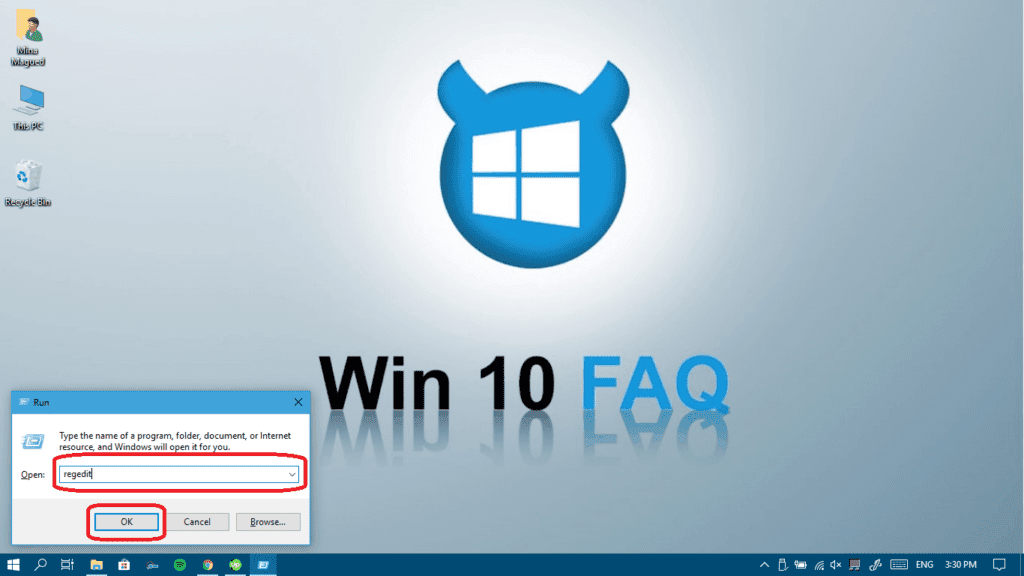
- Press your Windows logo Key + R to launch your Run app and then type regedit and click Ok.
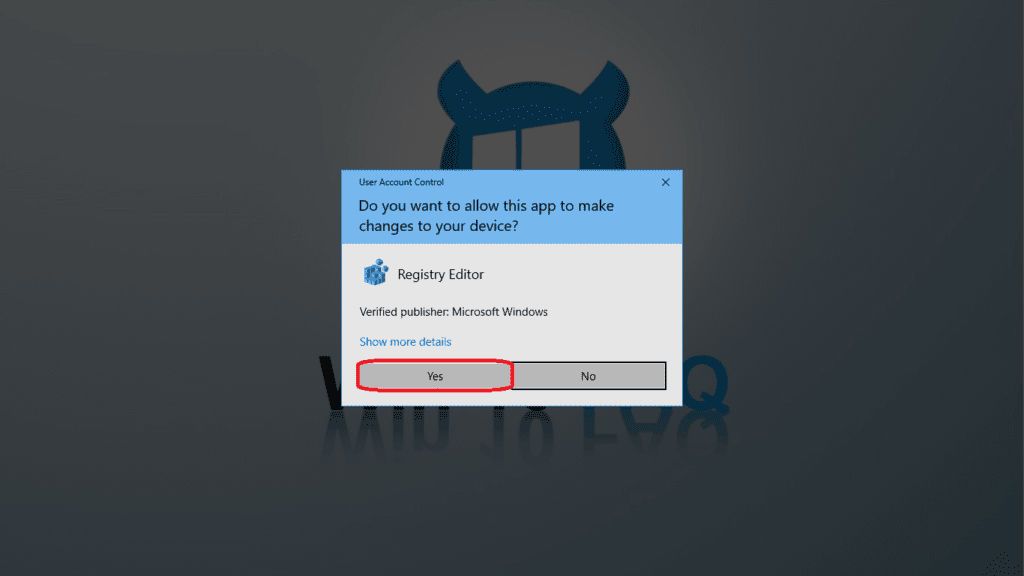
- Click Yes to give it permission.
- Go to this exact location and double click on BootExecute (you can copy and paste this directory at the top and then press Enter to get to it):
- Now delete all the lines in Value data and paste this then press Ok:
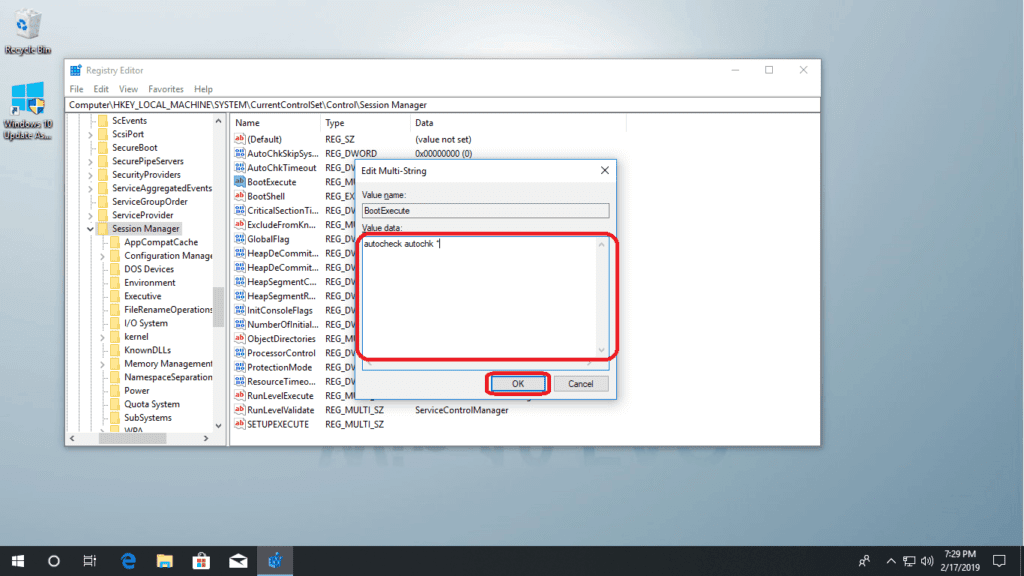
Here we go, now give your computer a couple of restarts, this was tested by many and it stops the auto disk check completely.
Other solutions found online:
There is a solution on many websites advising you to run this command in your CMD to exclude a certain drive from disk check at startup (it’s the C drive in this example):
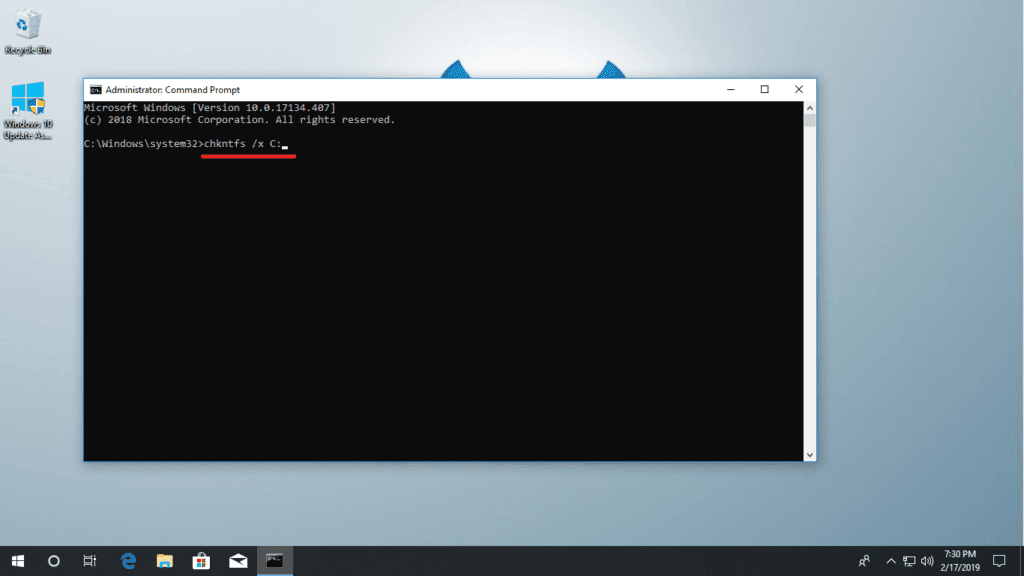
You can definitely do that, and it would work. I personally prefer the registry method editor, as that one stops disk check for all the hard drives at the same time.
Submit a Comment Cancel reply
This site uses Akismet to reduce spam. Learn how your comment data is processed.
As a participant in the Amazon Services LLC Associates Program, this site may earn from qualifying purchases. We may also earn commissions on purchases from other retail websites.
