- Требования к оборудованию для локальных дисковых пространств Storage Spaces Direct hardware requirements
- Основные требования Base requirements
- Серверы Servers
- ЦП CPU
- Память Memory
- Загрузка Boot
- Сеть Networking
- диски; Drives
- Минимальное число дисков (с исключением загрузочного диска) Minimum number of drives (excludes boot drive)
- Upgrade a Storage Spaces Direct cluster to Windows Server 2019
- Prerequisites and limitations
- Performing an in-place upgrade while VMs are running
- Performing a clean OS installation while VMs are running
- Performing an in-place upgrade while VMs are stopped
- Performing a clean OS installation while VMs are stopped
Требования к оборудованию для локальных дисковых пространств Storage Spaces Direct hardware requirements
Применяется к: Windows Server 2019, Windows Server 2016 Applies to: Windows Server 2019, Windows Server 2016
В этом разделе описаны минимальные требования к оборудованию для Локальные дисковые пространства в Windows Server. This topic describes minimum hardware requirements for Storage Spaces Direct on Windows Server. Требования к оборудованию для Azure Stack ХЦИ. Наша операционная система, предназначенная для развертываний гиперконвергентном с подключением к облаку, см. в разделе перед развертыванием Azure Stack хЦи: определение требований к оборудованию. For hardware requirements on Azure Stack HCI, our operating system designed for hyperconverged deployments with a connection to the cloud, see Before you deploy Azure Stack HCI: Determine hardware requirements.
Для рабочей среды корпорация Майкрософт рекомендует приобрести проверенное оборудование и программное обеспечение от наших партнеров, включая средства и процедуры развертывания. For production, Microsoft recommends purchasing a validated hardware/software solution from our partners, which include deployment tools and procedures. Эти решения разработаны, собраны и проверены в соответствии с эталонной архитектурой для обеспечения совместимости и надежности, что позволяет быстро приступить к работе. These solutions are designed, assembled, and validated against our reference architecture to ensure compatibility and reliability, so you get up and running quickly. Решения для Windows Server 2019 см. на веб-сайте Azure Stack хЦи Solutions. For Windows Server 2019 solutions, visit the Azure Stack HCI solutions website. Для решений Windows Server 2016 ознакомьтесь с дополнительными сведениями по Windows Server Software-Defined. For Windows Server 2016 solutions, learn more at Windows Server Software-Defined.
Хотите оценить Локальные дисковые пространства без оборудования? Want to evaluate Storage Spaces Direct but don’t have hardware? Используйте виртуальные машины Hyper-V или Azure, как описано в разделе использование Локальные дисковые пространства в кластерах гостевой виртуальной машины. Use Hyper-V or Azure virtual machines as described in Using Storage Spaces Direct in guest virtual machine clusters.
Основные требования Base requirements
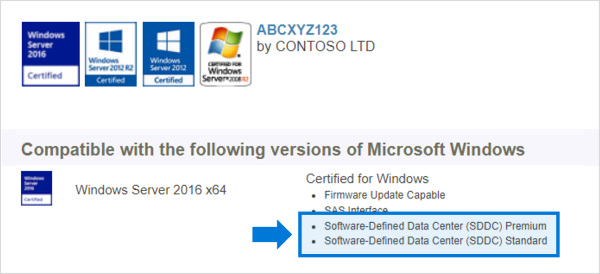
Системы, компоненты, устройства и драйверы должны быть сертифицированы для операционной системы, используемой в каталоге Windows Server. Systems, components, devices, and drivers must be certified for the operating system you’re using in the Windows Server Catalog. Кроме того, на серверах, дисках, адаптерах шины и сетевых адаптерах рекомендуется использовать программно-определяемый центр обработки данных (SDDC) и (или) программно-определяемый центр обработки данных (SDDC) Premium (АКС), как показано на рисунке ниже. In addition, we recommend that servers, drives, host bus adapters, and network adapters have the Software-Defined Data Center (SDDC) Standard and/or Software-Defined Data Center (SDDC) Premium additional qualifications (AQs), as pictured below. Существует более 1 000 компонентов с АКС SDDC. There are over 1,000 components with the SDDC AQs.
Полностью настроенный кластер (серверы, сеть и хранилище) должен пройти все проверочные тесты в мастере в Диспетчер отказоустойчивости кластеров или с помощью Test-Cluster командлета в PowerShell. The fully configured cluster (servers, networking, and storage) must pass all cluster validation tests per the wizard in Failover Cluster Manager or with the Test-Cluster cmdlet in PowerShell.
Кроме того, применяются следующие требования. In addition, the following requirements apply:
Серверы Servers
- Серверов не должно быть меньше 2 или больше 16. Minimum of 2 servers, maximum of 16 servers
- Рекомендуется, чтобы все серверы были одним и тем же производителем и моделью Recommended that all servers be the same manufacturer and model
ЦП CPU
- Процессор, совместимый с Intel Нехалем или более поздней версии; ни Intel Nehalem or later compatible processor; or
- Процессор AMD ЕПИК или более поздней версии AMD EPYC or later compatible processor
Память Memory
- Память для Windows Server, виртуальных машин и других приложений или рабочих нагрузок; плюс Memory for Windows Server, VMs, and other apps or workloads; plus
- 4 ГБ ОЗУ на терабайт (ТБ) емкости кэша на каждом сервере для метаданных Локальные дисковые пространства 4 GB of RAM per terabyte (TB) of cache drive capacity on each server, for Storage Spaces Direct metadata
Загрузка Boot
- Любое загрузочное устройство, поддерживаемое Windows Server, которое теперь включает сатадом Any boot device supported by Windows Server, which now includes SATADOM
- Зеркальное отображение RAID 1 не требуется, но поддерживается для загрузки RAID 1 mirror is not required, but is supported for boot
- Рекомендуется: 200 ГБ, минимальный размер Recommended: 200 GB minimum size
Сеть Networking
Для Локальные дисковые пространства требуется надежная сеть с высокой пропускной способностью и низкой задержкой между каждым узлом. Storage Spaces Direct requires a reliable high bandwidth, low latency network connection between each node.
Минимальное количество соединений для узла малого масштаба 2-3 Minimum interconnect for small scale 2-3 node
- 10 Гбит/с сетевая карта (NIC) или более мощный 10 Gbps network interface card (NIC), or faster
- Два или более сетевых подключения для каждого узла, Рекомендуемые для избыточности и производительности. Two or more network connections from each node recommended for redundancy and performance
Рекомендуемое соединение для высокопроизводительных, масштабируемых или развертываний 4 + Recommended interconnect for high performance, at scale, or deployments of 4+
- Сетевые карты, поддерживающие удаленный доступ к памяти (RDMA), iWARP (рекомендуется) или Роце NICs that are remote-direct memory access (RDMA) capable, iWARP (recommended) or RoCE
- Два или более сетевых подключения для каждого узла, Рекомендуемые для избыточности и производительности. Two or more network connections from each node recommended for redundancy and performance
- 25 Гбит/с, сетевой адаптер или более мощный 25 Gbps NIC or faster
Взаимосвязи узлов с переключением и с переключением Switched or switchless node interconnects
- Переключение: Сетевые коммутаторы должны быть правильно настроены для работы с пропускной способностью и типом сети. Switched: Network switches must be properly configured to handle the bandwidth and networking type. Если используется RDMA, который реализует протокол Роце, сетевое устройство и Конфигурация коммутатора еще более важны. If using RDMA that implements the RoCE protocol, network device and switch configuration is even more important.
- Без переключения: узлы могут быть взаимосоединены с помощью прямых подключений, избегая использования коммутатора. Switchless: Nodes can be interconnected using direct connections, avoiding using a switch. Необходимо, чтобы каждый узел имел прямое соединение со всеми остальными узлами кластера. It is required that every node have a direct connection with every other node of the cluster.
диски; Drives
Локальные дисковые пространства работает с прямым подключением дисков SATA, SAS, NVMe или энергонезависимой памяти (PMem), которые физически подключены только к одному серверу. Storage Spaces Direct works with direct-attached SATA, SAS, NVMe, or persistent memory (PMem) drives that are physically attached to just one server each. Дополнительные сведения о выборе дисков см. в разделах Выбор дисков и изучение и развертывание постоянных модулей памяти . For more help choosing drives, see the Choosing drives and Understand and deploy persistent memory topics.
- Поддерживаются диски SATA, SAS, энергонезависимой памяти и NVMe (M. 2, U. 2 и Add-on-Card). SATA, SAS, persistent memory, and NVMe (M.2, U.2, and Add-In-Card) drives are all supported
- поддерживаются собственные диски 512N, 512e и 4 КБ. 512n, 512e, and 4K native drives are all supported
- Твердотельные накопители должны обеспечивать защиту от потери питания Solid-state drives must provide power-loss protection
- Одинаковое число и типы дисков на каждом сервере — см. раздел требования к симметрии Same number and types of drives in every server – see Drive symmetry considerations
- Размер устройств кэша должен составлять 32 ГБ или больше. Cache devices must be 32 GB or larger
- Устройства энергонезависимой памяти используются в блочном режиме хранения Persistent memory devices are used in block storage mode
- При использовании постоянных устройств памяти в качестве устройств кэширования необходимо использовать устройства с устройствами NVMe или SSD (жесткие диски не используются). When using persistent memory devices as cache devices, you must use NVMe or SSD capacity devices (you can’t use HDDs)
- Драйвер NVMe, предоставленный корпорацией Майкрософт, входит в состав Windows (stornvme.sys) NVMe driver is the Microsoft-provided one included in Windows (stornvme.sys)
- Рекомендуется: количество дисков емкости является целым числом, кратным числу дисков кэша. Recommended: Number of capacity drives is a whole multiple of the number of cache drives
- Рекомендуется: диски кэша должны иметь высокую ендуранце записи: не менее 3 дисков — операций записи в день (ДВПД) или не менее 4 терабайт (ТБВ) в день. см. раздел Общие сведения о записи диска в день (двпд), терабайты (ТБВ) и Минимальное рекомендуемое значение для Локальные дисковые пространства Recommended: Cache drives should have high write endurance: at least 3 drive-writes-per-day (DWPD) or at least 4 terabytes written (TBW) per day – see Understanding drive writes per day (DWPD), terabytes written (TBW), and the minimum recommended for Storage Spaces Direct
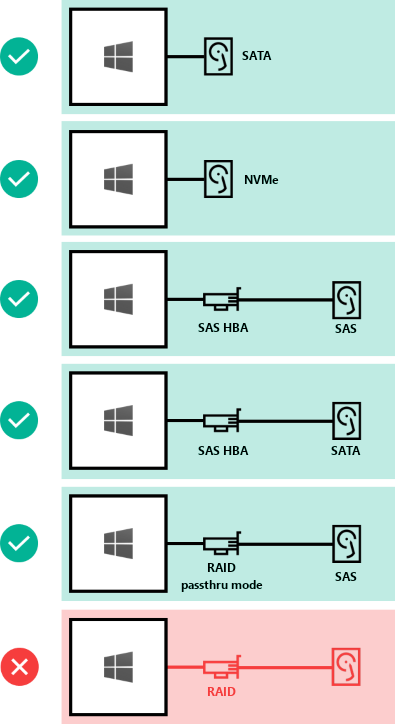
Вот как можно подключить диски для Локальные дисковые пространства: Here’s how drives can be connected for Storage Spaces Direct:
- Диски SATA с прямым подключением Direct-attached SATA drives
- Непосредственно подключенные диски NVMe Direct-attached NVMe drives
- Узел SAS — адаптер шины (HBA) с дисками SAS SAS host-bus adapter (HBA) with SAS drives
- Узел SAS — адаптер шины (HBA) с дисками SATA SAS host-bus adapter (HBA) with SATA drives
- не поддерживается: Карта RAID-контроллера или хранилище SAN (Fibre Channel, iSCSI, Фкое). NOT SUPPORTED: RAID controller cards or SAN (Fibre Channel, iSCSI, FCoE) storage. Карты адаптера шины (HBA) должны реализовывать простой сквозной режим. Host-bus adapter (HBA) cards must implement simple pass-through mode.
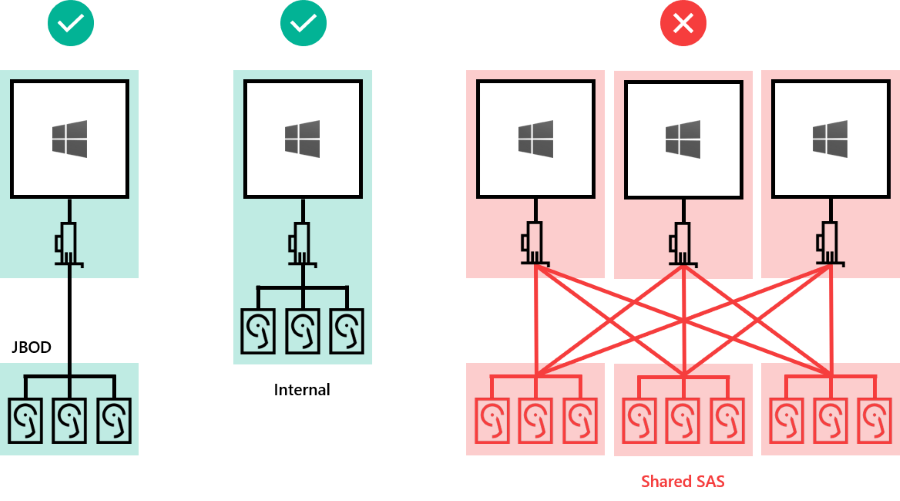
Диски могут быть внутренними для сервера или во внешнем корпусе, подключенном только к одному серверу. Drives can be internal to the server, or in an external enclosure that is connected to just one server. Службы корпуса SCSI (SES) требуются для сопоставления и идентификации слота. SCSI Enclosure Services (SES) is required for slot mapping and identification. Каждый внешний корпус должен представлять уникальный идентификатор (уникальный идентификатор). Each external enclosure must present a unique identifier (Unique ID).
- Внутренние диски сервера Drives internal to the server
- Диски во внешнем корпусе («JBOD»), подключенные к одному серверу Drives in an external enclosure («JBOD») connected to one server
- не поддерживается: Общие корпусы SAS подключены к нескольким серверам или к любой форме многопутевого ввода-вывода (MPIO), где доступ к дискам осуществляется по нескольким путям. NOT SUPPORTED: Shared SAS enclosures connected to multiple servers or any form of multi-path IO (MPIO) where drives are accessible by multiple paths.
Минимальное число дисков (с исключением загрузочного диска) Minimum number of drives (excludes boot drive)
- Если есть диски, которые используются для кэша, их должно быть по крайней мере 2. If there are drives used as cache, there must be at least 2 per server
- Должно быть по крайней мере 4 диска хранения (не кэш-диска) на сервер. There must be at least 4 capacity (non-cache) drives per server
| Имеющиеся типы дисков Drive types present | Минимальное необходимое количество Minimum number required |
|---|---|
| Вся постоянная память (та же модель) All persistent memory (same model) | 4 Постоянная память 4 persistent memory |
| Только накопители NVMe (одной и той же модели) All NVMe (same model) | 4 накопителя NVMe 4 NVMe |
| Только твердотельные накопители (SSD) (одной и той же модели) All SSD (same model) | 4 накопителя SSD 4 SSD |
| Постоянная память + NVMe или SSD Persistent memory + NVMe or SSD | 2 энергоустойчивая память + 4 NVMe или SSD 2 persistent memory + 4 NVMe or SSD |
| NVMe + SSD NVMe + SSD | 2 NVMe + 4 SSD 2 NVMe + 4 SSD |
| NVMe + жесткий диск NVMe + HDD | 2 NVMe + 4 HDD 2 NVMe + 4 HDD |
| SSD + жесткий диск SSD + HDD | 2 SSD + 4 HDD 2 SSD + 4 HDD |
| NVMe + SSD + жесткий диск NVMe + SSD + HDD | 2 NVMe + 4 других 2 NVMe + 4 Others |
В этой таблице приведены минимальные значения для аппаратных развертываний. This table provides the minimum for hardware deployments. При развертывании с помощью виртуальных машин и виртуализированного хранилища, например в Microsoft Azure, см. раздел использование Локальные дисковые пространства в кластерах гостевой виртуальной машины. If you’re deploying with virtual machines and virtualized storage, such as in Microsoft Azure, see Using Storage Spaces Direct in guest virtual machine clusters.
Upgrade a Storage Spaces Direct cluster to Windows Server 2019
This topic describes how to upgrade a Storage Spaces Direct cluster to Windows Server 2019. There are four approaches to upgrading a Storage Spaces Direct cluster from Windows Server 2016 to Windows Server 2019, using the cluster OS rolling upgrade process —two that involve keeping the VMs running, and two that involve stopping all VMs. Each approach has different strengths and weaknesses, so select that one that best suits the needs of your organization:
In-place upgrade while VMs are running on each server in the cluster—this option incurs no VM downtime, but you’ll need to wait for storage jobs (mirror repair) to complete after each server is upgraded.
Clean-OS installation while VMs are running on each server in the cluster—this option incurs no VM downtime, but you’ll need to wait for storage jobs (mirror repair) to complete after each server is upgraded, and you’ll have to set up each server and all its apps and roles again.
In-place upgrade while VMs are stopped on each server in the cluster—this option incurs VM downtime, but you don’t need to wait for storage jobs (mirror repair), so it’s faster.
Clean-OS install while VMs are stopped on each server in the cluster—This option incurs VM downtime, but you don’t need to wait for storage jobs (mirror repair) so it’s faster.
Prerequisites and limitations
Before proceeding with an upgrade:
Check that you have usable backups in case there are any issues during the upgrade process.
Check that your hardware vendor has a BIOS, firmware, and drivers for your servers that they will support on Windows Server 2019.
There are some limitations with the upgrade process to be aware of:
To enable Storage Spaces Direct with Windows Server 2019 builds earlier than 176693.292, customers may need to contact Microsoft support for registry keys that enable Storage Spaces Direct and Software Defined Networking functionality. For more info, see Microsoft Knowledge Base article 4464776.
When upgrading a cluster with ReFS volumes, there are a few limitations:
Upgrading is fully supported on ReFS volumes, however, upgraded volumes won’t benefit from ReFS enhancements in Windows Server 2019. These benefits, such as increased performance for mirror-accelerated parity, require a newly-created Windows Server 2019 ReFS volume. In other words, you’d have to create new volumes using the New-Volume cmdlet or Server Manager. Here are the some of the ReFS enhancements new volumes would get:
MAP log-bypass: a performance improvement in ReFS that only applies to clustered (Storage Spaces Direct) systems and doesn’t apply to stand-alone storage pools.
Compaction efficiency improvements in Windows Server 2019 that are specific to multi-resilient volumes.
Before upgrading a Windows Server 2016 Storage Spaces Direct cluster server, we recommend putting the server into storage maintenance mode. For more info, see the Event 5120 section of Troubleshoot Storage Spaces Direct. Although this issue has been fixed in Windows Server 2016, we recommend putting each Storage Spaces Direct server into storage maintenance mode during the upgrade as a best practice.
There is a known issue with Software Defined Networking environments that use SET switches. This issue involves Hyper-V VM live migrations from Windows Server 2019 to Windows Server 2016 (live migration to an earlier operating system). To ensure successful live migrations, we recommend changing a VM network setting on VMs that are being live-migrated from Windows Server 2019 to Windows Server 2016. This issue is fixed for Windows Server 2019 in the 2019-01D hotfix rollup package, AKA build 17763.292. For more info, see Microsoft Knowledge Base article 4476976.
Because of the known issues above, some customers may consider building a new Windows Server 2019 cluster and copying data from the old cluster, instead of upgrading their Windows Server 2016 clusters using one of the four processes described below.
Performing an in-place upgrade while VMs are running
This option incurs no VM downtime, but you’ll need to wait for storage jobs (mirror repair) to complete after each server is upgraded. Although individual servers will be restarted sequentially during the upgrade process, the remaining servers in the cluster, as well as all VMs, will remain running.
Check that all the servers in the cluster have installed the latest Windows updates. For more info, see Windows 10 and Windows Server 2016 update history. At a minimum, install Microsoft Knowledge Base article 4487006 (Feb 19th, 2019). The build number (see ver command) should be 14393.2828 or higher.
If you’re using Software Defined Networking with SET switches, open an elevated PowerShell session and run the following command to disable VM live migration verification checks on all VMs on the cluster:
Perform the following steps on one cluster server at a time:
Use Hyper-V VM live migration to move running VMs off the server you’re about to upgrade.
Pause the cluster server using the following PowerShell command—note that some internal groups are hidden. We recommend this step to be cautious — if you didn’t already live migrate VMs off the server this cmdlet will do that for you, so you could skip the previous step if you prefer.
Place the server in storage maintenance mode by running the following PowerShell commands:
Run the following cmdlet to check that the OperationalStatus value is In Maintenance Mode:
Perform an upgrade installation of Windows Server 2019 on the server by running setup.exe and using the “Keep personal files and apps” option. After installation is complete, the server remains in the cluster and the cluster service starts automatically.
Check that the newly upgraded server has the latest Windows Server 2019 updates. For more info, see Windows 10 and Windows Server 2019 update history. The build number (see ver command) should be 17763.292 or higher.
Remove the server from storage maintenance mode by using the following PowerShell command:
Resume the server by using the following PowerShell command:
Wait for storage repair jobs to finish and for all disks to return to a healthy state. This could take considerable time depending on the number of VMs running during the server upgrade. Here are the commands to run:
Upgrade the next server in the cluster.
After all servers have been upgraded to Windows Server 2019, use the following PowerShell cmdlet to update the cluster functional level.
We recommend updating the cluster functional level as soon as possible, though technically you have up to four weeks to do so.
After the cluster functional level has been updated, use the following cmdlet to update the storage pool. At this point, new cmdlets such as Get-ClusterPerf will be fully operational on any server in the cluster.
Optionally upgrade VM configuration levels by stopping each VM, using the Update-VMVersion cmdlet, and then starting the VMs again.
If you’re using Software Defined Networking with SET switches and disabled VM live migration checks as instructed to above, use the following cmdlet to re-enable VM Live verification checks:
Verify that the upgraded cluster functions as expected. Roles should fail-over correctly and if VM live migration is used on the cluster, VMs should successfully live migrate.
Validate the cluster by running Cluster Validation ( Test-Cluster ) and examining the cluster validation report.
Performing a clean OS installation while VMs are running
This option incurs no VM downtime, but you’ll need to wait for storage jobs (mirror repair) to complete after each server is upgraded. Although individual servers will be restarted sequentially during the upgrade process, the remaining servers in the cluster, as well as all VMs, will remain running.
Check that all the servers in the cluster are running the latest updates. For more info, see Windows 10 and Windows Server 2016 update history. At a minimum, install Microsoft Knowledge Base article 4487006 (Feb 19th, 2019). The build number (see ver command) should be 14393.2828 or higher.
If you’re using Software Defined Networking with SET switches, open an elevated PowerShell session and run the following command to disable VM live migration verification checks on all VMs on the cluster:
Perform the following steps on one cluster server at a time:
Use Hyper-V VM live migration to move running VMs off the server you’re about to upgrade.
Pause the cluster server using the following PowerShell command—note that some internal groups are hidden. We recommend this step to be cautious — if you didn’t already live migrate VMs off the server this cmdlet will do that for you, so you could skip the previous step if you prefer.
Place the server in storage maintenance mode by running the following PowerShell commands:
Run the following cmdlet to check that the OperationalStatus value is In Maintenance Mode:
Evict the server from the cluster by running the following PowerShell command:
Perform a clean installation of Windows Server 2019 on the server: format the system drive, run setup.exe and use the “Nothing” option. You’ll have to configure the server identity, roles, features, and applications after setup completes and the server restarts.
Install the Hyper-V role and Failover-Clustering feature on the server (you can use the Install-WindowsFeature cmdlet).
Install the latest storage and networking drivers for your hardware that are approved by your server manufacturer for use with Storage Spaces Direct.
Check that the newly upgraded server has the latest Windows Server 2019 updates. For more info, see Windows 10 and Windows Server 2019 update history. The build number (see ver command) should be 17763.292 or higher.
Rejoin the server to the cluster by using the following PowerShell command:
Remove the server from storage maintenance mode by using the following PowerShell commands:
Wait for storage repair jobs to finish and for all disks to return to a healthy state. This could take considerable time depending on the number of VMs running during the server upgrade. Here are the commands to run:
Upgrade the next server in the cluster.
After all servers have been upgraded to Windows Server 2019, use the following PowerShell cmdlet to update the cluster functional level.
We recommend updating the cluster functional level as soon as possible, though technically you have up to four weeks to do so.
After the cluster functional level has been updated, use the following cmdlet to update the storage pool. At this point, new cmdlets such as Get-ClusterPerf will be fully operational on any server in the cluster.
Optionally upgrade VM configuration levels by stopping each VM and using the Update-VMVersion cmdlet, and then starting the VMs again.
If you’re using Software Defined Networking with SET switches and disabled VM live migration checks as instructed to above, use the following cmdlet to re-enable VM Live verification checks:
Verify that the upgraded cluster functions as expected. Roles should fail-over correctly and if VM live migration is used on the cluster, VMs should successfully live migrate.
Validate the cluster by running Cluster Validation ( Test-Cluster ) and examining the cluster validation report.
Performing an in-place upgrade while VMs are stopped
This option incurs VM downtime but can take less time than if you kept the VMs running during the upgrade because you don’t need to wait for storage jobs (mirror repair) to complete after each server is upgraded. Although individual servers will be restarted sequentially during the upgrade process, the remaining servers in the cluster remain running.
Check that all the servers in the cluster are running the latest updates. For more info, see Windows 10 and Windows Server 2016 update history. At a minimum, install Microsoft Knowledge Base article 4487006 (Feb 19th, 2019). The build number (see ver command) should be 14393.2828 or higher.
Stop the VMs running on the cluster.
Perform the following steps on one cluster server at a time:
Pause the cluster server using the following PowerShell command—note that some internal groups are hidden. We recommend this step to be cautious.
Place the server in storage maintenance mode by running the following PowerShell commands:
Run the following cmdlet to check that the OperationalStatus value is In Maintenance Mode:
Perform an upgrade installation of Windows Server 2019 on the server by running setup.exe and using the “Keep personal files and apps” option. After installation is complete, the server remains in the cluster and the cluster service starts automatically.
Check that the newly upgraded server has the latest Windows Server 2019 updates. For more info, see Windows 10 and Windows Server 2019 update history. The build number (see ver command) should be 17763.292 or higher.
Remove the server from storage maintenance mode by using the following PowerShell commands:
Resume the server by using the following PowerShell command:
Wait for storage repair jobs to finish and for all disks to return to a healthy state. This should be relatively fast, since VMs are not running. Here are the commands to run:
Upgrade the next server in the cluster.
After all servers have been upgraded to Windows Server 2019, use the following PowerShell cmdlet to update the cluster functional level.
We recommend updating the cluster functional level as soon as possible, though technically you have up to four weeks to do so.
After the cluster functional level has been updated, use the following cmdlet to update the storage pool. At this point, new cmdlets such as Get-ClusterPerf will be fully operational on any server in the cluster.
Start the VMs on the cluster and check that they’re working properly.
Optionally upgrade VM configuration levels by stopping each VM and using the Update-VMVersion cmdlet, and then starting the VMs again.
Verify that the upgraded cluster functions as expected. Roles should fail-over correctly and if VM live migration is used on the cluster, VMs should successfully live migrate.
Validate the cluster by running Cluster Validation ( Test-Cluster ) and examining the cluster validation report.
Performing a clean OS installation while VMs are stopped
This option incurs VM downtime but can take less time than if you kept the VMs running during the upgrade because you don’t need to wait for storage jobs (mirror repair) to complete after each server is upgraded. Although individual servers will be restarted sequentially during the upgrade process, the remaining servers in the cluster remain running.
Check that all the servers in the cluster are running the latest updates. For more info, see Windows 10 and Windows Server 2016 update history. At a minimum, install Microsoft Knowledge Base article 4487006 (Feb 19th, 2019). The build number (see ver command) should be 14393.2828 or higher.
Stop the VMs running on the cluster.
Perform the following steps on one cluster server at a time:
Pause the cluster server using the following PowerShell command—note that some internal groups are hidden. We recommend this step to be cautious.
Place the server in storage maintenance mode by running the following PowerShell commands:
Run the following cmdlet to check that the OperationalStatus value is In Maintenance Mode:
Evict the server from the cluster by running the following PowerShell command:
Perform a clean installation of Windows Server 2019 on the server: format the system drive, run setup.exe and use the “Nothing” option. You’ll have to configure the server identity, roles, features, and applications after setup completes and the server restarts.
Install the Hyper-V role and Failover-Clustering feature on the server (you can use the Install-WindowsFeature cmdlet).
Install the latest storage and networking drivers for your hardware that are approved by your server manufacturer for use with Storage Spaces Direct.
Check that the newly upgraded server has the latest Windows Server 2019 updates. For more info, see Windows 10 and Windows Server 2019 update history. The build number (see ver command) should be 17763.292 or higher.
Rejoin the server to the cluster by using the following PowerShell command:
Remove the server from storage maintenance mode by using the following PowerShell command:
Wait for storage repair jobs to finish and for all disks to return to a healthy state. This could take considerable time depending on the number of VMs running during the server upgrade. Here are the commands to run:
Upgrade the next server in the cluster.
After all servers have been upgraded to Windows Server 2019, use the following PowerShell cmdlet to update the cluster functional level.
We recommend updating the cluster functional level as soon as possible, though technically you have up to four weeks to do so.
After the cluster functional level has been updated, use the following cmdlet to update the storage pool. At this point, new cmdlets such as Get-ClusterPerf will be fully operational on any server in the cluster.
Start the VMs on the cluster and check that they’re working properly.
Optionally upgrade VM configuration levels by stopping each VM and using the Update-VMVersion cmdlet, and then starting the VMs again.
Verify that the upgraded cluster functions as expected. Roles should fail-over correctly and if VM live migration is used on the cluster, VMs should successfully live migrate.
Validate the cluster by running Cluster Validation ( Test-Cluster ) and examining the cluster validation report.


