- Streamlabs obs mac os
- Streamlabs obs mac os
- Getting Started
- Onboarding:
- Overlay Themes
- Add Your Sources
- Add an Alert Box
- Capture Desktop Audio
- All of the features
- How to use OBS Streamlabs on Macпјџ
- Streamlabs OBS vs OBS
- Steps to Download Streamlabs OBS on Mac В
- 1. Download Streamlabs OBS
- 2. Install Streamlabs on Mac
- 3. Opreata Streamlabs OBS on Mac
- Acclimatizing with the dashboard
- Go live or record: you have got a choice
- Conclusion
Streamlabs obs mac os
Capturing Desktop Audio in Streamlabs OBS for Mac
With the release of Streamlabs OBS for Mac, a common question is “Why can’t I capture desktop audio?”. Unlike Windows, macOS does not have any.

With the release of Streamlabs OBS for Mac, a common question is “Why can’t I capture desktop audio?”. Unlike Windows, macOS does not have any system-level audio routing. This means that individual apps can’t access audio signal from other apps out of the box. However, there are third party solutions that can accomplish this.
As of macOS 11 Big Sur, we recommend BlackHole by Existential Audio. This guide will cover how to install and set up BlackHole for use with Streamlabs OBS.
Step 1
Download and install BlackHole.
Click here for BlackHole’s Github page, where you can find instructions on how to download the installer. Once you have the .pkg file downloaded, open it and you should see this:

Follow the instructions to finish installing, entering your password when prompted.
Step 2
Setting up a Multi-Output device
There are several different ways to utilize the features that BlackHole offers, however for the scope of this article and Streamlabs OBS in particular, we’ll only cover setting up a Multi-Output device so that you can capture and monitor desktop audio.
- Open the “Audio MIDI Setup” utility
- Click the Plus (+) button in the bottom left corner and click Create Multi-Output Device

- Check the box next to BlackHole, the Built-in Output, and any other devices you want to use for monitoring. Important: the built-in output needs to be ABOVE BlackHole in the list. If it’s not, uncheck and re-check the box under “Use” to alter the order.
- Right-click on the Multi-Output Device and select “Use This Device For Sound Output”. Now it’s set as your default output device! All desktop audio will now be output to both your built-in device as well as the virtual BlackHole device.


Now open Streamlabs OBS and make sure that BlackHole is selected as one of your Mic/Auxiliary devices in Settings > Audio. 
You’re done! For additional questions or troubleshooting, please refer to BlackHole’s Github FAQ and Wiki
Источник
Streamlabs obs mac os
Streamlabs is Live on Mac!
Get Started With This Basic Setup Guide

Today, we are excited to announce the availability and open beta of Streamlabs OBS on macOS! ?
Live streamers on Mac can now access dozens of features and deep customization tools to create professional broadcasts, engage with audiences and monetize across platforms like Twitch, YouTube, Mixer, and Facebook.
Today, we are providing a basic start-up guide to get you set up, add donation alerts and start live streaming in minutes.
Getting Started
Setting up Streamlabs OBS is easy. The onboarding process will provide you with the essential components you’ll need to start live streaming right away. Here is what you can expect:
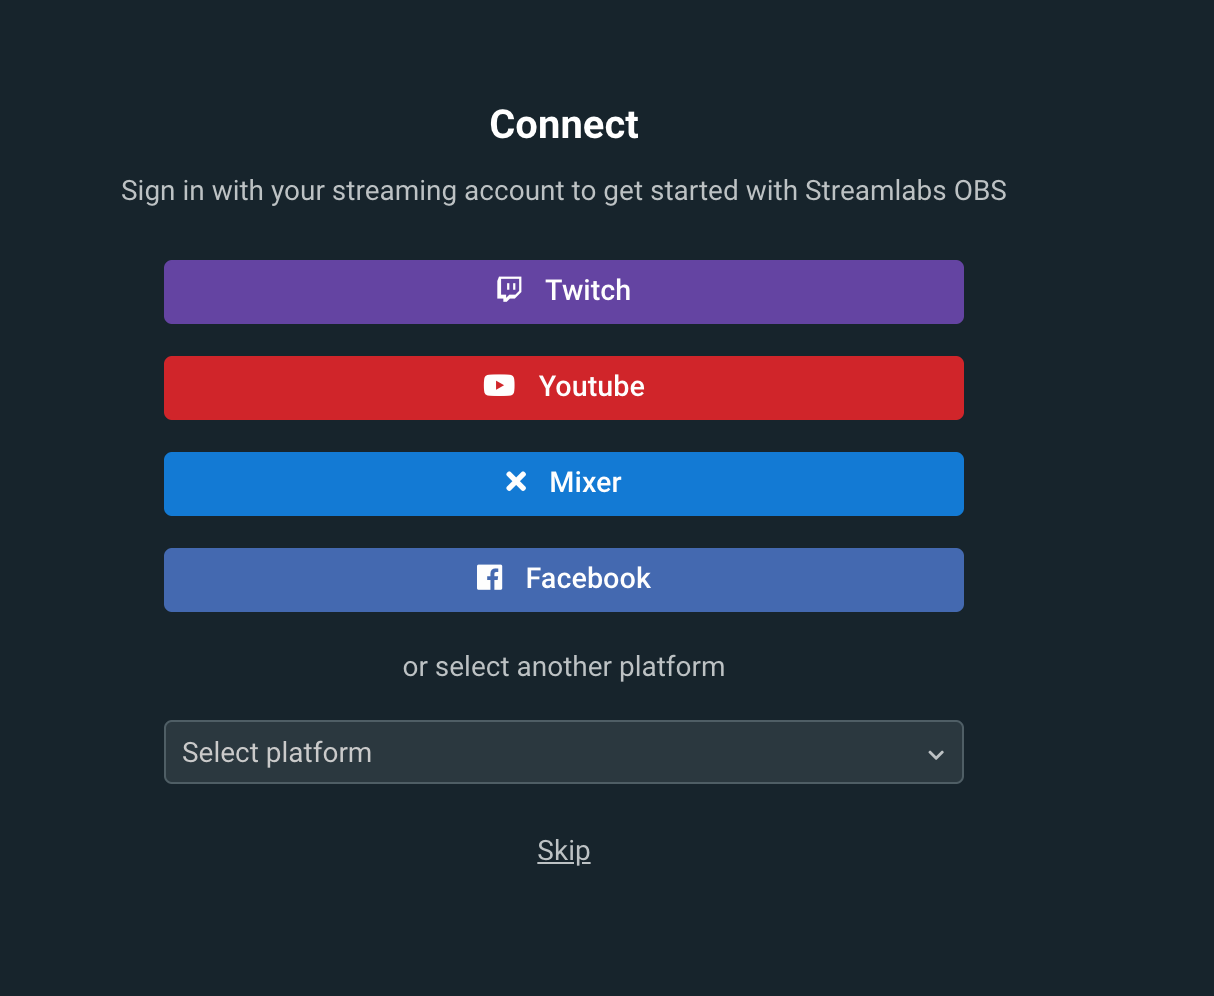
Onboarding:
- Grant Permissions

2. Connect Account
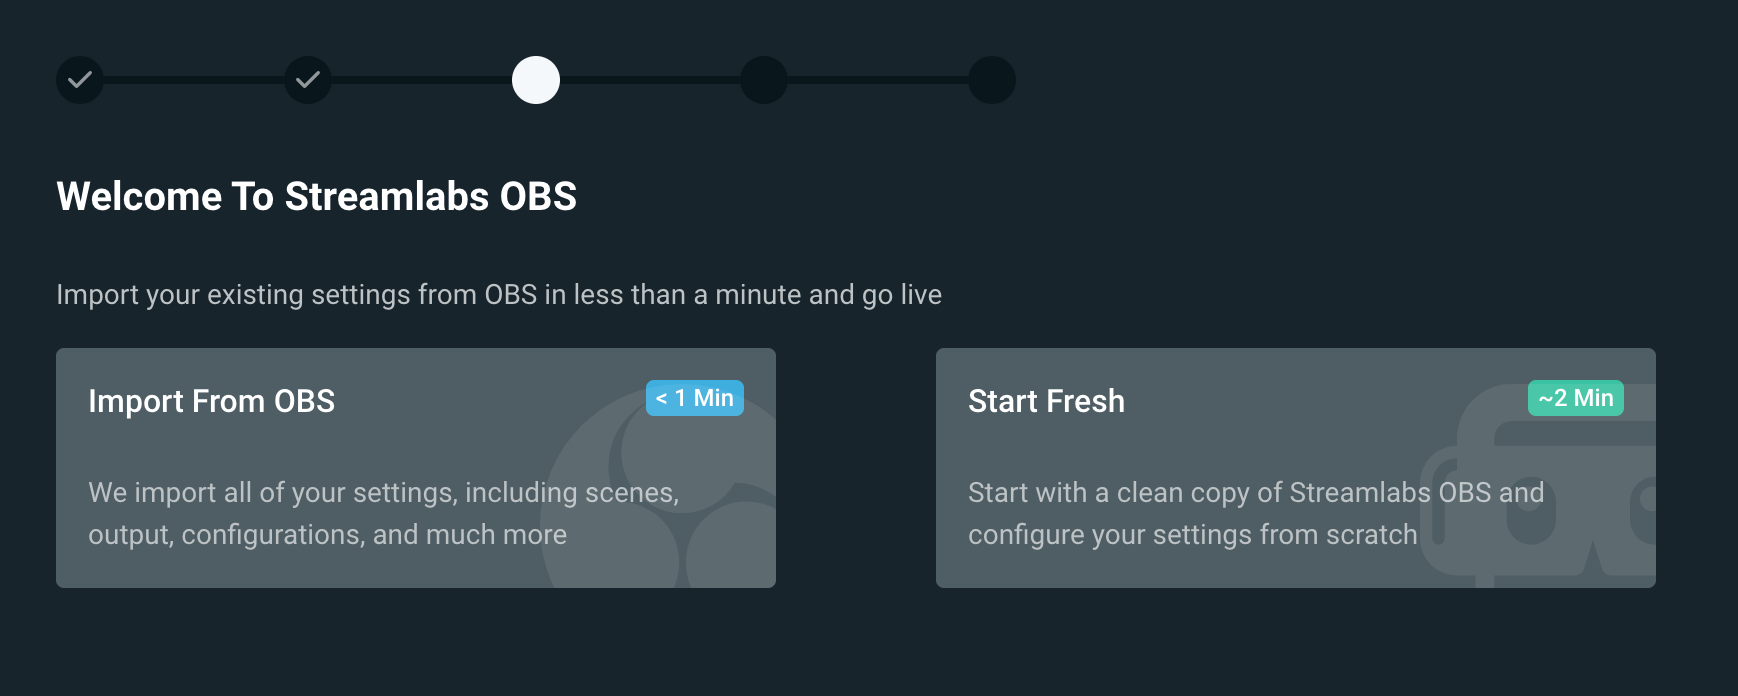
3. Import Settings: After logging in, the import settings function in Streamlabs OBS allows you to transfer settings from other broadcasting software in less than a minute. You can also start fresh, and configure settings manually.
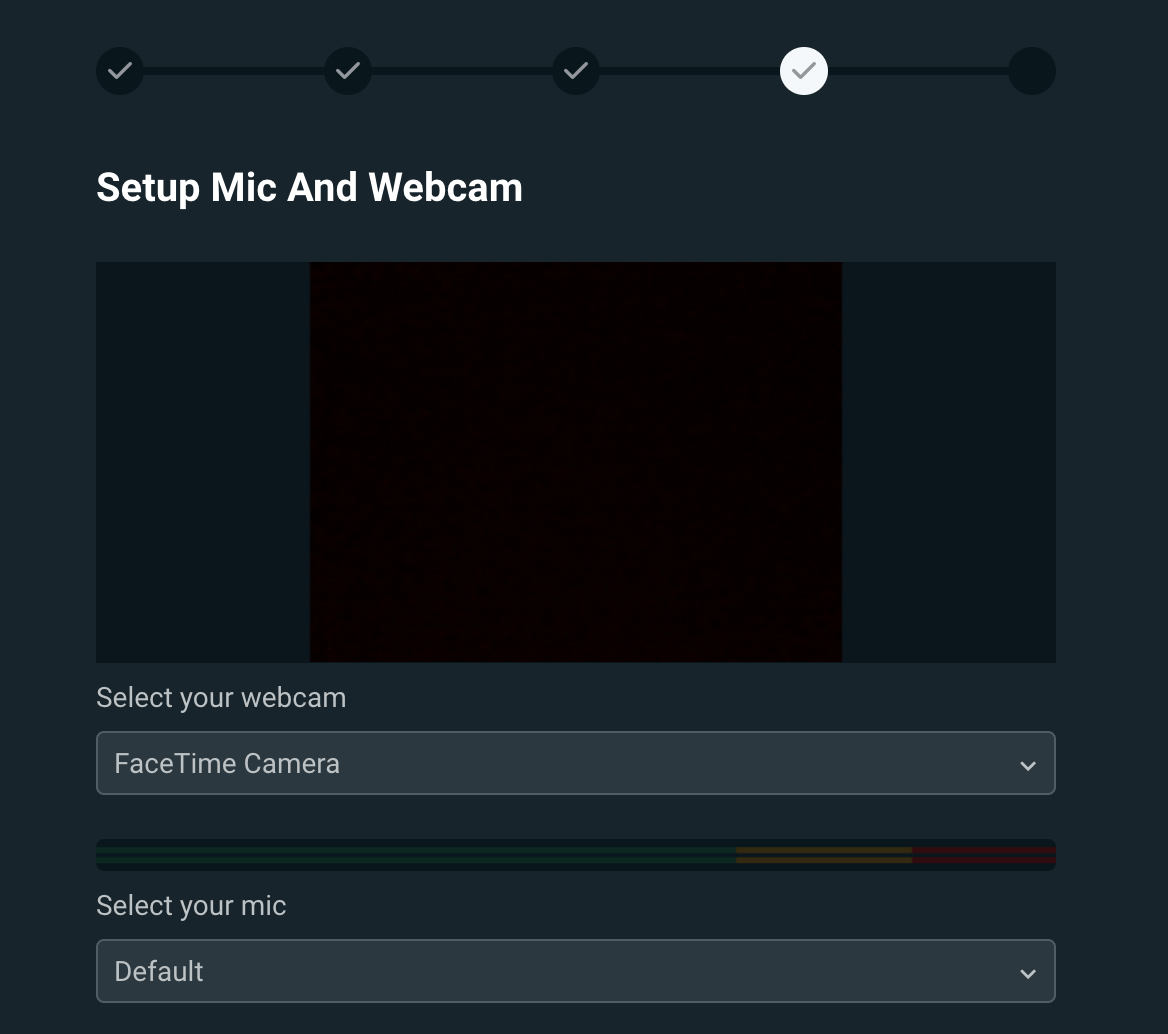
4. Add Your Microphone and Webcam: If you already have a webcam and a microphone connected to your computer, Streamlabs OBS will automatically detect it so you can choose which device you’d like to use. You can also change these devices later on.
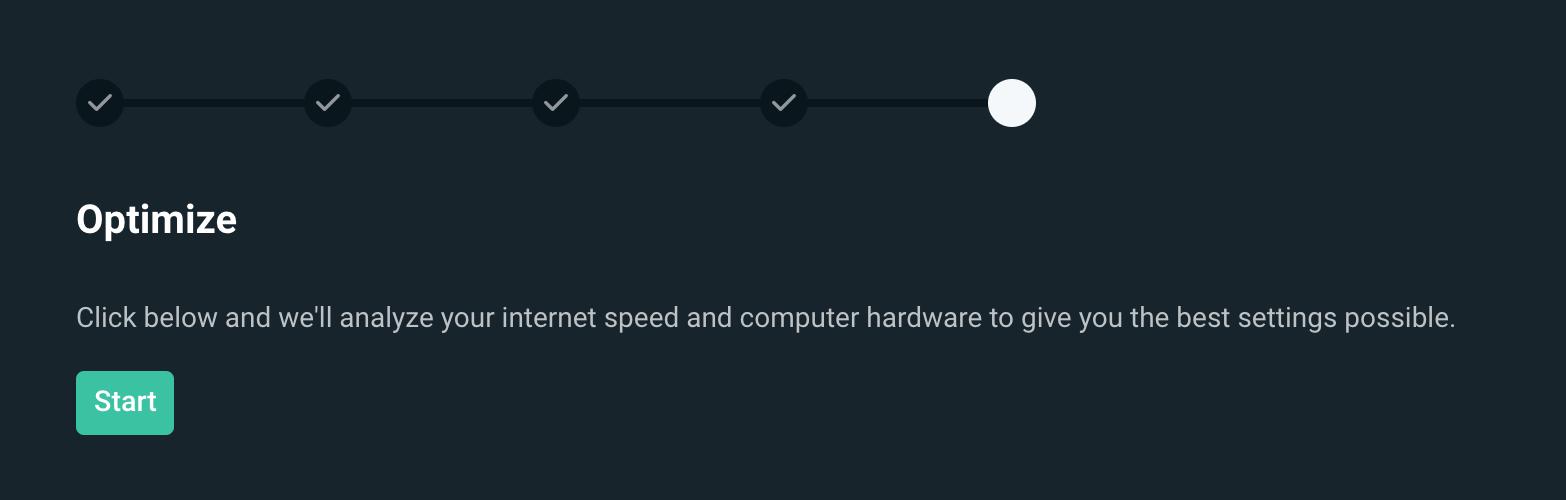
5. Optimize: Streamlabs’ Auto Optimizer will analyze your internet speed and computer hardware to get the best settings possible.
Overlay Themes
Now that you’ve finished the onboarding process we recommend adding a theme to add a professional look and feel to your stream.
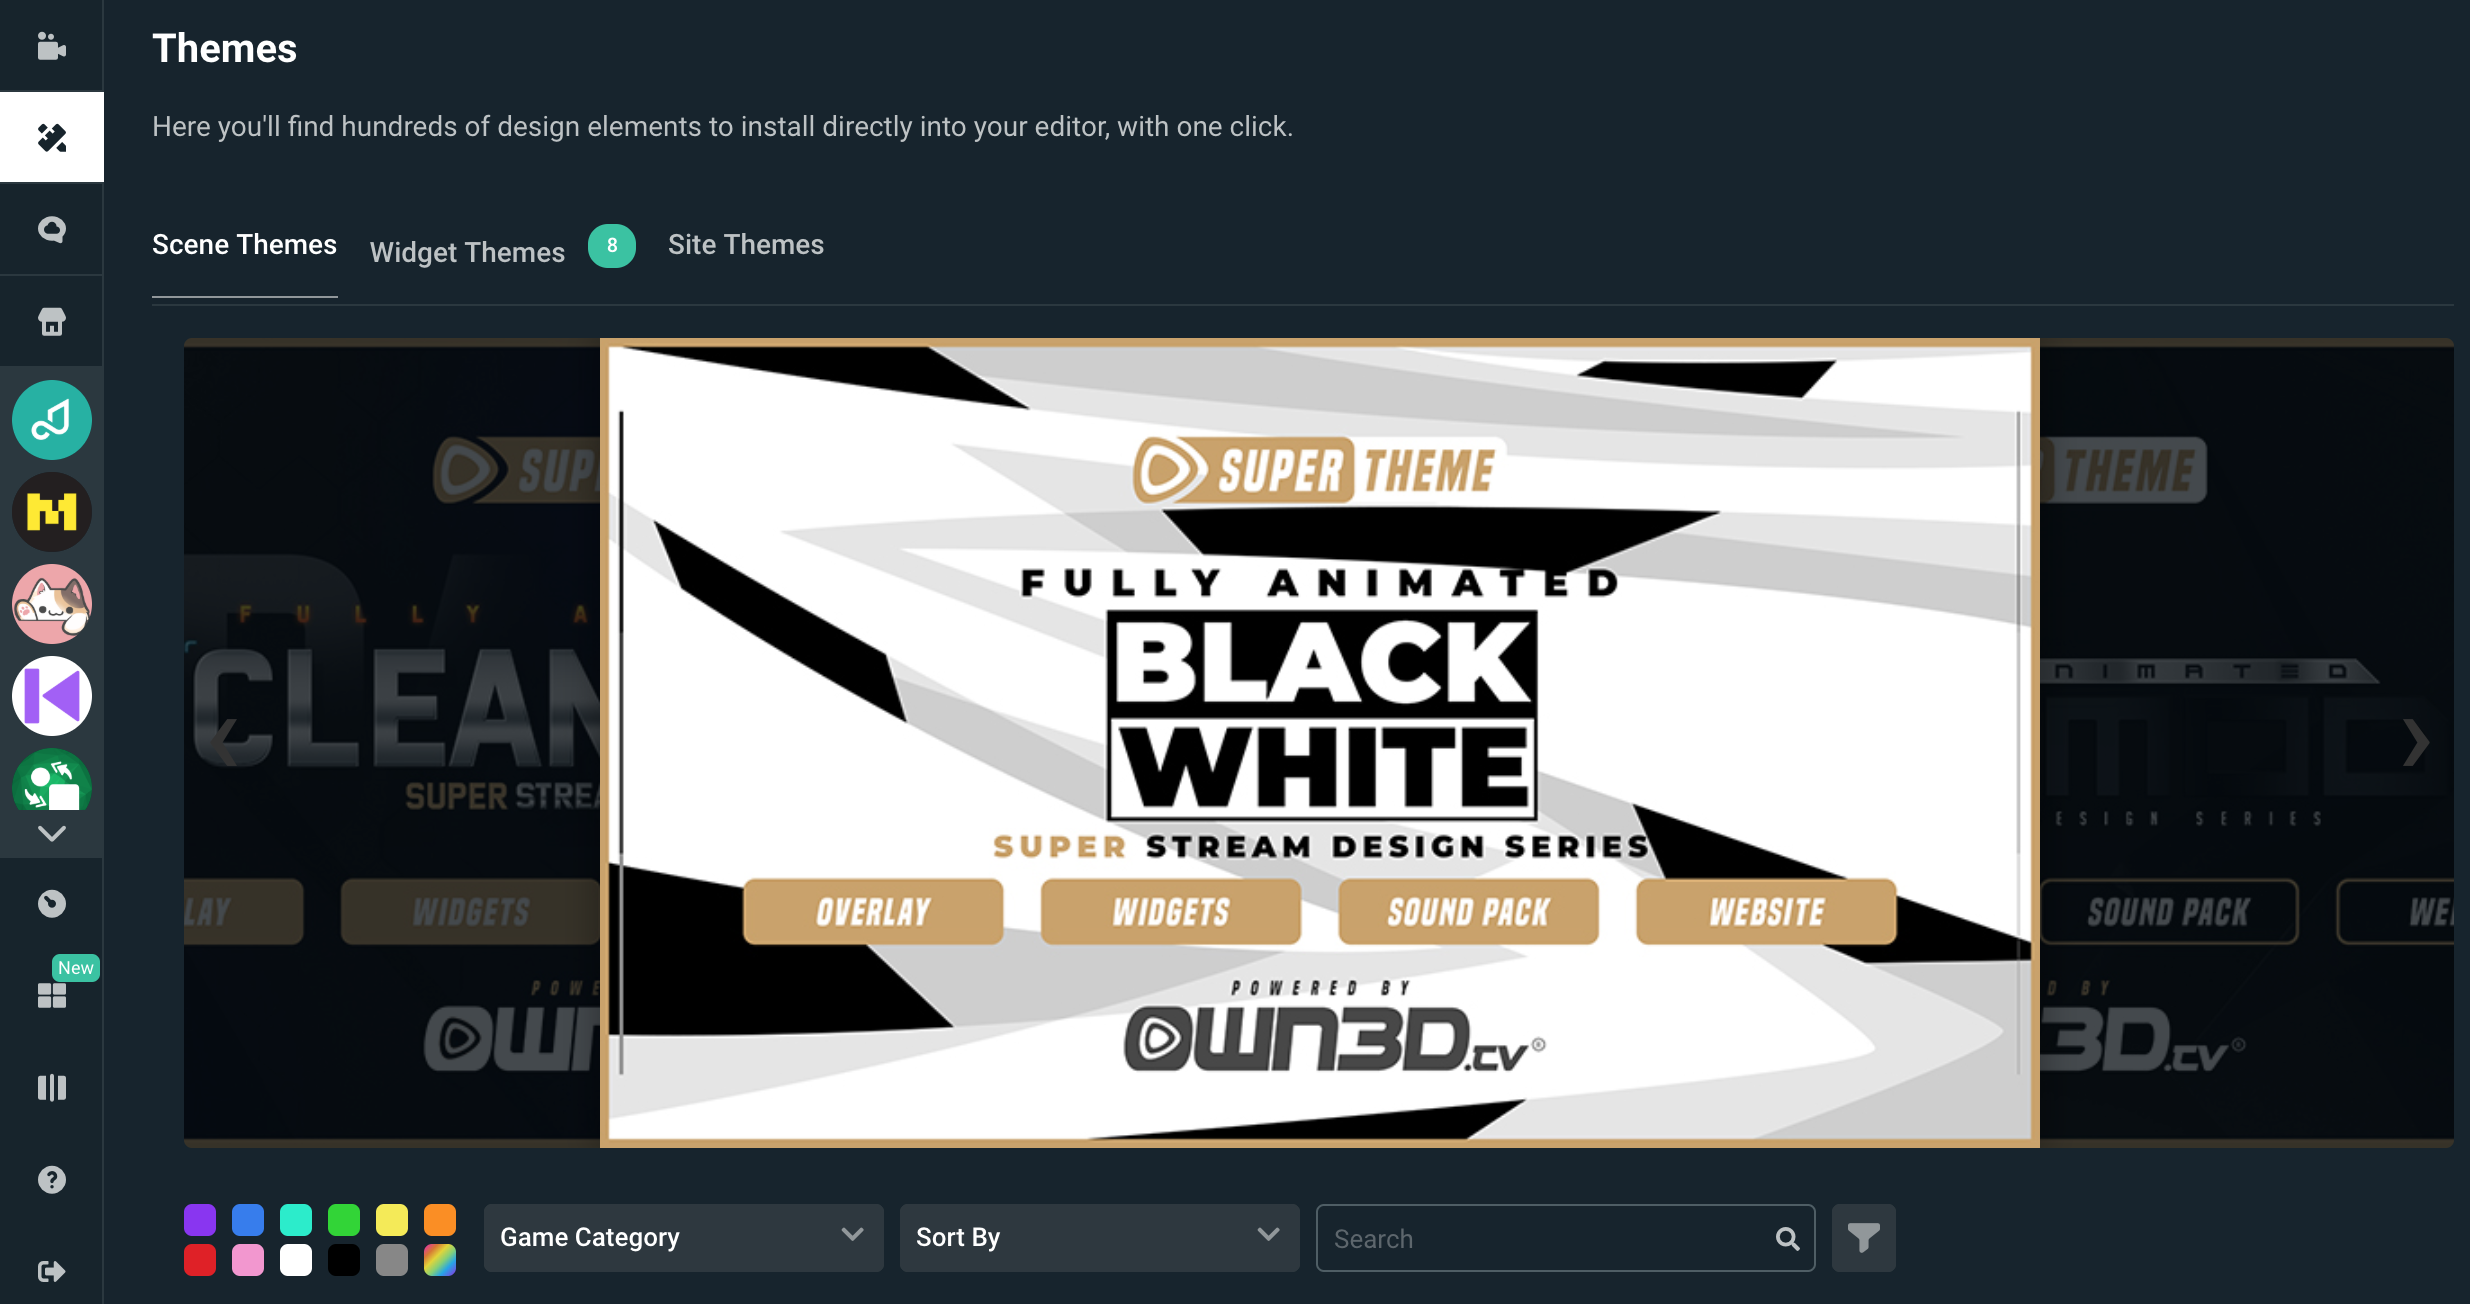
There are over 250 beautifully hand-crafted overlay themes available for free. When you choose a theme — everything is populated for you. A theme will come with a stream starting soon, a live scene, a be right back scene, and a stream ending scene. You’ll want to use your live scene when you are ready for your audience to see and hear you.
Add Your Sources
To add a source, click on the plus sign and choose the source you’d like to add. A source is something that outputs to the stream. A webcam is a source. One of the many widgets, such as a donation goal, can be a source. Capturing what’s on your screen is also a source.
If you selected a webcam during the onboarding process, you should see it automatically captured in your “live scene.” You will then need to add a source to capture your desktop or anything else you want to output to the stream.
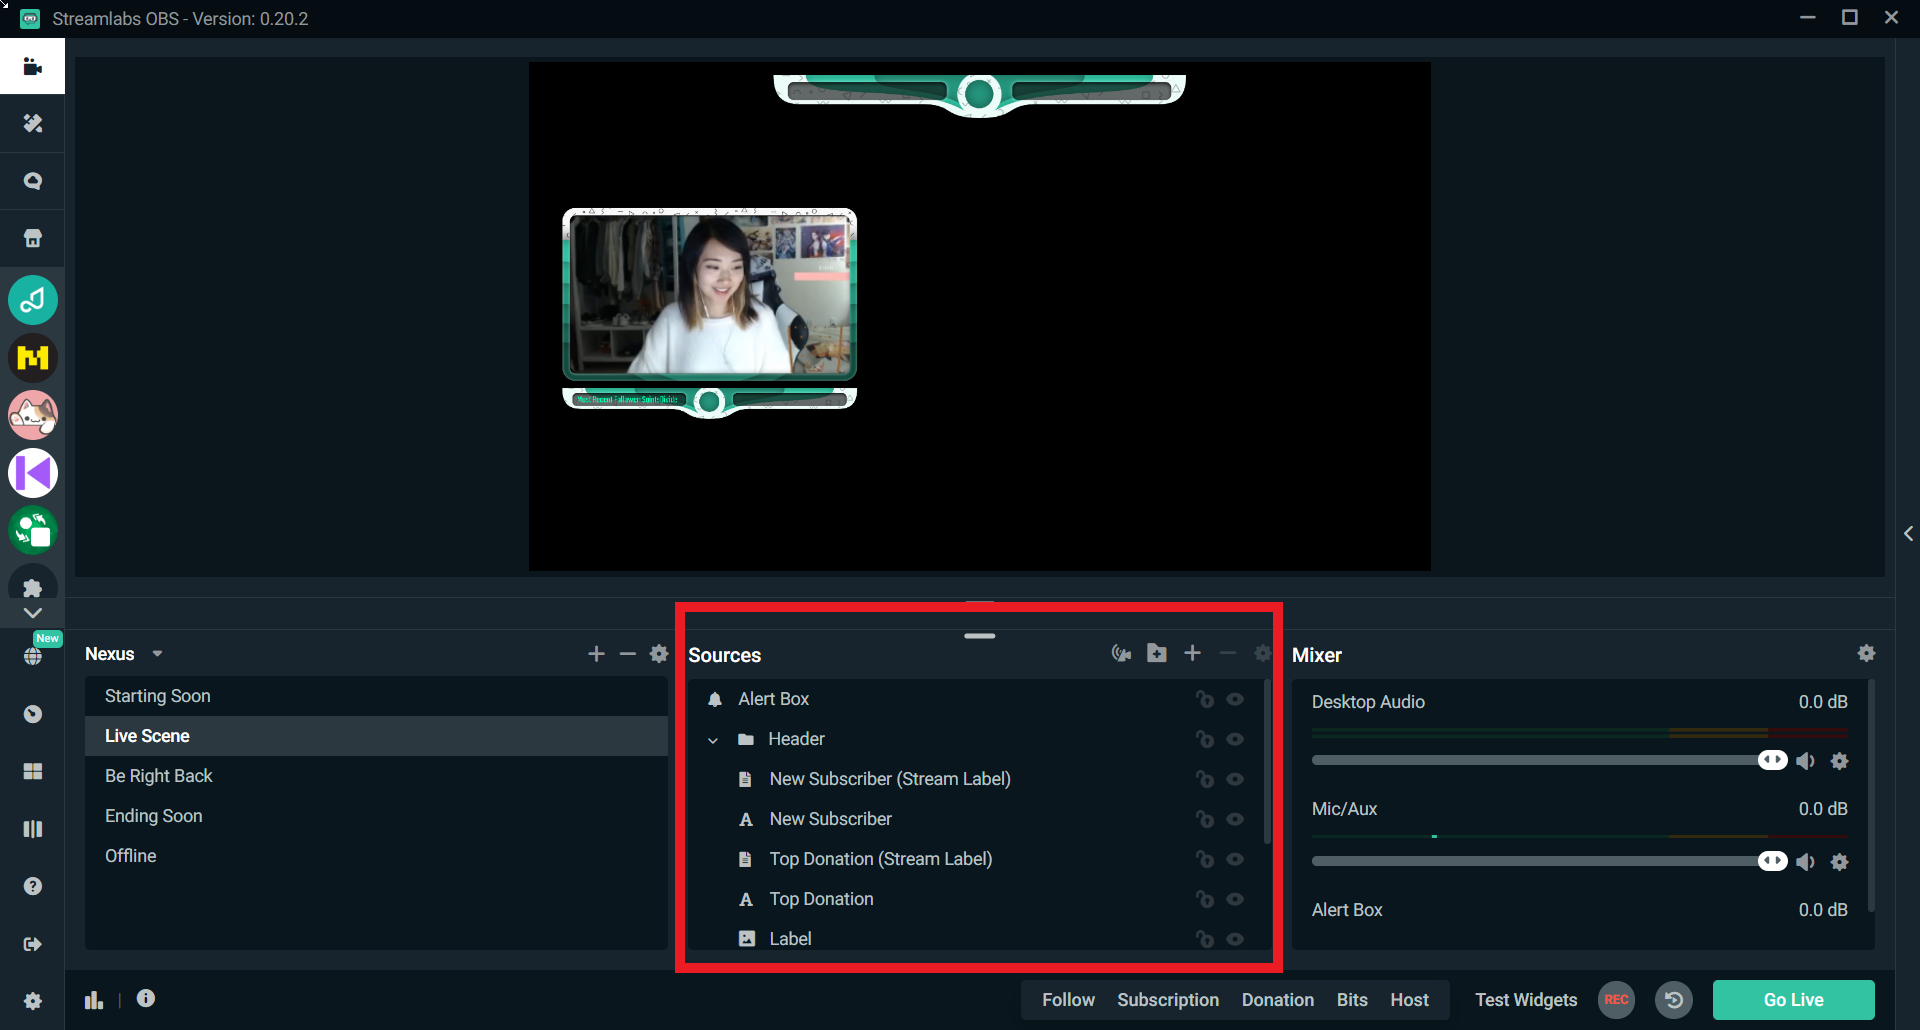
If you are playing a lot of video games we recommend choosing the “Game Capture” source. This will only display the game you are playing. If you enable the Automatic Game Capture functionality, Streamlabs OBS will automatically detect which game you are playing. There are other options, like “Window Capture”, which will only display a specific window from your computer, or “Display Capture” which will display your entire screen.
Add an Alert Box
We highly recommend adding an “Alert Box” source. An Alert Box will display an alert on-screen whenever somebody follows you, subscribes or donates. There are many different alert types, but these are some of the most common.
Customize these alerts by visiting the Alert Box Dashboard on Streamlabs.com. From this page, you can change the image and sound that appear for the various different types of alerts.
 Example of a custom alert
Adding alerts is a perfect opportunity to acknowledge and thank your viewers for contributing to the stream. Seeing their name on the screen makes your supporter feel great because you recognize them and also encourages others to support you.
Capture Desktop Audio
Lastly, Unlike Windows, macOS does not have any system-level audio routing. This means that individual apps can’t access the audio signal from other apps out of the box. However, there are multiple software solutions out there that accomplish this. Visit our support page with more information to learn how to capture desktop audio.
All of the features
Live streamers familiar with Streamlabs’ products can expect to see everything they need to help turn their passion for streaming into a career. Major features include:
- Custom Donation Alerts: Tailor-make the look of on-screen alerts and encourage donations by customizing the layout, animation, message, text, image and more
- Engaging Widgets: Over a dozen engaging widgets designed to increase viewer participation and improve monetization
- Video Encoding Optimization: A machine learning system encodes video games, giving streamers the ability to reduce CPU usage by more than 20% while retaining the same video quality
- Selective Recording: Pick and choose the sources that appear in a recorded video of your live broadcast
- Cloudbot Moderation Tools: Protect from spam in the chat or add entertaining features like mini-games, polls, loyalty points and more
- Premium Overlay Themes: Over 250 free overlay themes made from the best designers in the business
- Integrated Chat: An integrated chat window within the software to help streamers keep track of all the viewer chatter on their channel
- Merch Store: Streamlabs merch store feature gives live streamers the ability to customize an assortment of different products with their own logos and sell them on stream at no cost to them.
More than 20,000,000 streamers already trust Streamlabs to deliver reliable, well designed and feature-rich software. With the availability of its broadcasting software on Mac, Streamlabs is driving the growth of the creator economy as millions of live streamers on either operating system now have access to the industry-leading broadcasting software.
Источник
How to use OBS Streamlabs on Macпјџ

Richard Bennett
Sep 28, 2021• Proven solutions
Now, live streamers have multiple functions as well as customization tools for making broadcasts to attract engagements and monetize across various social media platforms. Popular platforms linked to the OBS Streamlabs Mac are Twitch, YouTube, Facebook, Mixer, and any other desirable streaming option. The possibilities are limitless. Surely, with this new development, OBS Streamlabs Mac can match close competitors such as the original OBS, ECamm live, and Twitch Studios.
Subsequently, we will go through the workings of the OBS Streamlabs Mac from download and onwards but, first, it is important to know all about this brilliant Open Broadcast Software and what makes it endearing.
Streamlabs OBS vs OBS
The generic OBS is a software put out to the general public to enable streaming in its simplest and unmodified form. For an individual that just wants to stream videos without colorfulness, effects, and additional features, the OBS is perfect.
However, Streamlabs OBS В is improved. Known as SLOBS to its increasing subscribers, Streamlabs OBS enhances user experience and provides a collection of tools to do so in one hub, with no outsourcing.В
- OBS (Open Broadcaster Studio)
It is free and open-source, the code is ‘naked’ to the public. At will, developers can improve on the software. Manual connection to Twitch, YouTube, and the likes is also possible. A few settings here and there and you are set!
OBS gives a wonderful experience to users albeit with its inefficiencies in providing added features and functions. It is seamless as far as primary recording and broadcasting are concerned, leaving out the extras.
There are overlays and background designs available on OBS for a price although limited. Largely, users will need to consult other websites—copy and paste—to have varied layout options. It is not much work, however; there are many such websites.
This is an example of when life gives you lemons, make lemonade. Streamlabs saw an opportunity with the original OBS and like any other developer, modified it. They have forged on everyone till this OBS Streamlab Mac version. The code was revamped to guarantee an improved user experience.В

Like OBS, OBS Streamlabs Mac is free with a relatively easier installation process. Preceding the OBS Streamlabs Mac, it was available only on Windows and had app versions on Android and iOS. Notwithstanding, through Bootcamp, Mac owners could switch operating systems and use StreamLabs OBS.
In a blink, all settings are pre-configured and subscribers are directed to the Dashboard where major choices are made. After a few clicks, you are set to stream.
OBS Streamlabs Mac’s enhanced experience is by far unmatched by any other of its kind. An array of themes and advanced features allows each user to create his world through personalized—unique—layouts.
Exclusively, OBS Streamlab Mac provides alerts, text-to-speech automation, widgets, and layouts for free.
Steps to Download Streamlabs OBS on Mac В
Here are the easy steps to get В OBS Streamlabs Mac working on your computer.
1. Download Streamlabs OBS
Visit StreamLabs.com and click on the Download Tab visible at the top right corner. After downloading the app, it goes on to require installation.
В В 
2. Install Streamlabs on Mac
To get the OBS Streamlab Mac running, В permission is asked to use your webcam and microphone. After permission is granted, the signing-in procedure follows.В
В 
Users are required to sign in with their streaming account. The regular options; Twitch, YouTube, Mixer, and Facebook are there. For a different streaming app, there is an entry box. Given a moment, the initialization process is completed.
В 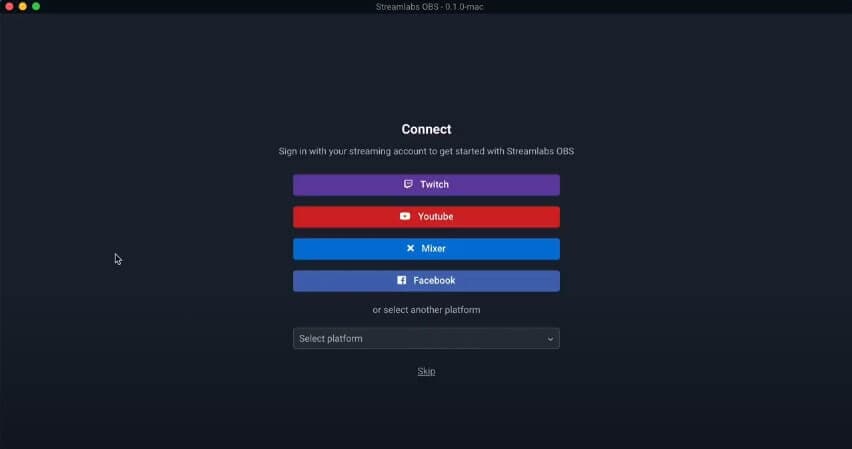
The next page is very important. Users with an OBS account can choose to import their data into the OBS Streamlabs Mac account. Also, you can start afresh. Either process does not exceed two minutes.
В 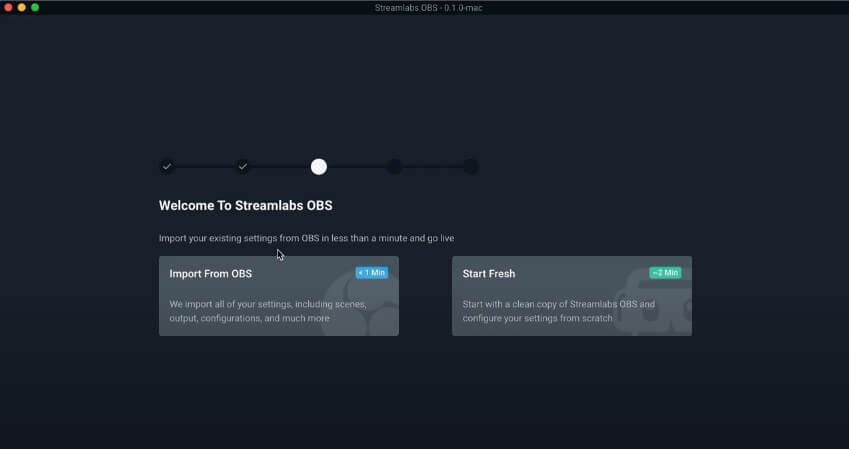
Thereafter, the webcam and microphones available can be crosschecking to ensure the right ones are matched. Auto optimization is then done to get the best quality video streaming your device can afford.
В 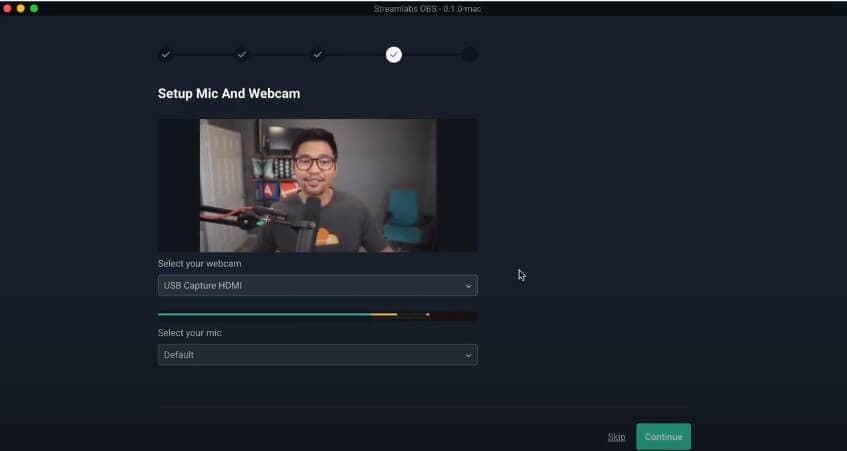
3. Opreata Streamlabs OBS on Mac
Acclimatizing with the dashboard
Ideally, the editor’s tab is the first stop. Enough time should be spent there. This hub is used to configure streams —the scenes, sources, and widgets.
Go live or record: you have got a choice
Unlike the generic type, OBS Streamlabs В Mac allows you to decide whether to go live or take a recording.
В 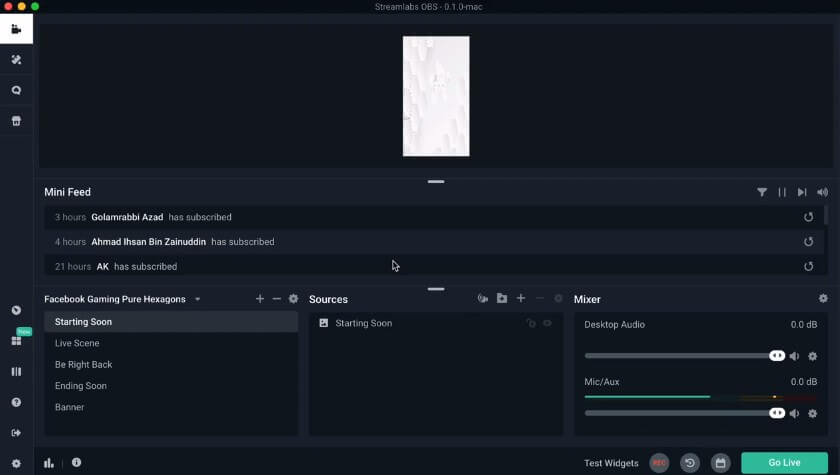
The streaming space has to be put in order according to the user’s taste and OBS StreamLabs Mac gives a plethora of choices. For the theme alone, there are about 250 beautiful hand-crafted options still subject to modifications. In fact, Prime offers more for $12 each.В
В 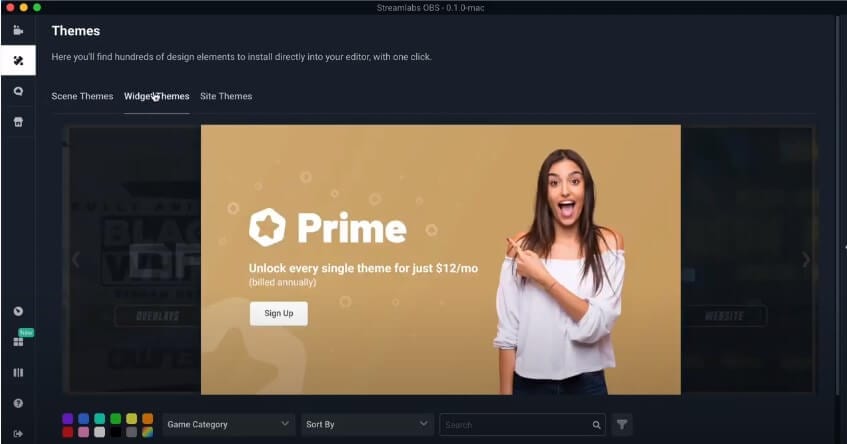
Sources for streaming are in their numbers too. It could be game capture, window capture, display capture, and a host of others. This enables streamers to cover almost anything they wish to share on OBS Streamlabs Mac. Quite intriguing are the alert boxes.В
В 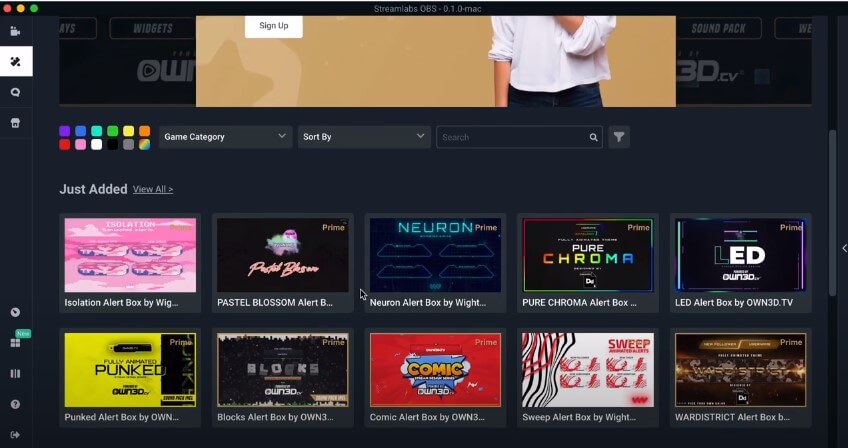
They are present in different shapes and forms to organize donation entries, follows, and subscriptions in real-time. Some other characteristics are the Mini Feed, Theme Library, and the Cloudbot that offers chat protection against tampering from the audience.В
Plug-ins are good accompaniments for streaming likewise, music for one.
Conclusion
A creation that considers streamers, OBS Streamlabs Mac gives streams visual appeal and makes them attract engagements. Name a streaming app; it is compatible with whichever one.
Versatility and a user-friendly interface are the major fronts for the OBS Streamlabs Mac. What else? It is easy to use, free for download and requires little or no foreknowledge. In the case of getting used to the app, the learning is speedy so that users can get to work quickly.
To achieve even better video quality, try an editor like FilmoraX. It requires no professional handling to transform your streams and make them inviting.
Источник


