- Сброс пароля IPMI у Supermicro Печать
- Reset Supermicro IPMI Password to Default – Physical Access – ipmicfg
- Update 2020: Default Passwords Changed
- Test Configuration
- How to Reset Supermicro IPMI Username and Password to Default
- Supermicro reset ipmi password – How we do it
- How to reset Supermicro IPMI password
- From web interface
- From Windows servers
- From Linux servers
- Having physical access to server
- Conclusion
- Related posts:
- PREVENT YOUR SERVER FROM CRASHING!
Сброс пароля IPMI у Supermicro Печать
Проблема: недоступен веб интерфейс IPMI , но сервер продолжает работать как ни в чем не бывало без ошибок и зависаний. Самая частая проблема, которая может наблюдаться на многих платформах.
Зачастую можно столкнутся с ситуацией, при которой Вы утеряли свой пароль от IPMI. Это вполне нормальное явление и в данной статье мы рассмотрим, как вы можете самостоятельно задать новый пароль своему IPMI интерфейсу. Для этого пройдите пошаговую инструкцию.
У Supermicro имеется ряд утилит, которые помогут Вам в работе с серверами данной компании. Одна из них называется «IPMICFG» . Данная утилита поможет Вам выполнить сброс всех настроек на заводские. Если Вы не хотите менять настройки сервера, то она так же поможет изменить пароль на новый, чтобы вы могли войти в веб интерфейс или через программу IPMIView (подробное описание использования программы найдете в нашей базе данных — https://my.fairyhosting.com/knowledgebase.php?action=displayarticle&id=106 ). Утилита позволит Вам вносить изменения в: настройки работы контроллера,изменить параметры сети, режим работы вентиляторов, список пользователей и их роли и т. д. Данный способ выполнен благодаря платформе DOS. Почему DOS? Данный пример самый простой и быстрый способ, для достижения результата. К тому же он очень подходит, если у Вас нету доступа к ОС.
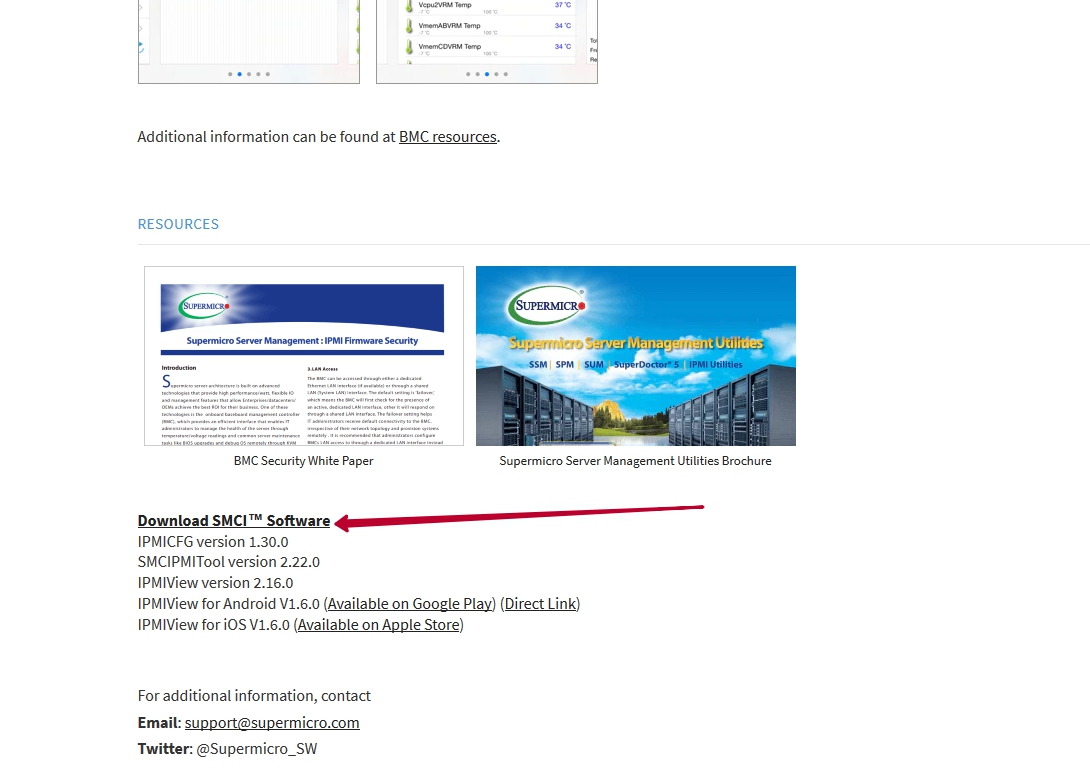
Данная программа доступна для скачивания на официальном сайте Supermicro. Для скачивания пройдите по ссылке здесь. — https://www.supermicro.com/en/solutions/management-software/ipmi-utilities#SMCIPMITool
Нажмите на ссылку « Download SMCI™ Software » для скачивания установочной программы.
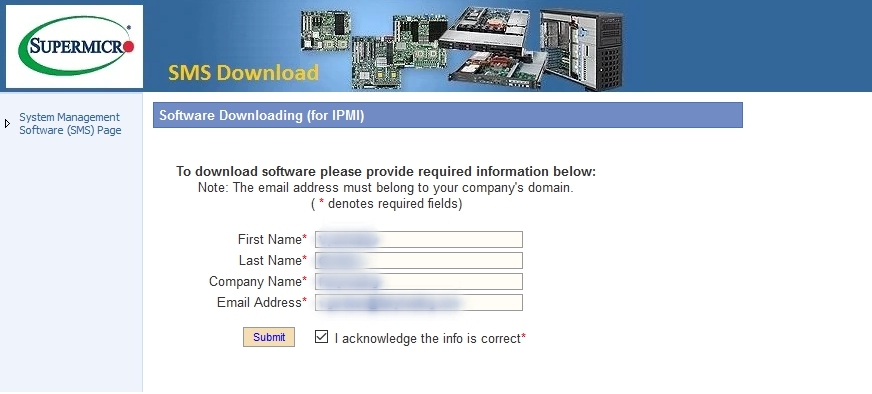
Для получения файла скачки программы необходимо заполнить стандартную форму, которую предполагает Supermicro – Имя и Фамилия, Имя компании, адрес электронной почты. (Любые данные)
Далее будет предоставлен список программ, которые Вы можете скачать для операционных систем Windows/Linux. Напротив программы IPMICFG нажмите кнопку для принятия условий пользования «Accepr EULA»
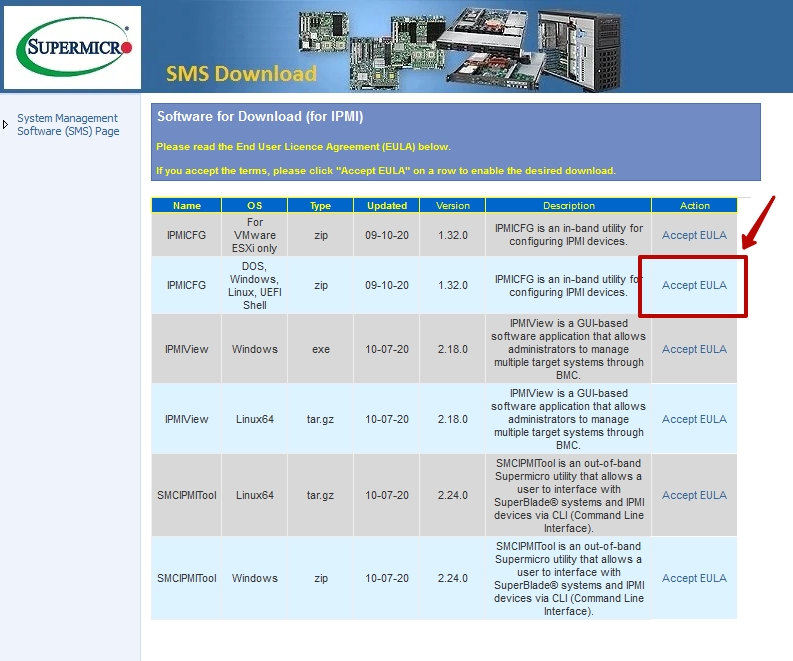
После того, как Вы примите условия, нажмите ещё раз для скачивания файла на Ваш компьютер.

Разархивировав скаченный архив, Вы увидите папку «IPMICFG_1.32.0_build.200910». Там найдете PDF инструкцию, по использованию утилиты и 3 других папки «DOS, Linux, Windows». В нашем примере пригодится только папка « DOS ». Отложите её, она нам далее понадобится.
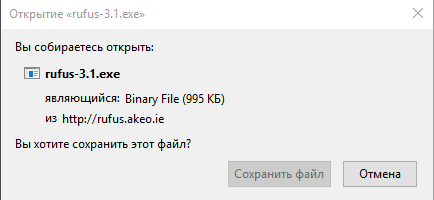
Итак, первым делом необходимо создать загрузочную флешку DOS с помощью программы Rufus. Скачайте бесплатную программу с официального сайта — http://rufus.akeo.ie/ 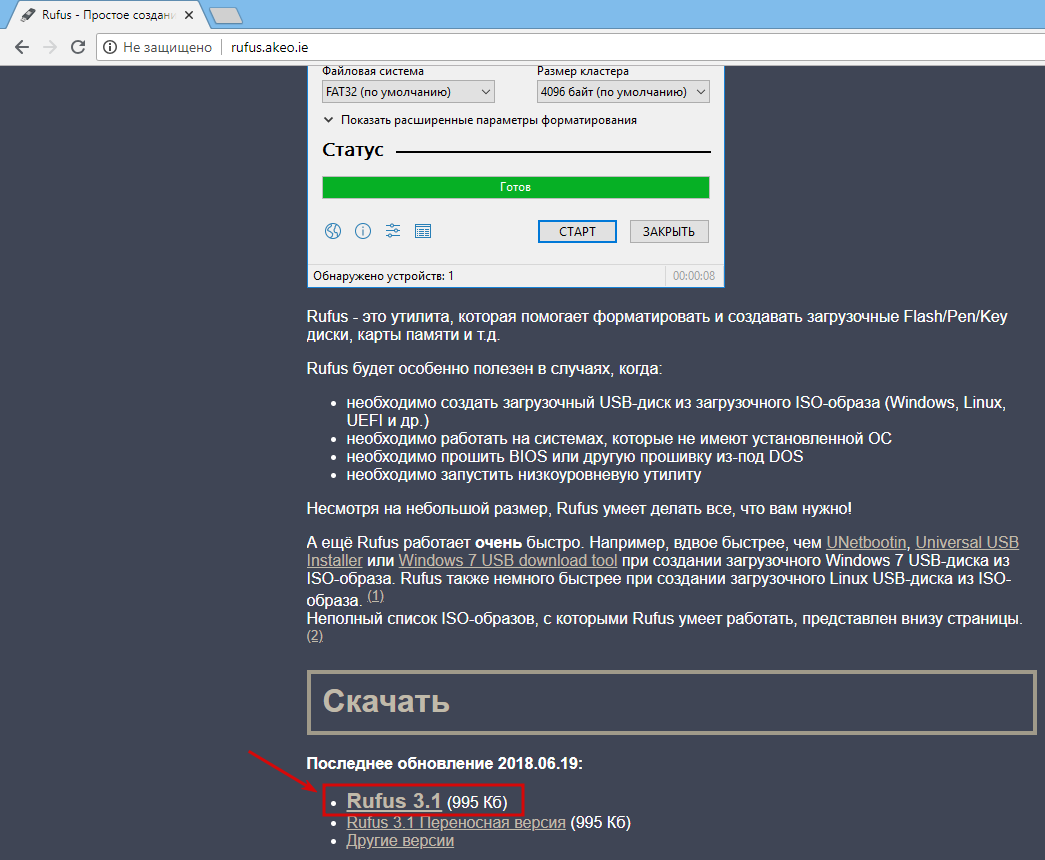
Программа не требует установки и готова сразу к использованию.
В поле DEVICE выберите USB накопитель, который нужно сделать загрузочным.
Внимание! Все файлы с флешки будут удалены, имейте это ввиду!
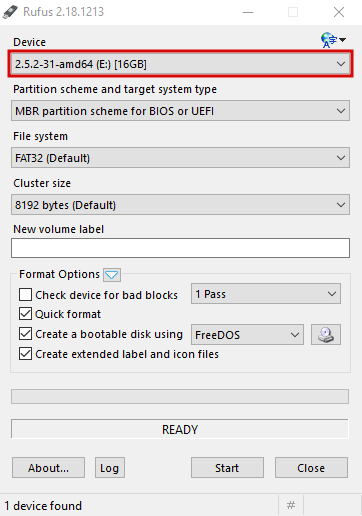
В поле FILE SYSTEM укажите FAT32.

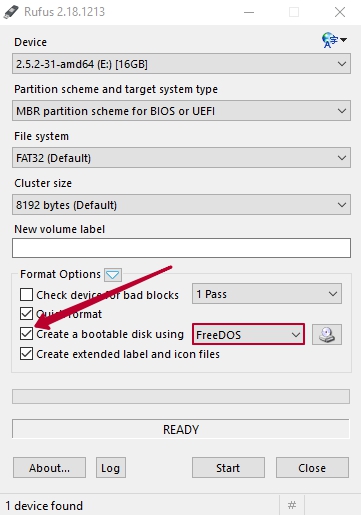
Напротив галочки «Create a bootable disk using» укажите FreeDOS.
Остальные поля трогать не нужно. Нажмите «START». Процесс создания загрузочного USB не займет у Вас больше нескольких секунд.
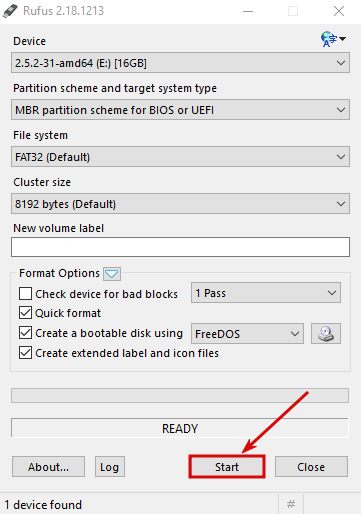
После этого появится надпись « READY ». После этого откройте USB на вашем компьютере и поместите туда, скаченную ранее папку «DOS». Теперь Вы можете загрузится с данной флешки, установив загрузку с неё в BIOS.
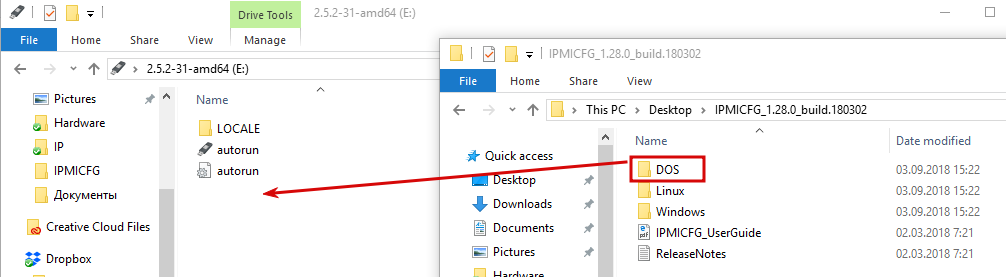
Теперь у нас имеется всё, чтобы поменять пароль на нужный нам. Для этого загружаемся с флешки и переходим в каталог «DOS», в котором и находится наша утилита.
Для этого необходимо выполнить команду: cd DOS

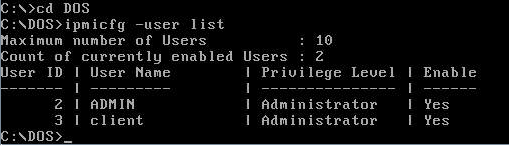
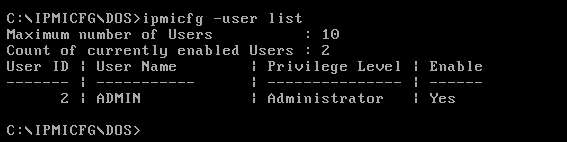
Выполняем команду: ipmicfg -user list
Видим в списке пользователей ADMIN и client. Из примера, у пользователя ADMIN ID =2, а уровень доступа Администратор. У пользователя client ID=3 и уровень доступа Администратор тоже.
Смена пароля выполняется командой: ipmicfg – user setpwd 2 ADMIN (где «2» ID пользователя, «ADMIN» — новый пароль ).
Если все получится, то вы увидите надпись «DONE».

На этом сброс пароля завершен, можете пользоваться IPMI. Не забудьте поменять пароль на новый (Configuration->Users-> выбор пользователя ->Modify User->Change Password->Modify).
В случае с Windows OS
Для пользователей Windows, при наличии доступа к операционной системе, имеется возможность установить утилиту . Она позволяет изменить пароль администратора, сетевые настройки и полностью сбросить основные настройки на заводские.
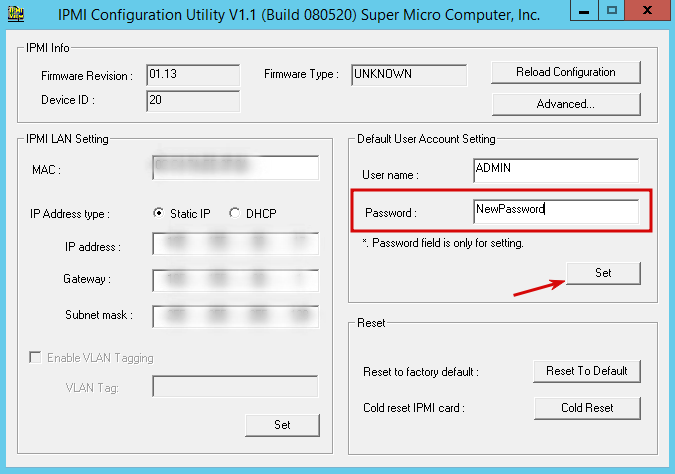
Данную программу легко найти, введя в поле для поиска слово «IPMI»
Источник
Reset Supermicro IPMI Password to Default – Physical Access – ipmicfg
Generally speaking, the default username and password for Supermicro IPMI is ADMIN / ADMIN. Since Supermicro platforms are plentiful, it is best practice to change the default, especially if you are going to colo the server. All too often, the server runs in the field fine for a year or two, then comes the need to perform some maintenance. When the time comes, it is easy to have forgotten the username and password. This just happens. In fact, I had a machine at home that had a 643 day uptime (Supermicro X8ST3-F if you were wondering) that I recently had to log into. I could not remember the password for the life of me. This guide will show you how to use ipmicfg to reset a lost password. The guide does assume you have physical access to the machine. I will do another guide shortly on how to reset the IPMI password under Linux and Windows. Bookmark this page, you never know when you will need it.
Update 2020: Default Passwords Changed
As a quick note here, due to SB327, the Supermicro default password is no longer “ADMIN”. Instead, it is now a randomized unique password. You can read more about this in: Why Your Favorite Default Passwords Are Changing. Check out the video here if you want to learn about why as you go through the procedure in this piece:
Ipmicfg is still a tool we recommend to change the ADMIN password over ipmitool. You can also use Supemicro SUM and the python scripts we mention in the above piece. Below, you can find the ipmicfg version we reference which still works.
Test Configuration
For this guide, I am using the new SSD test configuration.
For those wondering, I utilized a USB DVD drive and my LiveCD that was updated with IPMIcfg and the new Supermicro X9DR7-LN4F BIOS for flashing.
How to Reset Supermicro IPMI Username and Password to Default
This guide will show how to use a DOS LiveCD or USB to modify IPMI users and reset the IPMI BMC to factory defaults. The first step is to get ipmicfg. Supermicro has a package that includes DOS, Windows and Linux versions. The current revision is 1.02.
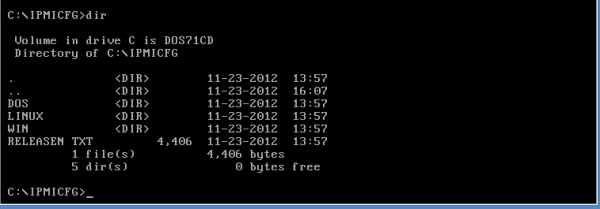 IPMIcfg dir listing
Since we have physical access to this machine, we are using a DOS LiveCD to do the IPMI Password reset.
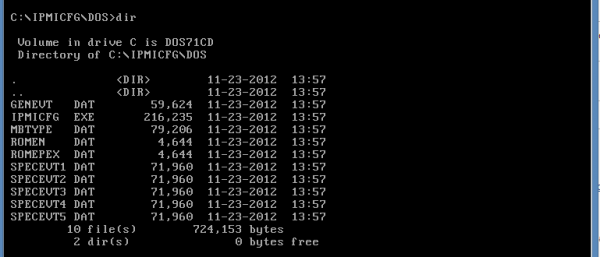 IPMIcfg DOS dir listing
The IPMICFG.EXE that one can see above is the tool that we will use. One of the first things that you should do is make sure you get the IPMI IP address and MAC address. Use ipmicfg -m to get this information. It may be a good idea to write this down.
 IPMIcfg show ip address and MAC
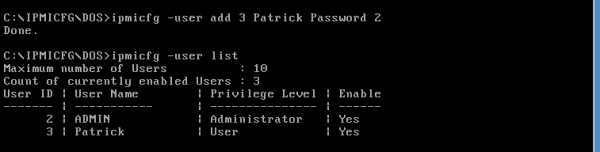
One of the most useful tools is just creating a new user. During this process, you need three pieces of information:
- User Number
- User Name
- Password
- Privileges
The next thing I will generally do is create a new user. The below creates a user with the username Patrick and the password Password. The user is created in the third spot. User 1 is anonymous and user 2 is ADMIN if that is still active. As will be obvious, it is easy to create a user with an IPMI password that you can use to login.
 IPMIcfg DOS add a user at the user level
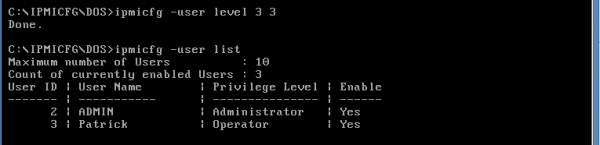
One thing you may want to consider is making an operator user. Using ipmicfg -user level 3 3 we can turn Patrick (user 3) into an operator (privilege level 3) in that order.
 IPMIcfg DOS add a user at the operator level
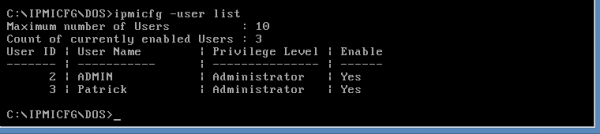
If this does not work, you can use ipmicfg -user level 3 4 and then see Patrick changed to an Administrator.
 IPMIcfg DOS add a user at the administrator level
All that is well and good, but there is a way to reset the unit to factory defaults, thereby resetting the IPMI password and user to ADMIN / ADMIN. Use ipmicfg -fd and in a few seconds, the BMC will restart. It should be noted, while you are restoring to factory defaults, you will not be able to use other commands.
 IPMIcfg reset to factory defaults and default IPMI password
As you can see, the Patrick user we created is no longer there. The factory default username and password have been re-enabled.
 IPMIcfg user results after reset
Hopefully, that quick guide helps those who have a Supermicro server or motherboard with IPMI that they are locked out of. The total process takes a few minutes at most.
Источник
Supermicro reset ipmi password – How we do it
by Adarsh M | Dec 6, 2019
Are you trying to reset Supermicro IPMI password?
IPMI provides remote access to multiple users at different locations for networking. The default username and password are ADMIN / ADMIN.
At Bobcares, we get requests to reset the IPMI password as a part of our Server Management Services.
Today, let’s have a look at how our Support Engineers reset the IPMI password.
How to reset Supermicro IPMI password
Let’s discuss how our Support Engineers reset the password using different methods.
From web interface
Recently one of our customers contacted us to change the default admin password. Let’s see how our Support Engineers reset the password from the web interface.
The password can be reset from the panel only if we know the password.
1. First, we login to the web console using the administrator account.
2. In the menu layout, we select Configuration. Then select the Users menu.
3. Now we select the ADMIN user then we select the Modify User button.
4. In Modify User, we tick the checkbox Change Password.

5. Now we enter the password twice.
6. Finally, click on modify. A success confirmation prompt pops up.
From Windows servers
We can also reset the IPMI password from the Windows server. Initially, we login to the server.
1. First, we download the IPMI Configuration utility. We download it based on the OS architecture.
2. Now we unzip the downloaded file. Next, we open command prompt as administrator. Then move to the directory.
3. We reset to the default password using the command,
Since factory reset is done. We assign the IP address, Subnet Mask and gateway. We turn DHCP off if we are going to use a static IP. Else we leave DHCP ON. We use the below commands.
4. Now we will be able to log in via default username and password. Now we change the password from the panel or leave as default.
From Linux servers
To reset the password for Linux servers we download the ipmitool. For that, we use the command.
Then we use the below command to reset the admin password.
We replace NEW_PASSWORD with the required password.
Thus we reset the password.
Having physical access to server
We provide the below steps to our customers if they have physical access to the server.
1. Initially, download the latest IPMICFG utility released by Supermicro.
2. Then, copy the extracted contents to the server.
3. Open a command window as an administrator.
4. Change directory to the ipmicfg-win.exe appropriate for your architecture (32-bit or 64-bit)
5. Get the user ID of the IPMI user whose password you want to set:
6. Set a new password for that user:
Login to the IPMI web GUI using the password you just set.
[Need any assistance in resetting Supermicro IPMI password?- We’ll help you]
Conclusion
In short, we’ve discussed how our Support Engineers change the IPMI password from Linux and Windows server. Also, we’ve discussed how we change the password from the web interface and from the physical server.
Related posts:
PREVENT YOUR SERVER FROM CRASHING!
Never again lose customers to poor server speed! Let us help you.
Our server experts will monitor & maintain your server 24/7 so that it remains lightning fast and secure.
Источник


