- Suse linux install packages
- Suse linux install packages
- Suse linux install packages
- 20.1 Definition of Terms #Edit source
- 20.2 Registering an Installed System #Edit source
- 20.2.1 Registering with YaST #Edit source
- 20.2.2 Registering with SUSEConnect #Edit source
- 20.3 Using the YaST Software Manager #Edit source
- 20.3.1 Views for Searching Packages or Patterns #Edit source
- 20.3.2 Installing and Removing Packages or Patterns #Edit source
- 20.3.3 Updating Packages #Edit source
- 20.3.4 Package Dependencies #Edit source
Suse linux install packages
Установка программного обеспечения обычно не вызывает никаких проблем в openSUSE. Имеется менеджер пакетов, позволяющий легко устанавливать и удалять пакеты. Это похоже на магазины прикладных программ для современных смартфонов.
Просто откройте «Управление программным обеспечением» в YaST.

Ваш браузер не поддерживает видеоэлемент HTML5 и/или формат Ogg Theora.
Воспользуйтесь Firefox, Konqueror или Opera.
Произведите поиск требуемого пакета, выберите его для установки и нажмите «Принять». После этого менеджер пакетов получит RPM-пакет из настроенных репозиториев и установит его, включая зависимости. По завершении установки программа появится в меню запуска (если только она не предназначена для командной строки).
 | Доступность пакетов программного обеспечения в менеджере пакетов зависит от настроенных репозиториев программного обеспечения. См. следующий раздел о репозиториях программного обеспечения. |
На сайтах, связанных с openSUSE, нередко можно увидеть кнопки, похожие на вот эту:

Установка в один клик (или «прямая установка») — это просто автоматический процесс добавления одного или нескольких репозиториев программного обеспечения и установки одного или нескольких RPM-пакетов. Поэтому при установке в один клик следует соблюдать осторожность, как и при ручном добавлении неофициальных репозиториев (см. следующий раздел о репозиториях программного обеспечения).
Большинству пользователей будет достаточно того, что предоставляет менеджер пакетов, особенно если добавить пару дополнительных репозиториев программного обеспечения (см. следующий раздел). Но не все программы предоставляются в виде пакетов через репозитории, а несвободное программное обеспечение, как правило, нельзя легально распространять через менеджер пакетов из-за лицензионных ограничений.
В подобных случаях необходимо обращаться к сайту разработчика/поставщика и скачивать и устанавливать программное обеспечение вручную, но обязательно сначала следует поискать пакет в репозиториях openSUSE и скачивать и устанавливать программное обеспечение только из надёжных источников.
 | Устанавливайте только те RPM-файлы, которые собраны для вашей конкретной версии openSUSE. |
Архив может содержать выполняемые двоичные файлы, а может содержать исходный код, требующий компиляции для запуска на вашей системе, что может быть довольно сложным и потребовать установку инструментов разработчика. Не существует одного стандартного способа установки содержимого tar-архива, но инструкции всегда можно найти в файлах с названиями INSTALL, README и т .п. или на сайте, откуда скачан tar-архив.
При желании устанавливать и удалять пакеты можно через терминал.
Команда для поиска пакета: zypper search [слово поиска]. Пример:
Вы можете легко получить много полезной информации об установленных пакетах из базы данных RPM.
Источник
Suse linux install packages
Software installation is generally incredibly easy on openSUSE. There’s a package manager, which lets you install and remove packages very easily — it’s comparable to the app stores found on many modern smart phones.
Simply open YaST Software Management.
Your web browser does not support the HTML5 video element and/or Ogg Theora format.
Try Firefox, Konqueror or Opera.
Now search for the package you want, select it for installation and click Accept. The package manager will then fetch the RPM package from your configured software repositories — and install it including any dependencies. After installation is complete the application should appear in the launch menu (unless it’s a command line program).
 | The availability of software packages in the package manager depends on the configured software repositories. Read about software repositories in the next chapter. |
When browsing openSUSE related websites, you’re likely to come across buttons such as this one:

1-click installation (also referred to as «Direct Install») simply automates the process of adding one or more software repositories to the package manager and installing one or more RPM packages. Therefore 1-click installation should be used with the same care as manually adding unofficial repositories (see the next chapter for more on software repositories).
Most users will find everything they need and more in the package manager — especially if a few additional software repositories are added (see next chapter). But not all software is packaged and provided via repositories, and non-free software usually can’t be legally redistributed via the package manager because of license restrictions.
In these cases you’ll need to go to the developer/vendor website and download and install the software manually — but always look for an openSUSE package in repositories first — and make sure you only download and install software from trusted sources.
 | Only install RPM files that are built specifically for (your version of) openSUSE. |
The tarball might contain binaries that just need to be run, or it might contain source code which needs to be compiled to run on your system — this can be very complicated, and requires you to first install various developer tools. There’s no one standard way to install tarball content, but instructions should always be included in the tarball in files called INSTALL, README or similar — or you should be able to find installation instructions on the website where you downloaded the tarball.
If you wish, you can install and remove packages via a terminal too.
To search for a package run zypper search [search term]. Example:
You can get a lot of useful information about installed packages from the RPM database very easily.
Источник
Suse linux install packages
Use YaST’s software management module to search for software components you want to add or remove. YaST resolves all dependencies for you. To install packages not shipped with the installation media, add software repositories to your setup and let YaST manage them. Keep your system up-to-date by managing software updates with the update applet.
Change the software collection of your system with the YaST Software Manager. This YaST module is available in two flavors: a graphical variant for X Window and a text-based variant to be used on the command line. The graphical flavor is described here—for details on the text-based YaST, see Chapter 5, YaST in Text Mode.
Note: Confirmation and Review of Changes
When installing, updating or removing packages, any changes in the Software Manager are only applied after clicking Accept or Apply . YaST maintains a list with all actions, allowing you to review and modify your changes before applying them to the system.
20.1 Definition of Terms #Edit source
The following terms are important for understanding installing and removing software in SUSE Linux Enterprise Server .
A local or remote directory containing packages, plus additional information about these packages (package metadata).
(Repository) Alias/Repository Name
A short name for a repository (called Alias within Zypper and Repository Name within YaST). It can be chosen by the user when adding a repository and must be unique.
Repository Description Files
Each repository provides files describing content of the repository (package names, versions, etc.). These repository description files are downloaded to a local cache that is used by YaST.
Represents a whole product, for example SUSEВ® Linux Enterprise Server .
A pattern is an installable group of packages dedicated to a certain purpose. For example, the Laptop pattern contains all packages that are needed in a mobile computing environment. Patterns define package dependencies (such as required or recommended packages) and come with a preselection of packages marked for installation. This ensures that the most important packages needed for a certain purpose are available on your system after installation of the pattern. If necessary, you can manually select or deselect packages within a pattern.
A package is a compressed file in rpm format that contains the files for a particular program.
A patch consists of one or more packages and may be applied by means of delta RPMs. It may also introduce dependencies to packages that are not installed yet.
A generic term for product, pattern, package or patch. The most commonly used type of resolvable is a package or a patch.
A delta RPM consists only of the binary diff between two defined versions of a package, and therefore has the smallest download size. Before being installed, the full RPM package is rebuilt on the local machine.
Certain packages are dependent on other packages, such as shared libraries. In other terms, a package may require other packages—if the required packages are not available, the package cannot be installed. In addition to dependencies (package requirements) that must be fulfilled, some packages recommend other packages. These recommended packages are only installed if they are actually available, otherwise they are ignored and the package recommending them is installed nevertheless.
20.2 Registering an Installed System #Edit source
If you skipped registration during installation or want to re-register your system, you can register the system at any time. Use the YaST module Product Registration or the command line tool SUSEConnect .
20.2.1 Registering with YaST #Edit source
To register the system, start YaST and switch to Software , then Product Registration .
By default the system is registered with the SUSE Customer Center. If your organization provides local registration servers, you can either choose one from the list of auto-detected servers or provide the URL manually.
20.2.2 Registering with SUSEConnect #Edit source
To register from the command line, use the command
Replace REGISTRATION_CODE with the registration code you received with your copy of SUSE Linux Enterprise Server. Replace EMAIL_ADDRESS with the e-mail address associated with the SUSE account you or your organization uses to manage subscriptions.
To register with a local registration server, also provide the URL to the server:
20.3 Using the YaST Software Manager #Edit source
Start the software manager from the YaST Control Center by choosing Software  › Software Management .

20.3.1 Views for Searching Packages or Patterns #Edit source
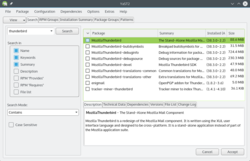
The YaST software manager can install packages or patterns from all currently enabled repositories. It offers different views and filters to make it easier to find the software you are searching for. The Search view is the default view of the window. To change view, click View and select one of the following entries from the drop-down box. The selected view opens in a new tab.
Lists all patterns available for installation on your system.
Lists all packages sorted by groups such as Graphics , Programming , or Security .
A filter to list all packages needed to add a new system language.
A filter to list packages by repository. To select more than one repository, hold the Ctrl key while clicking repository names. The “ pseudo repository ” @System lists all packages currently installed.
Shows which packages belong to a certain module or extension. Select an entry (for example, Basesystem or High Availability ) to display a list of packages that belong to this module or extension.
Lets you search for a package according to certain criteria. Enter a search term and press Enter . Refine your search by specifying where to Search In and by changing the Search Mode . For example, if you do not know the package name but only the name of the application that you are searching for, try including the package Description in the search process.
If you have already selected packages for installation, update or removal, this view shows the changes that will be applied to your system when you click Accept . To filter for packages with a certain status in this view, activate or deactivate the respective check boxes. Press Shift – F1 for details on the status flags.
Tip: Finding Packages Not Belonging to an Active Repository
To list all packages that do not belong to an active repository, choose View  › Repositories  › @System and then choose Secondary Filter  › Unmaintained Packages . This is useful, for example, if you have deleted a repository and want to make sure no packages from that repository remain installed.
20.3.2 Installing and Removing Packages or Patterns #Edit source
Certain packages are dependent on other packages, such as shared libraries. On the other hand, some packages cannot coexist with others on the system. If possible, YaST automatically resolves these dependencies or conflicts. If your choice results in a dependency conflict that cannot be automatically solved, you need to solve it manually as described in Section 20.3.4, “Package Dependencies”.
Note: Removal of Packages
When removing any packages, by default YaST only removes the selected packages. If you want YaST to also remove any other packages that become unneeded after removal of the specified package, select Options  › Cleanup when deleting packages from the main menu.
The packages found are listed in the right pane. To install a package or remove it, right-click it and choose Install or Delete . If the relevant option is not available, check the package status indicated by the symbol in front of the package name—press Shift – F1 for help.
Tip: Applying an Action to All Packages Listed
To apply an action to all packages listed in the right pane, go to the main menu and choose an action from Package  › All in This List .
To install a pattern, right-click the pattern name and choose Install .
It is not possible to remove a pattern. Instead, select the packages of a pattern you want to remove and mark them for removal.
To select more packages, repeat the steps mentioned above.
Before applying your changes, you can review or modify them by clicking View  › Installation Summary . By default, all packages that will change status, are listed.
To revert the status for a package, right-click the package and select one of the following entries: Keep if the package was scheduled to be deleted or updated, or Do Not Install if it was scheduled for installation. To abandon all changes and quit the Software Manager, click Cancel and Abandon .
When you are finished, click Accept to apply your changes.
In case YaST found dependencies on other packages, a list of packages that have additionally been chosen for installation, update or removal is presented. Click Continue to accept them.
After all selected packages are installed, updated or removed, the YaST Software Manager automatically terminates.
Note: Installing Source Packages
Installing source packages with YaST Software Manager is not possible at the moment. Use the command line tool zypper for this purpose. For more information, see Section 6.1.3.5, “Installing or Downloading Source Packages”.
20.3.3 Updating Packages #Edit source
Instead of updating individual packages, you can also update all installed packages or all packages from a certain repository. When mass updating packages, the following aspects are generally considered:
priorities of the repositories that provide the package,
architecture of the package (for example, AMD64/IntelВ 64),
version number of the package,
Which of the aspects has the highest importance for choosing the update candidates depends on the respective update option you choose.
To update all installed packages to the latest version, choose Package  › All Packages  › Update if Newer Version Available from the main menu.
All repositories are checked for possible update candidates, using the following policy: YaST first tries to restrict the search to packages with the same architecture and vendor like the installed one. If the search is positive, the “ best ” update candidate from those is selected according to the process below. However, if no comparable package of the same vendor can be found, the search is expanded to all packages with the same architecture. If still no comparable package can be found, all packages are considered and the “ best ” update candidate is selected according to the following criteria:
Repository priority: Prefer the package from the repository with the highest priority.
If more than one package results from this selection, choose the one with the “ best ” architecture (best choice: matching the architecture of the installed one).
If the resulting package has a higher version number than the installed one, the installed package will be updated and replaced with the selected update candidate.
This option tries to avoid changes in architecture and vendor for the installed packages, but under certain circumstances, they are tolerated.
Note: Update Unconditionally
If you choose Package  › All Packages  › Update Unconditionally instead, the same criteria apply but any candidate package found is installed unconditionally. Thus, choosing this option might actually lead to downgrading some packages.
To make sure that the packages for a mass update derive from a certain repository:
Choose the repository from which to update as described in Section 20.3.1, “Views for Searching Packages or Patterns” .
On the right hand side of the window, click Switch system packages to the versions in this repository . This explicitly allows YaST to change the package vendor when replacing the packages.
When you proceed with Accept , all installed packages will be replaced by packages deriving from this repository, if available. This may lead to changes in vendor and architecture and even to downgrading some packages.
To refrain from this, click Cancel switching system packages to the versions in this repository . Note that you can only cancel this until you click the Accept button.
Before applying your changes, you can review or modify them by clicking View  › Installation Summary . By default, all packages that will change status, are listed.
If all options are set according to your wishes, confirm your changes with Accept to start the mass update.
20.3.4 Package Dependencies #Edit source
Most packages are dependent on other packages. If a package, for example, uses a shared library, it is dependent on the package providing this library. On the other hand, some packages cannot coexist, causing a conflict (for example, you can only install one mail transfer agent: sendmail or postfix). When installing or removing software, the Software Manager makes sure no dependencies or conflicts remain unsolved to ensure system integrity.
In case there exists only one solution to resolve a dependency or a conflict, it is resolved automatically. Multiple solutions always cause a conflict which needs to be resolved manually. If solving a conflict involves a vendor or architecture change, it also needs to be solved manually. When clicking Accept to apply any changes in the Software Manager, you get an overview of all actions triggered by the automatic resolver which you need to confirm.
By default, dependencies are automatically checked. A check is performed every time you change a package status (for example, by marking a package for installation or removal). This is generally useful, but can become exhausting when manually resolving a dependency conflict. To disable this function, go to the main menu and deactivate Dependencies  › Autocheck . Manually perform a dependency check with Dependencies  › Check Now . A consistency check is always performed when you confirm your selection with Accept .
To review a package’s dependencies, right-click it and choose Show Solver Information . A map showing the dependencies opens. Packages that are already installed are displayed in a green frame.
Note: Manually Solving Package Conflicts
Unless you are very experienced, follow the suggestions YaST makes when handling package conflicts, otherwise you may not be able to resolve them. Keep in mind that every change you make, potentially triggers other conflicts, so you can easily end up with a steadily increasing number of conflicts. In case this happens, Cancel the Software Manager, Abandon all your changes and start again.
Источник


