- Suse linux ��������� rpm
- SUSE Linux: Install RPM File And Packages
- Installing RPM In SLES
- Installing Binary Packages In SLES
- Install Packages Using TUI or GUI Tools In SLES
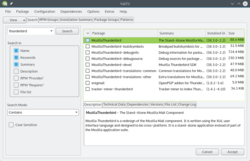
- Installing RPM Files Using KDE GUI
- ИТ База знаний
- Полезно
- Навигация
- Серверные решения
- Телефония
- Корпоративные сети
- RPM — установка и использование в Linux
- Установка
- Удаление
- Полезно?
- Почему?
- Introduction to RPM Packaging
- 1 What Is a Package #Edit source
- 1.1 Anatomy of a Package #Edit source
- 1.2 Installing Packages #Edit source
- 1.3 Dependency Matching #Edit source
- 1.4 Weak Dependencies #Edit source
- 2 Working with Packages #Edit source
- 2.1 Repositories #Edit source
- 2.1.1 Refreshing a Repository #Edit source
- 2.1.2 Services #Edit source
- 2.1.3 Repository sources #Edit source
- 2.2 Other Package Manager Operations #Edit source
- 2.3 Other Solvable Types (Products, Patterns, System) #Edit source
- 2.3.1 Patterns #Edit source
- 2.3.2 Products #Edit source
- 2.3.3 Patches #Edit source
- 2.3.4 System #Edit source
- 3 Creating packages #Edit source
- 3.1 Common Macros #Edit source
- 3.2 Sub-packages #Edit source
- 3.3 Building with rpmbuild #Edit source
- 3.4 Building in a Real Build Environment #Edit source
- 3.4.1 The Open Build Service #Edit source
- 3.4.2 Using the Open Build Service locally #Edit source
- 3.5 Improving the Package #Edit source
- 3.6 Changelogs #Edit source
- 4 Legal Notice #Edit source
- 5 GNU Free Documentation License #Edit source
Suse linux ��������� rpm
Установка программного обеспечения обычно не вызывает никаких проблем в openSUSE. Имеется менеджер пакетов, позволяющий легко устанавливать и удалять пакеты. Это похоже на магазины прикладных программ для современных смартфонов.
Просто откройте «Управление программным обеспечением» в YaST.
Ваш браузер не поддерживает видеоэлемент HTML5 и/или формат Ogg Theora.
Воспользуйтесь Firefox, Konqueror или Opera.
Произведите поиск требуемого пакета, выберите его для установки и нажмите «Принять». После этого менеджер пакетов получит RPM-пакет из настроенных репозиториев и установит его, включая зависимости. По завершении установки программа появится в меню запуска (если только она не предназначена для командной строки).
 | Доступность пакетов программного обеспечения в менеджере пакетов зависит от настроенных репозиториев программного обеспечения. См. следующий раздел о репозиториях программного обеспечения. |
На сайтах, связанных с openSUSE, нередко можно увидеть кнопки, похожие на вот эту:

Установка в один клик (или «прямая установка») — это просто автоматический процесс добавления одного или нескольких репозиториев программного обеспечения и установки одного или нескольких RPM-пакетов. Поэтому при установке в один клик следует соблюдать осторожность, как и при ручном добавлении неофициальных репозиториев (см. следующий раздел о репозиториях программного обеспечения).
Большинству пользователей будет достаточно того, что предоставляет менеджер пакетов, особенно если добавить пару дополнительных репозиториев программного обеспечения (см. следующий раздел). Но не все программы предоставляются в виде пакетов через репозитории, а несвободное программное обеспечение, как правило, нельзя легально распространять через менеджер пакетов из-за лицензионных ограничений.
В подобных случаях необходимо обращаться к сайту разработчика/поставщика и скачивать и устанавливать программное обеспечение вручную, но обязательно сначала следует поискать пакет в репозиториях openSUSE и скачивать и устанавливать программное обеспечение только из надёжных источников.
 | Устанавливайте только те RPM-файлы, которые собраны для вашей конкретной версии openSUSE. |
Архив может содержать выполняемые двоичные файлы, а может содержать исходный код, требующий компиляции для запуска на вашей системе, что может быть довольно сложным и потребовать установку инструментов разработчика. Не существует одного стандартного способа установки содержимого tar-архива, но инструкции всегда можно найти в файлах с названиями INSTALL, README и т .п. или на сайте, откуда скачан tar-архив.
При желании устанавливать и удалять пакеты можно через терминал.
Команда для поиска пакета: zypper search [слово поиска]. Пример:
Вы можете легко получить много полезной информации об установленных пакетах из базы данных RPM.
Источник
SUSE Linux: Install RPM File And Packages
S use Linux is similar to RPM based Linux distro such as RHEL but does not comes with yum command. How do I install a rpm file or packages such as Apache or PHP under Suse Enterprise / OpenSuse Linux?
You need to use YaST (Yet another Setup Tool), in the openSUSE or Suse Enterprise Linux distribution.
Installing RPM In SLES
Simply use the following syntax to install rpm file as root user:
rpm -ivh file.rpm
OR
yast2 -i file.rpm
Installing Binary Packages In SLES
The yum or up2date command can be used to install pakages from RHN or repos. The yast2 command can be used to install binary packages too as follows:
yast2 -i packageName
yast2 -i apache2
yast2 -i php5 php5-curl php5-fastcgi php5-gd php5-mysql php5-openssl php5-pear php5-zlib
Install Packages Using TUI or GUI Tools In SLES
Just type yast or yast2 comamnd to start yast in TUI (text based user interface over ssh session) or GUI mode:
yast2 -i
You can now select and install all supported packages. You can use the same system to remove or delete packages.
- No ads and tracking
- In-depth guides for developers and sysadmins at Opensourceflare✨
- Join my Patreon to support independent content creators and start reading latest guides:
- How to set up Redis sentinel cluster on Ubuntu or Debian Linux
- How To Set Up SSH Keys With YubiKey as two-factor authentication (U2F/FIDO2)
- How to set up Mariadb Galera cluster on Ubuntu or Debian Linux
- A podman tutorial for beginners – part I (run Linux containers without Docker and in daemonless mode)
- How to protect Linux against rogue USB devices using USBGuard
Join Patreon ➔
Installing RPM Files Using KDE GUI
You can install an RPM file in KDE. First, browse to where the RPM is located. Next, right-click the RPM file. From the menu, select ACTIONS, and then INSTALL WITH YAST. You need supply the root password.
Or you can just double click on the RPM file and it will allow you to install the same.
🐧 Get the latest tutorials on Linux, Open Source & DevOps via
Источник
ИТ База знаний
Курс по Asterisk
Полезно
— Узнать IP — адрес компьютера в интернете
— Онлайн генератор устойчивых паролей
— Онлайн калькулятор подсетей
— Калькулятор инсталляции IP — АТС Asterisk
— Руководство администратора FreePBX на русском языке
— Руководство администратора Cisco UCM/CME на русском языке
— Руководство администратора по Linux/Unix
Навигация
Серверные решения
Телефония
FreePBX и Asterisk
Настройка программных телефонов
Корпоративные сети
Протоколы и стандарты
RPM — установка и использование в Linux
Вам пакет нужен? Нет, я со своим.
RPM (Red Hat Package Manager) — это наиболее популярная утилита управления пакетами для Linux систем на базе Red Hat, таких как (RHEL, CentOS и Fedora). Она используется для установки, удаления, обновления, запроса и проверки пакетов программного обеспечения. Пакет состоит из архива файлов и информации о пакете, включая имя, версию и описание. Формат файлов также называется RPM.
Мини — курс по виртуализации
Знакомство с VMware vSphere 7 и технологией виртуализации в авторском мини — курсе от Михаила Якобсена

Есть несколько способов откуда можно взять пакеты RPM: CD/DVD с программным обеспечением, CentOS Mirror, RedHat (нужен аккаунт) или любые открытые сайты репозитория.
В RPM используется несколько основных режимов команд: Install (используется для установки любого пакета RPM), Remove (используется для удаления, стирания или деинсталляции пакета), Upgrade (используется для обновления существующего пакета), Query (используется для запроса пакета) и Verify (используется для проверки пакетов RPM).
Рассмотрим это на примере. У нас есть пакет, и теперь посмотрим, что мы можем с ним делать.
Установка
Как узнать информацию о пакете RPM без установки?
После того, как мы скачали пакет мы хотим узнать информацию о пакете перед установкой. Мы можем использовать -qipoption (запрос информации о пакете), чтобы вывести информацию о пакете.
Как установить RPM пакет?
Мы можем использовать параметр -ivh для установки определенного пакета, как показано ниже.
Как проверить установленный пакет RPM?
Мы можем использовать параметр -q с именем пакета, и он покажет, установлен ли пакет или нет.
Как вывести список всех файлов для определенного установленного пакета RPM?
Мы можем перечислить все файлы установленных пакетов rpm, используя опцию -ql с командой rpm.
Как вывести список недавно установленных пакетов RPM?
Мы можем использовать параметр -qa с параметром —last, в котором будут перечислены все недавно установленные пакеты rpm.
Как установить RPM пакет без зависимостей?
Мы можем использовать параметры -ivh с параметром —nodeps для проверки отсутствия зависимостей, чтобы установить конкретный пакет без зависимостей, как показано ниже.
Как заменить установленный пакет RPM?
Мы можем использовать параметры -ivh –replacepkgs для замены установленного пакета.
Удаление
Как удалить пакет RPM?
Мы можем использовать параметр -e для удаления определенного пакета, установленного без зависимостей. Обратите внимание, что удаление определенного пакета может нарушить работу других приложений.
Обновление
Как обновить установленный пакет RPM?
Для обновления пакета мы используем параметры -Uvh
Запрос
Как запросить все установленные пакеты?
Мы можем использовать параметры -a вместе с q для запроса всех установленных пакетов на сервере.
Как запросить конкретный пакет?
Мы можем использовать команду grep, чтобы узнать, установлен ли конкретный пакет или нет.
Как запросить файл, который принадлежит пакету RPM?
Чтобы узнать к какому пакету RPM относится файл /usr/lib64/libGeoIP.so.1.5.0. используем следующую команду.
Проверка
Как получить информацию для конкретного пакета?
Мы можем использовать параметры -i вместе с q, чтобы получить информацию для конкретного пакета, как показано ниже.
Как проверить RPM пакет?
Мы можем проверить пакет, сравнив информацию об установленных файлах пакета с базой данных rpm, используя опцию -Vp.
Как проверить все пакеты RPM?
Мы можем проверить все установленные пакеты rpm, используя опцию -Va
Онлайн курс по Linux
Мы собрали концентрат самых востребованных знаний, которые позволят тебе начать карьеру администратора Linux, расширить текущие знания и сделать уверенный шаг к DevOps

Полезно?
Почему?
😪 Мы тщательно прорабатываем каждый фидбек и отвечаем по итогам анализа. Напишите, пожалуйста, как мы сможем улучшить эту статью.
😍 Полезные IT – статьи от экспертов раз в неделю у вас в почте. Укажите свою дату рождения и мы не забудем поздравить вас.
Источник
Introduction to RPM Packaging
In general, a pre-built, open source application is called a package and bundles all the binary, data, and configuration files required to run the application. A package also includes all the steps required to deploy the application on a system, typically in the form of a script. The script might generate data, start and stop system services, or manipulate files and directories. A script might also perform operations to upgrade existing software to a new version.
Because each operating system has its idiosyncrasies, a package is typically tailored to a specific system. Moreover, each operating system provides its own package manager , a special utility to add and remove packages from the system. SUSE-based systems – openSUSE and SUSE Linux Enterprise — use the RPM Package Manager. The package manager precludes partial and faulty installations and “ uninstalls ” by adding and removing the files in a package atomically. The package manager also maintains a manifest of all packages installed on the system and can validate the existence of prerequisites and co-requisites beforehand.
This document describes in detail how to create an RPM package on SUSE-based systems.
1 What Is a Package #Edit source
A package is a way of distributing software on Linux systems. A single application is distributed as one or more packages. Usually the main package contains the program, and in addition some optional or secondary packages.
On some platforms, applications are self-contained into a directory. This means installing an application is simply adding a directory, and uninstalling the application is simply removing this directory.
Linux systems tend to share as much as components as possible. Partly this is the case because of some advantages of this philosophy. But mainly it happens because of the fact that in the Linux ecosystem, the whole universe is built by the same entity, except for a few 3rd party applications. This makes it easy to assume that a library is available for all applications to consume.
In a MacOS system, only the core comes from a single vendor, and all applications are provided by third party suppliers. It is therefore harder to make assumptions, and they tend to ship their own version of any depending component, with the exception of everything being documented as the “ platform ” .
1.1 Anatomy of a Package #Edit source
As an example, we start with a well-known UNIX tool: rsync.
A package is an archive file:
This archive file contains all files related to the application:
Additionally, it contains some extra metadata. This metadata should include but it is not limited to:
As an example, the metadata for rsync look as follows:
To get a list of additional packages which the respective package requires to be installed to work, use the command Requires as shown below:
As an example, a package may need a library, or an executable that is called during runtime.
To get a list of information the respective package provides for other packages to work, use the command Provides as shown below:
1.2 Installing Packages #Edit source
When a package is installed, the content (or list of files) is placed on the system at the location of each file path relative to the root ( / ) directory.
Additionally, the metadata of the package (and the fact that it is installed) is recorded in a system-wide database located in /var/lib/rpm . This is managed by the rpm tool, the utility that manages packages at the lowest level.
Packages can be installed with the rpm tools:
When you do this, you can perform the same queries without specifying the -p option and using what is called the NVRA (name-version-release-architecture, rsync-3.1.2-1.5.x86_64 ) or a subset of it, for example, just the name ( rsync ).
The rpm tool will not help you if the dependencies of the package are not met at installation time. It will then refuse to install the package to avoid having the system in an inconsistent state.
Features like automatically finding the required packages and retrieving them, are implemented in higher-level tools like zypper .
1.3 Dependency Matching #Edit source
The section Section 1.1, “Anatomy of a Package” explains that a package contains a list of Requires and Provides . Those are not package names, but arbitrary symbols. A package can require or provide any string of text.
The main rule is that each package provides its own name. This means the rsync package Provides: rsync .
You have also learned that rsync requires /bin/sh . While this looks like a file name, in our context it is an arbitrary symbol and the meaning is given by the whole distribution. The reason why it does not require a package named sh instead is that it provides a layer of indirection that makes the system cohesive.
/bin/sh is a capability provided by the bash package. This allows rsync to depend on any shell implementation as long as it provides that symbol.
The distribution build system will scan all executables a package installs in a system and inject automatically those Provides . The packager does not need to take care of them.
The same is done with libraries. As an example, rsync does not depend on the glibc package. When glibc was built, the build system scanned the content, found /lib64/libc.so.6 and injected a Provides: libc.so.6()(64bit) into the glibc metadata. In the case of shared libraries it is not so important where they are located, because the linker configuration takes care of that. When the rsync package was built ( glibc needed to be installed at that point to build it), the build system scanned the executable /usr/lib/rsync and realized it was linked against libc.so.6 :
Therefore, it injected Requires: libc.so.6()(64bit) to the rsync package.
Now compare it to other packaging systems. The package musicplayer requires libsound . /usr/bin/musicplayer links to /usr/lib64/libsound.so.5 . At a later point in time, musicplayer is rebuilt against a newer libsound , which is not published. The user installs musicplayer without any issue because it only Requires: libsound (as in the package name). However, when the user tries to run it, he or she gets the following message:
The layer of indirection of automatically injected dependencies prevents this manual work from keeping dependencies in synchronization. Packages only provide what they really carry (because provides are injected by advanced scanners). Packages only require what they really need (because requires are injected by scanning executables, scripts for shebangs, etc.).
This allows rpm based distributions to use these conventions highly cohesive. It makes upgrades less problematic and the danger of breaking your system nearly non-existent. At the same time, the conventions and indirections between Provides and Requires allow for packages to depend on more abstract capabilities, instead of specific package names (which sometimes get renamed, split, obsoleted, etc). For example, you can be sure the vim package provides vi .
There are also other dependencies with more advances purposes: Conflicts , Obsoletes , etc. Their names let you easily understand what purposes they have.
1.4 Weak Dependencies #Edit source
Not everything is as strict as you might think. Sometimes a package works better if another package is present. Sometimes a package enhances the functionality of another package, however in neither case they are required. For this purpose, packages can have the following dependencies:
Recommends : a soft version of requires. If the recommended packages are not installed, the package will be installed anyway. Higher level tools however may pull automatically recommended packages based on user settings.
The reverse of this dependency is Supplements . For example a package spellchecker could Supplements an office-suite package.
Suggests and Enhances :the forward and backward version of Recommends and Supplements in a weaker version.
2 Working with Packages #Edit source
For daily system administration and maintenance, the rpm tool does not suffice. You will quickly fall into what is commonly called the “dependency hell”. This means you download packages manually to quickly satisfy a dependency, but then you realize the new package implicates another dependency.
This problem is taken care of by a tool that implements a solver. The solver considers:
The list of installed packages (and therefore all its dependencies)
The list of available packages
The user request ( “ install package foo ” , “ upgrade system ” )
The solver performs an operation that finds the best solution to a problem that has many solutions. Therefore “best” is defined by policies, user settings, the distribution itself, etc.
On SUSE systems, the solver is implemented by the libsolv/> project (see more at https://github.com/openSUSE/libsolv. This engine implements both a satisfiability algorithm and an efficient way to represent the problem in memory. Originally it was developed by Michael Schroeder at SUSE, but today it powers also other distribution package managers, such as Fedora’s dnf .
The rest of the package manager includes:
Handling of package repositories
Checking the integrity of packages
Fetching remote packages
Reading and honoring user/system policies
In SUSE systems, this functionality is implemented by the ZYpp (see https://en.opensuse.org/Portal:Libzypp)library, which also includes a command-line tool called zypper . While tools like YaST (see https://yast.github.io/) also interact with ZYpp , on the console you will likely interact with zypper . The command
will, unlike rpm, check what else your system is missing, retrieve it, and then install all the required packages in the right order. It will also warn you if another package conflicts with what you are installing, or if the operation has more than one solution, and ask you for your decision what to do.
But from where does the system “ retrieve other packages ” ?
2.1 Repositories #Edit source
zypper can install a package directly from an rpm file. If there is the need for installing dependencies or retrieving packages – for example when you upgrade a system — you will need a “library” of packages. This is what is called a repository. A repository is:
A collection of packages
A set of metadata files
The metadata is nothing more than the information present in the rpm file (Name, Description, Dependencies). The metadata allows the package manager to operate with the repository without having stored all rpm files locally. Every operation that is processed uses the given information of the package, and then the rpm files are retrieved on demand at installation time.
A system normally will have the following repositories:
The base repository, which contains all the distribution packages
Additional modules, add-on products or extensions
An update repository for each base product or extension
Running list repositories with -u will display the URI of the repository:
If you visit the URI, you will see:
a x86_64 directory containing all architecture-dependent packages (this means ones that contain executables, shared libraries, etc)
a noarch directory containing architecture-independent packages (this means ones containing data or scripts)
a repodata directory, containing the metadata for all packages
The metadata for this type of repositories consists in a repodata/repomd.xml file index, which is signed ( repomd.xml.asc ) using a key already present in the original system. repodata/repomd.xml refers to other metadata file with their checksums. The most important file is primary.xml which contains all package dependencies.
If you have a directory with rpm packages, you can create the metadata for them using the createrepo tool. After that you can serve that repository via HTTP.
If you have a directory with rpms you want to use as repository, you don’t need to add metadata. ZYpp allows to have a plain local directory as a repository, and will read the metadata directly from the rpm files into its cache.
2.1.1 Refreshing a Repository #Edit source
You can refresh a repository with the command
While the base repository of the distribution is normally immutable, repositories like the one containing updates often get new content. The purpose of refreshing a repository is to get the up-to-date version of the metadata locally, so that all operations (solving, retrieval) match the current content of the repository.
If a repository is out of date, it means the local metadata represents a previous version of the repository content. You could try to solve this and fetch packages, but those packages may not exists on the repository anymore, and you will get an error at retrieval time.
The list of repositories of the system is kept in /etc/zypp/repos.d . zypper provides most of repository operations in a safer way than trying to update these files manually.
During refresh, metadata is cached locally at /var/cache/zypp/raw and converted to an efficient format for solving operations in /var/cache/zypp/solv .
2.1.2 Services #Edit source
Services are a higher-level version of repositories. It is another index that lists repositories. When the system is subscribed to a service, refreshing the service will result in a new list of repositories, and the package manager will add new ones or remove obsolete ones.
Services are used for example on SUSE Linux Enterprise with the SUSE Customer Center (SCC). A customer is subscribed to a service provided by SCC using proper credentials. The customer, based on his or her entitlements, can “activate” a new product. SUSE Customer Center knows about those activations, and on service refresh, it will provide a new list of repositories that includes the new activated product.
Services can be installed remote (like SCC), or locally, via a plug-in, on the system. The package manager asks the plug-in for a list of repositories. It is up to the plug-in to build this list. This is normally used for integration with other systems. For example, the connectivity between zypper and Spacewalk respective SUSE Manager (see https://www.suse.com/products/suse-manager/ was originally implemented using a local plug-in.
2.1.3 Repository sources #Edit source
If you are using SUSE Linux Enterprise, your repositories will appear after the SUSEConnect tool registers your product against the SUSE Customer Center at https://scc.suse.com/login.
If you are using openSUSE, the default installation will set up the base and update the repositories. Additionally, there is a lot of content published by the community on the build service projects or via projects like packman packman (see http://packman.links2linux.org/.
SUSE Linux Enterprise users can take advantage of the community content via the Package Hub at https://packagehub.suse.com/.
2.2 Other Package Manager Operations #Edit source
You can use zypper lu to list updates, and zypper up to install them.
You can lock packages to avoid them being removed or pulled-in using zypper addlock or zypper removelock . You can also list active locks with zypper locks .
The distribution upgrade operation dup is used to do destructive upgrades. This means packages may be suggested for removal as dependencies like Obsoletes are taken into account. It is usually used to upgrade to major releases or to update rolling distributions like Tumbleweed (see https://en.opensuse.org/Portal:Tumbleweed. This command needs to be used with care.
2.3 Other Solvable Types (Products, Patterns, System) #Edit source
The package manager solver loads all available and installed packages and cares for solving the dependencies. However, there are other entities similar to packages that also have dependencies.
2.3.1 Patterns #Edit source
Patterns are used to install a collection of software in a comfortable way. For example you can install a working Laptop-oriented system with the command:
But where do patterns come from? They do not exists on their own. The package managers creates them dynamically from packages named patterns-XXXXXX which have a special set of dependencies. Installing a pattern would actually install the package representing that pattern. The other way around is true, if you install the package representing the pattern, it will make the system look like the pattern is installed.
reveals some detail behind patterns (equivalent to rpm -q —provides patterns-openSUSE-laptop ).
2.3.2 Products #Edit source
Similar to patterns, products can be queried with:
“ Product ” comes from a package called XXXXXX-release which has some special dependencies ( rpm -q —provides openSUSE-release ). The release package/product installs some information in /etc/products.d that is used by other tools get information about the base and add-on products installed.
2.3.3 Patches #Edit source
Patches are used for updates and described by the updateinfo.xml section of the metadata. They represent an entity that conflicts with older versions of one or more packages. Installing a patch does not install packages, but generates a conflict in the solver that ends with the affected version of packages being upgraded.
Patches also carry additional property, like the CVE (see https://cve.mitre.org/identifiers of the issues they fix or links to bug tracker incidents.
2.3.4 System #Edit source
During solving, there is one entity providing dependencies that is used to match locale and hardware information. If you have a Wi-Fi card, the package manager will dynamically read /sys/devices and make this entity have provides like:
A package providing a Wi-Fi driver for some cards (for example, wlan-kmp-default ), could have the following dependencies:
This results in the fact that, at solving time, if the hardware is present, the driver will be selected automatically.
Note: SUSE SolidDriver Program
This is one of the core features of the Kernel Module Packages (KMP) section of the SUSE SolidDriver Program (see https://drivers.suse.com/doc/SolidDriver/Kernel_Module_Packages.html. For more information about the SUSE SolidDriver Program and about KMP’s, check the article “ Using SLES and the SLE SDK to Build a Kernel Module Package (KMP) ” at https://www.suse.com/communities/blog/using-sles-and-the-sle-sdk-build-kernel-module-package-kmp/.
Something similar is done with translation packages and the current configured system locale.
Important: All Information Comes from the Installed Packages
Be aware that all those types mentioned (Patterns, Products, System) are only present at solving time. Actually your system consists only of packages, and all information comes from the installed packages. Every operation on patches, patterns and products result in a package operation. The purpose behind is to make the package manager compatible with the lower level rpm tool.
3 Creating packages #Edit source
When packages are created they provide a so called .spec file. A spec file defines the attributes of the package, explicit dependencies (others are injected as already mentioned), and how the content of the package is created. A very simple spec file would be:
This spec file creates a directory /usr/share/mypackage and puts a dummy CONTENT file in it.
spec files are heavily defined by macros that make sure that paths and values are specified by the distribution. Those macros are shipped by the base distribution and are located in /usr/lib/rpm and /etc/rpm . Other packages may contribute more macros. For example the macros defined in /usr/lib/rpm/golang-macros.rb are provided by the golang-packaging package and are useful to create packages that use the Go language.
3.1 Common Macros #Edit source
When building spec files, you should be familiar with macros like % , % , % , % , % , etc. You can evaluate a macro as follows:
3.2 Sub-packages #Edit source
Sometimes you will build multiple components from a single source that are independent of each other.
The sources for a package Office Suite may result in:
A Word Processor
For this, you can declare subpackages , independent description and attributes sections for each component. The build section is common to all subpackages, and then again in the %files section, you will declare which files go to each subpackage. In this example, the subpackages could be:
3.3 Building with rpmbuild #Edit source
You can build a package with the rpmbuild tool. It requires the spec file to be in a specific location. You can tweak the standard configuration to search spec files in the current directory:
You can configure it so that built packages are saved in /space/packages . Make the tweaks according to your own preferences.
When this is set up, enter the following command:
Now you can verify the content of the package:
Everything that you put into the % did end up as content of the package.
The term “ building a package ” can have two meanings. One is assembling the package from existing content. You could build your application in Jenkins, take the built artifacts and use the spec file to package it.
However, where rpm excels is that you can build the application in the spec file itself, and use the distribution and dependencies to set up the build environment.
A common use case to illustrate this is the typical Linux application built with configure && make && make install . In the next example you build a package for gqlplus (see http://gqlplus.sourceforge.net/, an alternative client for Oracle databases.
Provided that you have readline and ncurses development headers, you can build this application by unpacking the TAR archive and performing the commands mentioned above. Some programs require an extra step with autoconf to generate the configure script. This is specific to building software and has nothing to do with packaging.
When you do ./configure you need to pass the right —prefix . Macros can help here. You could use the command configure —prefix=% <_prefix>. However, there is a better macro called %configure which takes care and sets most of the configuration options (You can also try expanding it with echo $(rpm —eval ‘%configure’) ).
The package cannot build if some libraries are not present. A C compiler is there, but the basic build tools ( make ) are not available. That is what BuildRequires are for. They define what packages are needed for building — but not necessarily at runtime.
On the other hand, the original oracle-instantclient-sqlplus package is required at runtime, but you do not need it to build your package.
The Source0 section specifies a source that you can refer later using the %SOURCE0 or % macros. You can have more than one source ( Source1 , etc).
The prep section uses the %setup macro (see http://ftp.rpm.org/max-rpm/s1-rpm-inside-macros.html#S2-RPM-INSIDE-SETUP-MACROto unpack the sources. You could as well operate directly on the source files if you need to do something unconventional.
As we need make install to install the files inside % , we should call make install DESTDIR=%
The files section list the files rpmbuild should expect to find inside the % macro that will be the content of the package.
Note: Not Needed at Runtime
You do not need to add a runtime Requires to the readline and ncurses libraries. Because the executable is linked against the ones installed by the -devel packages, it will be scanned and the right Requires will be injected:
These symbols are provided by the right package, thus the solver will match them:
For more information on how to build packages for various types of software, visit the openSUSE Packaging Guidelines at https://en.opensuse.org/openSUSE:Packaging_guidelines.
3.4 Building in a Real Build Environment #Edit source
Building this way means the build environment is your system. If a package is available in BuildRequires , you will have to install it on your system first.
If the software you are building links against some library only if it is available, even if you do not mention it in your BuildRequires , if that library is present in your system, it will taint the build and make the command configure find it.
The following section outlines what to do if you want to build against only the packages that are in the build requirements.
3.4.1 The Open Build Service #Edit source
The Open Build Service at http://openbuildservice.org/ allows to build packages for multiple distributions and architectures. Visit the Materials section of the Web site (see http://openbuildservice.org/help/) for a deeper introduction. For the package you are building, you can get an account at the openSUSE Build Service instance. Go to your “ Home Project ” , and click “ Create New Package ” . Upload the spec file and sources.
After that you need to configure some target distributions for your home project. That can be one base distribution, or another project. This shows the power by allowing building based on layers that can override things from previous layers.
Add the most popular (open)SUSE distributions (latest Leap and Tumbleweed) and your package will be built automatically. A repository will be published automatically and made available for public consumption.
Every time the sources change, the package will be rebuilt. If you have more packages in the same project, those will be rebuilt in the right order, and re-published.

FigureВ 1: Open Build Service Overview of Packages #
The Open Build Service cannot only build packages, but also images from those packages. All SUSE products and the openSUSE distributions are built using the Open Build Service. Contributors submit new sources, and the Open Build Service takes care of assembling everything (and openQA later ensures that everything works).
3.4.2 Using the Open Build Service locally #Edit source
With the osc tool you can checkout packages from the Open Build Service, make changes to them and resubmit them.
The most interesting feature is the ability to build packages or images locally. osc allows you to build in an isolated environment (either a chroot jail [see https://en.wikipedia.org/wiki/Chroot] or a virtual machine) by setting up that environment automatically using the BuildRequires of the spec file. It also allows you to build against a different distribution than the one you are running.
3.5 Improving the Package #Edit source
When you build a package in the Open Build Service, you will find out that, in addition to the automated actions that inject dependencies, there are several checks being done to the package.
These checks are very detailed. But this is the only way to ensure quality and consistency when a product is assembled from thousands of sources by hundreds of contributors.
The spec-cleaner tool can help you keeping your spec file in shape:
For example, it can help you converting BuildRequires: foo-devel dependencies to BuildRequires: pkgconfig(foo) . If a -devel package installs a pkg-config module, a Provides: pkgconfig(foo) is automatically injected. If the build process ( ./configure or Makefile ) uses pkg-config to find the software, it makes more sense and it is closer to reality to depend on pkgconfig(foo) being present, regardless which -devel package provides it.
You can get more information about how to fix post-build checks in the openSUSE Packaging Checks page at https://en.opensuse.org/openSUSE:Packaging_checks.
3.6 Changelogs #Edit source
Until now you left the %changelog section empty. Some distributions write the history of the package to the changelog. SUSE-flavored distributions keep the changelog in a separate .changes file. To quickly generate or update it, you can use osc vc in the directory containing the spec file and the sources.
4 Legal Notice #Edit source
Copyright ©2006– 2017 SUSE LLC and contributors. All rights reserved.
Permission is granted to copy, distribute and/or modify this document under the terms of the GNU Free Documentation License, Version 1.2 or (at your option) version 1.3; with the Invariant Section being this copyright notice and license. A copy of the license version 1.2 is included in the section entitled “ GNU Free Documentation License ” .
SUSE, the SUSE logo and YaST are registered trademarks of SUSE LLC in the United States and other countries. For SUSE trademarks, see http://www.suse.com/company/legal/. Linux is a registered trademark of Linus Torvalds. All other names or trademarks mentioned in this document may be trademarks or registered trademarks of their respective owners.
This article is part of a series of documents called «SUSE Best Practices». The individual documents in the series were contributed voluntarily by SUSE’s employees and by third parties.
The articles are intended only to be one example of how a particular action could be taken. They should not be understood to be the only action and certainly not to be the action recommended by SUSE. Also, SUSE cannot verify either that the actions described in the articles do what they claim to do or that they don’t have unintended consequences.
Therefore, we need to specifically state that neither SUSE LLC, its affiliates, the authors, nor the translators may be held liable for possible errors or the consequences thereof. Below we draw your attention to the license under which the articles are published.
5 GNU Free Documentation License #Edit source
Copyright (C) 2000, 2001, 2002 Free Software Foundation, Inc. 51 Franklin St, Fifth Floor, Boston, MA 02110-1301 USA. Everyone is permitted to copy and distribute verbatim copies of this license document, but changing it is not allowed.
0. PREAMBLE #Edit source
The purpose of this License is to make a manual, textbook, or other functional and useful document «free» in the sense of freedom: to assure everyone the effective freedom to copy and redistribute it, with or without modifying it, either commercially or non-commercially. Secondarily, this License preserves for the author and publisher a way to get credit for their work, while not being considered responsible for modifications made by others.
This License is a kind of «copyleft», which means that derivative works of the document must themselves be free in the same sense. It complements the GNU General Public License, which is a copyleft license designed for free software.
We have designed this License to use it for manuals for free software, because free software needs free documentation: a free program should come with manuals providing the same freedoms that the software does. But this License is not limited to software manuals; it can be used for any textual work, regardless of subject matter or whether it is published as a printed book. We recommend this License principally for works whose purpose is instruction or reference.
1. APPLICABILITY AND DEFINITIONS #Edit source
This License applies to any manual or other work, in any medium, that contains a notice placed by the copyright holder saying it can be distributed under the terms of this License. Such a notice grants a world-wide, royalty-free license, unlimited in duration, to use that work under the conditions stated herein. The «Document», below, refers to any such manual or work. Any member of the public is a licensee, and is addressed as «you». You accept the license if you copy, modify or distribute the work in a way requiring permission under copyright law.
A «Modified Version» of the Document means any work containing the Document or a portion of it, either copied verbatim, or with modifications and/or translated into another language.
A «Secondary Section» is a named appendix or a front-matter section of the Document that deals exclusively with the relationship of the publishers or authors of the Document to the Document’s overall subject (or to related matters) and contains nothing that could fall directly within that overall subject. (Thus, if the Document is in part a textbook of mathematics, a Secondary Section may not explain any mathematics.) The relationship could be a matter of historical connection with the subject or with related matters, or of legal, commercial, philosophical, ethical or political position regarding them.
The «Invariant Sections» are certain Secondary Sections whose titles are designated, as being those of Invariant Sections, in the notice that says that the Document is released under this License. If a section does not fit the above definition of Secondary then it is not allowed to be designated as Invariant. The Document may contain zero Invariant Sections. If the Document does not identify any Invariant Sections then there are none.
The «Cover Texts» are certain short passages of text that are listed, as Front-Cover Texts or Back-Cover Texts, in the notice that says that the Document is released under this License. A Front-Cover Text may be at most 5 words, and a Back-Cover Text may be at most 25 words.
A «Transparent» copy of the Document means a machine-readable copy, represented in a format whose specification is available to the general public, that is suitable for revising the document straightforwardly with generic text editors or (for images composed of pixels) generic paint programs or (for drawings) some widely available drawing editor, and that is suitable for input to text formatters or for automatic translation to a variety of formats suitable for input to text formatters. A copy made in an otherwise Transparent file format whose markup, or absence of markup, has been arranged to thwart or discourage subsequent modification by readers is not Transparent. An image format is not Transparent if used for any substantial amount of text. A copy that is not «Transparent» is called «Opaque».
Examples of suitable formats for Transparent copies include plain ASCII without markup, Texinfo input format, LaTeX input format, SGML or XML using a publicly available DTD, and standard-conforming simple HTML, PostScript or PDF designed for human modification. Examples of transparent image formats include PNG, XCF and JPG. Opaque formats include proprietary formats that can be read and edited only by proprietary word processors, SGML or XML for which the DTD and/or processing tools are not generally available, and the machine-generated HTML, PostScript or PDF produced by some word processors for output purposes only.
The «Title Page» means, for a printed book, the title page itself, plus such following pages as are needed to hold, legibly, the material this License requires to appear in the title page. For works in formats which do not have any title page as such, «Title Page» means the text near the most prominent appearance of the work’s title, preceding the beginning of the body of the text.
A section «Entitled XYZ» means a named subunit of the Document whose title either is precisely XYZ or contains XYZ in parentheses following text that translates XYZ in another language. (Here XYZ stands for a specific section name mentioned below, such as «Acknowledgements», «Dedications», «Endorsements», or «History».) To «Preserve the Title» of such a section when you modify the Document means that it remains a section «Entitled XYZ» according to this definition.
The Document may include Warranty Disclaimers next to the notice which states that this License applies to the Document. These Warranty Disclaimers are considered to be included by reference in this License, but only as regards disclaiming warranties: any other implication that these Warranty Disclaimers may have is void and has no effect on the meaning of this License.
2. VERBATIM COPYING #Edit source
You may copy and distribute the Document in any medium, either commercially or noncommercially, provided that this License, the copyright notices, and the license notice saying this License applies to the Document are reproduced in all copies, and that you add no other conditions whatsoever to those of this License. You may not use technical measures to obstruct or control the reading or further copying of the copies you make or distribute. However, you may accept compensation in exchange for copies. If you distribute a large enough number of copies you must also follow the conditions in section 3.
You may also lend copies, under the same conditions stated above, and you may publicly display copies.
3. COPYING IN QUANTITY #Edit source
If you publish printed copies (or copies in media that commonly have printed covers) of the Document, numbering more than 100, and the Document’s license notice requires Cover Texts, you must enclose the copies in covers that carry, clearly and legibly, all these Cover Texts: Front-Cover Texts on the front cover, and Back-Cover Texts on the back cover. Both covers must also clearly and legibly identify you as the publisher of these copies. The front cover must present the full title with all words of the title equally prominent and visible. You may add other material on the covers in addition. Copying with changes limited to the covers, as long as they preserve the title of the Document and satisfy these conditions, can be treated as verbatim copying in other respects.
If the required texts for either cover are too voluminous to fit legibly, you should put the first ones listed (as many as fit reasonably) on the actual cover, and continue the rest onto adjacent pages.
If you publish or distribute Opaque copies of the Document numbering more than 100, you must either include a machine-readable Transparent copy along with each Opaque copy, or state in or with each Opaque copy a computer-network location from which the general network-using public has access to download using public-standard network protocols a complete Transparent copy of the Document, free of added material. If you use the latter option, you must take reasonably prudent steps, when you begin distribution of Opaque copies in quantity, to ensure that this Transparent copy will remain thus accessible at the stated location until at least one year after the last time you distribute an Opaque copy (directly or through your agents or retailers) of that edition to the public.
It is requested, but not required, that you contact the authors of the Document well before redistributing any large number of copies, to give them a chance to provide you with an updated version of the Document.
4. MODIFICATIONS #Edit source
You may copy and distribute a Modified Version of the Document under the conditions of sections 2 and 3 above, provided that you release the Modified Version under precisely this License, with the Modified Version filling the role of the Document, thus licensing distribution and modification of the Modified Version to whoever possesses a copy of it. In addition, you must do these things in the Modified Version:
Use in the Title Page (and on the covers, if any) a title distinct from that of the Document, and from those of previous versions (which should, if there were any, be listed in the History section of the Document). You may use the same title as a previous version if the original publisher of that version gives permission.
List on the Title Page, as authors, one or more persons or entities responsible for authorship of the modifications in the Modified Version, together with at least five of the principal authors of the Document (all of its principal authors, if it has fewer than five), unless they release you from this requirement.
State on the Title page the name of the publisher of the Modified Version, as the publisher.
Preserve all the copyright notices of the Document.
Add an appropriate copyright notice for your modifications adjacent to the other copyright notices.
Include, immediately after the copyright notices, a license notice giving the public permission to use the Modified Version under the terms of this License, in the form shown in the Addendum below.
Preserve in that license notice the full lists of Invariant Sections and required Cover Texts given in the Document’s license notice.
Include an unaltered copy of this License.
Preserve the section Entitled «History», Preserve its Title, and add to it an item stating at least the title, year, new authors, and publisher of the Modified Version as given on the Title Page. If there is no section Entitled «History» in the Document, create one stating the title, year, authors, and publisher of the Document as given on its Title Page, then add an item describing the Modified Version as stated in the previous sentence.
Preserve the network location, if any, given in the Document for public access to a Transparent copy of the Document, and likewise the network locations given in the Document for previous versions it was based on. These may be placed in the «History» section. You may omit a network location for a work that was published at least four years before the Document itself, or if the original publisher of the version it refers to gives permission.
For any section Entitled «Acknowledgements» or «Dedications», Preserve the Title of the section, and preserve in the section all the substance and tone of each of the contributor acknowledgements and/or dedications given therein.
Preserve all the Invariant Sections of the Document, unaltered in their text and in their titles. Section numbers or the equivalent are not considered part of the section titles.
Delete any section Entitled «Endorsements». Such a section may not be included in the Modified Version.
Do not retitle any existing section to be Entitled «Endorsements» or to conflict in title with any Invariant Section.
Preserve any Warranty Disclaimers.
If the Modified Version includes new front-matter sections or appendices that qualify as Secondary Sections and contain no material copied from the Document, you may at your option designate some or all of these sections as invariant. To do this, add their titles to the list of Invariant Sections in the Modified Version’s license notice. These titles must be distinct from any other section titles.
You may add a section Entitled «Endorsements», provided it contains nothing but endorsements of your Modified Version by various parties—for example, statements of peer review or that the text has been approved by an organization as the authoritative definition of a standard.
You may add a passage of up to five words as a Front-Cover Text, and a passage of up to 25 words as a Back-Cover Text, to the end of the list of Cover Texts in the Modified Version. Only one passage of Front-Cover Text and one of Back-Cover Text may be added by (or through arrangements made by) any one entity. If the Document already includes a cover text for the same cover, previously added by you or by arrangement made by the same entity you are acting on behalf of, you may not add another; but you may replace the old one, on explicit permission from the previous publisher that added the old one.
The author(s) and publisher(s) of the Document do not by this License give permission to use their names for publicity for or to assert or imply endorsement of any Modified Version.
5. COMBINING DOCUMENTS #Edit source
You may combine the Document with other documents released under this License, under the terms defined in section 4 above for modified versions, provided that you include in the combination all of the Invariant Sections of all of the original documents, unmodified, and list them all as Invariant Sections of your combined work in its license notice, and that you preserve all their Warranty Disclaimers.
The combined work need only contain one copy of this License, and multiple identical Invariant Sections may be replaced with a single copy. If there are multiple Invariant Sections with the same name but different contents, make the title of each such section unique by adding at the end of it, in parentheses, the name of the original author or publisher of that section if known, or else a unique number. Make the same adjustment to the section titles in the list of Invariant Sections in the license notice of the combined work.
In the combination, you must combine any sections Entitled «History» in the various original documents, forming one section Entitled «History»; likewise combine any sections Entitled «Acknowledgements», and any sections Entitled «Dedications». You must delete all sections Entitled «Endorsements».
6. COLLECTIONS OF DOCUMENTS #Edit source
You may make a collection consisting of the Document and other documents released under this License, and replace the individual copies of this License in the various documents with a single copy that is included in the collection, provided that you follow the rules of this License for verbatim copying of each of the documents in all other respects.
You may extract a single document from such a collection, and distribute it individually under this License, provided you insert a copy of this License into the extracted document, and follow this License in all other respects regarding verbatim copying of that document.
7. AGGREGATION WITH INDEPENDENT WORKS #Edit source
A compilation of the Document or its derivatives with other separate and independent documents or works, in or on a volume of a storage or distribution medium, is called an «aggregate» if the copyright resulting from the compilation is not used to limit the legal rights of the compilation’s users beyond what the individual works permit. When the Document is included in an aggregate, this License does not apply to the other works in the aggregate which are not themselves derivative works of the Document.
If the Cover Text requirement of section 3 is applicable to these copies of the Document, then if the Document is less than one half of the entire aggregate, the Document’s Cover Texts may be placed on covers that bracket the Document within the aggregate, or the electronic equivalent of covers if the Document is in electronic form. Otherwise they must appear on printed covers that bracket the whole aggregate.
8. TRANSLATION #Edit source
Translation is considered a kind of modification, so you may distribute translations of the Document under the terms of section 4. Replacing Invariant Sections with translations requires special permission from their copyright holders, but you may include translations of some or all Invariant Sections in addition to the original versions of these Invariant Sections. You may include a translation of this License, and all the license notices in the Document, and any Warranty Disclaimers, provided that you also include the original English version of this License and the original versions of those notices and disclaimers. In case of a disagreement between the translation and the original version of this License or a notice or disclaimer, the original version will prevail.
If a section in the Document is Entitled «Acknowledgements», «Dedications», or «History», the requirement (section 4) to Preserve its Title (section 1) will typically require changing the actual title.
9. TERMINATION #Edit source
You may not copy, modify, sublicense, or distribute the Document except as expressly provided for under this License. Any other attempt to copy, modify, sublicense or distribute the Document is void, and will automatically terminate your rights under this License. However, parties who have received copies, or rights, from you under this License will not have their licenses terminated so long as such parties remain in full compliance.
10. FUTURE REVISIONS OF THIS LICENSE #Edit source
The Free Software Foundation may publish new, revised versions of the GNU Free Documentation License from time to time. Such new versions will be similar in spirit to the present version, but may differ in detail to address new problems or concerns. See http://www.gnu.org/copyleft/.
Each version of the License is given a distinguishing version number. If the Document specifies that a particular numbered version of this License «or any later version» applies to it, you have the option of following the terms and conditions either of that specified version or of any later version that has been published (not as a draft) by the Free Software Foundation. If the Document does not specify a version number of this License, you may choose any version ever published (not as a draft) by the Free Software Foundation.
ADDENDUM: How to use this License for your documents #Edit source
If you have Invariant Sections, Front-Cover Texts and Back-Cover Texts, replace the «with. Texts». line with this:
If you have Invariant Sections without Cover Texts, or some other combination of the three, merge those two alternatives to suit the situation.
If your document contains nontrivial examples of program code, we recommend releasing these examples in parallel under your choice of free software license, such as the GNU General Public License, to permit their use in free software.
Источник


