- SDB:Create a Live USB stick using Windows
- Contents
- Using Etcher
- Using Rufus
- Using ImageUSB
- Using SUSE Studio ImageWriter
- Using GRUB4DOS
- Troubleshooting
- Verifying checksum of downloaded files
- Write access problems
- Abz’s note
- How to Make OpenSUSE 11.4 (or Later) Live USB on Windows
- SDB:Live USB stick
- Contents
- Download the latest openSUSE ISO file
- Backup your USB drive
- Using SUSE Studio Image Writer
- Install ImageWriter for openSUSE
- Write ISO to USB
- Using live-fat-stick, live-grub-stick, live-usb-gui (Command line or GUI way)
- Using commandline tools
- Download LiveCD ISO
- Find Block Device
- Optional steps
- How to recover the USB stick for «normal» use again
- Troubleshooting
- How to make a USB drive bootable
SDB:Create a Live USB stick using Windows
Version: 12.2+ This applies to openSUSE 12.2 and above.
Contents
Using Etcher
- Download the current ISO image of openSUSE Leap or Tumbleweed. The filename ends with «.iso».
- Download, install and start Etcher
- Select the openSUSE .iso file you just downloaded using the «Select Image» button.
- Plug a USB drive into you computer, if it’s the only drive connected to your computer, it will be automatically selected. If not, select it.
Using Rufus
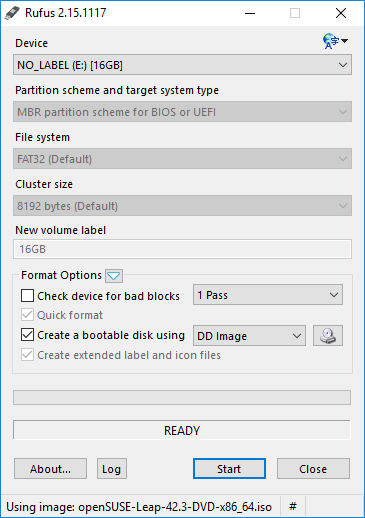
- Download the current ISO image of openSUSE Leap or Tumbleweed. The filename ends with «.iso».
- Download and start Rufus
- Plug a USB drive into you computer and select it in Rufus (see screenshot)
Using ImageUSB
Download ImageUSB and follow the instructions on their page.
Using SUSE Studio ImageWriter
We used to have SUSE Studio ImageWriter compiled for windows, but this is not maintained anymore. Feel free to fork it and build/maintain the windows version yourself.
Using GRUB4DOS
This method will keep all current data in your USB medium. Demonstration is provided in this video. Note: These instruction will not work, if your computer boots via UEFI (like most computers made after
2011-2012 and all computers with preinstalled Windows 8/8.1/10); at first you must go to BIOS, enable Legacy boot (i.e. dissable UEFI/secure boot option)!
- Copy ISO into «boot» folder of USB flash.
- Extract «initrd» and «linux» files into «boot» folder of USB medium. These files located in boot\i386\loader or boot\x86_64\loader directory of ISO image. For ISO mounting you can use, for example, Pismo File Mount Audit Package.
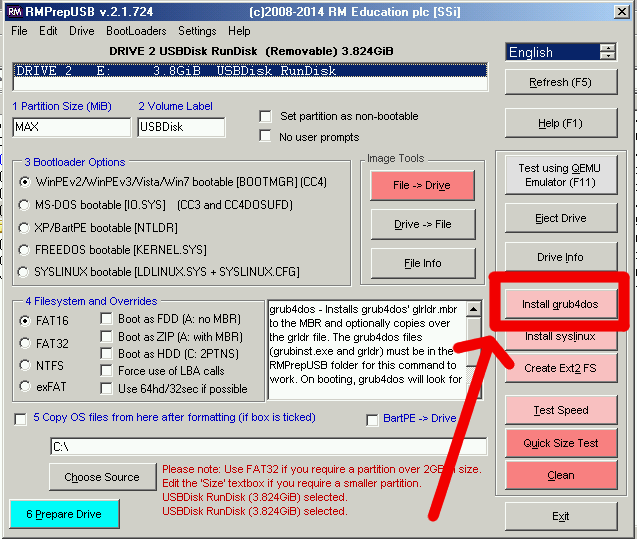
- GRUB4DOS installation into MBR of USB flash:
- download RMPrepUSB and install it;
- start RMPrepUSB;
- select your medium;
- click «Install GRUB4DOS»;
- confirm GRUB installation to MBR;
- confirm GRUB installation to selected medium;
- confirm GRLDR copying into selected medium.
- Create «menu.lst» file in root folder of USB key. Content of «menu.lst» should be (in both places – in line 2 and in line 5 – replace openSUSE.iso with real name of your ISO file):
Reboot your computer from USB stick.
Troubleshooting
Verifying checksum of downloaded files
If you need to verify that the file you’ve just downloaded is correct, you can use the CertUtil program (At least on windows10)
Write access problems
If you get write access problems with the USB drive you can try to reformat the drive in Windows prior to writing the image.
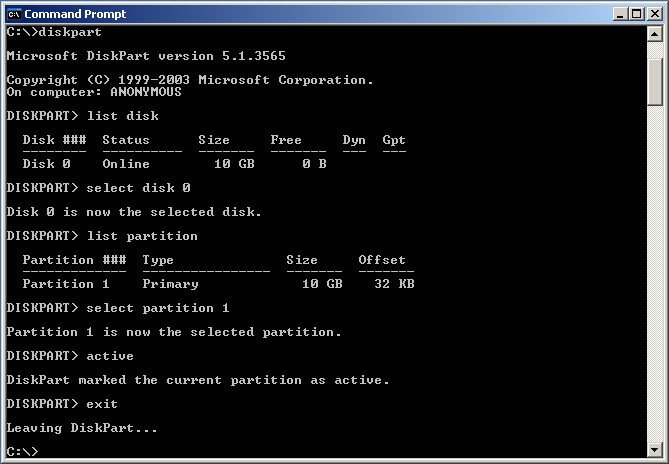
This situation would happen very rarely, but in the even that your computer doesn’t boot from the LiveUSB/DVD from the steps above, you might try the following procedure.
Unlike fdisk, diskpart will perform changes as you enter them, therefore, there is no write instruction.
Abz’s note

How to Make OpenSUSE 11.4 (or Later) Live USB on Windows
10 Thursday Nov 2011
Tags

Here is my 2nd try to migrate to OpenSUSE with my Laptop. My first try to migrate to OpenSUSE has make me disappointed, why? because proxy issues on OpenSUSE, so i got some trouble to get ‘uptodate’. On my 2nd try, i forced to use USB, because my optical drive was ‘gone’, hahaha.
After some googling days, attempts and a little frustating. Here is my way to make OpenSUSE Live USB on Windows, thx 4 people on openSUSE forum especialy Jefro, kiwi man and Lexar for creating an ‘unique’ tool.
Prepare some stuff
- OpenSUSE Live CD Image (i’m using OpenSUSE 11.4 KDE 64 bit, just in case :))
SUSE studio image writer. Download here
BootIt by Lexar, to make USB flash drive act as local drive. Download here
Procedures
- Rename downloaded ISO to .raw extension, so SUSE studio image writer could read it.
for example : openSUSE-11.4-KDE-LiveCD-x86_64.iso.raw
Install Lexar USB utility
Format the USB with Lexar USB utility (BootIt) Like mine : (my usb is drive F: dont forget to set active)
BootIt to create usb flash drive act as fix/local drive
Install or just run imagewriter.exe (SUSE studio image writer) BUT DONT DO ANYTHINK, JUST LAUNCH the imagewriter

SUSE studio image writer
Format manually with windows WHILE imagewriter is still OPEN.
Enjoy, and happy Live USB with the green lizard =))
SDB:Live USB stick
| This article is in need of attention because it does not follow our wiki guidelines. If you want to contribute, please read the rules for this wiki and if you have any questions, don’t hesitate to contact the wiki team, we are more then willing to help you! 🙂 |
Version: 12.2+ This applies to openSUSE 12.2 and later.
Contents
Download the latest openSUSE ISO file
See http://download.opensuse.org/distribution/leap/ as of Nov 2019, this repo keep all the Leap versions (since 42.2 to 15.2), following the links lead to a repo «live» with live isos.
Backup your USB drive
You could, if you prefer, make a backup image of the stick prior to using it for installation, with dd, and recover it after the installation. [Detailed instructions needed]
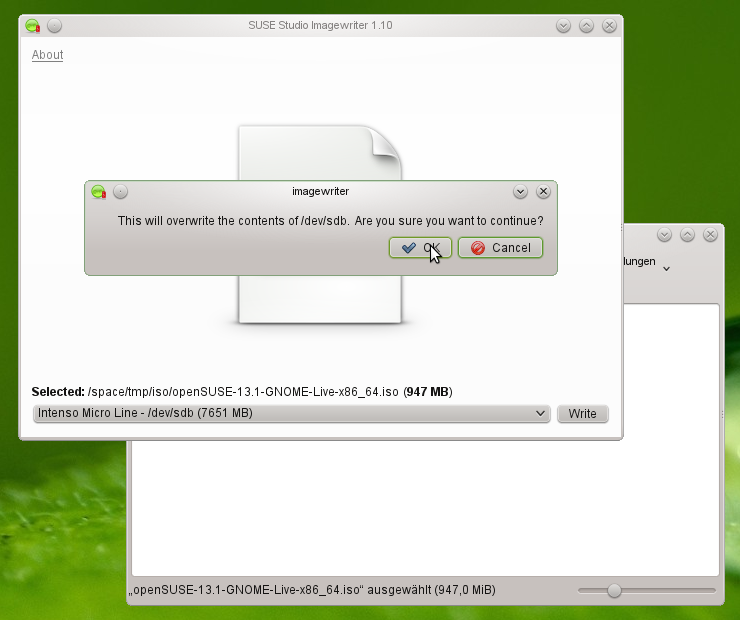
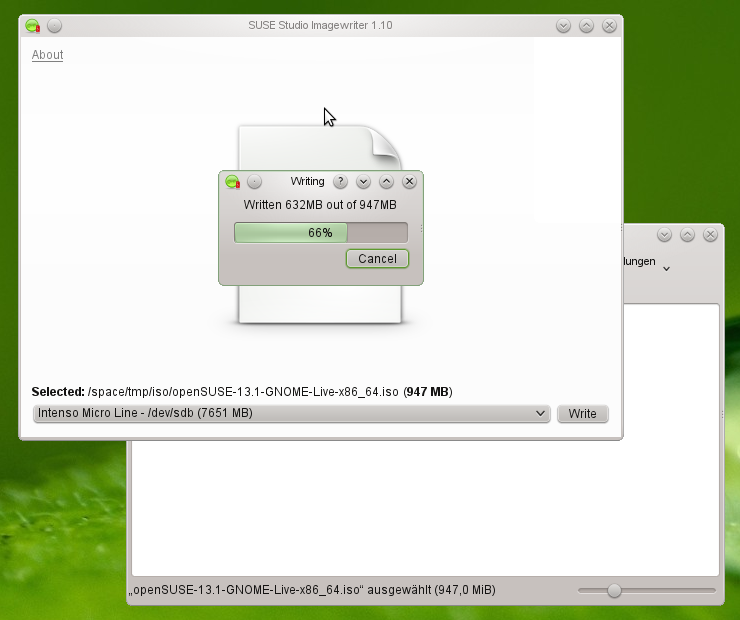
Using SUSE Studio Image Writer
These a general instructions to write an hybrid iso dvd to an usb device.
Install ImageWriter for openSUSE
Install SUSE Imagewriter with 1-Click Install
For openSUSE 15.1: 
For openSUSE 15.0:
For openSUSE Leap 42.3:
For openSUSE Tumbleweed:
Or you can use this command as a root to install Imagewriter.
Write ISO to USB
 |
|

- Open a file manager application.
- Navigate in the file manager to the downloaded ISO file.
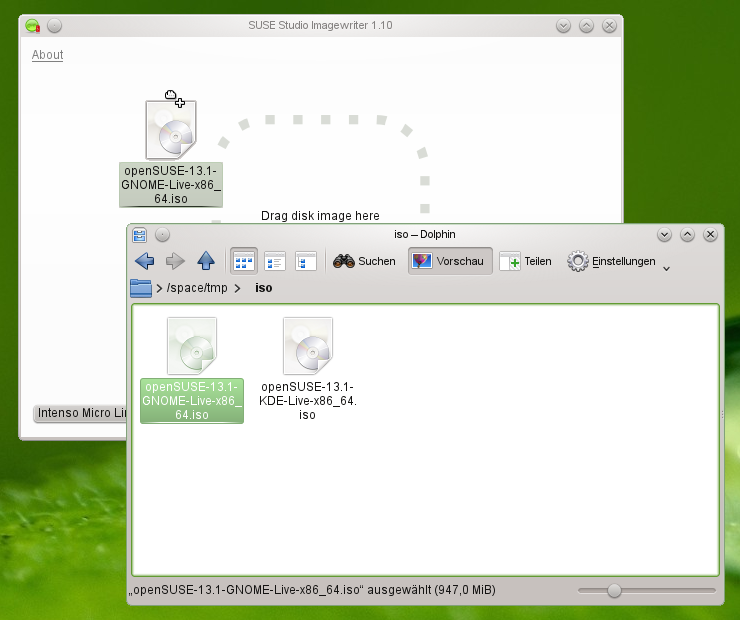
- Drag&Drop it to the Imagewriter.
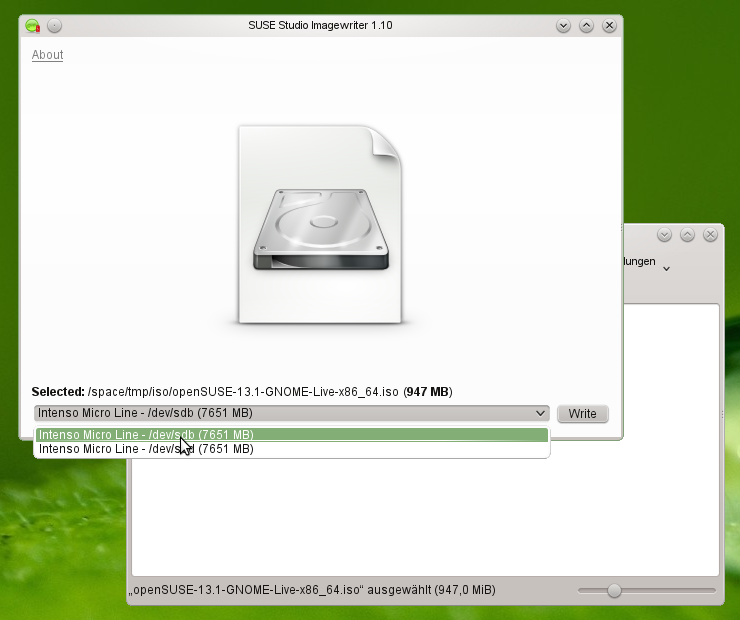
- Plug your USB memory device in your computer.
- Select it from the dropdown menu at the bottom corner of Imagewriter.
Using live-fat-stick, live-grub-stick, live-usb-gui (Command line or GUI way)
If you’d rather not reformat the USB device and keep the ability of putting files on it and accessible by other operating systems, you have the option of using the live-fat-stick or live-fat-stick scripts from command line or live-usb-gui point and click graphical interface. You can put ISO on vfat partitioned USB stick or hard disk.
On openSUSE you can install the packages simply via yast (Leap 15.1) or via 1-click from here live-fat-stick, live-grub-stick and live-usb-gui, if you are running any other distribution, get the scripts from here and make it executable(as root, with chmod +x /usr/bin/live-fat-stick ) after copying it to /usr/bin/, make sure you have syslinux and gpart installed before running it.
Run the following as root (with su — , not using sudo ) in terminal to get the USB device path:
Run the following to make USB stick with vfat(fat32) partition bootable with iso copied on it:
To make USB device bootable with EFI(Secure boot capabilities) wiping all data from it, run:
For more help, run:
Use live-grub-stick command in place of live-fat-stick as shown in above examples if you wish to create bootable usb sticks formatted in any file systems supported by grub2, for example you can use ext3/ntfs formatted stick to create bootable USB from standard openSUSE installation iso, this allows the use of remaining space for putting other iso images or data.
Multiple iso images from multiple distributions can be added to the USB device with vfat partition when not using «isohybrid» option, boot menu will offer a choice of distribution to boot from. Scripts does not format or remove data from the device.
Using commandline tools
Download LiveCD ISO
Download the installation image of your choice from http://software.opensuse.org/.
Verify the integrity of a downloaded image:
Find Block Device
After inserting your USB stick, you can find out what device it is:
Finally, once you’ve found your block device, write the image to it. Point ‘dd’ to the full path such as ‘/home/user/Downloads/openSUSE-13.2-GNOME-Live-x86_64.iso’ or change directory (example: cd ./Downloads ) to where the image is contained.
If you get the message
your dd version does not support the status=progress option and therefore you have to remove it (and you will miss the writing progress indicator).
Optional steps
How to recover the USB stick for «normal» use again
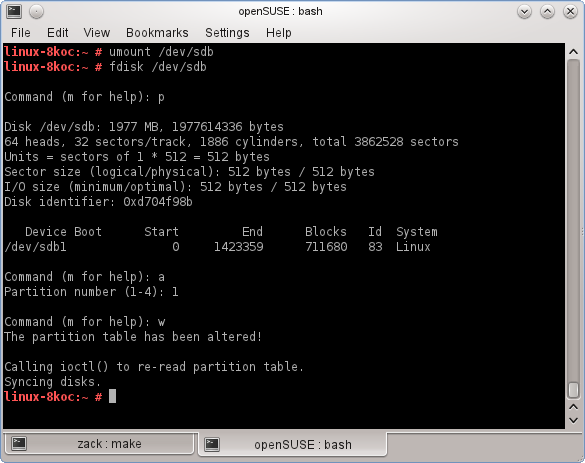
After system installation, you may want to reuse the stick as you would normally to write things on it. In that case you have to reformat it. Often people complain that Windows fails to do it.
Typically, you would simply start fdisk:
(primary, number 1, default size to use the entire device)
Use type 6, FAT16
This last step is necessary, particularly the -n SOME_NAME, or the USB stick will mount with the iso name.
And done. Or, you could use gparted for partitioning and formatting.
If that doesn’t work try the following steps with extreme care:
If you look at the 12.3 DVD image on a USB stick with fdisk, you would see something like this (notice the GPT warning):
So, before reformatting, you have to repartition it again. And sometimes, if this fails, you may need an extra step — because software thinks the stick is a CD and thus not writable:
Notice: all these instructions assume the stick device is /dev/sdX. You have to find which is yours (see “Find Block Device” section above). An error here will destroy some other disk in your system.
That destroys the boot sector, partition table, and initial structures. Any operating system should be happy to reformat it again.
Troubleshooting
How to make a USB drive bootable
This situation would happen very rarely, but in the event that your computer doesn’t boot from the LiveUSB/DVD from the steps above, you might try the following procedure.
Open a console and do the following as root:


