- Как создать загрузочную флешку с openSUSE
- Где найти информацию об openSUSE?
- About openSUSE
- Как создать загрузочную флешку с openSUSE
- Второй метод
- SDB:Live USB stick
- Contents
- Download the latest openSUSE ISO file
- Backup your USB drive
- Using SUSE Studio Image Writer
- Install ImageWriter for openSUSE
- Write ISO to USB
- Using live-fat-stick, live-grub-stick, live-usb-gui (Command line or GUI way)
- Using commandline tools
- Download LiveCD ISO
- Verify the integrity of a downloaded image
- Find Block Device
- Write ISO to USB
- Optional steps
- How to recover the USB stick for «normal» use again
- Troubleshooting
- How to make a USB drive bootable
- Create installation USB stick
- Contents
- Requirements
- Download installation images
- A large capacity USB stick
- A working PC
- Create bootable USB stick
- Imagewriter (openSUSE)
- Universal USB Installer (Windows)
- UNetbootin (OpenSUSE)
- UNetbootin (Other Linux, Windows, Mac)
- Boot from USB stick
Как создать загрузочную флешку с openSUSE
openSUSE — это свободная операционная система на базе Linux для Вашего ПК, ноутбука или сервера. Вы можете просматривать веб, управлять почтой и фотографиями, выполнять офисную работу, смотреть видео или слушать музыку. Have a lot of fun! Гласит сайт разработчиков. Последняя стабильная версия это openSUSE 11.4 включает в себя новые версии GNOME, KDE, LibreOffice, Firefox, ядра Linux, и многие, многие другие обновления и улучшения. В 11.4 Вы найдете более 1000 рабочих приложений с открытым исходным кодом. openSUSE также включает в себя полный набор серверного программного обеспечения и богатый выбор инструментов для разработки. Кстати Have a lot of fun! это у них слоган такой. Познакомиться ближе с процессом создания загрузочной флешки вы можете уже сейчас, под катом.
Где найти информацию об openSUSE?
Информации больше на английском, чем на русском. Источников информации миллион, изучайте.
About openSUSE
Я питаю нелюбовь ко всем RPM-подобным дистрибутивам, потому что в них нет apt-get, aptitude и dpkg, если этих утилит нет, то дистрибутив можно считать ущербным. Но openSUSE это реально круто, мне он нравиться по тому, что KDE-версия openSUSE это вам не какая-нибудь Kubuntu, это качественный, вылизанный и на 100% рабочий дистрибутив. В openSUSE есть YaST (Yet another Setup Tool), довольно таки стрёмная и проприетарная утилита конфигурации операционной системы и установки/обновления пакетов с ПО, в настоящий момент распространяется по лицензии GPL.
Дистрибутивы openSUSE и SUSE Linux Enterptise заточены под управление посредством YaST, т.е. без YaST они и посрать сходить не смогут, YaST делает всё: управление ПО, on-line обновление, обновление с CD/DVD, установка дополнительных пакетов, используется непосредственно для установки дистрибутива и конфигурации всей системы.
Так же, в openSUSE есть Zypper жалкая копия apt-get для Debian, Zypper (libzypp) — консольный менеджер пакетов который умеет управлять используемыми репозиториями, искать нужные пакеты, устанавливать или удалять их, типа младший брат дистрофик у apt-get’a =) Фанатов openSUSE прошу не обижаться, тут написана правда, тем более, что мне openSUSE нравится.
Как создать загрузочную флешку с openSUSE
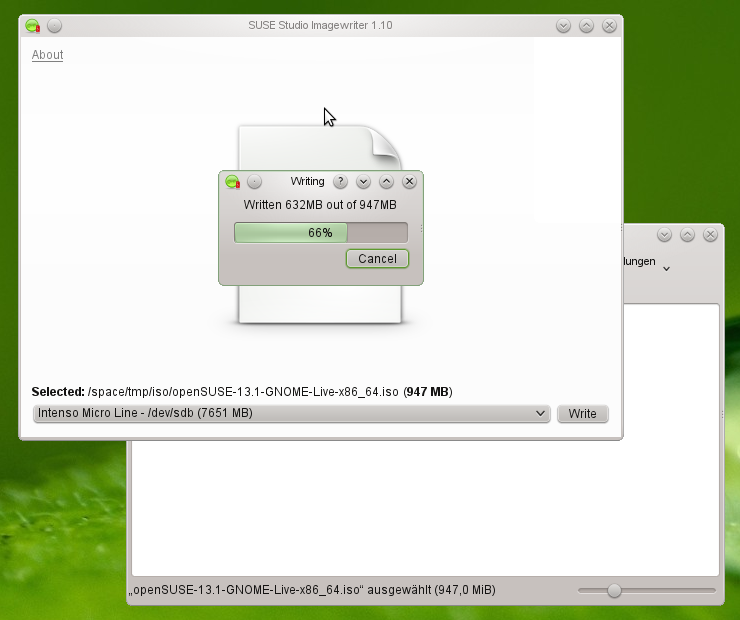
Вот тут начинается жопа. openSUSE это вам не Ubuntu. Вообще если у вас на компьютере уже установлена openSUSE, то создать загрузочную флешку с ней не проблема, ибо в openSUSE есть специально заточенная под это утилита SUSE Studio Image Writer , она доступна для загрузки в качестве RPM-пакета.
SUSE Studio Image Writer будет работать в Windows XP и Windows Vista. Внимание, в вашей пиратской Windows 7 может не работать!
Для Debian/Ubuntu пакетов нет! Т.е. deb-пакета утилиты SUSE Studio Image Writer в природе не существует. Теперь есть, вы можете скачать его вот так:
и установить в системе:
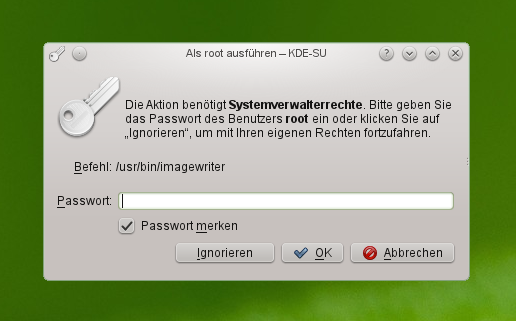
Утилита появиться у вас в меню Приложения > Системные утилиты > SUSE Studio ImageWriter. Но её надо запускать с правами root’a так что делаем это так:
Дальше просто следуйте инструкциям и ваш Live USB с openSUSE на борту готов!
Второй метод
Любой кто сидит НЕ на Ubuntu думает, что он Хакер , и что все Убунтоиды просто тупые хомячки (Виндузятников они вообще за людей не считают), которые умеют только обои рабочего стола менять. Жаль им напоминать, что дело не в выборе дистрибутива, а в голове и руках, у кого они есть — тот и крут!
Ладно давайте не спорить. Для создания загрузочную флешку с openSUSE хакерским методом вам будет нужен образ. Ещё нужна флешка, желательно объёмом >= 1GB. Она должна быть пустой и с fat16/fat32 на борту, если это не так, то стоит подготовить её.
Находим флешку в системе:
У меня это /dev/sdc1, у вас может быть что угодно, что-бы вас не путать в дальнейшем, я заменил последнюю букву на Икс /dev/sdX
Проедемся по ней утилитой mkdosfs :
Если опции выше не понятны, то идем читать man mkdosfs.
Убедитесь, что флешка готова:
Заливаем образ на флешку:
Для надежности, восстановим MBR (master boot record) на флешке:
Источник
SDB:Live USB stick
| This article is in need of attention because it does not follow our wiki guidelines. If you want to contribute, please read the rules for this wiki and if you have any questions, don’t hesitate to contact the wiki team, we are more then willing to help you! 🙂 |
Version: 12.2+ This applies to openSUSE 12.2 and later.
Contents
Download the latest openSUSE ISO file
See http://download.opensuse.org/distribution/leap/ as of Nov 2019, this repo keep all the Leap versions (since 42.2 to 15.2), following the links lead to a repo «live» with live isos.
Backup your USB drive
You could, if you prefer, make a backup image of the stick prior to using it for installation, with dd, and recover it after the installation. [Detailed instructions needed]
Using SUSE Studio Image Writer
These a general instructions to write an hybrid iso dvd to an usb device.
Install ImageWriter for openSUSE
Install SUSE Imagewriter with 1-Click Install
For openSUSE 15.1: 
For openSUSE 15.0:
For openSUSE Leap 42.3:
For openSUSE Tumbleweed:
Or you can use this command as a root to install Imagewriter.
Write ISO to USB
 |
|

- Open a file manager application.
- Navigate in the file manager to the downloaded ISO file.
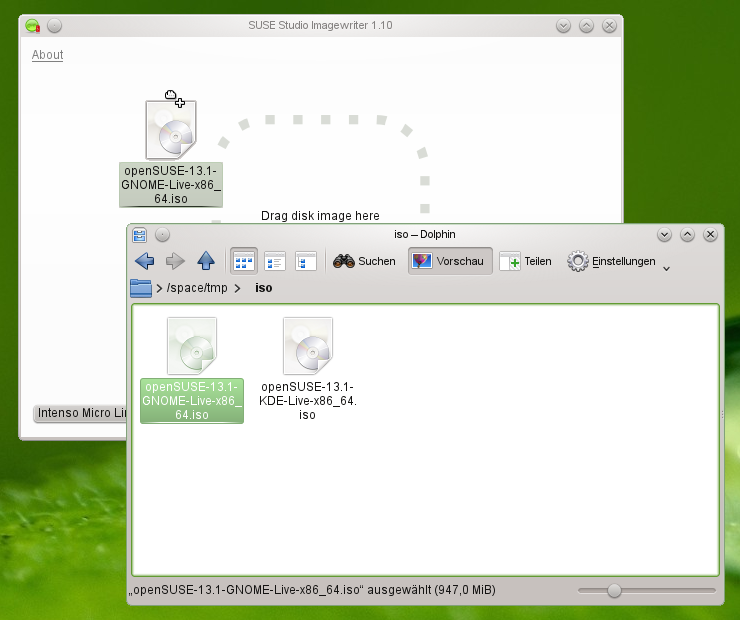
- Drag&Drop it to the Imagewriter.
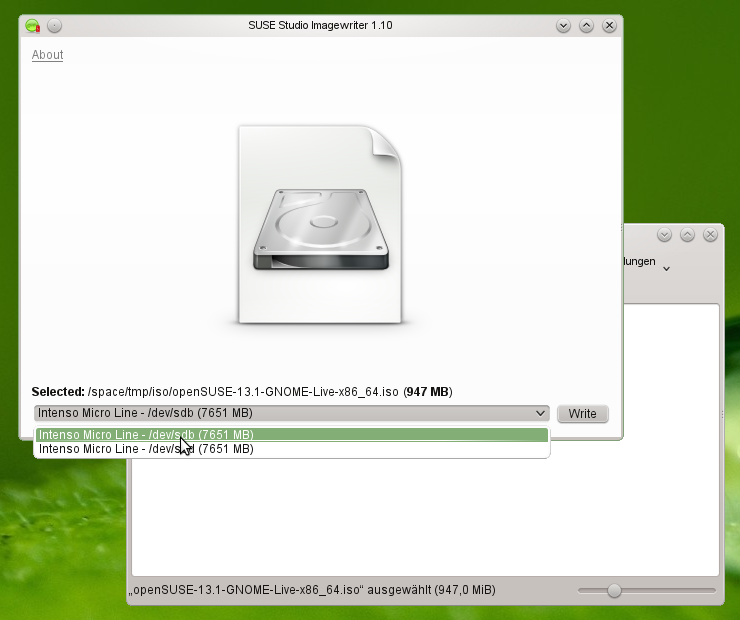
- Plug your USB memory device in your computer.
- Select it from the dropdown menu at the bottom corner of Imagewriter.
Using live-fat-stick, live-grub-stick, live-usb-gui (Command line or GUI way)
If you’d rather not reformat the USB device and keep the ability of putting files on it and accessible by other operating systems, you have the option of using the live-fat-stick or live-fat-stick scripts from command line or live-usb-gui point and click graphical interface. You can put ISO on vfat partitioned USB stick or hard disk.
On openSUSE you can install the packages simply via yast (Leap 15.1) or via 1-click from here live-fat-stick, live-grub-stick and live-usb-gui, if you are running any other distribution, get the scripts from here and make it executable(as root, with chmod +x /usr/bin/live-fat-stick ) after copying it to /usr/bin/, make sure you have syslinux and gpart installed before running it.
Run the following as root (with su — , not using sudo ) in terminal to get the USB device path:
Run the following to make USB stick with vfat(fat32) partition bootable with iso copied on it:
To make USB device bootable with EFI(Secure boot capabilities) wiping all data from it, run:
For more help, run:
Use live-grub-stick command in place of live-fat-stick as shown in above examples if you wish to create bootable usb sticks formatted in any file systems supported by grub2, for example you can use ext3/ntfs formatted stick to create bootable USB from standard openSUSE installation iso, this allows the use of remaining space for putting other iso images or data.
Multiple iso images from multiple distributions can be added to the USB device with vfat partition when not using «isohybrid» option, boot menu will offer a choice of distribution to boot from. Scripts does not format or remove data from the device.
Using commandline tools
The following steps use CLI tools. The example uses prompts: the $ is the user prompt and # means the root prompt.
Download LiveCD ISO
Download the installation image of your choice from http://software.opensuse.org/.
Verify the integrity of a downloaded image
After the download has been succeeded, verify the correct download with the commands:
Find Block Device
To find the block device of your USB stick, make sure you have NOT plugged the stick to your computer.
2. Plug in your USB stick to your computer.
The output can vary depending on the content of the stick. In this case, your disk is sdb so you need to use the device /dev/sdb .
Write ISO to USB
Finally, once you’ve found your block device, write the image to it. Point ‘dd’ to the full path such as ‘/home/user/Downloads/openSUSE-*.iso’.
Replace /dev/sd with your block device of your USB stick from the previous step:
If you get the message
your dd version does not support the status=progress option and therefore you have to remove it (and you will miss the writing progress indicator).
Optional steps
How to recover the USB stick for «normal» use again
After system installation, you may want to reuse the stick as you would normally to write things on it. In that case you have to reformat it. Often people complain that Windows fails to do it.
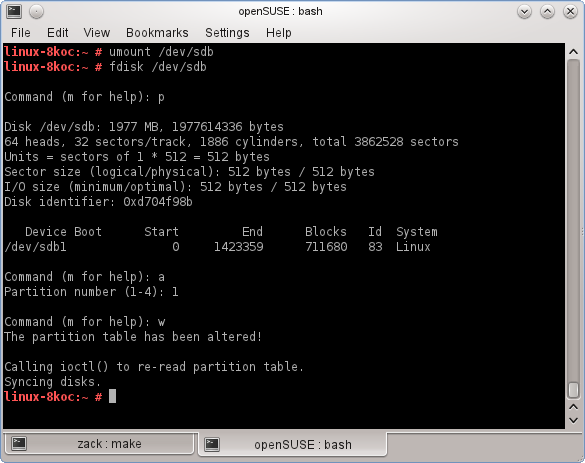
Typically, you would simply start fdisk:
(primary, number 1, default size to use the entire device)
Use type 6, FAT16
This last step is necessary, particularly the -n SOME_NAME, or the USB stick will mount with the iso name.
And done. Or, you could use gparted for partitioning and formatting.
If that doesn’t work try the following steps with extreme care:
If you look at the 12.3 DVD image on a USB stick with fdisk, you would see something like this (notice the GPT warning):
So, before reformatting, you have to repartition it again. And sometimes, if this fails, you may need an extra step — because software thinks the stick is a CD and thus not writable:
Notice: all these instructions assume the stick device is /dev/sdX. You have to find which is yours (see “Find Block Device” section above). An error here will destroy some other disk in your system.
That destroys the boot sector, partition table, and initial structures. Any operating system should be happy to reformat it again.
Troubleshooting
How to make a USB drive bootable
This situation would happen very rarely, but in the event that your computer doesn’t boot from the LiveUSB/DVD from the steps above, you might try the following procedure.
Open a console and do the following as root:
Источник
Create installation USB stick
Tested on openSUSE
Contents
Requirements
Download installation images
You need to download a DVD or Network installation image (ISO file) before creating the installation USB stick.
A large capacity USB stick
To write DVD images, your USB stick must have at least 5 GB storage space.
To write Network images, your USB stick must have at least 100 MB storage space.
NOTE: All data in the USB stick will be erased! Backup all contents before writing the images.
A working PC
You need a working PC to run the bootable USB creation tool. ImageWriter can be run on openSUSE. UNetbootin can be run on other Linux distributions, Microsoft Windows and Apple macOS.
Create bootable USB stick
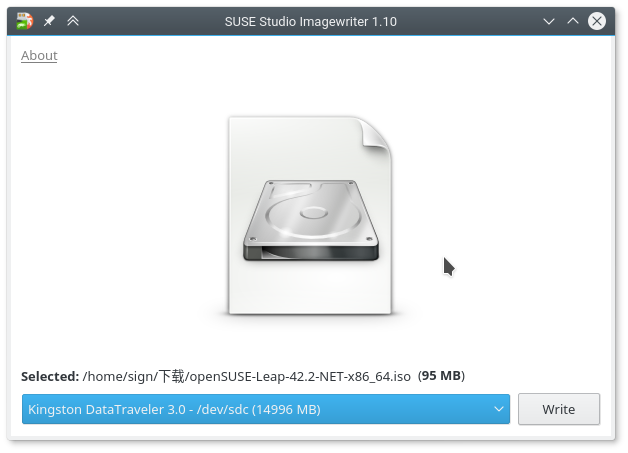
Imagewriter (openSUSE)
- Open YaST —> Software Management
- Search and install «imagewriter» package
- Open «SUSE Studio Imagewriter»
- Select downloaded image (*.iso file)
- Select the USB device
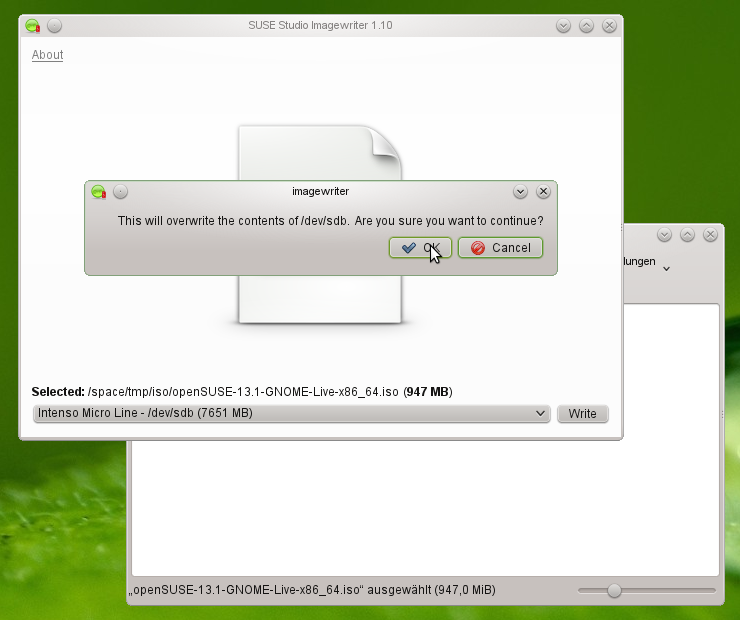
- Click «Write» button
It takes several minutes or longer, depending on image size and hardware performance.
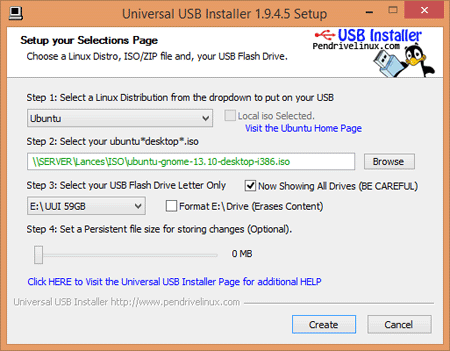
Universal USB Installer (Windows)
Note: Universal USB Installer only supports ISO files up to a maximum size of 4 GiB, which can be exceeded by some openSUSE DVD images. In this case, use UNetbootin for Windows as described below.
- Download Universal USB Installer (GPLv2)
- Run it. You will see a simple application window.
- Select Linux distribution «openSUSE».
- Select downloaded image.
- Select the USB device.
- Click «Create» button.
It takes several minutes or longer, depending on image size and hardware performance.
UNetbootin (OpenSUSE)
- Install unetbootin via zypper
- Figure out which drive is your USB stick you wish to overwrite
- Wipe out the partition table of your USB stick to avoid issues with existing contents
- select /dev/sdc ( if your usb stick is /dev/sdc )
- p ( to print existing partitions )
- rm 1 ( to remove first partition )
- mklabel gpt ( to wipe device and make it GPT )
- mkpart primary ext4 1 -1 ( fill entire USB drive with ext4 partition )
- set 1 boot on ( make the new partition bootable )
- quit
- Unplug and replug the USB stick to have OpenSUSE automount /dev/sdc1
- Run unetbootin with environment variable to avoid UI bug
- Select radio button
- Click . and open previously downloaded iso file
- Select Type: is not already selected
- Select Drive: if not already selected
- Click OK
- Exit unetbootin
- Eject the USB drive from UI, or run
to umount files
UNetbootin (Other Linux, Windows, Mac)
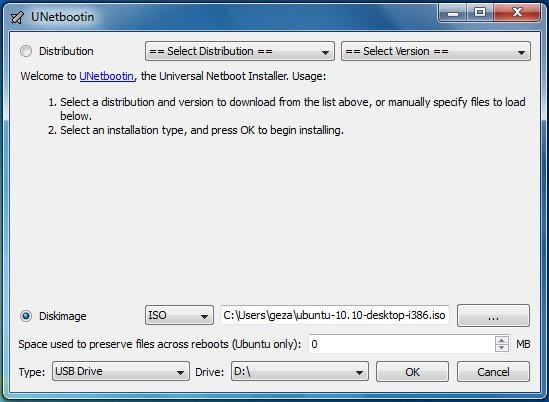
- Download UNetbootin (GPLv2)
- Run it
- Select «Diskimage» radio button
- Select «ISO» file type
- Click <
- Select device Type: «USB Drive»
- Select Drive: «Letter/Name of your USB stick» if not already selected
- Click OK
It takes several minutes or longer, depending on image size and hardware performance.
Boot from USB stick
- Plug your the USB stick into computer.
- Boot or reboot system.
- Press F12 and enter boot menu when you see BIOS interface. Quickly! (Some computers use Esc , F8 , F10 for boot menu, you should see it on BIOS screen)
- Select your USB stick in the boot menu
- Press Enter
System will restart and boot from the USB stick. Then you can follow the normal DVD installation instructions.
Источник


