- Управление версиями Java в linux (ubuntu)
- Switching between Java Versions on Ubuntu linux
- How to change the default Java version on Ubuntu
- Bonus: Use Script to Switch Java Version If you frequently switch between different Java versions, it is a good idea to write a short script to automate the process. Here is the script I used for switching to OpenJDK 8 on my machine. Similarly, you can create scripts for other Java versions installed on your machine. The next step is to add these scripts as aliases to .bashrc file. Next, run the following command to load the changes of .bashrc file: Now if you want to switch to Java 8, just type the following command in your terminal: ✌️ Like this article? Follow me on Twitter and LinkedIn. You can also subscribe to RSS Feed. Источник How To Install / Switch Between Multiple Java Versions Using SDKMAN SDKMAN! is a tool to manage multiple versions of software development kits on macOS, Linux, WLS, Cygwin, Solaris and FreeBSD. It can install and manage Java, Groovy, Scala, Kotlin, Ceylon, Ant, Gradle, and many more. The tool was inspired by RVM and rbenv, and it only requires curl and zip / unzip to be present on your system to work, being written in Bash (don’t worry, it works with Zsh too). This article shows how to install Java using SDKMAN! (using its installer, or offline using your own Java binaries), and how to manage and use multiple Java versions (easily setting a Java version as default, including setting the JAVA_HOME environment variable, or switching Java versions temporarily for the current terminal session, or only for a particular directory). 1. To get started, install the SDKMAN! command line interface. 2. List all the candidate Java versions. Now that SDKMAN! is installed, let’s put it to use. Use this command to list all the candidate Java versions: This lists AdoptOpenJDK and the versions you can install, Amazon Java, Azul Zulu OpenJDK, Java.net etc. This is an excerpt (the output is quite large) of what you’d see when using the «list java» command: Pay attention to the Identifier column. That’s the package name that you need to use to install a Java version. 3. Install a Java version using SDKMAN!. The command that you can use to install a Java version is: Replace IDENTIFIER with the Java version identifier, as seen in the sdk list java command output. For example, to install AdoptOpenJDK version 11.0.8.hs, the install command is: SDKMAN! can also install a local version of Java, like this: For example download the latest Oracle Java 14 .tar.gz (if you don’t use our Oracle Java installer), extract it, then use SDKMAN! to install it using: 4. Switch between Java versions. There are 3 ways to manage Java versions using SDKMAN!: set a Java version as default use a Java version for the current terminal session only activate a particular Java version when you enter a directory A. Set a Java version as default. To set one of the Java versions installed using SDKMAN! (no matter if installed using its built-in installer or from a local directory) as the default Java version, use: Replace IDENTIFIER with the Java version identifier, as seen in the sdk list java command output. For example, to make AdoptOpenJDK version 11.0.8.hs the default system Java version, use: This also sets the JAVA_HOME environment variable to B. Use a Java version for the current terminal session only: Replace IDENTIFIER with the Java version identifier, as seen in the sdk list java command output. For example, set the locally installed 14.0.2-oracle Java as the Java version for the current terminal session: C. Activate a particular Java version when you enter a directory. Run this in the directory for which you want to use a custom Java version: A file called .sdkmanrc has now been generated in this directory. Open it and change the value of java= to the Java version identifier you want to use, e.g. 11.0.8.hs-adpt for AdoptOpenJDK 11.0.8. Now either run sdk env in this directory to activate the Java version you’ve set in the .sdkmanrc file, or edit the SDKMAN! configuration file ( /.sdkman/etc/config ) and set sdkman_auto_env=true so that SDK versions are automatically switched when you cd into a directory. No matter how you’re using a Java version through SDKMAN!, you can check to see which Java version is currently in use (as set by SDKMAN) using: You may also inquire Java directly about the current version in use: Источник How to Check Java Version Installed on Linux Home » SysAdmin » How to Check Java Version Installed on Linux How do I check my current Java version? There are several ways to check if Java is installed and which version is running on your system. In this tutorial, learn how to check the Java version installed on Linux distros, including Ubuntu, CentOS, and Debian. A user account with sudo privileges Access to the command-line/terminal window A version of Java Method 1: Check the Java Version On Linux To check the Java version on Linux Ubuntu/Debian/CentOS: 1. Open a terminal window. 2. Run the following command: 3. The output should display the version of the Java package installed on your system. In the example below, OpenJDK version 11 is installed. Note: If the output indicates there is no such package on the system, you can install it with the help of one of our guides – How to install Java on Ubuntu or How to Install Java on CentOS. You can also check the version of the primary Java compiler – javac (pronounced “java-see”) with the command: Method 2: Find Version by Checking Path Where Java is Installed There are two ways to find the path of the Java directory. The first option includes running a single command: The system should respond with the path where Java is installed. Note: This option may not work on CentOS systems. If you have issues finding the path of the Java directory with the command above, use the alternative outlined below. Alternatively, you can use the whereis command and follow the symbolic links to find the Java path. 1. Run the command: The output tells you that Java is located in /usr/bin/java. 2. List the content of the /usr/bin/java directory: Inspecting the directory shows that /usr/bin/java is only a symbolic link for /etc/alternatives/java. 3. Just like in the previous step, list the content of the provided path by running: Finally, the output displays /etc/alternatives/java is another symbolic link and that the real path of the Java directory is /usr/lib/jvm/java-11-openjdk-amd64/bin/java. Method 3: Search for Java in the Installed Packages List You can also prompt the system to list installed packages and search for Java, with its version number. Find Java by listing all installed packages. 1. To generate a list of all installed packages, use the command: 2. Scroll up/down until you find the Java packages as shown in this example. To avoid searching through all installed packages, list Java packages only. Prompt the system to list a specific software package. In this case, the package name is openjdk: Note: CentOS users need to modify the commands for listing installed packages for their package manager. Use the commands: sudo yum list installed and sudo yum list installed | grep -i openjdk instead. With this article, you have successfully checked the Java version installed on Linux. We also covered checking the Java path and searching for Java among the installed packages. Once the Java version is confirmed, you can start developing anything from lightweight mobile to desktop applications. Источник
- How To Install / Switch Between Multiple Java Versions Using SDKMAN
- How to Check Java Version Installed on Linux
- Method 1: Check the Java Version On Linux
- Method 2: Find Version by Checking Path Where Java is Installed
- Method 3: Search for Java in the Installed Packages List
Управление версиями Java в linux (ubuntu)
Иногда необходимо использовать другую версию java для корректной работы того или иного проекта.
1. Для этого необходимо скачать необходимую версию с сайта
2. Извлекаем содержимое архива -> /usr/lib/jvm/
3. Устанавливаем альтернативные ссылки:
update-alternatives —install «/usr/bin/java» «java» «/usr/lib/jvm/jdk1.7.0_60/bin/java» 1
update-alternatives —install «/usr/bin/javac» «javac» «/usr/lib/jvm/jdk1.7.0_60/bin/javac» 1
update-alternatives —install «/usr/bin/javaws» «javaws» «/usr/lib/jvm/jdk1.7.0_60/bin/javaws» 1
4. Изменяем ссылки на Java, Javac, Javaws:
update-alternatives —config java
Есть 4 варианта для альтернативы java (предоставляет /usr/bin/java).
Выбор Путь Приор Состояние
————————————————————
0 /usr/lib/jvm/java-8-oracle/jre/bin/java 1072 автоматический режим
1 /usr/lib/jvm/java-7-openjdk-amd64/jre/bin/java 1071 ручной режим
2 /usr/lib/jvm/java-8-oracle/jre/bin/java 1072 ручной режим
3 /usr/lib/jvm/jdk1.7.0_60/bin/java 1 ручной режим
* 4 /usr/lib/jvm/jdk1.8.0_05/bin/java 1 ручной режим
Нажмите enter, чтобы сохранить текущий выбор[*], или введите выбранное число: 3
update-alternatives: используется /usr/lib/jvm/jdk1.7.0_60/bin/java для предоставления /usr/bin/java (java) в ручной режим
update-alternatives —config javac
Есть 4 варианта для альтернативы javac (предоставляет /usr/bin/javac).
Выбор Путь Приор Состояние
————————————————————
0 /usr/lib/jvm/java-8-oracle/bin/javac 1072 автоматический режим
1 /usr/lib/jvm/java-7-openjdk-amd64/bin/javac 1071 ручной режим
2 /usr/lib/jvm/java-8-oracle/bin/javac 1072 ручной режим
3 /usr/lib/jvm/jdk1.7.0_60/bin/javac 1 ручной режим
* 4 /usr/lib/jvm/jdk1.8.0_05/bin/javac 1 ручной режим
Нажмите enter, чтобы сохранить текущий выбор[*], или введите выбранное число: 3
update-alternatives: используется /usr/lib/jvm/jdk1.7.0_60/bin/javac для предоставления /usr/bin/javac (javac) в ручной режим
update-alternatives —config javaws
Есть 5 вариантов для альтернативы javaws (предоставляет /usr/bin/javaws).
Выбор Путь Приор Состояние
————————————————————
0 /usr/lib/jvm/java-8-oracle/jre/bin/javaws 1072 автоматический режим
1 /usr/lib/jvm/java-6-openjdk-amd64/jre/bin/javaws 1061 ручной режим
2 /usr/lib/jvm/java-7-openjdk-amd64/jre/bin/javaws 1071 ручной режим
3 /usr/lib/jvm/java-8-oracle/jre/bin/javaws 1072 ручной режим
4 /usr/lib/jvm/jdk1.7.0_60/bin/javaws 1 ручной режим
* 5 /usr/lib/jvm/jdk1.8.0_05/bin/javaws 1 ручной режим
Нажмите enter, чтобы сохранить текущий выбор[*], или введите выбранное число: 4
update-alternatives: используется /usr/lib/jvm/jdk1.7.0_60/bin/javaws для предоставления /usr/bin/javaws (javaws) в ручной режим
Проверяем версию Java:
java -version
java version «1.7.0_60»
Java(TM) SE Runtime Environment (build 1.7.0_60-b19)
Java HotSpot(TM) 64-Bit Server VM (build 24.60-b09, mixed mode)
Источник
Switching between Java Versions on Ubuntu linux
If you’re using Ubuntu Linux on your daily basis work, you’ve probably Java installed on your machine. Personally I prefer using Wepupd8 PPA to manage JAVA installation, it makes my life a lot more easier especially for updates. The Wepupd8 team didn’t add any binary for Oracle JAVA installation and they made a script to download the Oracle JAVA from Oracle website and install it straight away. So whenever Oracle will release the update, I can simple upgrade via package manager.
Working with multiple Java versions in your machine is a normal thing, especially if you’re a Java developer, and because I’m a (very) lazy person, I’m always looking for a quicker/easier way to make the switch.
Today, I’ll share with you my tip on this subject. First, let’s run the following command:
$ sudo update-alternatives —config java
Running this command shows a list of installed Java JDKs and JREs allowing one to be selected as the default that is used when java needs to be executed.
But I’m using it just to get the Installation path of each Java version.
Then, for each version I created a script that contain the following lines (in the example below, I’m showing the one for java 8):
Note that I’m using u8.sh to make he switch to Java 8, and u9.sh for Java 9 and so on.
The final step is to add an alias in
/.bashrc file to source our script as follow:
and That’s all. Now for switching between Java versions, I only run u8, u7 or u9 😉
Источник
How to change the default Java version on Ubuntu
If you are a Java developer, it is normal to have multiple Java versions installed on your machine to support different build environments. When a Java program is compiled, the build environment sets the oldest JRE version the program can support. Now, if you run this program on a Linux machine where an unsupported Java version is installed, you will encounter an exception.
For example, if your program is compiled on Java 11, it can’t be run on a machine where Java 8 is installed. But the good thing is you can install multiple Java versions on your machine and quickly change the default JRE version.
In this tutorial, I’ll explain how to change the default Java version on a Linux machine. First of all, run the following command to check the current Java version:
As you can see above, the default Java version is currently set to OpenJDK JRE 1.8. Now, let’s run the following command to see all available Java versions:
Running the above command displays a list of installed Java JDKs and JREs allowing you to select the one as you want to set as default.
When prompted, select the Java version you would like to use. If the list does not include your desired Java version, you can always install it.
Now you can verify the default Java version as fellows:
That’s it. The default Java version is changed to OpenJDK 11.
Bonus: Use Script to Switch Java Version
If you frequently switch between different Java versions, it is a good idea to write a short script to automate the process. Here is the script I used for switching to OpenJDK 8 on my machine.
Similarly, you can create scripts for other Java versions installed on your machine. The next step is to add these scripts as aliases to .bashrc file.
Next, run the following command to load the changes of .bashrc file:
Now if you want to switch to Java 8, just type the following command in your terminal:
✌️ Like this article? Follow me on Twitter and LinkedIn. You can also subscribe to RSS Feed.
Источник
How To Install / Switch Between Multiple Java Versions Using SDKMAN

SDKMAN! is a tool to manage multiple versions of software development kits on macOS, Linux, WLS, Cygwin, Solaris and FreeBSD. It can install and manage Java, Groovy, Scala, Kotlin, Ceylon, Ant, Gradle, and many more.
The tool was inspired by RVM and rbenv, and it only requires curl and zip / unzip to be present on your system to work, being written in Bash (don’t worry, it works with Zsh too).
This article shows how to install Java using SDKMAN! (using its installer, or offline using your own Java binaries), and how to manage and use multiple Java versions (easily setting a Java version as default, including setting the JAVA_HOME environment variable, or switching Java versions temporarily for the current terminal session, or only for a particular directory).
1. To get started, install the SDKMAN! command line interface.
2. List all the candidate Java versions.
Now that SDKMAN! is installed, let’s put it to use. Use this command to list all the candidate Java versions:
This lists AdoptOpenJDK and the versions you can install, Amazon Java, Azul Zulu OpenJDK, Java.net etc.
This is an excerpt (the output is quite large) of what you’d see when using the «list java» command:
Pay attention to the Identifier column. That’s the package name that you need to use to install a Java version.
3. Install a Java version using SDKMAN!.
The command that you can use to install a Java version is:
Replace IDENTIFIER with the Java version identifier, as seen in the sdk list java command output.
For example, to install AdoptOpenJDK version 11.0.8.hs, the install command is:
SDKMAN! can also install a local version of Java, like this:
For example download the latest Oracle Java 14 .tar.gz (if you don’t use our Oracle Java installer), extract it, then use SDKMAN! to install it using:
4. Switch between Java versions.
There are 3 ways to manage Java versions using SDKMAN!:
- set a Java version as default
- use a Java version for the current terminal session only
- activate a particular Java version when you enter a directory
A. Set a Java version as default.
To set one of the Java versions installed using SDKMAN! (no matter if installed using its built-in installer or from a local directory) as the default Java version, use:
Replace IDENTIFIER with the Java version identifier, as seen in the sdk list java command output.
For example, to make AdoptOpenJDK version 11.0.8.hs the default system Java version, use:
This also sets the JAVA_HOME environment variable to
B. Use a Java version for the current terminal session only:
Replace IDENTIFIER with the Java version identifier, as seen in the sdk list java command output.
For example, set the locally installed 14.0.2-oracle Java as the Java version for the current terminal session:
C. Activate a particular Java version when you enter a directory.
Run this in the directory for which you want to use a custom Java version:
A file called .sdkmanrc has now been generated in this directory. Open it and change the value of java= to the Java version identifier you want to use, e.g. 11.0.8.hs-adpt for AdoptOpenJDK 11.0.8.
Now either run sdk env in this directory to activate the Java version you’ve set in the .sdkmanrc file, or edit the SDKMAN! configuration file (
/.sdkman/etc/config ) and set sdkman_auto_env=true so that SDK versions are automatically switched when you cd into a directory.
No matter how you’re using a Java version through SDKMAN!, you can check to see which Java version is currently in use (as set by SDKMAN) using:
You may also inquire Java directly about the current version in use:
Источник
How to Check Java Version Installed on Linux
Home » SysAdmin » How to Check Java Version Installed on Linux
How do I check my current Java version? There are several ways to check if Java is installed and which version is running on your system.
In this tutorial, learn how to check the Java version installed on Linux distros, including Ubuntu, CentOS, and Debian.
- A user account with sudo privileges
- Access to the command-line/terminal window
- A version of Java
Method 1: Check the Java Version On Linux
To check the Java version on Linux Ubuntu/Debian/CentOS:
1. Open a terminal window.
2. Run the following command:
3. The output should display the version of the Java package installed on your system. In the example below, OpenJDK version 11 is installed.

Note: If the output indicates there is no such package on the system, you can install it with the help of one of our guides – How to install Java on Ubuntu or How to Install Java on CentOS.
You can also check the version of the primary Java compiler – javac (pronounced “java-see”) with the command:

Method 2: Find Version by Checking Path Where Java is Installed
There are two ways to find the path of the Java directory.
The first option includes running a single command:
The system should respond with the path where Java is installed.

Note: This option may not work on CentOS systems. If you have issues finding the path of the Java directory with the command above, use the alternative outlined below.
Alternatively, you can use the whereis command and follow the symbolic links to find the Java path.
1. Run the command:

The output tells you that Java is located in /usr/bin/java.
2. List the content of the /usr/bin/java directory:

Inspecting the directory shows that /usr/bin/java is only a symbolic link for /etc/alternatives/java.
3. Just like in the previous step, list the content of the provided path by running:

Finally, the output displays /etc/alternatives/java is another symbolic link and that the real path of the Java directory is /usr/lib/jvm/java-11-openjdk-amd64/bin/java.
Method 3: Search for Java in the Installed Packages List
You can also prompt the system to list installed packages and search for Java, with its version number.
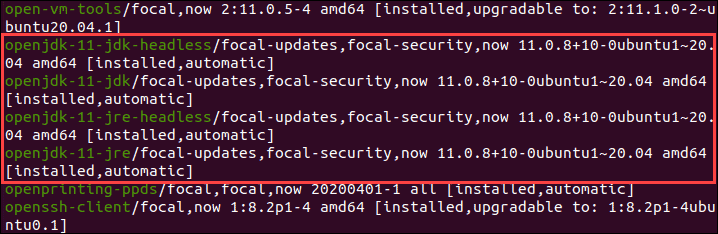
Find Java by listing all installed packages.
1. To generate a list of all installed packages, use the command:
2. Scroll up/down until you find the Java packages as shown in this example.
To avoid searching through all installed packages, list Java packages only. Prompt the system to list a specific software package. In this case, the package name is openjdk:
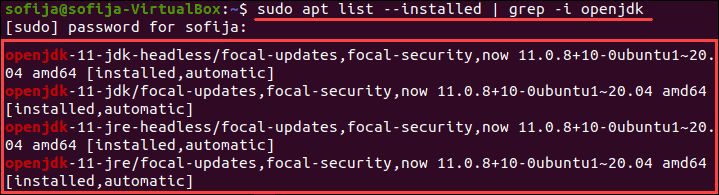
Note: CentOS users need to modify the commands for listing installed packages for their package manager. Use the commands: sudo yum list installed and sudo yum list installed | grep -i openjdk instead.
With this article, you have successfully checked the Java version installed on Linux. We also covered checking the Java path and searching for Java among the installed packages.
Once the Java version is confirmed, you can start developing anything from lightweight mobile to desktop applications.
Источник


