- Начало работы. Подготовка Windows для контейнеров Get started: Prep Windows for containers
- Предварительные требования Prerequisites
- Windows Server Windows Server
- Windows 10 Windows 10
- Установка Docker Install Docker
- Windows Admin Center; Windows Admin Center
- Дальнейшие действия Next steps
- Начало работы с удаленными контейнерами Docker в WSL 2 Get started with Docker remote containers on WSL 2
- Общие сведения о контейнерах Docker Overview of Docker containers
- Предварительные требования Prerequisites
- Установка Docker Desktop Install Docker Desktop
- Разработка в удаленных контейнерах с помощью VS Code Develop in remote containers using VS Code
- Устранение неполадок Troubleshooting
- Нерекомендуемый контекст DOCKER WSL WSL docker context deprecated
- Не удается найти папку хранилища образов DOCKER Trouble finding docker image storage folder
Начало работы. Подготовка Windows для контейнеров Get started: Prep Windows for containers
Из этого руководства вы узнаете, как выполнить следующие задачи: This tutorial describes how to:
Предварительные требования Prerequisites
Windows Server Windows Server
Чтобы запустить контейнеры в Windows Server, вам нужен физический сервер или виртуальная машина под управлением Windows Server (Semi-Annual Channel), Windows Server 2019 или Windows Server 2016. To run containers on Windows Server, you need a physical server or virtual machine running Windows Server (Semi-Annual Channel), Windows Server 2019, or Windows Server 2016.
Windows 10 Windows 10
Для запуска контейнеров в Windows 10 необходимо следующее: To run containers on Windows 10, you need the following:
- Одна физическая компьютерная система под управлением Windows 10 Профессиональная или Корпоративная с юбилейным обновлением (версия 1607) или более поздней версии. One physical computer system running Windows 10 Professional or Enterprise with Anniversary Update (version 1607) or later.
- Необходимо включить Hyper-V. Hyper-V should be enabled.
Начиная с Windows 10 с обновлением от октября 2018 г. мы не запрещаем пользователям запускать контейнер Windows в режиме изоляции процессов в Windows 10 Корпоративная или Профессиональная для целей разработки и тестирования. Starting with the Windows 10 October Update 2018, we no longer disallow users from running a Windows container in process-isolation mode on Windows 10 Enterprise or Professional for dev/test purposes. Дополнительные сведения см. в разделе вопросов и ответов. See the FAQ to learn more.
Контейнеры Windows Server по умолчанию используют изоляцию Hyper-V в Windows 10, чтобы разработчики получили ту же версию ядра и ту же конфигурацию, что и в рабочей среде. Windows Server Containers use Hyper-V isolation by default on Windows 10 in order to provide developers with the same kernel version and configuration that will be used in production. Дополнительные сведения об изоляции Hyper-V см. в разделе документации с описанием концепций. Learn more about Hyper-V isolation in the Concepts area of our docs.
Установка Docker Install Docker
Первым шагом станет установка Docker. Это нужно для работы с контейнерами Windows. The first step is to install Docker, which is required for working with Windows containers. Docker предоставляет стандартную среду выполнения для контейнеров, а также основной API и интерфейс командной строки (CLI). Docker provides a standard runtime environment for containers, with a common API and command-line interface (CLI).
Дополнительные сведения о конфигурации см. в статье Подсистема Docker в Windows. For more configuration details, see Docker Engine on Windows.
Чтобы установить Docker в Windows Server, можно использовать модуль PowerShell поставщика OneGet, который опубликован корпорацией Майкрософт, под именем DockerMicrosoftProvider. To install Docker on Windows Server, you can use a OneGet provider PowerShell module published by Microsoft called the DockerMicrosoftProvider. Этот поставщик включает поддержку контейнеров в Windows, а также устанавливает подсистему и клиент Docker. This provider enables the containers feature in Windows and installs the Docker engine and client. Вот как это сделать. Here’s how:
Откройте сеанс PowerShell с повышенными привилегиями и установите поставщик Docker-Microsoft PackageManagement из коллекции PowerShell. Open an elevated PowerShell session and install the Docker-Microsoft PackageManagement Provider from the PowerShell Gallery.
Если будет предложено установить поставщик NuGet, введите Y и установите его. If you’re prompted to install the NuGet provider, type Y to install it as well.
С помощью модуля PackageManagement PowerShell установите последнюю версию Docker. Use the PackageManagement PowerShell module to install the latest version of Docker.
Когда в PowerShell появится запрос, доверять ли источнику пакета DockerDefault, введите A , чтобы продолжить установку. When PowerShell asks you whether to trust the package source ‘DockerDefault’, type A to continue the installation.
После установки перезагрузите компьютер. After the installation completes, restart the computer.
Если позже вам потребуется обновить Docker, выполните следующие действия: If you want to update Docker later:
- Проверьте установленную версию с помощью следующей команды: Check the installed version using:
- Найдите текущую версию с помощью следующей команды: Find the current version using:
- Когда все будет готово, запустите обновление с помощью следующей команды: When you’re ready, upgrade using:
- Затем выполните следующую команду: Then, followed with:
Windows Admin Center; Windows Admin Center
Вы можете использовать Windows Admin Center для корректной настройки компьютера Windows Server в качестве узла контейнера. You can use Windows Admin Center to properly set up a Windows Server machine as a container host. Чтобы начать работу, убедитесь, что в вашем экземпляре Windows Admin Center установлена последняя версия расширения «Контейнеры». To get started, ensure you have the latest Containers extension installed on your Windows Admin Center instance. Дополнительные сведения об установке и настройке расширений см. в документации по Windows Admin Center. For more information on how to install and configure extensions, check out the Windows Admin Center documentation. Установив расширение «Контейнеры», выберите компьютер Windows Server, который нужно настроить, и выберите вариант «Контейнеры»: With the Containers extension installed, target the Windows Server machine you want to configure and select the Containers option:

Нажмите кнопку Установить. Click the Install button. Windows Admin Center запустит настройку Windows Server и Docker в фоновом режиме. Windows Admin Center will start the configuration of Windows Server and Docker in the background. После завершения процесса можно обновить страницу и просмотреть другие функции расширения «Контейнеры». After the process is complete, you can refresh the page and see the other functionalities of the Containers extension.

Вы можете установить Docker в Windows 10 Профессиональная и Корпоративная, выполнив описанные ниже действия. You can install Docker on Windows 10 Professional and Enterprise editions by using the following steps.
Скачайте и установите Docker Desktop, создав бесплатную учетную запись Docker, если у вас ее нет. Download and install Docker Desktop, creating a free Docker account if you don’t have one already. Дополнительные сведения см. в документации по Docker. For more details, see the Docker documentation.
Во время установки выберите контейнеры Windows в качестве типа контейнеров по умолчанию. During installation, set the default container type to Windows containers. Чтобы переключиться после установки, можно использовать элемент Docker в области уведомлений Windows (как показано ниже) либо следующую команду в командной строке PowerShell: To switch after installation completes, you can use either the Docker item in the Windows system tray (as shown below), or the following command in a PowerShell prompt:

Дальнейшие действия Next steps
Теперь, когда ваша среда полностью настроена, перейдите по приведенной ниже ссылке, чтобы узнать, как запустить контейнер. Now that your environment has been configured correctly, follow the link to learn how to run a container.
Начало работы с удаленными контейнерами Docker в WSL 2 Get started with Docker remote containers on WSL 2
Это пошаговое руководство поможет приступить к разработке с помощью удаленных контейнеров, настроив для Windows классическую версию DOCKER, WSL 2 (подсистему Windows для Linux, версия 2). This step-by-step guide will help you get started developing with remote containers by setting up Docker Desktop for Windows with WSL 2 (Windows Subsystem for Linux, version 2).
Служба DOCKER Desktop для Windows доступна бесплатно и предоставляет среду разработки для создания, доставки и запуска приложений пакетных. Docker Desktop for Windows is available for free and provides a development environment for building, shipping, and running dockerized apps. Включив модуль на основе WSL 2, вы можете запускать контейнеры Linux и Windows на рабочем столе DOCKER на одном компьютере. By enabling the WSL 2 based engine, you can run both Linux and Windows containers in Docker Desktop on the same machine.
Общие сведения о контейнерах Docker Overview of Docker containers
Docker — это средство для создания, развертывания и запуска приложений с использованием контейнеров. Docker is a tool used to create, deploy, and run applications using containers. Контейнеры позволяют разработчикам упаковывать приложения с использованием всех необходимых компонентов (библиотек, платформ, зависимостей и т. п.) и поставлять все это как один пакет. Containers enable developers to package an app with all of the parts it needs (libraries, frameworks, dependencies, etc) and ship it all out as one package. Использование контейнера дает возможность приложению работать одинаково, независимо от настроенных параметров или ранее установленных библиотек на компьютере, где оно запускается, так как он может отличаться от компьютера, который использовался для написания и тестирования кода приложения. Using a container ensures that the app will run the same regardless of any customized settings or previously installed libraries on the computer running it that could differ from the machine that was used to write and test the app’s code. Это позволяет разработчикам сосредоточиться на написании кода, не беспокоясь о том, в какой системе он будет выполняться. This permits developers to focus on writing code without worrying about the system that code will be run on.
Контейнеры Docker похожи на виртуальные машины, но не создают всю виртуальную операционную систему. Docker containers are similar to virtual machines, but don’t create an entire virtual operating system. Вместо этого контейнер Docker позволяет приложению использовать то же ядро Linux, что и система, в которой оно работает. Instead, Docker enables the app to use the same Linux kernel as the system that it’s running on. Таким образом пакету приложения требуются только те части, которых еще нет на главном компьютере. В результате размер пакета уменьшается, а производительность увеличивается. This allows the app package to only require parts not already on the host computer, reducing the package size and improving performance.
Постоянная доступность, которую обеспечивает использование контейнеров Docker с такими инструментами, как Kubernetes, — еще одна причина популярности контейнеров. Continuous availability, using Docker containers with tools like Kubernetes, is another reason for the popularity of containers. Это позволяет создавать несколько версий контейнера приложения в разное время. This enables multiple versions of your app container to be created at different times. Вместо того чтобы останавливать всю систему для обновления или обслуживания, каждый контейнер (и определенные микрослужбы) можно заменить на лету. Rather than needing to take down an entire system for updates or maintenance, each container (and it’s specific microservices) can be replaced on the fly. Вы можете подготовить новый контейнер со всеми обновлениями, настроить его для рабочей среды и просто указать новый контейнер после его готовности. You can prepare a new container with all of your updates, set up the container for production, and just point to the new container once it’s ready. Можно также архивировать различные версии вашего приложения, используя контейнеры, и при необходимости поддерживать их работу в качестве резервного ресурса. You can also archive different versions of your app using containers and keep them running as a safety fallback if needed.
Дополнительные сведения см. в разделе Введение в контейнеры DOCKER на Microsoft Learn. To learn more, checkout the Introduction to Docker containers on Microsoft Learn.
Предварительные требования Prerequisites
- Убедитесь, что на компьютере установлена ОС Windows 10, обновлена до версии 2004, Сборка 18362 или более поздняя версия. Ensure your machine is running Windows 10, updated to version 2004, Build 18362 or higher.
- Включите WSL, установите дистрибутив Linux и обновите его до версии WSL 2. Enable WSL, install a Linux distribution, and update to WSL 2.
- Скачайте и установите пакет обновления ядра Linux. Download and install the Linux kernel update package.
- Установите Visual Studio Code(необязательно). Install Visual Studio Code(optional). Это обеспечит лучшие возможности, включая возможность кодирования и отладки в удаленном контейнере DOCKER и подключения к дистрибутиву Linux. This will provide the best experience, including the ability to code and debug inside a remote Docker container and connected to your Linux distribution.
- Установите терминал Windows(необязательно). Install Windows Terminal(optional). Это обеспечит лучшие возможности, включая возможность настройки и открытия нескольких терминалов в одном интерфейсе (включая Ubuntu, Debian, PowerShell, Azure CLI или то, что вы предпочитаете использовать). This will provide the best experience, including the ability to customize and open multiple terminals in the same interface (including Ubuntu, Debian, PowerShell, Azure CLI, or whatever you prefer to use).
- Зарегистрируйте идентификатор DOCKER в DOCKER Hub(необязательно). Sign up for a Docker ID at Docker Hub(optional).
WSL может запускать дистрибутивы в режиме WSL версии 1 или WSL 2. WSL can run distributions in both WSL version 1 or WSL 2 mode. Это можно проверить, открыв PowerShell и введя: wsl -l -v . You can check this by opening PowerShell and entering: wsl -l -v . Убедитесь, что дистрибутив настроен на использование WSL 2, введя: wsl —set-version 2 . Ensure that the your distribution is set to use WSL 2 by entering: wsl —set-version 2 . Замените на имя дистрибутив (например, Ubuntu 18,04). Replace with the distro name (e.g. Ubuntu 18.04).
В WSL версии 1 из-за фундаментальных различий между Windows и Linux подсистема DOCKER не смогла запуститься непосредственно внутри WSL, поэтому Группа DOCKER разработала альтернативное решение с использованием виртуальных машин Hyper-V и Линукскит. In WSL version 1, due to fundamental differences between Windows and Linux, the Docker Engine couldn’t run directly inside WSL, so the Docker team developed an alternative solution using Hyper-V VMs and LinuxKit. Однако поскольку WSL 2 теперь работает в ядре Linux с полной емкостью системных вызовов, Docker можно полностью запустить в WSL 2. However, since WSL 2 now runs on a Linux kernel with full system call capacity, Docker can fully run in WSL 2. Это означает, что контейнеры Linux могут работать изначально без эмуляции, что обеспечивает лучшую производительность и совместимость со средствами Windows и Linux. This means that Linux containers can run natively without emulation, resulting in better performance and interoperability between your Windows and Linux tools.
Установка Docker Desktop Install Docker Desktop
Если серверная часть WSL 2 поддерживается в DOCKER Desktop для Windows, вы можете работать в среде разработки на основе Linux и создавать контейнеры на основе Linux, используя Visual Studio Code для редактирования кода и отладки, а также запуска контейнера в браузере Microsoft ребра в Windows. With the WSL 2 backend supported in Docker Desktop for Windows, you can work in a Linux-based development environment and build Linux-based containers, while using Visual Studio Code for code editing and debugging, and running your container in the Microsoft Edge browser on Windows.
Чтобы установить DOCKER (после установки WSL 2), сделайте следующее: To install Docker (after already installing WSL 2):
Скачайте DOCKER Desktop и следуйте инструкциям по установке. Download Docker Desktop and follow the installation instructions.
После установки запустите приложение DOCKER Desktop из меню «Пуск» Windows, а затем выберите значок DOCKER в меню «скрытые значки» панели задач. Once installed, start Docker Desktop from the Windows Start menu, then select the Docker icon from the hidden icons menu of your taskbar. Щелкните правой кнопкой мыши значок, чтобы открыть меню команд DOCKER и выбрать пункт «Параметры». Right-click the icon to display the Docker commands menu and select «Settings». 
Убедитесь, что флажок «использовать ядро на основе WSL 2» установлен в параметрах > Общие. Ensure that «Use the WSL 2 based engine» is checked in Settings > General. 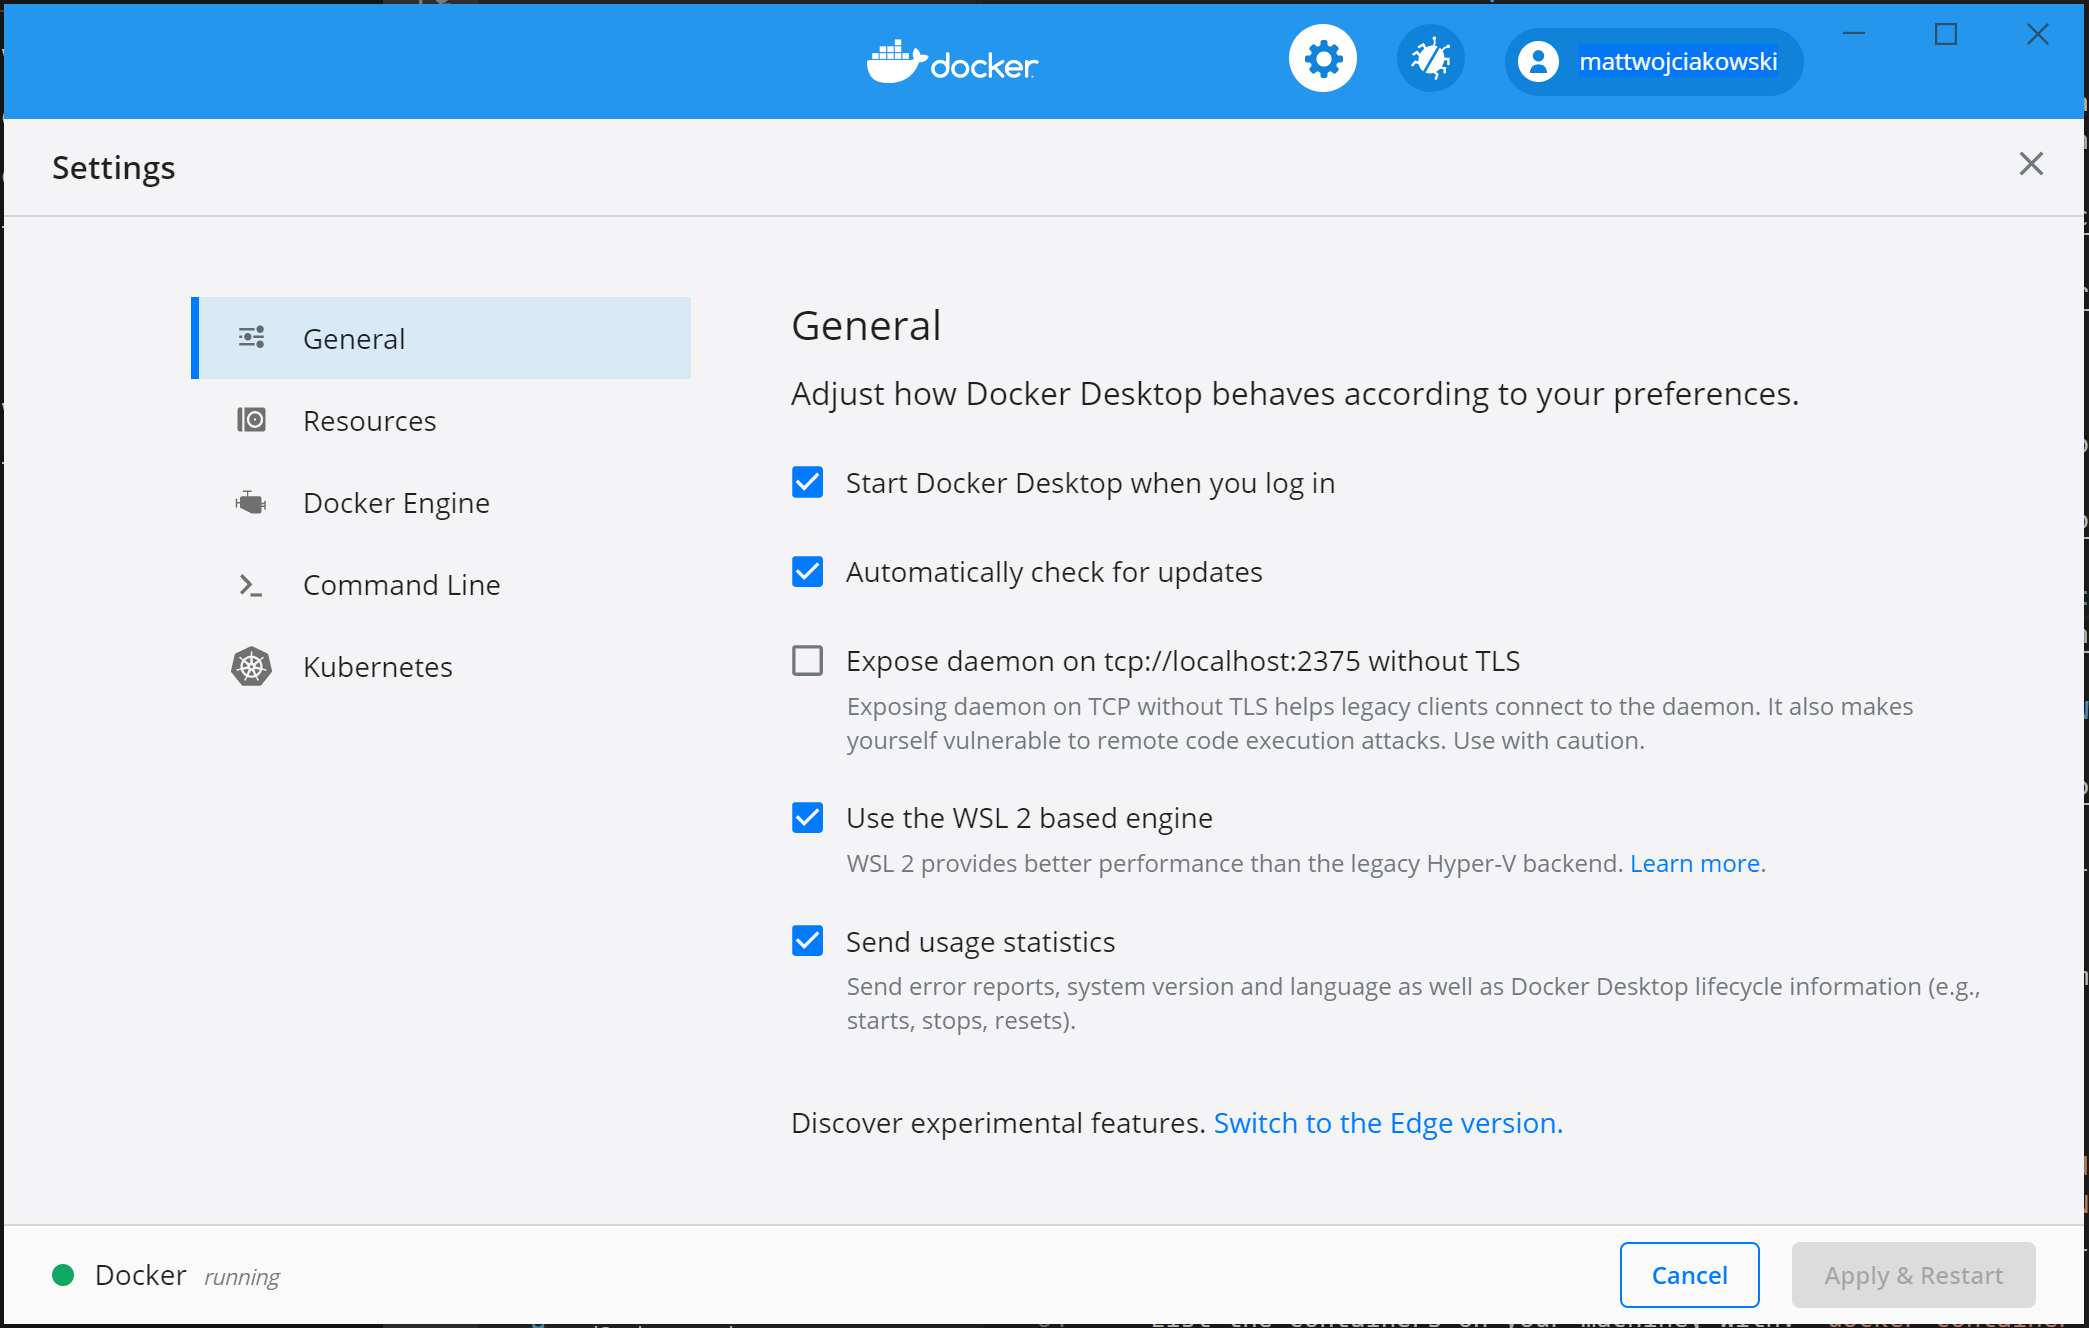
Выберите из установленных дистрибутивов WSL 2, для которых вы хотите включить интеграцию с DOCKER, перейдя по следующим параметрам > ресурсы > WSL Integration. Select from your installed WSL 2 distributions which you want to enable Docker integration on by going to: Settings > Resources > WSL Integration. 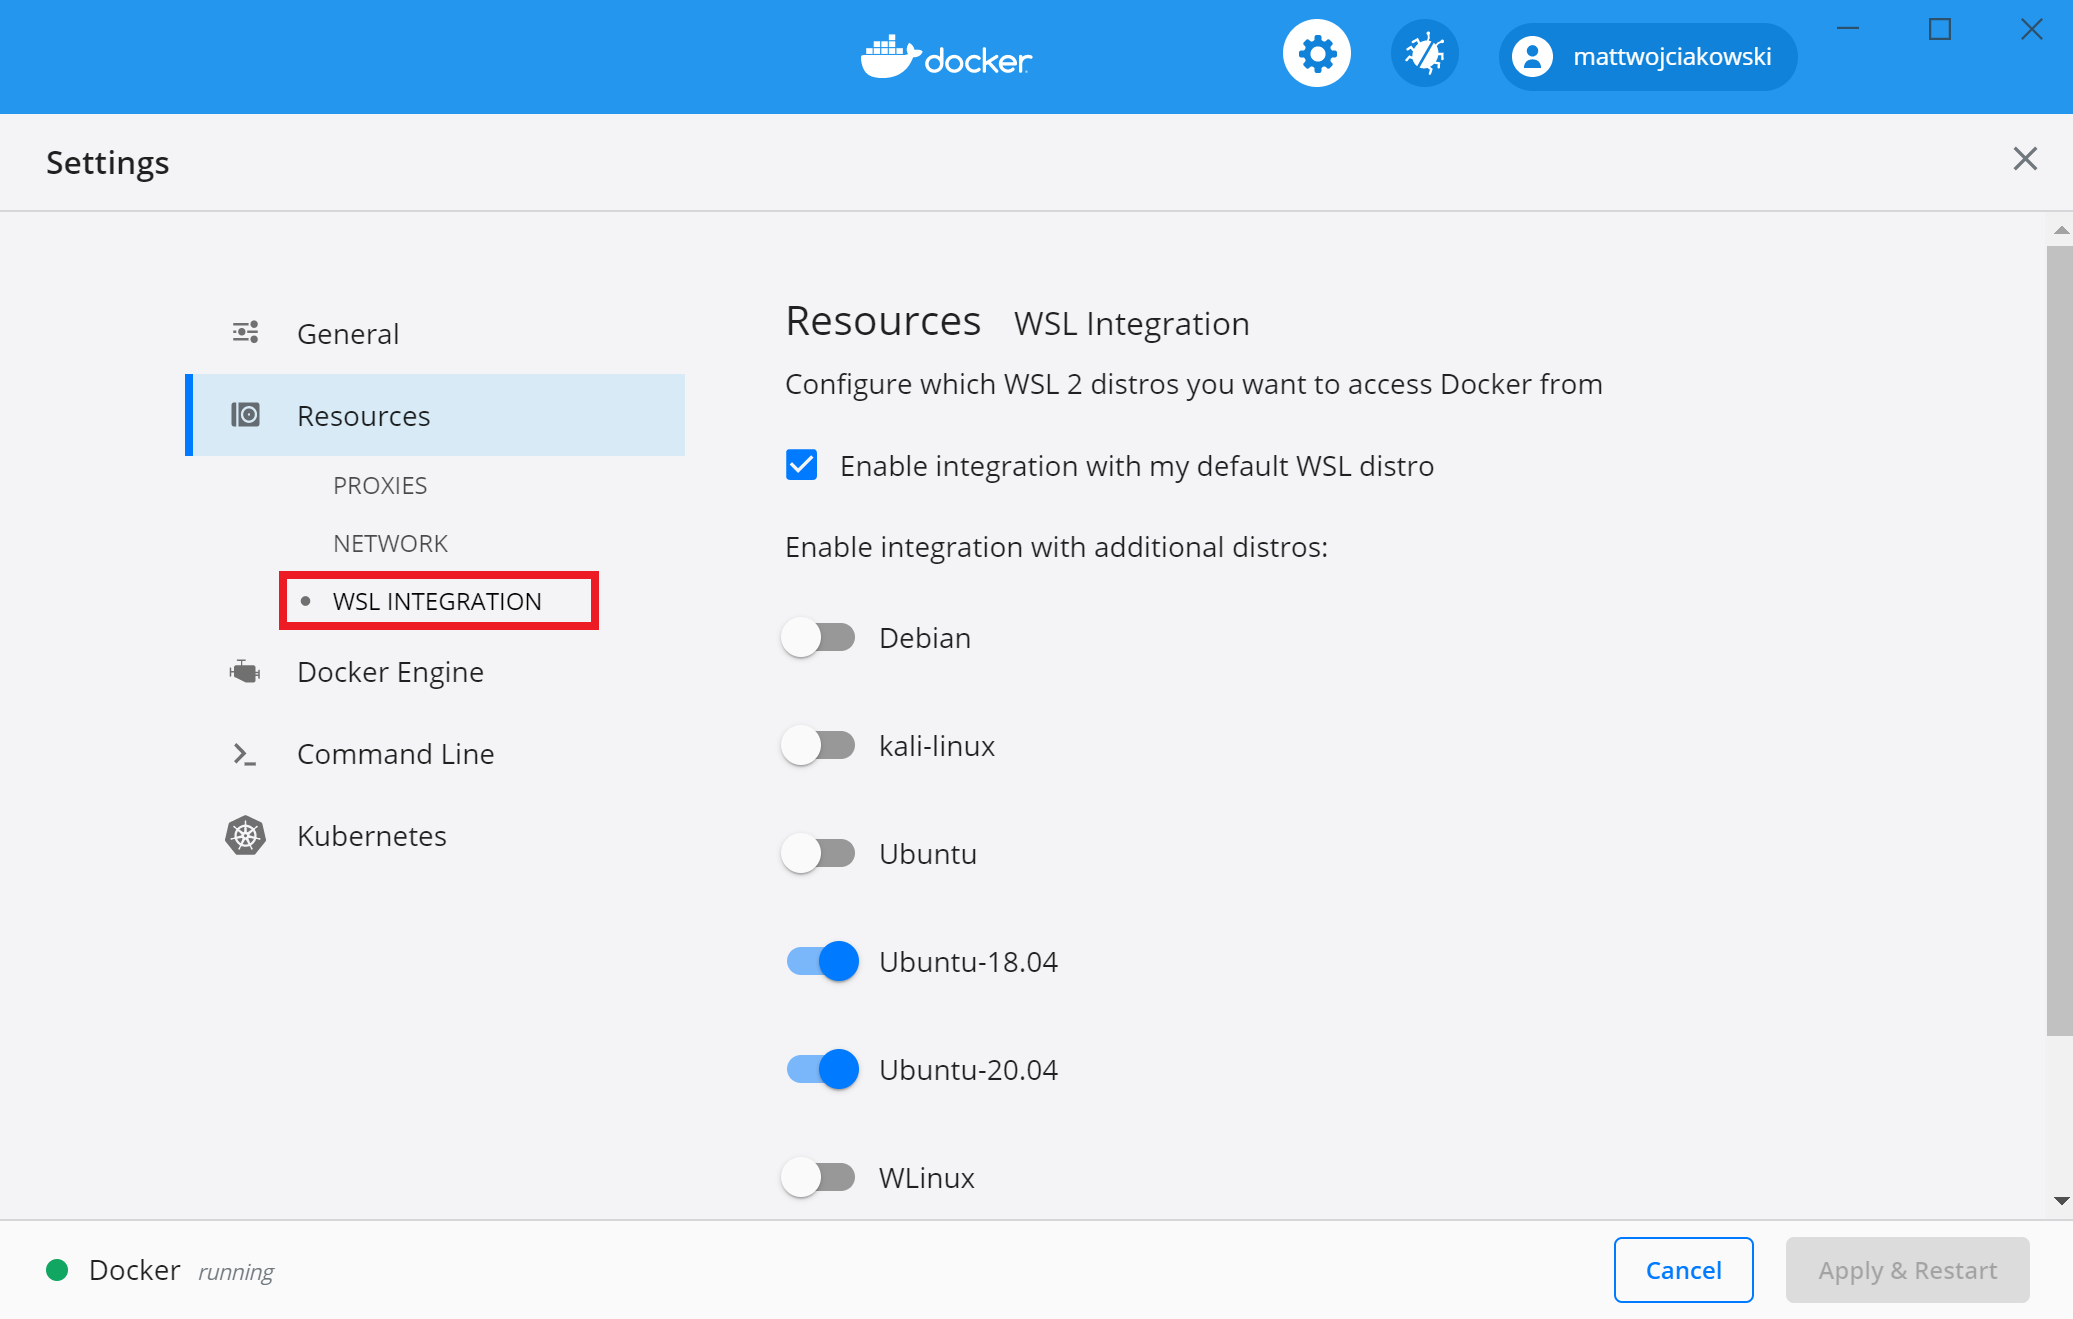
Чтобы убедиться, что DOCKER установлен, откройте дистрибутив WSL (например, Ubuntu) и отобразите версию и номер сборки, введя следующее: docker —version To confirm that Docker has been installed, open a WSL distribution (e.g. Ubuntu) and display the version and build number by entering: docker —version
Проверьте, правильно ли работает установка, выполнив простой встроенный образ DOCKER с помощью: docker run hello-world Test that your installation works correctly by running a simple built-in Docker image using: docker run hello-world
Вот несколько полезных команд DOCKER для получения сведений: Here are a few helpful Docker commands to know:
- Перечислить команды, доступные в интерфейсе командной строки Docker, можно, выполнив команду docker . List the commands available in the Docker CLI by entering: docker
- Просмотреть сведения о конкретной команде можно, выполнив команду docker —help . List information for a specific command with: docker —help
- Перечислить образы Docker на вашем компьютере (сейчас только образ Hello-World) можно, используя следующие команды docker image ls —all . List the docker images on your machine (which is just the hello-world image at this point), with: docker image ls —all
- Перечислите контейнеры на компьютере с помощью: docker container ls —all или docker ps -a (без флага Показать все, будут отображаться только выполняющиеся контейнеры). List the containers on your machine, with: docker container ls —all or docker ps -a (without the -a show all flag, only running containers will be displayed)
- Перечислите системную информацию об установке DOCKER, включая статистику и ресурсы (память ЦП &), доступные в контексте WSL 2, с помощью: docker info List system-wide information regarding the Docker installation, including statistics and resources (CPU & memory) available to you in the WSL 2 context, with: docker info
Разработка в удаленных контейнерах с помощью VS Code Develop in remote containers using VS Code
Чтобы приступить к разработке приложений с помощью DOCKER с WSL 2, мы рекомендуем использовать VS Code, а также расширение Remote-WSL и расширение DOCKER. To get started developing apps using Docker with WSL 2, we recommend using VS Code, along with the Remote-WSL extension and Docker extension.
Установите VS Code расширение Remote-WSL. Install the VS Code Remote-WSL extension. Это расширение позволяет открыть проект Linux, работающий на WSL, в VS Code (не нужно беспокоиться о проблемах с путями, двоичной совместимости или других задачах, связанных с разными операционными системами). This extension enables you to open your Linux project running on WSL in VS Code (no need to worry about pathing issues, binary compatibility, or other cross-OS challenges).
Установите расширение VS code Remote-Containers. Install the VS code Remote-Containers extension. Это расширение позволяет открыть папку проекта или репозиторий в контейнере, используя преимущества полного набора функций Visual Studio Code для выполнения разработки в контейнере. This extension enables you to open your project folder or repo inside of a container, taking advantage of Visual Studio Code’s full feature set to do your development work within the container.
Установите VS Code расширение DOCKER. Install the VS Code Docker extension. Это расширение добавляет функциональные возможности для создания и развертывания контейнерных приложений, а также управления ими в VS Code. This extension adds the functionality to build, manage, and deploy containerized applications from inside VS Code. (Для фактического использования контейнера в качестве среды разработки требуется расширение Remote-Container.) (You need the Remote-Container extension to actually use the container as your dev environment.)
Давайте создадим контейнер разработки для существующего проекта приложения с помощью DOCKER. Let’s use Docker to create a development container for an existing app project.
В этом примере я использую исходный код из руководства по Hello World Django в среде разработки Python Настройка документов. Этот шаг можно пропустить, если вы предпочитаете использовать собственный исходный код проекта. For this example, I’ll use the source code from my Hello World tutorial for Django in the Python development environment set up docs. You can skip this step if you prefer to use your own project source code. Чтобы скачать веб-приложение HelloWorld-Django из GitHub, откройте терминал WSL (например, Ubuntu) и введите: git clone https://github.com/mattwojo/helloworld-django.git To download my HelloWorld-Django web app from GitHub, open a WSL terminal (Ubuntu for example) and enter: git clone https://github.com/mattwojo/helloworld-django.git
Всегда храните код в той же файловой системе, в которой вы используете средства. Always store your code in the same file system that you’re using tools in. Это приведет к повышению производительности доступа к файлам. This will result in faster file access performance. В этом примере мы используем Linux дистрибутив (Ubuntu) и хотим сохранить файлы проекта в файловой системе WSL \\wsl\ . In this example, we are using a Linux distro (Ubuntu) and want to store our project files on the WSL file system \\wsl\ . Хранение файлов проекта в файловой системе Windows значительно замедляет работу при использовании средств Linux в WSL для доступа к этим файлам. Storing project files on the Windows file system would significantly slow things down when using Linux tools in WSL to access those files.
В терминале WSL измените каталоги на папку исходного кода для этого проекта: From your WSL terminal, change directories to the source code folder for this project:
Откройте проект в VS Code, работающем на локальном сервере расширений Remote-WSL, введя следующее: Open the project in VS Code running on the local Remote-WSL extension server by entering:
Убедитесь, что вы подключены к WSL Linux дистрибутив, проверив зеленый индикатор зеленого цвета в левом нижнем углу экземпляра VS Code. Confirm that you are connected to your WSL Linux distro by checking the green remote indicator in the bottom-left corner of your VS Code instance.

В VS Code команде паллетте (Ctrl + Shift + P) введите: Remote-Containers: Open Folder in контейнер. Если эта команда не отображается при вводе, убедитесь, что вы установили расширение удаленного контейнера, связанное выше. From the VS Code command pallette (Ctrl + Shift + P), enter: Remote-Containers: Open Folder in Container. If this command doesn’t display as you begin to type it, check to ensure that you’ve installed the Remote Container extension linked above.

Выберите папку проекта, которую вы хотите контейнеризовать. Select the project folder that you wish to containerize. В моем случае это \\wsl\Ubuntu-20.04\home\mattwojo\repos\helloworld-django\ In my case, this is \\wsl\Ubuntu-20.04\home\mattwojo\repos\helloworld-django\

Появится список определений контейнеров, так как в папке проекта (репозитории) еще нет конфигурации Девконтаинер. A list of container definitions will appear, since there is no DevContainer configuration in the project folder (repo) yet. Список отображаемых определений конфигурации контейнера фильтруется на основе типа проекта. The list of container configuration definitions that appears is filtered based on your project type. Для моего проекта Django я выберу Python 3. For my Django project, I’ll select Python 3.

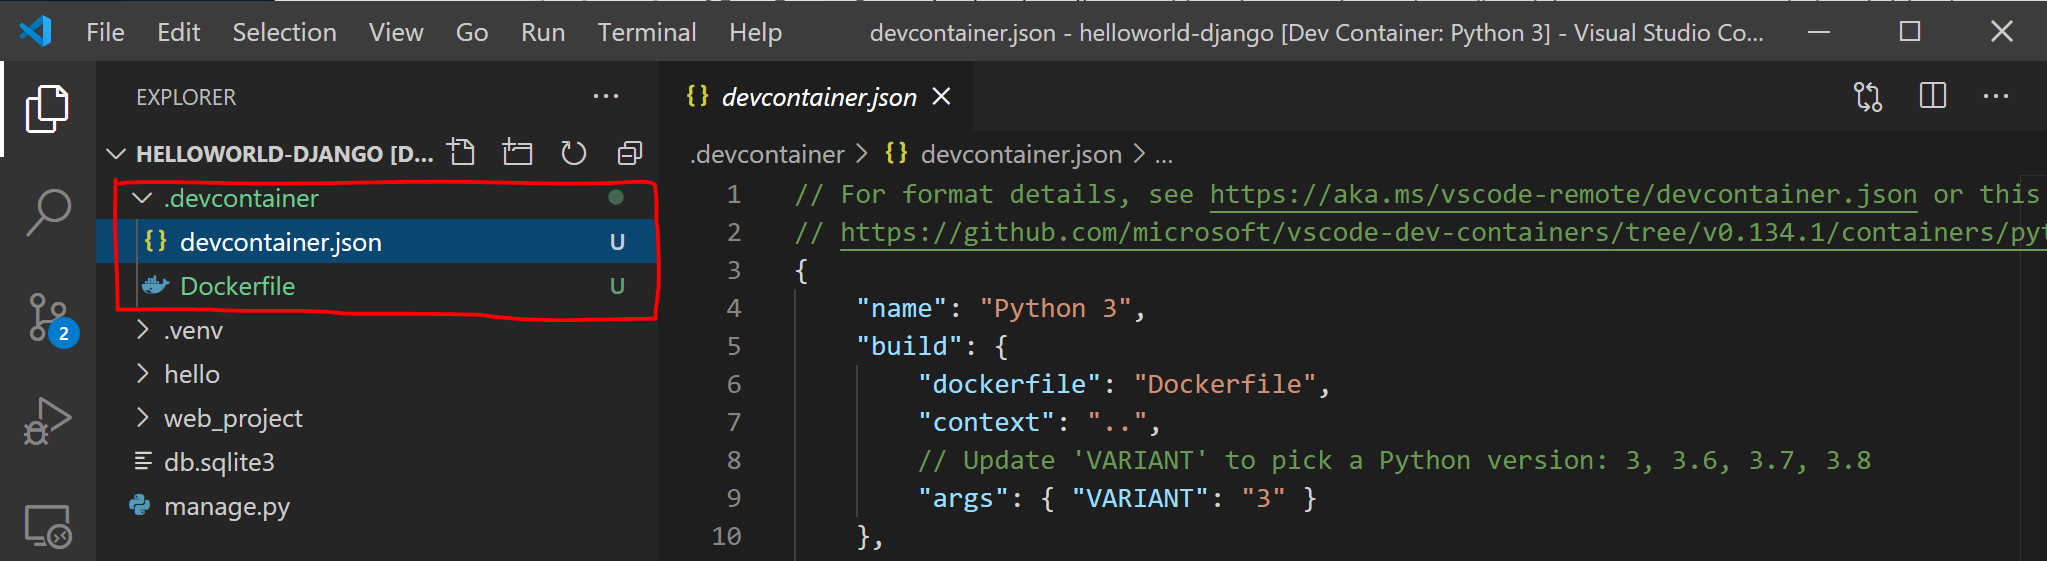
Откроется новый экземпляр VS Code, начнется создание нового образа и после завершения сборки будет запущен наш контейнер. A new instance of VS Code will open, begin building our new image, and once the build completed, will start our container. Вы увидите, что новая .devcontainer Папка содержит сведения о конфигурации контейнера в Dockerfile devcontainer.json файле и. You will see that a new .devcontainer folder has appeared with container configuration information inside a Dockerfile and devcontainer.json file.
Чтобы убедиться, что проект по-прежнему подключен к WSL и в контейнере, откройте VS Code интегрированный терминал (Ctrl + Shift +
). To confirm that your project is still connected to both WSL and within a container, open the VS Code integrated terminal (Ctrl + Shift +
). Проверьте операционную систему, введя: uname и версию Python с: python3 —version . Check the operating system by entering: uname and the Python version with: python3 —version . Вы видите, что uname возвращено как Linux, поэтому вы все еще подключены к подсистеме WSL 2, а номер версии Python будет основан на конфигурации контейнера, которая может отличаться от версии Python, установленной в дистрибутиве WSL. You can see that the uname came back as «Linux», so you are still connected to the WSL 2 engine, and Python version number will be based on the container config that may differ from the Python version installed on your WSL distribution.
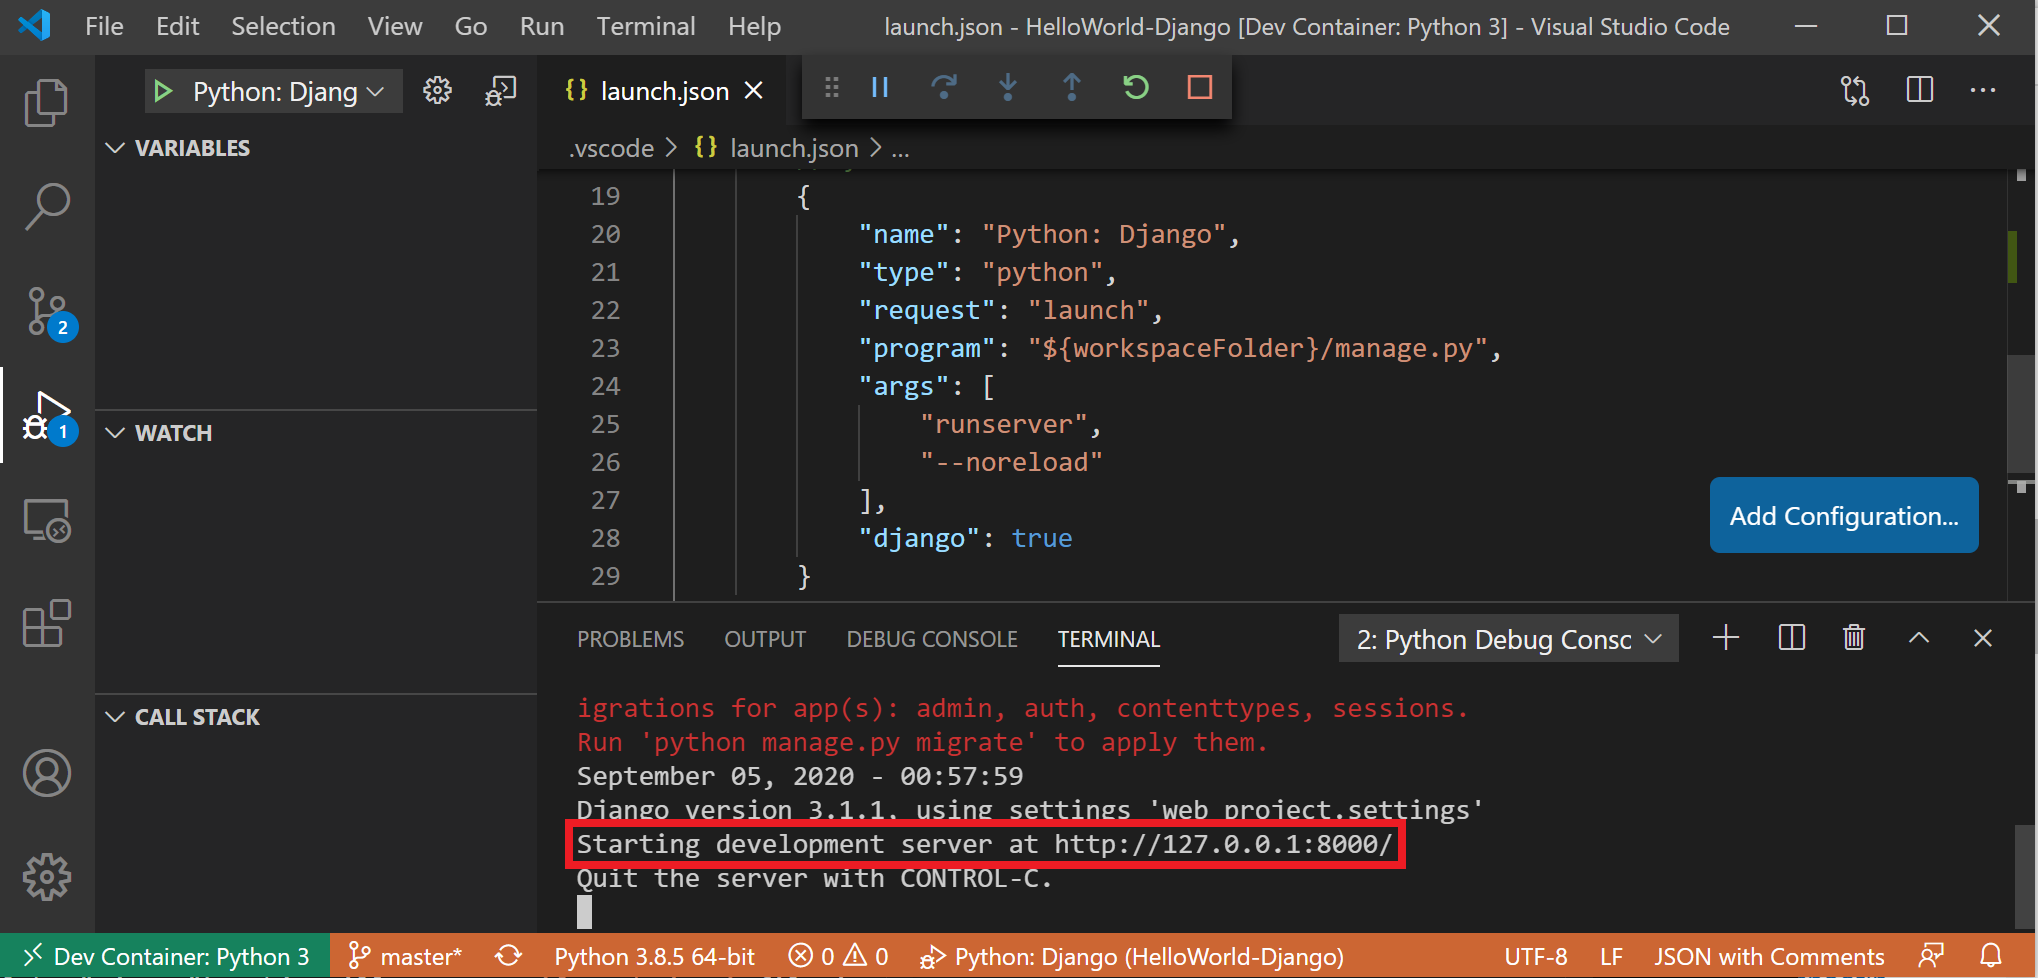
Чтобы запустить и выполнить отладку приложения в контейнере с помощью Visual Studio Code, сначала откройте меню выполнить (Ctrl + Shift + D или выберите вкладку в левой строке меню). To run and debug your app inside of the container using Visual Studio Code, first open the Run menu (Ctrl+Shift+D or select the tab on the far left menu bar). Затем выберите Запуск и отладка , чтобы выбрать конфигурацию отладки и выбрать конфигурацию, наиболее подходящую для вашего проекта (в нашем примере это будет «Django»). Then select Run and Debug to select a debug configuration and choose the configuration that best suites your project (in my example, this will be «Django»). При этом launch.json в папке проекта будет создан файл .vscode с инструкциями по запуску приложения. This will create a launch.json file in the .vscode folder of your project with instructions on how to run your app.

В VS Code выберите запустить > отладку запуска (или просто нажмите клавишу F5 ). From inside VS Code, select Run > Start debugging (or just press the F5 key). При этом откроется окно терминала в VS Code. результат должен выглядеть следующим образом: «Запуск сервера разработки при http://127.0.0.1:8000/ выходе из системы на сервере с помощью Control-C». This will open a terminal inside VS Code and you should see a result saying something like: «Starting development server at http://127.0.0.1:8000/ Quit the server with CONTROL-C.» Удерживайте нажатой клавишу CTRL и выберите отображаемый адрес, чтобы открыть приложение в веб-браузере по умолчанию и просмотреть проект, работающий в контейнере. Hold down the Control key and select the address displayed to open your app in your default web browser and see your project running inside of its container.
Вы успешно настроили удаленный контейнер разработки с помощью DOCKER Desktop, на базе серверной части WSL 2, который можно использовать для кодирования, сборки, запуска, развертывания или отладки с помощью VS Code! You have now successfully configured a remote development container using Docker Desktop, powered by the WSL 2 backend, that you can code in, build, run, deploy, or debug using VS Code!
Устранение неполадок Troubleshooting
Нерекомендуемый контекст DOCKER WSL WSL docker context deprecated
Если вы использовали предварительную ознакомительную версию DOCKER для WSL, возможно, у вас есть контекст DOCKER с именем «WSL», который теперь устарел и больше не используется. If you were using an early Tech Preview of Docker for WSL, you may have a Docker context called «wsl» that is now deprecated and no longer used. Можно проверить с помощью команды: docker context ls . You can check with the command: docker context ls . Вы можете удалить контекст «WSL», чтобы избежать ошибок с помощью команды: docker context rm wsl так, как вы хотите использовать контекст по умолчанию для Windows и WSL2. You can remove this «wsl» context to avoid errors with the command: docker context rm wsl as you want to use the default context for both Windows and WSL2.
Возможные ошибки, которые могут возникнуть при работе с этим нерекомендуемым контекстом WSL, включают: docker wsl open //./pipe/docker_wsl: The system cannot find the file specified. или error during connect: Get http://%2F%2F.%2Fpipe%2Fdocker_wsl/v1.40/images/json?all=1: open //./pipe/docker_wsl: The system cannot find the file specified. Possible errors you might encounter with this deprecated wsl context include: docker wsl open //./pipe/docker_wsl: The system cannot find the file specified. or error during connect: Get http://%2F%2F.%2Fpipe%2Fdocker_wsl/v1.40/images/json?all=1: open //./pipe/docker_wsl: The system cannot find the file specified.
Не удается найти папку хранилища образов DOCKER Trouble finding docker image storage folder
DOCKER создает две папки дистрибутив для хранения данных: Docker creates two distro folders to store data:
- \WSL $ \доккер-десктоп \wsl$\docker-desktop
- \WSL $ \доккер-десктоп-Дата \wsl$\docker-desktop-data
Эти папки можно найти, открыв дистрибутив WSL Linux и введя: explorer.exe . для просмотра папки в проводнике Windows. You can find these folders by opening your WSL Linux distribution and entering: explorer.exe . to view the folder in Windows File Explorer. Введите: \\wsl\ \mnt\wsl замените именем вашего распространения (IE. Ubuntu-20,04) для просмотра этих папок. Enter: \\wsl\ \mnt\wsl replacing with the name of your distribution (ie. Ubuntu-20.04) to see these folders.
Дополнительные сведения о поиске расположений хранилищ DOCKER в WSL см. в этой статье из РЕПОЗИТОРИЯ WSL или этой стакковерлов записи. Find more on locating docker storage locations in WSL, see this issue from the WSL repo or this StackOverlow post.
Дополнительные сведения об устранении общих проблем в WSL см. в документации по устранению неполадок . For more help with general troubleshooting issues in WSL, see the Troubleshooting doc.


